Direct Deposit

The Direct Deposit program is used to create export files for automatic payroll deposits for the following banks: Royal Bank of Canada, Toronto Dominion Bank, Bank of Montreal, Automated Clearing House, and the Bank of Nova Scotia. Also, the program can be used to create automatic deposits for drivers who are not paid through the TruckMate payroll module. Employee and driver records must be configured in order for them to be included in automatic deposits.
To configure non-payroll Drivers for automatic deposits, fill in the fields in the Driver Profiles program > Direct Deposit Tab. To configure Employees for automatic payroll deposits, fill in the Direct Deposit fields on the Employee Profile program > Address Tab. To configure Vendors for automatic payroll deposits, fill in the required fields on the Customer & Vendor Profiles program > Vendor > Direct Deposit Tab.
The Direct Deposit program is run after check entries have been created in the Accounts Payable module (using the Driver Pay Statements program or the Payroll Processing program) and the entries have been updating using the A/P Check Register program.
To access Direct Deposit:
| From this location | Go to |
|---|---|
TruckMate Menu and TruckMate Task List |
|
Windows Start Menu |
TruckMate 20xx > Direct Deposit |
Windows Explorer |
C:\Program Files (x86) > TruckMate 20xx > DirDep.exe |
How Do I?
How do I Create an Export File for an Automatic Payroll Deposit?
-
Open the Employee Profiles program (EMPLOYEE.EXE).
-
Ensure the employee has direct deposit information added to his record and that there is a checkmark in the Direct Deposit checkbox. If not, add the information in.
-
Process the payroll in the usual way using the Timesheets program. Open the Payroll Time Sheets program (TIMESHEETS.EXE).
-
Enter the hourly or salary information here and proceed to the Payroll Register program.
-
Open the Payroll Register program (PRREGISTER.EXE).
-
Once you open the Payroll Register program, you should see your entry in the Grid. After verifying that your entry is correct, press 'Create Checks'. All checks, both regular and direct deposit will be created. You can print a report of the checks for review. Once you’ve verified their accuracy, press 'Mark Ready'.
-
View or process regular checks through the Check Printing program. View or process direct deposit checks in the Direct Deposit program.
-
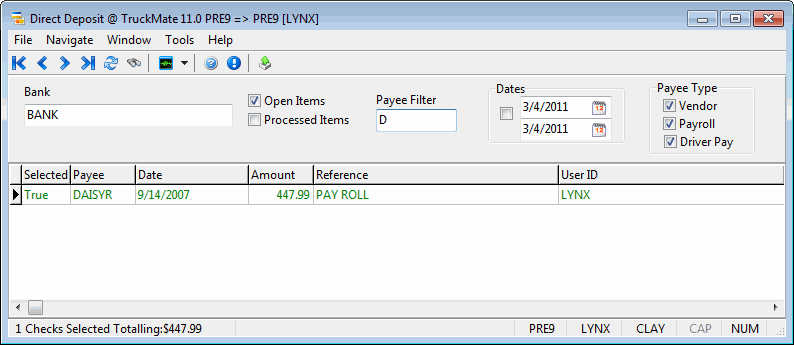
Select or Deselect the check you wish to import for automatic payroll deposit. When a check is selected it will appear in red, and the select column will show as 'True'. De-selected causes the check to appear in the colour green, and the select column to show as 'False'.
-
Press the 'Export' button. Enter your client number which is the identification number that has been assigned to your company by the bank.
-
Use the pull-down menu under the Direct Deposit Transfer Format, and select the desired bank. Different pieces of information are required for each bank, so you’ll notice the area just below the Direct Deposit Transfer Format change, depending on your bank. Refer to the online help for each bank if you require more information.
-
Then, move to the Output Filename and Directory area where you’ll enter the location where the export file should be created. Click the folder button for a navigation form. You bank will provide you with details regarding the export file’s required name.
-
Press the 'Export' button to complete the process.
How do I Create an Automatic Deposit for a Driver not paid through TruckMate payroll?
Payroll
The Direct Deposit information is set up in the Employee Data program. After the Driver Pay Statements have been run through in the usual manner, begin the payroll processing. See the Driver Contracts instructions to create an automatic deposit.
Driver
-
Set up the Direct Deposit information in the Driver Profiles program. Run the Driver Pay Statements, and if, after verifying, they are acceptable, say 'Yes' to update the Driver Pay. All checks, both regular and Direct Deposit will be created. View or process regular checks through the Check Printing program, and view or process Direct Deposit checks through the Direct Deposit program. In the Direct Deposit program, you will see all of the driver checks from the pay run that were to be sent as Direct Deposits.
-
In the Direct Deposit program, click on 'Export' and the Export window will open up. Confirm that all of the bank information has been set up correctly and that an export file path and/or name has been entered. Click 'Export' again. A confirmation box will appear, select 'Yes'. The report select box will open and you should print the Direct Deposit Audit Report ('DDAUDIT.RPT').
The Audit number will appear in the top right-hand corner. -
Print or close this dialog box and a message box will then appear telling you that a Direct Deposit Audit has been created. Click 'OK', and your file is now ready to be submitted to your bank. Run the Check Register program to update the checks.
Vendor
-
Vendor Direct Deposit information is set up in the Customer & Vendor Profiles program, Direct Deposit Tab. Run the Driver Pay Statements, and if, after verification, the information appears acceptable, say 'Yes' to update Driver Pay information. All checks, both regular and Direct Deposit will be created. View or process regular checks through the Check Printing program, and view or process Direct Deposit checks through the Direct Deposit program. In the Direct Deposit program, you will see all of the driver checks from the pay run that were to be sent as Direct Deposits.
-
In the Direct Deposit program, click on 'Export' and the Export window will open up. Confirm that all of the bank information has been set up correctly and that an export file path and/or name has been entered. Click 'Export' again. A confirmation box will appear, select 'Yes'. The report select box will open and you should print the Direct Deposit Audit Report ('DDAUDIT.RPT').
Note: The Audit number will appear in the top right-hand corner.
-
Print or close this dialog box and a message box will then appear telling you that a Direct Deposit Audit has been created. Click 'Okay', and your file is now ready to be submitted to your bank. Run the Check Register program to update the checks.
How do I Pay a Vendor using Direct Deposits?
This task requires that you have setup your Vendor record for Direct Deposit payments. See the Customer & Vendor Profiles program Manual for more information.
-
Open the A/P Invoice Entry program (APNE.EXE).
-
Enter the Vendor invoice details and create a check for the Vendor as you normally would.
-
Open the Direct Deposit program (DIRPDEP.EXE).
-
You will see the details of the checks you created in APNE.EXE displayed in the Grid once you have selected the GL account that the checks were entered against.
-
Select or De-Select the check you wish to import for automatic payroll deposit. When a check is selected it will appear in red, and the select column will show as 'True'. De-selected causes the check to appear in the colour green, and the select column to show as 'False'.
-
Press the 'Export' button. Enter your client number which is the identification number that has been assigned to your company by the bank.
-
Use the pull-down menu under the Direct Deposit Transfer Format, and select the desired bank. Different pieces of information are required for each bank, so you’ll notice the area just below the Direct Deposit Transfer Format change, depending on your bank. Refer to the online help for each bank if you require more information.
-
Then, move to the Output Filename and Directory area where you’ll enter the location where the export file should be created. Click the folder button for a navigation form. You bank will provide you with details regarding the export file’s required name.
-
Press the 'Export' button to complete the process.
Menu Bar / Toolbar

Multi-Company
For more information on the Multi-Company options available from the Menu Bar, see the Multi-Company documentation.
Tools Menu
TruckMate Monitor
 Click the down arrow next to this button to access the various functions of the new TruckMate Monitor.
Remember Position / Size
Selecting this option will maintain the program window position and size upon close. When the program is re-opened, it will appear the same.
Export
 Click this button to open the Export Window.
Select / De-Select Direct Deposit Check for Exporting
This option will toggle the 'Selected' Status of the currently highlighted check entry. 'True' Status means that the check will be included in Exports, while 'False' means it will not.
Select All Direct Deposit Checks for Exporting
This option will set all checks in the Checks Grid to a 'Selected' Status of 'True', meaning that all displayed checks will be included in the next Export.
De-Select All Direct Deposit Checks for Exporting
This option will set all checks in the Checks Grid to a 'Selected' Status of 'False', meaning that all displayed checks will not be included in the next Export.
Print Direct Deposit Cash Requirements
Selecting this option will open the Crystal Report selection window, with the 'CASH_REQ.RPT' report available. See the Crystal Report Reference section for details on this specific report.
Change Direct Deposit Cash Requirements
There are three additional options available here:
-
Delete All and Start Again: selecting this option will delete all checks displayed in the Checks Grid.
-
Delete Selected: selecting this option will delete all checks that are 'Selected = True' from the Checks Grid.
-
Delete Non-Selected: selecting this option will delete all checks that are 'Selected = False' from the Checks Grid.
Re-Print Direct Deposit Audit
Selecting this option will open the Crystal Report selection window, with the 'DDAUDIT.RPT' report available. See the Crystal Report Reference section for details on this specific report.
Print Vendor Remittance Reports
Selecting this option will open the Crystal Report selection window, with the 'DDVENDORREMIT.RPT' report available. See the Crystal Report Reference section for details on this specific report.
| You can also re-print the Vendor Remittance Report from a processed check. Simply select this option for a processed check and use the 'DIRECTDEPOSIT.RPT' report. |
Transfer to Check Printing
Selecting this option will transfer all 'Selected = True' checks in the Checks Grid to the Check Printing program for printing.
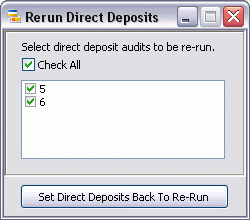
Rerun Direct Deposits
Selecting this option opens the Rerun Direct Deposits window, which allows you to select available Direct Deposit audits (that have not yet been posted) to be rerun.
Window Menu
Check Printing
![]() Select this option to open an instance of the Check Printing program.
Select this option to open an instance of the Check Printing program.
Check Register
 Select this option to open an instance of the Check Register program.
Help Menu
TruckMate Help
 Selecting this button will open the Direct Deposit topic in the TruckMate Online Help file (the page you are currently viewing).
Service Portal
 Selecting this button will open an instance of your default Internet browsing software, with the https://www.tmwcare.com login page displayed.
About
 Selecting this button will open the standard TruckMate About window, which contains important information about the application you are currently using, including its version number (important for support calls).
Header Information
Bank
The GL account that is of the type 'Bank' and is of the lowest account number will display by default when the program is opened. To select a different back account, use the arrow buttons on the right side of the field. Bank accounts are assigned to checks when they are created in the A/P Inquiry program (using the Pay Bills function), in the Driver Statements program, in the COD Payable Audit program, and in the Payroll Processing program.
Use the record navigation buttons to move between bank accounts.
Open Items / Processed Items
These two flags can be used to filter on the check type you wish to view.
Payee Filter
When browsing through many check records, you can enter the first few characters of a specific 'Payee' name to view only those checks for that payee.
Dates Filter
You can also filter the displayed checks by their 'Date' value. Enter a Date Range and select the flag to filter the checks grid by a date range.
Checks Selected Totalling
This information (at the bottom of the window) will pre-populated based on the number of checks you select, and the total dollar amount involved.
Payee Type Filter
Check the boxes to select the types of checks you wish to view and / or print. If one or more of the options is not available for selection, it means that security for this type of check has been restricted in the Security Setup program.
Export
Once you have selected all of your payments for direct deposit, click this button to open the 'Export to Direct Deposit File' form box where you specify your direct deposit batch options and then generate your export file. More information is available on this section below.
Direct Deposit Grid
Direct deposit check information will pre-populate in this grid after running the Payroll Processing program.
Context Menu
Select/Deselect Direct Deposit Check for Exporting
By default, when checks are created their 'Selected Status' is set to 'True'. Selected checks are displayed with green text. Using this menu option, you can prevent a check from printing by changing the Selected status to 'False'. Checks that have been deselected will appear in red text, and will not be included in check runs until their Selected status has been changed to 'True'. You can also double click on the record to toggle the 'True'/ 'False' value.
Select All Direct Deposit Check for Exporting
Will set the 'Selected Status' of all checks for this bank account to 'True'.
De-Select All Direct Deposit Check for Exporting
Will set the 'Selected Status' of all checks for this bank account to 'False'.
Print Direct Deposit Cash Requirements
Will display the Report Selection form. The Crystal Report templates supplied with the TruckMate system is called 'DDCASHREQ.RPT'. After selecting the desired report (using the Report Selection form) the report will preview to the screen. Click the printer icon at the top of the screen to send the report to the printer that is configured as the default printer for your workstation. See the Crystal Reports Reference for more information on report functions.
Change Direct Deposit Cash Requirements
| Requirement | Definition |
|---|---|
Delete all and start again |
Will delete the check record for all checks generated in the A/P Inquiry program and will delete all checks generated in the Driver Statement program. Checks generated by the COD Payable Register program will not be affected. The invoices associated with the checks will be returned to a non - selected status in the A/P Inquiry program. Driver pay and deduction entries will be available for inclusion on a new driver statement. |
Delete selected |
Will affect only checks that are currently selected (displayed in green text). This will delete all selected check records generated in the A/P Inquiry program and all selected checks generated in the Driver Statement program. Checks generated by the COD Payable Register program will not be affected. The invoices associated with the checks will be returned to a non - selected status in the A/P Inquiry program. Driver pay and deduction entries will be available for inclusion on a new statement. |
Delete non-selected |
Will affect only checks that are currently non selected (displayed in red text). This will delete all non Selected check records generated in the A/P Inquiry program and all non selected checks generated in the Driver Statement program. Checks generated by the COD Payable Register program will not be affected. The invoices associated with the checks will be returned to a non - selected status in the A/P Inquiry program. Driver pay and deduction entries will be available for inclusion on a new statement. |
Re-Print Direct Deposit Audit
Selecting this option will bring up the Report Selection dialog box where you can select the 'ddcashreq_REPRINT.RPT'. See the Crystal Reports Reference for more information on report functions.
Print Vendor Remittance Reports
Selecting this option will bring up the Report Selection dialog box where you can select the 'DDVENDORREMIT.RPT'. See the Crystal Reports Reference for more information on report functions.
| You can also re-print the Vendor Remittance Report from a processed check. Simply select this option for a processed check and use the 'DIRECTDEPOSIT.RPT' report. |
Transfer to Check Printing
Selecting this option will transfer the highlighted checks from the Direct Deposit program to the Check Printing program. This allows you to process special check runs such as bonuses checks, where normally you would normally process the payments as direct deposit.
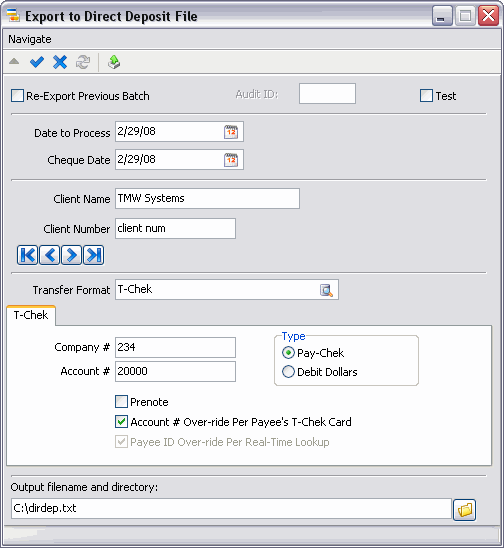
Export Window
Menu Bar / Toolbar
Export to File
Selecting this button will allow the export process to occur. During the report printing process, you also have the option of sending the reports out via e-mail. There are several config options that are used in this process, so be sure to check the Application Configurator program > DIRDEP.EXE page for more information.
Re-export Previous Batch
Place a checkmark in this box if you wish to re-export a previously exported batch.
Audit ID
Only enabled if you place a checkmark in the Re-export Previous Batch. Then, you can enter an audit ID.
Date to Process
Enter the date that the bank should process the direct deposit. This date will be written to the export file.
| When working with the T-Chek format, you must change it to either the current date or a future-date. If you don’t, you will get an error when you try to export. |
Check Date
Enter the check date that should be written to the export file (and thus become the check date in the employee or driver’s bank statement). This field is not a selection criterion; that is, all payment records included in the specified A/P Check Register program number will be included regardless of whether their check date matches the date entered in this field.
| When working with the T-Chek format, this field is not used. |
Client Name
The value in this field will default to the company name entered in the Company Profiles program. If you have configured multiple companies, you can change the selection by clicking on the arrows located to the right of the Client Name field.
| When working with the T-Chek format, this field is not used. |
Client Number
Enter the identification number that has been assigned to your company by the bank: either Royal Bank of Canada, the Toronto Dominion Bank of Canada (TD), the Bank of Montreal (BofM), the Bank of Nova Scotia (BofNS), the Hong Kong Bank of BC (HSBC), the Canadian Imperial Bank of Commerce (CIBC), National Automated Clearing House Association (NACHA), the Canadian Payments Association, the EFS National Bank, the Alberta Treasury Branch, or a ComData account.
| When working with the T-Chek format, this field is not used. |
Direct Deposit Transfer Format
Use the database search button to select the bank of your choice of one of the following transfer formats:
-
Alberta Treasury Branch
-
Automated Clearing House
-
Bank of Montreal (BofM)
-
Bank of Nova Scotia (BofNS)
-
Canadian Imperial Bank of Commerce (CIBC)
-
Canadian Payments Association (CPA)
-
ComData
-
EFS National Bank
-
Hong Kong Bank of BC (HSBC)
-
National Automated Clearing House Association (NACHA)
-
Royal Bank of Canada
-
T-Chek
-
Toronto Dominion Bank of Canada (TD)
Output Filename and Directory
Enter the location where the export file should be created. Click the folder button for a navigation form. You bank will provide you with details regarding the export file’s required name.
| Unlike other direct deposits, T-Chek requires that the export file always be named the same: PCxxx.txt where xxx = the T-Chek account number. So, if you manually enter the filename, and it does not meet this naming requirement, then you will get an error when you try to export. If you use the button beside the filename, unlike other export types which get you to select a directory and file, you will be asked to select a directory only - the filename will automatically be set for you. |
Test
If this box is checked, the export file will contain characters that the bank will use to identify the file as a test file. Therefore, no payments will be made based on the file. Do not check this box if you are creating a real export file containing 'live' payment information.
Export
Selecting this button will allow the export process to occur.
Close
Selecting this button will close out of the Export to Direct Deposit File dialog box.
T-Chek Specific warnings
Currency
Currently, T-Chek only supports direct deposits in USD. You will get a warning when you try to export if the currency of the bank GL account you selected either starts with a C or if you are using the real-time card management module and the currency is the designated CAD currency for a T-Chek account. Because some carrier may have a custom currency that starts with C, but is actually representing USD, this is only a warning; you may ignore it and continue with the export.
Profile Info
T-Chek’s new format requires that a payee’s distribution (between checking, savings, and direct to card) be setup on their web-site, not in TruckMate. So, you must have exactly one row in the Direct Deposit tab in the payee’s profile (for each payee included in the export). If you have none or more than one, then you will get an error when you try to export. Also, the option D=direct to card is no longer allowed (within TruckMate); you must select either C=checking or S=savings in the profile. Also, the bank name is not used for T-Chek and may be left blank in the profile; bank account and routing are used and are required for a Prenote (if left blank, you will get an error on trying to export). In fact, all the bank info from the payee’s profile (account type, account number, and routing) are required only on a Prenote.