Performing basic actions in Customer Service
This set of topics describes some of the basic actions that are available via the buttons on the right side of the Customer Service header. Several other actions are discussed here as well.
Finding a freight bill
Use Find to locate a freight bill on the Find Freight Bill window.
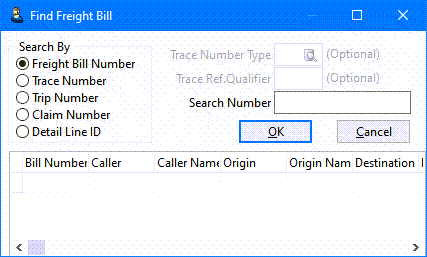
On this window, select your search criterion, enter the information to search for, and click OK.
For information on finding a quote, see Working with quotes.
Copying a freight bill
Use Copy to make one or more copies of the currently-displayed freight bill or quote.
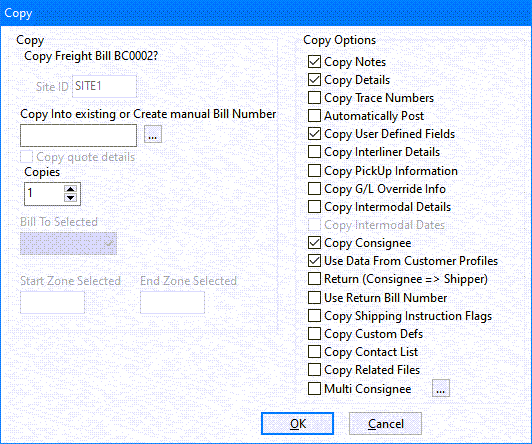
| If you copy the parent freight bill of an extra stop set, you will create a new duplicate parent/child series. If you copy the child bill of an extra stop set, you will create a child freight bill in the same series as the parent freight bill. |
| Field | Definition |
|---|---|
Copy into Existing or Create manual Bill Number |
If your system allows, you can enter a freight bill number. If the number you enter already exists in the database, the system prompts you to confirm whether you want to overwrite the existing record with the new (copied) information. |
Copy quote details |
Available only when copying a quote. If selected, the system will copy the information in the Quotes tab. |
Copies |
Number of copies |
Bill To Selected |
Bill To for the copied freight bill The values in this field default to those entered in Codes Maintenance. The site ID determines which values appear. |
Start Zone Selected |
Start and end zones, respectively, for the copied freight bill. The values in these fields default to those entered in Codes Maintenance. The site ID determines which values appear. |
Copy Notes |
If selected, the copied freight bill will contain the notes from the original freight bill. |
Copy Details |
If selected, the copied freight bill will contain all entries for the original freight bill that were made on the Details tab. |
Copy Trace Numbers |
If selected, the copied freight bill will contain all trace numbers for the original freight bill that were made on the Trace# tab. |
Automatically Post |
If selected, the system will post the copied freight bill automatically. |
Copy User Defined Fields |
If selected, the copied freight bill will contain the values entered for the original freight bill in the user-defined fields. |
Copy Interliner Details |
If selected, the copied freight bill will contain the values entered for the original freight bill on the I/P tab. |
Copy PickUp Information |
If selected, the copied freight bill will contain the pickup information entered for the original freight bill. This can be useful for creating an "on the fly" freight bill for an active trip. For example, suppose freight bill FB1 is put on a trip. When the driver arrives to pick up the freight for this trip, they learn that there is another load that needs to be picked up. A dispatcher can load FB1 in Customer Service, click Copy, and select Copy PickUp Information to create a copy (FB2). This new freight bill automatically attaches to the trip, and all the history from FB1 will be added. |
Copy G/L Override Info |
If selected, the copied freight bill will contain the values entered for the original freight bill on the G/L tab. |
Copy Intermodal Details |
If selected, the copied freight bill will contain the values entered for the original freight bill on the InterModal tab. If your system allows, the container number will be included in the copy. |
Copy Consignee |
If selected, the copied freight bill will contain the original freight bill’s consignee. If the consignee is also the Bill To for the original freight bill, you must select this option to copy the freight bill. Even if the consignee is not copied to the new freight bill, the value in the End Zone field will determine the consignee. |
Use Data From Customer Profiles |
If selected, the copied freight bill will contain the current profile data for the specified customers. |
Return (Consignee ⇒ Shipper) |
If selected, the copied freight bill will contain the contents of the return information from the original freight bill. |
Use Return Bill Number |
If selected, the copied freight bill’s number will have an -R extension. For exmaple, if the original freight bill number was T0005, the new freight bill’s number will be T0005-R. |
Copy Shipping Instruction Flags |
If selected, the copied freight bill will contain available shipping instruction information. |
Copy Custom Defs |
If selected, the copied freight bill will contain the values entered for the original freight bill on the Custom Def’s tab. |
Copy Contact List |
If your system allows, you can select this option to add the contact list found in the original freight bill to the copied freight bill. |
Copy Related Files |
If your system allows, you can select this option to add any associated files, including document images, to the copied freight bill. This allows you to index a single document to multiple freight bills in your database. |
Multi Consignee |
This option allows you to create multiple copies of a freight bill, each of which contains a different consignee. |
Making copies for multiple consignees
In the Copy window, follow these steps.
-
Select Multi Consignee. (If your system allows, it may be selected by default.)
-
Click the button to the right of the option. The Copy Multi Consignee window opens.
-
In the Client List fields, select your filter criteria. Customers that match the criteria appear in the left grid.
-
To select a consignee, double-click on the name in the left grid, press ENTER, or click
 Add Client. The name appears in the right grid.
If you change your mind about a consignee, select it in the right grid and click Delete Consignee. The name is removed from the right grid.
 -
Click Close when you are finished.
When you select Multi Consignee, the following options are selected by default:
-
Automatically Post
-
Copy Trace Numbers
-
Copy Notes
-
Copy PickUp Information
-
Copy Details
-
Copy User Defined Fields
-
-
Click OK on the Copy window.
The system creates a freight bill for each consignee that you specified.
Working with parent and child freight bills
You may encounter a situation where, for example, a customer wants you to make several stops, but you only want to create a single freight bill for billing purposes. Parent and child freight bills fulfill this function.
Parent and child freight bills are treated as independent bills in Customer Service and Dispatch. Each can:
-
Have its own billing information (in Customer Service program)
-
Appear in the Freight Bill grid in Dispatch
-
Be independently assigned to trips (although the dispatcher is asked if associated parent and child bills should be assigned to the same trip)
However, for billing purposes, there are some important considerations about the nature of parent and child bills.
When you create a child bill (also known as an extra stop freight bill), it receives the following information from the parent bill:
-
Header information (Caller, Shipper, Consignee, etc.)
-
Entries on the Details tab
Because detail lines are "rolled up" to the parent bill, creating an child bill from a freight bill with detail lines creates a double set of detail lines on the parent bill. Detail lines from the parent bill appear in black text, while detail lines from child bills appear in gray text. The Details tab for the child bill will only display the detail lines associated with the child bill. It will not display the detail lines associated with the parent bill.
The following information does not "roll up" from the child bill to the parent bill:
-
Trace numbers
-
Interliner charges
-
Accessorial charges
In addition, you cannot use CODs on a child bill. If you want to use CODs, you must put them on the parent bill or create a new, separate bill for them.
When you post a parent or child bill, all associated bills in the series will also be posted.
In Customer Service, under the FB # field, a parent bill lists the number of attached child bills. A child bill lists its order in the sequence of child bills. In addition, each child bill’s freight number has a suffix attached to it.
Making a freight bill a child of another freight bill
To make a freight bill a child of another freight bill:
-
Click Move
The Move Freight Bill window opens.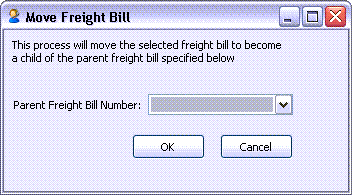
-
In the Parent Freight Bill Number field, select the number of the parent bill. The values in this field correspond to freight bills that:
-
share the same Bill To
-
have not been assigned to trips in Dispatch
-
have not been completed
-
-
Click OK.
Adding extra stops to a freight bill
Adding extra stops to a freight bill is the equivalent of creating child bills under a parent bill. Each child bill represents a portion of the total move.
If your system allows, you can add stops to a freight bill using the Extra Stops Maintenance and Sequencing window.
-
Click X-Stops.
The Extra Stops Maintenance and Sequencing window opens.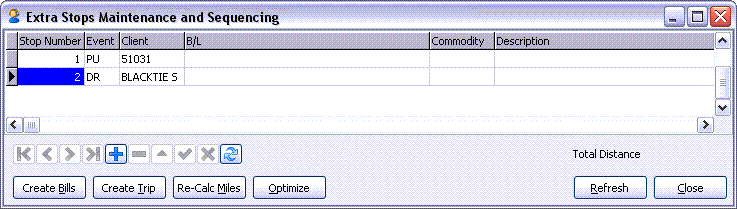
-
Do either of the following:
-
Click
 Add.
Add. -
Right-click anywhere in the grid below the first pickup line and select Insert Stop Here.
-
-
Enter stop information in the grid columns.
-
Repeat Steps 2 and 3 as needed.
-
Do one or more of the actions available when you click these buttons:
Button Function Create Bills
Creates a new freight bill for each extra stop in the grid
Create Trip
Associates new trips on the current freight bill for each detail line in the grid
Re-Calc Miles
If Mileage Server Maintenance is running, this function recalculates the mileage for the trip. The new mileage appears in the Total Distance field.
Optimize
Orders the legs of the trip according to the most efficient route. This feature works if all of the following are true:
-
Mileage Server Maintenance is running
-
Your system is using PC*Miler
-
The freight bill is assigned to an active trip in Dispatch
-
-
When you are finished, click Close.
Note: If you click Close without performing Step 5, the system will prompt you to choose from one of the actions described in Step 5.
Posting freight bills
In general, posting a new freight bill:
-
Assigns a freight bill number
-
Makes the bill available in Dispatch and Local Dispatch
Bill number sequence limit
Bill numbers follow a predetermined sequence with a preset sequence limit set by a system administrator. When you post a bill, if your system allows, you may see a warning when you reach this limit, and you can then increase the limit on the fly.
Without this setup, if you try to post a bill and the limit has been reached, the system will roll back the entire transaction. This could cause issues if, for example, a customer is waiting on the phone.
Posting parent and child bills
When you post a parent or child bill, all associated freight bills will also be posted. For this reason, make sure all bills in the series are complete before posting any single bill.
Changing the status code prior to posting
By default, when a freight bill is posted, it is assigned the default status code associated with the site.
However, you can change this code by right-clicking on the Post button and selecting a status in the menu that appears. The code that you select will become the default status code that is assigned to freight bills when they are posted.
Credit limit exceeded
If the charges applied to a freight bill exceed the credit limit for the Bill To customer (as specified in Customer & Vendor Profiles), a warning message appears when you post the bill. If you choose to proceed by clicking OK, the system posts the bill and records audit information about the transaction, including your user ID, the bill number, and the Bill To customer name.
Duplicate trace numbers
Your system may allow you to add a duplicate trace number of the same trace type for the same customer onto a freight bill.
If your system setup forbids this, a warning message appears when you post the bill. To proceed, you must provide a reason for the duplicate trace number.
Selecting a site
The Site button displays the currently selected site. Depending on the site’s setup, certain header fields default to predetermined values.
To change a site, click the button. In the window that appears, double-click on the new site.
Printing a freight bill
To print a freight bill, click Print (or press CTRL+P). The Report Selection window opens.
For freight bills, the CSERV.RPT template is supplied with TruckMate.
For more information on report functions, see the Crystal Reports Reference.
Updating freight bill details
If your system allows, the Update Freight Bill Details button is visible, allowing you to update freight bill details manually.
Accessing recently viewed freight bills
To access freight bills that you viewed previously in Customer Service, go to File > Recent Items and select a bill from the menu.
Your system administrator determines the number of bills that appear in the menu.
|
In a Multi-Company setup, the freight bills displayed in the menu will vary depending on whether Cross-Company viewing is enabled.
|
Accessing other TruckMate applications from within Customer Service
When you are working in Customer Service, the Customer Service menu option is selected in the Windows menu. Selecting this option while in the Filter window, for example, redisplays the main Customer Service window.
These TruckMate applications are available via the Windows menu and the toolbar.
| Icon | Application |
|---|---|
|
Dispatch |
|
Driver Call-In |
|
Trip Tracer |
|
Billing Register |
|
Interline Payable Accrual Register |
Freight Board Interface
Freight Board Interface (FBI) is an application that runs in the system tray. It accepts requests (via TCP strings) from various TruckMate applications to post or cancel a freight bill load or equipment to various load matching websites.
If your system is set up for it, you can access FBI functionality by right-clicking on any gray area in the Customer Service window and selecting either of the options described below.
| Option | Definition |
|---|---|
Post Load |
Launches FBI and attempts to create a posting for the freight bill If you are using FBI for the first time, you may need to enter setup information, such as the FTP site location. |
Cancel Load |
Cancels a load that has been posted to one of the load handling web sites |
For more information on Freight Board Interface, see the Freight Board Interface Install and User Guide.
Other features
| Tools menu option | Definition |
|---|---|
Split/Merge Bill |
Selecting this option opens the LTL FB Split window, which allows you to split a single freight bill’s manifest into two or more separate shipments if necessary during transport. When the freight reaches the destination, use this feature to merge the separate shipments back together. For more information, see Multi Mode Dispatch. |
Chassis Inspection Report |
Selecting this option opens the DVIR Inspection Report window, where you can create a chassis report record for a chassis that failed inspection. You must enter the date of inspection, the chassis number, and the reason for the inspection failure (via the 'Defects' flags). You can then submit the report and then choose another chassis for their freight bill. |