Intermodal Configuration
The Intermodal Configuration program is used to setup background data related to intermodal shipping such as setting up a code for your container or chassis, entering per diem and/or storage rate information, creating an intermodal customer code, producing an intermodal delivery type, and modifying an intermodal service type, etc.
To access Intermodal Configuration:
| From this location | Go to |
|---|---|
TruckMate Menu and TruckMate Task List |
|
Windows Start Menu |
TruckMate 20xx > Intermodal Configuration |
Windows Explorer |
C:\Program Files (x86) > TruckMate 20xx > IMConfig.exe |
Setting up Application Configurator for Intermodal Configuration
The following Application Configurator options are listed under Configuration Options > IMCONFIG.EXE.
| Option | Definition | Values |
|---|---|---|
Pop IM User 1 thru 10 with Check List Code |
Set the check list code values displayed on the Intermodal Configuration > Check List tab for users 1 through 10. |
From the list of values on the Profiles > Codes Maintenance > Checklist Items tab |
Destuff FB to No Charge |
Set Destuff FBs to No Charge. |
|
EmptyFB to NoCharge |
Set 'Empty' or 'Chassis Terminated' Freight Bills to 'No Charge' Freight Bills. |
|
Lock Empty No Charge FB |
Prevent the user from editing 'No Charge' freight bills that are in a completed status. |
|
Test Check Digit |
Generate a warning or error message if an invalid check digit is entered. |
|
Security Configuration for Intermodal Configuration
There are several options available in the Security > Business Events > Misc > Intermodal section of the Security Configuration program to control behaviors within the Customer Service and Intermodal Trace programs. These settings do not directly affect the Intermodal Configuration program but they do affect what the users can do when creating and editing an intermodal freight bill.
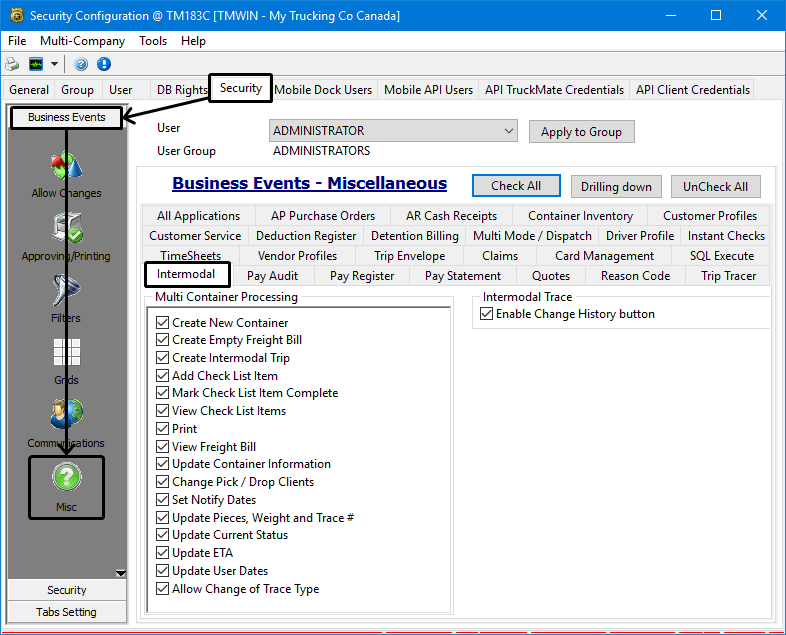
The Multi Container Processing options control access to the Intermodal Multi-Container Entry functionality in the Customer Service program.
The Enable Change History checkbox option enables user access to the Change History menu option found in the Tools menu for the Intermodal Trace (IMTrace.exe) program. (The Change History function allows you to select a new Container record to be displayed in the main form of the Intermodal Trace program.
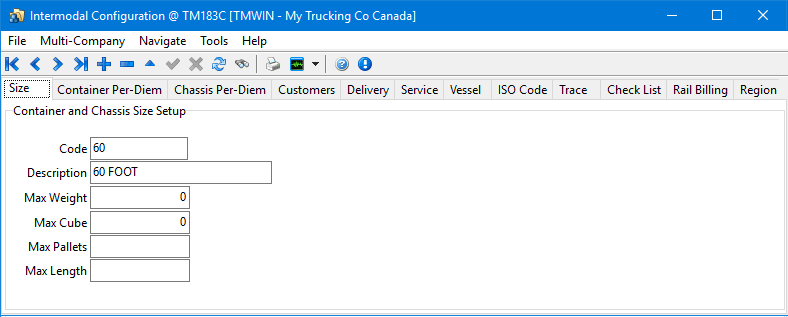
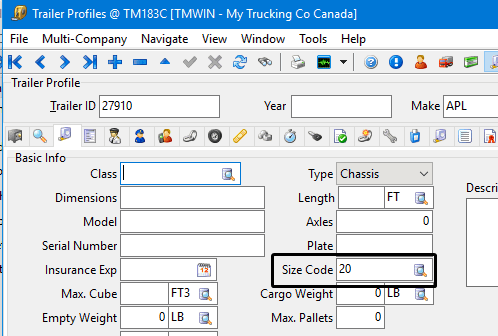
Setting standard container and chassis size codes
The Intermodal Configuration > Size tab allows you to create a standardized set of container and/or chassis Size Codes for use when defining trailer and container properties.
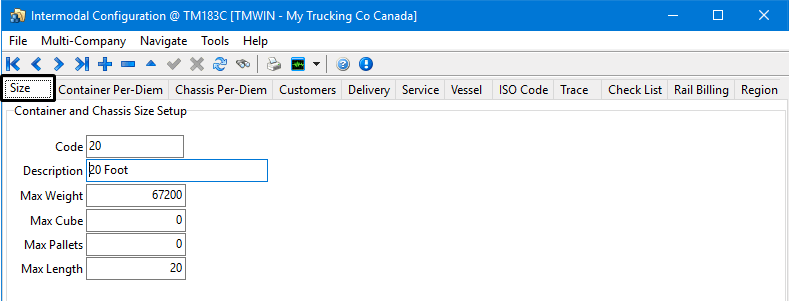
The Size Code is an optional property field used by the Trailer Profiles and Container Profiles programs.
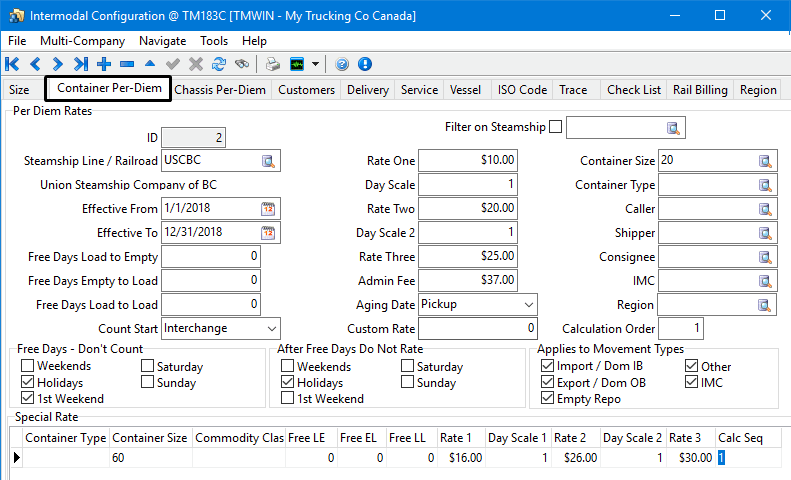
Setting container per-diem rates
The Intermodal Configuration > Container Per-Diem tab allows you to configure all the information related to Intermodal Per Diem Rates associated with containers.
When associating a container to a freight bill, the pre-diem rates will be linked to the freight bill based on the customer.
You would typically create a separate record for each size of container for each of the container owners if the rates were unique and different between container owners and container sizes.
To create a new container per-diem contract rate record:
-
Click
 Insert item.
 -
Make the appropriate entries to these fields.
Field Definition Filter on Steamship
Place a checkmark in the box provided if you wish to use the filter option. Then, select the search button to the right of the checkbox to bring up the 'Select Steamship Line' dialog box where you can search by Bill-To Code and Name.
Steamship Line / Railroad
Use the search button to bring up the Client ID dialog box where you can search by Client ID or Name.
Effective From /
Effective ToSelect the calendar button on the far right of the field to bring up a calendar. Scroll to the desired date to indicate when these rates will be applied.
Free Days Load to Empty
Enter the number of days that the equipment can be away without additional charges being added. In this case, the equipment would be taken out loaded, but returned empty.
Free Days Empty to Load
Enter the number of days that the equipment can be away without additional charges being added. In this case, the equipment would be taken out empty, but returned loaded.
Free Days Load to Load
Enter the number of days when they take the equipment out loaded, have it unloaded and reload it at another place before taking it back to the yard.
Count Start
The value you select from the Count Start drop-down determines when the Free Days will begin to accrue for this record (the first count day). Select either 'Interchange' or 'Day After'.
Per Diem Rating Charge Calculation
Rate One / Day Scale
The 'Rate One' field is used to enter a particular dollar amount that the Client will be charged on a daily basis once the Container is 'overdue' for pickup. The 'Day Scale' field is used to enter the number of days that the Client will be charge at the dollar amount entered in the 'Rate One' field. This will occur once the Container’s 'Return Date' has been exceeded.
Rate Two / Day Scale 2
The 'Rate Two' field is used to enter a particular dollar amount that the Client will be charged on a daily basis once the Client has been charged at 'Rate One' for 'Day Scale (1)' X number of days. (If no 'Rate One' value exists, then this is the rate that will be used after the Container’s 'Return Date' has expired). The 'Day Scale 2' field value is not the number of days that 'Rate Two' will apply (after 'Rate One' has been applied), but rather represents the point at which 'Rate Two' will cease to apply (see example below).
Rate Three
The 'Rate Three' field is used to enter a particular dollar amount that the Client will be charged on a daily basis at the point that the 'Rate Two' dollar amount will cease to apply. This will be charged for all remaining days until the container has been returned to the owner.
For Example:
-
Charge $100/day (Rate One) for the first 7 days after the container return date has expired.
-
Charge $200/day (Rate Two) for the next 7 days (Day 8 through Day 14).
-
Charge $300/day (Rate Three) for all remaining days until the trucking company obtains the Container and returns to 'owner'
This is how it should be entered in the Per Diem Setup Tab:
-
'Rate One' = 100 / 'Day Scale' = 7 (for the first 7 days)
-
'Rate Two = 200 / 'Day Scale' = 14 (for the next 7 days; day 8 through 14)
-
'Rate Three' = 300 (for all remaining days until the company obtains the Container and returns to 'owner')
Admin Fee
If there is an associated Administration Fee, use this field to enter a dollar amount.
Aging Date
The options available in this drop-down menu determine when the displayed Per Diem Rating contract begins calculating the Aging Days (outside of those days determined as 'Free Days' below). Choose from either:
-
The day the Freight Bill was created ('Created').
-
The day the Trip was dispatched ('Dispatch').
-
The day the Freight was Pickup up ('Pickup').
-
The day that your company was notified of the Freight being in Detention ('Notify').
Custom Rate
Enter a custom rate for this client in the field provided.
Container Size
Enter the Container Size, or click the search button to select a Container Size from those available on your system.
Container Type
Enter the container Type. Use the search button to bring up the 'Select Container Class' dialog box where you can search by Code or Description.
Caller / Shipper / Consignee
These fields allow you to select when the displayed Per Diem Rate will be applied to a contact, based on if they are selected as 'Caller', 'Shipper' or 'Consignee' on an Intermodal Freight Bill.
IMC
Enter the name of the Intermodal Carrier you employ. The value here must match the IMC entered against the Container record in the CONTAINER Table.
Region
The 'Region' field allows you to specify a Zone Code that the Per Diem Rate will apply within.
Calculation Order
Enter a value for the Calculation order.
Free Days - Don’t Count
The options in this section determine which days of the week will be considered as 'Free Days' for the displayed Per Diem Rating contract. For example, perhaps you offer the first weekend free of charge.
After Free Days Do Not Rate
Once the 'Free Days' have elapsed, the flagged options here will determine which days do not apply to the Per Diem contract.
Choosing the 1st weekend option in conjunction with the one in the 'Free Days - Don’t Count' section would effectively grant two free weekends to the Per Diem Contract. Applies to Movement Types
Specify which movement types the displayed Per Diem rate applies to. For example, you may create a rate that applies only to empty repositions.
Special Rate Grid
The grid at the bottom of the Intermodal Configuration window displays the information pertaining to the various Storage Rates entered in the above section. The fields here are for informational purposes only, all changes are made in the above section.
-
-
Click
 Post to save.
Copy an existing container per-diem rate
To create a copy of an existing per-diem rate into a new record, right-click within a blank space on the window and select Copy Per Diem Rate. A new record will be created using the previous one as a starting point allowing you to enter similar Per Diem Rates for other contracts quickly.
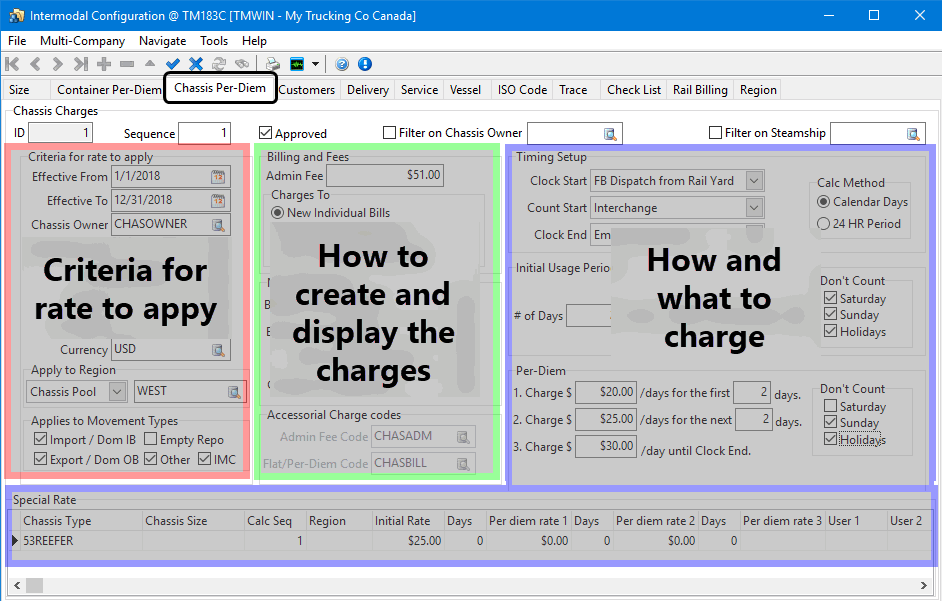
Setting chassis per-diem rates
The Intermodal Configuration > Chassis Per-Diem tab allows you to configure all the information related to Intermodal Per Diem rates associated with chassis. When a chassis is attached to a freight bill the system will look to the rate contracts setup within the Intermodal Configuration program looking for matching criteria to decide which rates to use.
When associating a chassis to a freight bill, the standard default pre-diem rates will be linked to the freight bill based on the chassis owner. These defaults can be over-ridden by a Special Rate if one has been setup for a specific chassis type and size by entering information into the Special Rates grid at the bottom of the window.
To create a new chassis per-diem contract rate record:
-
Click
Insert. -
Make the appropriate entries to the fields, as described below.
-
Enter information into the Special Rates grid at the bottom of the window if there are scenarios requiring the standard default per-diem rates to be superseded and overridden.
The Special Rates grid allows you to override the standard rates with a specific set of rates for exact Chassis Type, Size and Region criteria as applicable.
When calculating chassis per-diem charges, once a valid contract has been selected, the calculation routine checks against the Special Rates grid for the contract, to see if there are any special rates that exactly match the Chassis Type, Size and Region field etc. If a matching special rate is found, it will use this special rate rather than the regular per-diem contract rates.
-
Click
Post to save.
Header
| Field | Definition |
|---|---|
Sequence |
If there are multiple rate sheet contracts that can match a freight bill, the system will use the one with the lower sequence number. |
Approved |
This Intermodal configuration rate sheet is approved and can be selected and used to generate chassis charges for freight bills. |
Filter on Chassis Owner |
There could be many rate sheets defined for each chassis owner. Use this filter checkbox to restrict the window to only show the rate sheets defined for the selected chassis owner. |
Filter on Steamship |
There could be many rate sheets defined for each steamship company. Use this filter checkbox to restrict the window to only show the rate sheets defined for the selected steamship company. |
Criteria for rate to apply
In order for the freight bill to use this rate sheet, it must match the criteria as defined on the Intermodal Configuration > Chassis Per-Diem tab. Leaving an optional field empty means this field will not be applied as a filter so all records would be a match.
Required field: *
| Field | Definition |
|---|---|
Effective From * Effective To * |
Select the calendar button on the far right of the field to bring up a calendar. Scroll to the desired date to indicate when these rates will be applied. |
Chassis Owner * |
Chassis Owner - if selected, match against the Chassis Owner on the order. |
Steamship Line |
The Steamship Line owning the container. This will be compared with the container owner on the order when trying to find a matching rate sheet. |
Caller / Shipper / Consignee |
If selected, match against the Caller, Shipper or Consignee on the order. |
Currency |
Specifies the currency for the rate sheet. Also, match against the billing currency of the caller on the freight bill in order to use this rate sheet. |
Apply to Region |
Match against the selected region (regions are defined on the Region tab of Intermodal Configuration) by choosing one of the 2 matching options:
Please note if the region is in a chassis pool, but the chassis itself is not, then a message will appear when the Chassis Pick field is assigned offering to assign the chassis to the pool. The Chassis' pool can also be set via the Origin Pool field on the Ownership tab of Trailer Profiles. The Origin Pool for the chassis in question can also be seen as a field on the Chassis tab grid in Dispatch. |
Applies to Movement Types |
Select all that apply. For example, you could create unique rate sheets just for empty reposition moves. |
Billing and Fees
This section is used to determine how and where the charges will be created and displayed.
| Field | Definition |
|---|---|
Admin Fee |
An additional flat fee to add to the per diem amount before generating the accessorial charge or supplemental invoice. |
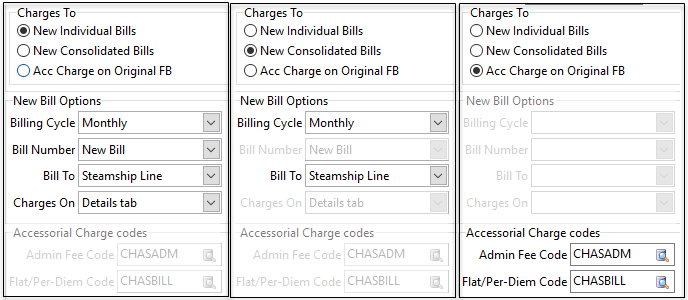
Charges To / New Bill Options / Accessorial Charge Codes |
Each of the Charges To options will enable a different set of New Bill Options or Accessorial Charge Codes.
|
New Individual Bills |
Used for manual chassis billing. The Chassis Billing program must be used to generate each chassis billing for a client as a separate invoice (new freight bills). An individual client could get many Chassis Billing invoices per cycle. Billing cycle - this can be weekly or monthly - will match up with weekly or monthly billing cycles selected when the Chassis Billing application is run. *Bill Number - can be "New Bill" to generate a new freight bill number, or "Orig FB with Suffix" to generate a dashed freight bill number based on the original, e.g. IM123456-1. Bill To - choices of Bill To Code, Caller, Destination, Origin or Steamship Line to select who to bill. Charges On - for supplemental invoices/new bills - a choice as to whether to place the charges on the Acc Chgs tab or Details tab on the new bill in Customer Service. |
New Consolidated Bills |
Used for manual chassis billing. When the Chassis Billing program is run, a single invoice per cycle is generated for each client, and all the charges are consolidated onto one bill. Each charge will appear as a separate line on the Details section of the bill. Bill Number must be a "New Bill" (instead of using the original FB number and appending a suffix) and charges must be displayed on the "Details" tab for this option. Note that this option cannot display information on the Acc Chgs tab since potentially the charges may involve many different chassis with many different Acc Charge codes. Billing cycle - this can be weekly or monthly - will match up with weekly or monthly billing cycles selected when the Chassis Billing application is run. Bill To - choices of Bill To Code, Caller, Destination, Origin or Steamship Line to select who to bill. |
Acc Charge on Original FB |
Generates the charges as accessorial charges on the original Intermodal freight bill. All fields are required. Admin Fee Code - The charge code to use on the charge bill, if an Admin Fee has been applied based on the contract / rate sheet. Flat/Per-Diem Code - The charge code to use on the charge bill for flat and per-diem usage charges. |
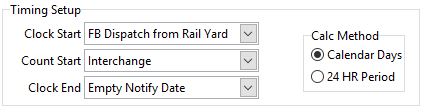
Timing Setup
The timing setup determines what values will be used to define the start and end dates and times used for calculating the chassis charges.
| Field | Definition |
|---|---|
Clock Start |
Identifies the date field that will act as the start date for chassis tracking using the entries displayed on the Customer Service > Intermodal tab > Chassis Bill sub-tab. This works in a very similar manner to the Aging Date in Container Per-Diem, with choices of: Notify date - when the Notify Date on the Intermodal order passes FB Dispatched from Rail Yard - after a dispatch behavior has been applied to the trip FB Delivery to Consignee - after a delivery behavior has been applied to the trip FB Picked - after a picked behavior has been applied to the trip |
Count start |
Determines whether the counting will start on or the day after the clock start as follows: Interchange - means the exact date of the Start Clock date value will be used (e.g. the day of the Notify Date). Day After - means that counting starts the day after the Start Clock date (e.g. the day after the Notify Date). |
Clock End |
Identifies the date field that will act as the end date for chassis tracking using the entries displayed on the Customer Service > Intermodal tab > Chassis Bill sub-tab. Empty Notify Date - charges calculated on the Empty Notify Date ("Empty" field on the main details section of the Intermodal tab of Customer Service) as the clock end. First Trip from Consignee - charges calculated on the "First Trip After" field (on the Chassis Bill section of the Intermodal tab of Customer Service) as the clock end. FB Delivered - charges calculated using the FB Delivered date as the clock end. |
Calc Method |
Choice between Calendar Days and 24 HR period. If using 24 hour period then the time also needs to be considered. If using Calendar Days, the time is ignored. |
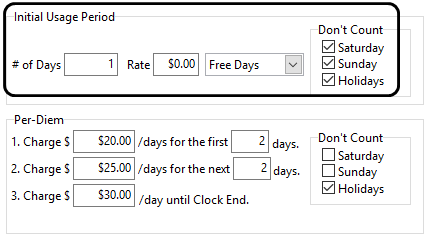
Initial Usage Period
The initial usage period can be billed differently than the main tiers defining the regular per-diem rates.
| Field | Definition | ||
|---|---|---|---|
# of Days |
The number of days in the initial usage period where a specific rate is applied during this time. For example, the first day may be free or have a reduced rate. |
||
Rate |
Rate to apply during the initial number of days depending on one of the following options: Per Day Rate - apply this rate per day across the initial period
Free Days - assign this initial period as "Free Days" with no charge being applied. The initial period free days will apply even if the total number of days exceeds the initial period # of days. Flat Rate - apply this rate as a single flat charge across the initial period. |
||
Don’t Count |
Indicate which days not to count towards the number of "days" elapsed in the initial period. Many contracts count only working days (i.e., excludes weekends and holidays). |
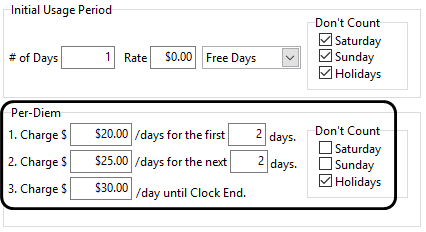
Per-Diem
Defines different tiers of per-diem rates depending on how long the chassis is being used.
| Field | Definition |
|---|---|
Per-Diem 1 / 2 / 3 |
Tier 1. - Charge $A per day for the first X days Tier 2. - Charge $B per day for the next Y days Tier 3. - Charge $C per day for the remaining Z days |
Don’t Count |
Indicate which days not to count towards the number of "days" elapsed in the initial period. Many contracts count only working days (i.e., excludes weekends and holidays). |
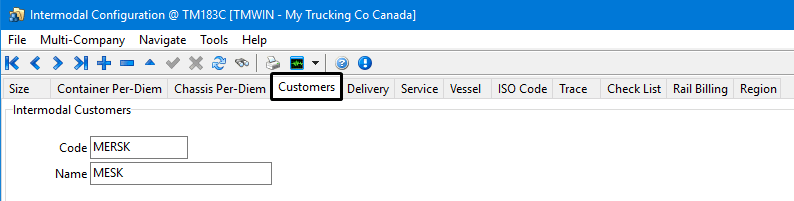
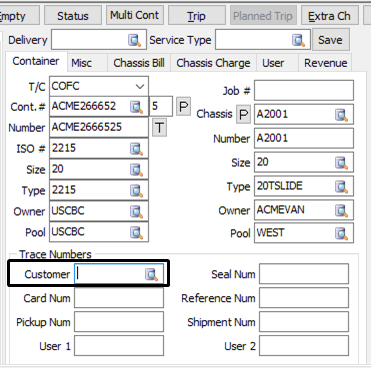
Customers (intermodal customers)
The Intermodal Configuration > Customers tab displays a list of intermodal clients.
| Field | Definition |
|---|---|
Code |
The Code name for the new Intermodal Customer (up to a maximum of 8 characters). |
Name |
The full Customer Name |
The entries in this list appear in the Trace Numbers section on the Customer Service > Intermodal tab > Container sub-tab.
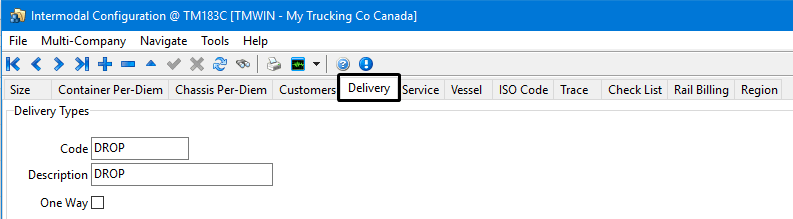
Delivery
The Intermodal Configuration > Delivery tab is used to setup delivery type codes for use throughout the Intermodal module.
| Field | Definition |
|---|---|
Code |
The code name for the new delivery type (up to a maximum of 8 characters). |
Description |
Enter a description that will help users when selecting a code. |
One Way |
When this checkbox is selected, if this Delivery Code is used in the Customer Service program > Intermodal tab, then the user will not be required to enter an 'Empty Disp' value (for an Import movement) or an 'Empty Org' value (for an Export movement). Furthermore, no empty Freight Bills will be required for the Freight Bill. When this 'One Way' Delivery code is used on a Freight Bill in Customer Service, the only delivery being made is for the delivery of the loaded container |
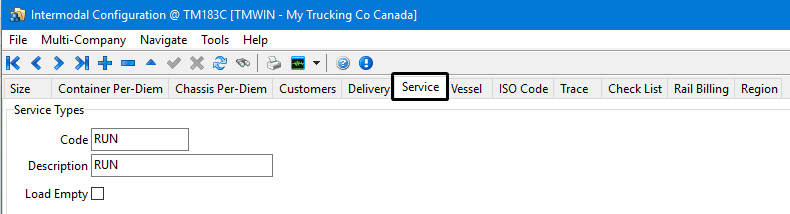
Service
The Intermodal Configuration > Service tab is used to create service type codes for use throughout the Intermodal module.
| Field | Definition |
|---|---|
Code |
The code name for the new service type (up to a maximum of 8 characters). |
Description |
Enter a description that will help users when selecting a code. |
Load Empty |
This field is currently only used for reporting purposes (it was previously used for Per Diem calculations). |
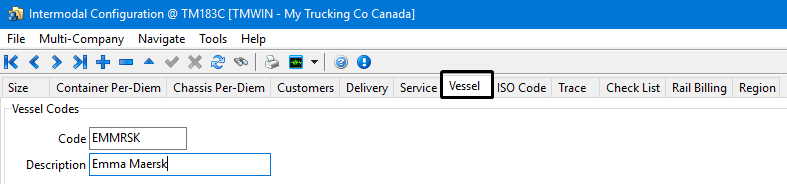
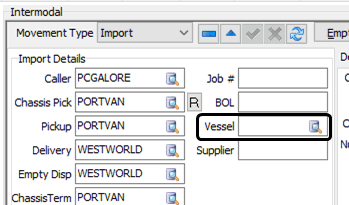
Vessel
The Intermodal Configuration > Vessel tab is used to create vessel codes (usually relating to large ships) for use throughout the Intermodal module.
| Field | Definition |
|---|---|
Code |
Enter the code name for the new vessel code (up to a maximum of 8 characters). |
Description |
Enter a description that will help users when selecting a code. |
The entries in this list appear in the movement type details section on the Customer Service > Intermodal tab.
ISO Code
The Intermodal Configuration > ISO Code tab is used to enter new ISO Codes and configure their relation to TruckMate Type Codes. All records are entered by clicking the '+' button on the Navigation bar and entering data into the various fields of the Grid.

| Field | Definition | ||
|---|---|---|---|
ISO Number |
Enter an integer value that will become the ISO Number for this detail line. |
||
TM Size Code / |
Double click these fields to choose the TruckMate Size and Type Codes to relate to the ISO Number of this detail line. |
||
Valid |
Select either 'True' or 'False' depending on the Valid Status of this ISO Code. |
||
Max Weight |
Enter the maximum weight that the selected container/chassis can hold. |
||
Max Cube |
Enter the maximum volume (cube) for the selected container/chassis. |
||
Max Pallets |
Enter the maximum number of pallets that the selected container/chassis can hold.
|
||
Description |
Enter any free format notes to describe this ISO Number. |
||
Length / Width / Height |
Enter integer values for these fields by manually entering them in the space provided. |
||
Height Code |
Enter a Height Code in the space provided. |
||
MOL Code / MOL Description |
Enter an MOL Code (i.e. CEDEX code for Markings / Owner’s Logo) and description in the spaces provided. |
||
Import
|
Clicking the Import button will open a window where you may select a text file to Import ISO Codes from. This file is usually named 'ISOS.TXT' and can be found in your TruckMate folder. |
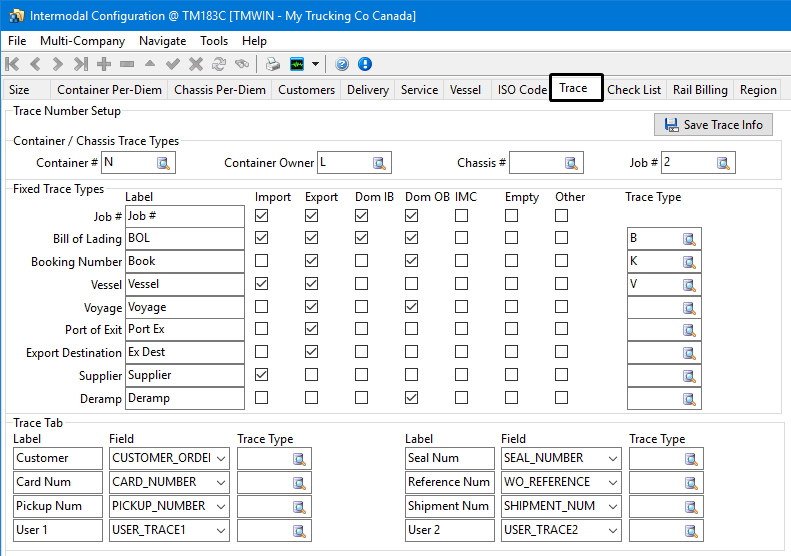
Trace
The Intermodal Configuration > Trace tab is used to indicate which Trace options are available for use while working in the Customer Service program > Trace# tab. Users can also control which fields trigger to the TRACE Table.
Save Trace Info
Selecting the Save Trace Info button will save the settings configured on the Trace tab.
Container / Chassis Trace Types
This section is used to configure Container / Chassis Trace Types available in the TruckMate system, most notably on the Customer Service program > Trace tab. These values will be used when Tracing records in the CONTAINER_TLORDER Table. Use the four Database Search buttons to configure the details of the Container/Chassis Trace Type. The available values are configured on the Codes Maintenance program > Trace Number Types Tab.
Fixed Trace Types
This section is used to configure the Fixed Trace Types available in the TruckMate system, most notably on the Customer Service program > Trace Tab.
| Field | Definition |
|---|---|
Label |
The Label field is used to enter the Label that will appear when the associated 'Trace Type' (see below) is added to a Freight Bill. |
Import / Export / Dom IB / Dom OB / IMC / Empty / Other |
Select the flags of the shipment types you wish to use with the associated Trace Type. You have the choice between 'Import' and 'Export' shipments, as well as 'Domestic Inbound', 'Domestic Outbound', 'IMC', 'Empty' or 'Other'. |
Trace Type |
Select the Database Search button to choose a Trace Type for the selected record from the Trace Types available in your system. Trace Types are configured on the Codes Maintenance program > Trace Number Types Tab. |
Trace Tab
These settings alter the appearance / behavior of the Customer Service program > Intermodal Tab > Trace Tab. Select the TLORDER Table field you wish to Trace on by using the drop-down menu in the 'Field' field, then give the Trace a text name in the 'Label' field.
| Field | Definition |
|---|---|
Trace Type |
Select the Database Search button to choose a Trace Type for the selected record from the Trace Types available in your system. Trace Types are configured on the Codes Maintenance program > Trace Number Types Tab. |
Check List
The Intermodal Configuration > Check List tab is used to tie the various Check List Item Codes setup in your system to one of the 10 available 'User Defined' fields from the CONTAINER_TLORDER Table.
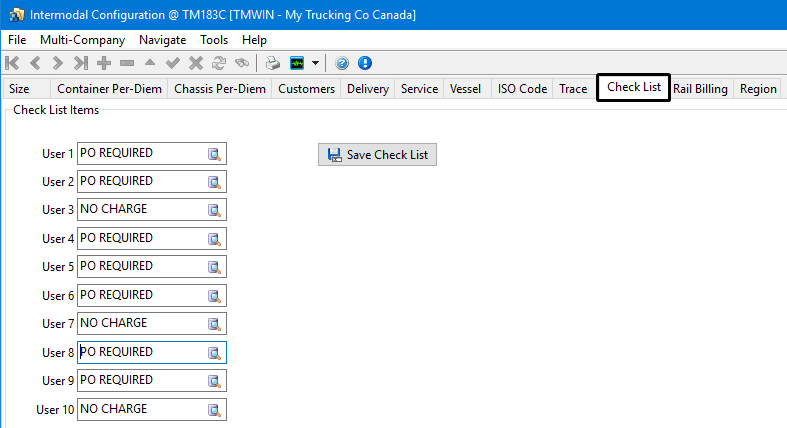
If you assign one (or more) Check List Item Codes into the User Defined fields of CONTAINER_TLORDER, when the Check List Item is assigned or completed on a Freight Bill, the associated User Field will be updated as well.
Using this functionality, you setup your system to ensure that a Container passes one (or several) required checks before it can be made available for Dispatch.
| Check List Item codes are configured and maintained on the Codes Maintenance program > Check List Tab, and are assigned to Freight Bills on the Customer Service program > Check List Tab. |
Rail Billing
The Intermodal Configuration > Rail Billing tab is used to setup codes and information related to billing for rail shipments.
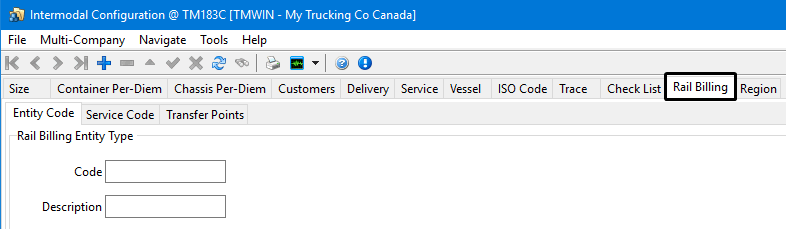
Entity Code
Setup 'Entity Type' codes that are used for EDI Rail Billing.
| Field | Definition |
|---|---|
Code |
Supply a name for the entity codes you will use in TruckMate. (Maximum of 8 characters). |
Description |
Enter a description that will help users when selecting a code. |
Service Code
Setup service codes used for EDI Rail Billing.
| Field | Definition |
|---|---|
Code |
The code name for the service code (up to a maximum of 8 characters). |
Description |
A brief description of the service code. |
Transfer Points
Specify the Transfer points that will be used between Carrier locations and/or Zones for the Rail Billing movements for Rule 11 IP records, created on the Customer Service program > IP Tab > RB Tab.
| Field | Definition |
|---|---|
From Carrier / From Zone Code |
Specify the originating vendor code and zone location that the transfer point you are setting up will apply to. |
To Carrier / To Zone Code |
Specify the destination vendor code and zone location that the transfer point you are setting up will apply to. |
Is Inactive |
If the vendor record you select in either of the carrier fields above has been disabled in the Vendor Profiles program, the 'Is Inactive' field will be flagged. You should either use a vendor who is not inactive, or change the required vendor’s configuration. |
Allow Between |
If you would like the specified From Carrier/Zone and To Carrier/Zone combination to use the same transfer point for movements in both directions, select this flag. |
Zone Code |
Specify the Zone Code that the transfer point you are setting up will apply to. |
Transfer Point |
This is a free format text field which will auto-populate into the Customer Service program > IP Tab > RB Tab when the above From Carrier/Zone and To Carrier/ Zone Code combination is used for a rail billing container movement. Transfer points can then be selected from the Rail Billing window in Customer Service (when the user selects the 'Rule 11' button on the IP Tab > RB Tab). |
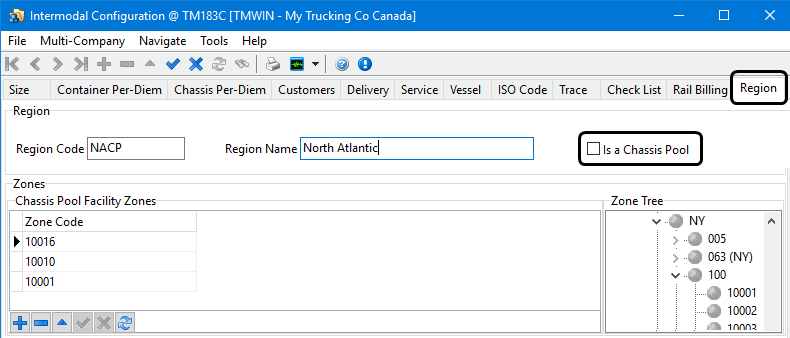
Region
The Intermodal Configuration >Region tab is used to indicate what defines a region. Each region is made of either a collection of chassis pool facilities or a collection of zone codes as determined by the Is a Chassis Pool checkbox.
When leasing containers or chassis, the rates received depend on the market (i.e., "region"). Not only do equipment providers set their rate structures by region, but steamship lines also have different pool alliances in different regions.
See Setting up Intermodal Configuration for regions for instructions related to configuring regions.
-
Collection of chassis pool facilities (Is a Chassis Pool)
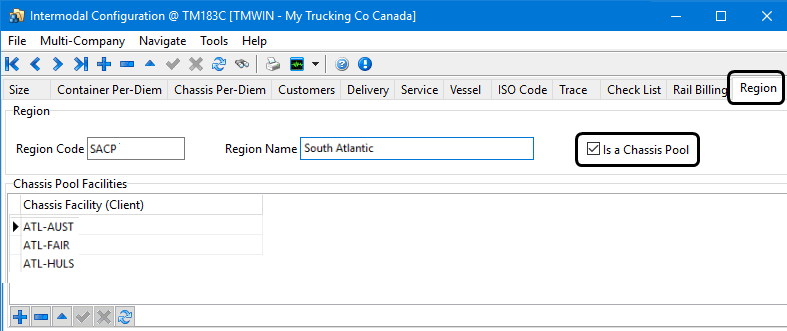
-
Collection of zone codes