Mobile Device Maintenance

The Mobile Device Maintenance program is used to setup and configure a variety of different mobile device network accounts and to enter, edit and assign mobile communication devices to power units. (Power units are configured in the Power Unit Profiles program).
The Mobile Device Maintenance program can also be used to create groups of users, so the same message can be sent simultaneously to several mobile units at once from TruckMate programs like Driver Call In and the Message Center. Similarly, it is also possible to create different groups for controlling who receives the messages coming from the mobile units.
The panel on the right side of the window displays the details for the item selected from the list of mobile device accounts and account properties on the left.
The Mobile Device Maintenance program and the Communications Manager are two parts of a larger team. The Communications Manager provides the setup for the interface managing the data being sent to and from the mobile devices and the Mobile Device Manager keeps track of the associated logistics like the list of devices, which power units are using which device and creating groups of devices for simultaneous and selectively filtered mass communication.
To access Mobile Device Maintenance:
| From this location | Go to |
|---|---|
TruckMate Menu and TruckMate Task List |
Mobile Communication > Mobile Device Maintenance |
Windows Start Menu |
TruckMate 20xx > Mobile Device Maintenance |
Windows Explorer |
C:\Program Files (x86) > TruckMate 20xx > Cfgcomm.exe |
Setting up Mobile Device Maintenance
The basic steps for setting up mobile devices are:
-
Get the account and login information for your mobile device network account from Trimble (e.g. PeopleNet) or a third party vendor.
-
Go to Mobile Device Maintenance and setup your Mobile Device Network Account
-
Enter your mobile devices and assign them to specific equipment items
-
Create groups for sending messages to multiple devices
-
Create user distribution groups for receiving messages from devices
-
Configure additional device settings specific to this Mobile Device Network
-
Go to the Communications Manager program > Service menu > Windows Service Setup to setup / start the Windows service.
-
Go to the Communications Manager program > File menu > Configuration and complete the configuration for your mobile device network.
Application Configurator for Mobile Device Maintenance
The following Application Configurator options are listed under Configuration Options > CFGCOMM.EXE.
| Option | Definition | Values |
|---|---|---|
Multiple Devices Per Resource |
Disables the check for multiple devices that would normally restrict how many devices can be assigned to a single resource (e.g. Power Unit). Allows you to add more than one mobile communications device. |
|
Security Configuration for Mobile Device Maintenance (None)
There are no specific options available in the Security > Business Events or other Security Configuration directly related to the Mobile Device Maintenance program.
|
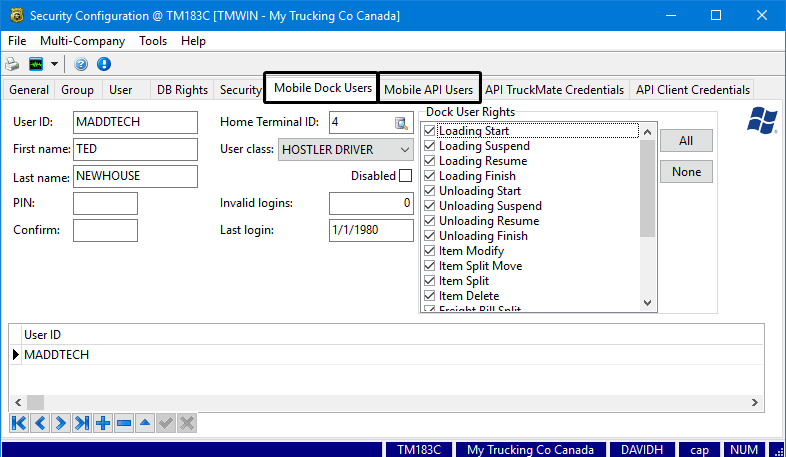
The security settings for Mobile Dock Workers and Mobile API Users are described elsewhere in the Help system.
|
Adding a Mobile Device Network Account
A mobile device network account is required before you can setup TruckMate to communicate with the associated mobile devices using this network. Once you have been registered and setup with the mobile network, you need to configure TruckMate to communicate with the devices.
| Devices from more than one mobile communications network can exist in the system. |
To add a mobile device network account:
-
In Mobile Device Maintenance, click Add Account.
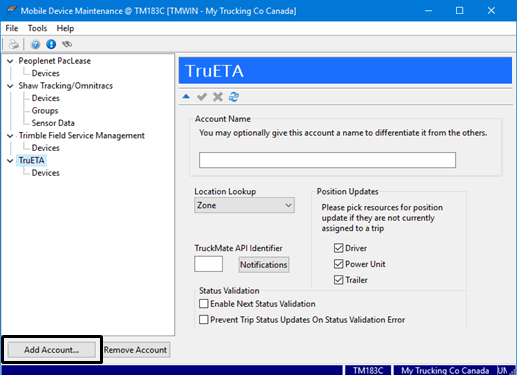
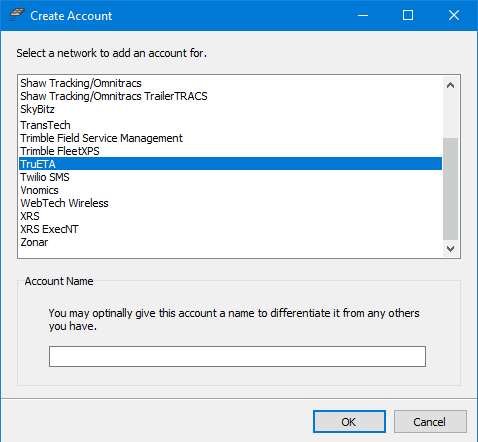
The Create Account window is displayed.
-
Select a network account and click OK.
Note: The list of available devices and network accounts will change over time as new devices enter the market and old devices become obsolete.
-
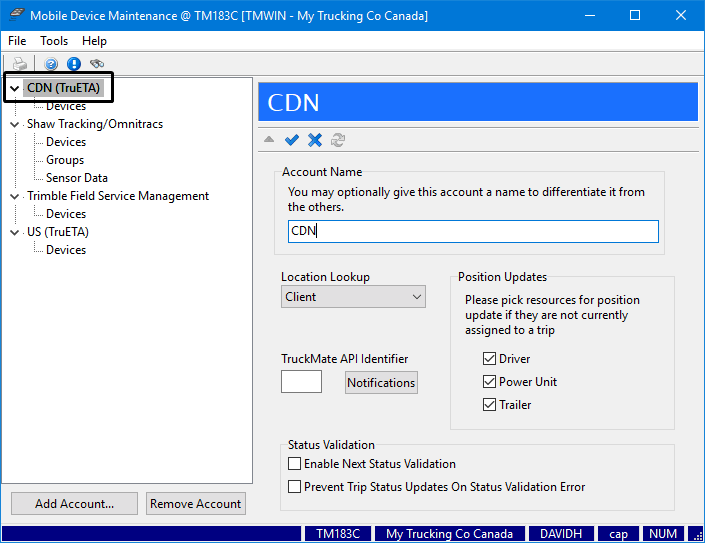
The Mobile Device Maintenance window will display the new network account in the list on the left side of the window.
Note: You may optionally give this account a different name if you need to differentiate it from other similar network names. (You can revise the network account name later.) This name is appended to the default name for this network account. For example: If you enter the name as CDN for the TruETA network it would appear as follows:

-
Select the network account name you just added to the list.
The remaining settings will be specific to your installation.
-
If you are uncertain, accept the defaults for now and confirm the settings with your mobile network vendor, TruckMate implementer or TruckMate support.
Field Definition Location Lookup
(Normally set to Client.)
Legacy: This is the default to ensure continuity for customers who were already setup before this Location Lookup feature was added in TruckMate 2015. It ensures the workflow is not changed unless someone explicitly adjusts this option.
Client: Sets both the processing of returned information and the stoplist generation process to use client locations
Zone: Sets both the processing of returned information and the stoplist generation process to use zone locations.
Position Updates
These checkboxes determine which resource items will also have their positions revised as part of the Driver Workflow updates. If the updates occur too frequently or take too long, deselect a resource type to increase performance.
TruckMate API Identifier
Enter the TruckMate API Identifier if your mobile network is setup to use the API to communicate with TruckMate.
Click the Notifications button to enter the associated API notification setup information.
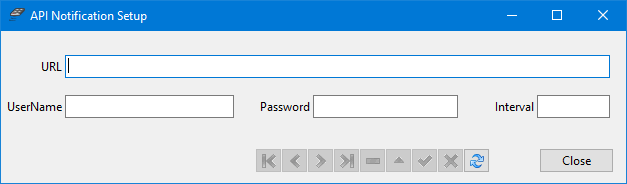
The TruckMate API is a SOAP-based programming interface to TruckMate to enable easier integration with third party networks.
Status Validations
Enable Next Status Validation
Restricts the status code updates (from a macro) to the defined 'next available' set of status codes.
Prevent Trip Status Updates On Status Validation Error
Prevents the trip from being updated by a mobile device if a macro tries to update a trip’s status incorrectly. This allows a dispatcher to apply the correct status updates and give control back to the mobile device.
-
Click
 Post to save your changes.
Removing a Mobile Device Network Account
| If you remove a mobile device network account, it will also remove all the devices, groups and any other device or network settings (e.g. reefer monitoring, sensor data, etc.) associated with this network. (It will not delete drivers, power units, trailers, etc.) |
To remove a mobile device network account:
-
In Mobile Device Maintenance, select the mobile device network account.
-
Click the Remove Account button.
A confirmation message is displayed.
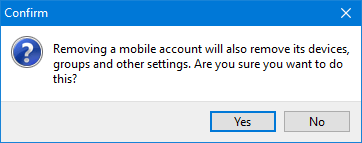
-
Click Yes to remove the mobile device network account.
Adding a Mobile Device
-
In Mobile Device Maintenance, select the mobile device network account.
-
Select Devices for that account.
-
Click the Insert
 button to enter a device.
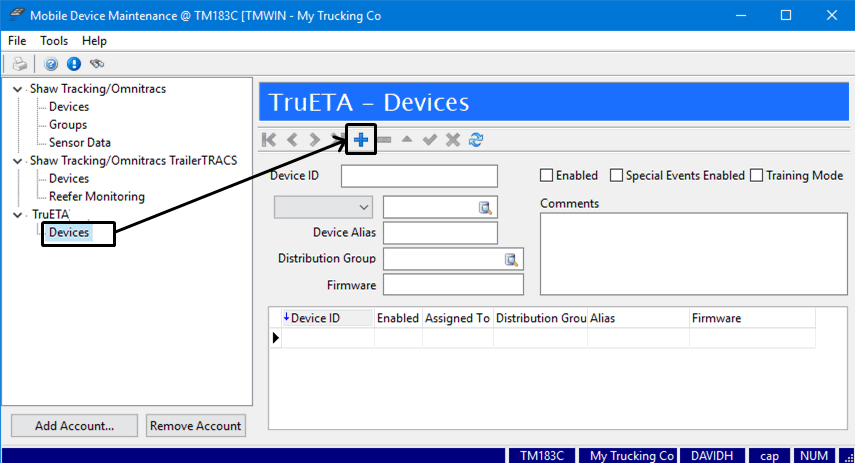
-
Make the appropriate entries to the fields associated with this specific mobile device. The fields and options will vary depending on the network account but the following describes some basic fields common to most devices.
Required field: *
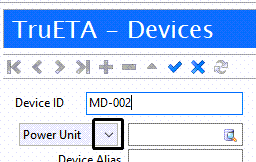
Field Definition Device ID *
Every mobile communications system assigns a unique identifier to each of their mobile hardware devices.
Enabled
This checkbox indicates the working status of the mobile unit. If the unit is no longer active or the Device ID is not valid, clear this checkbox. If a device was previously or is currently assigned to a power unit and actively used to communicate data, it cannot be deleted because messaging data is tied to this master record. A device must be associated with a specific unit before it can be enabled.
Special Events Enabled
The system will send a macro to your Mobile Communication Devices whenever a Special Event is added.
Training Mode
This option allows you to set a specific Mobile Device into Training Mode. Use this when training new drivers on device usage without running the risk of triggering an automatic action in dispatch based on an error made by the trainee driver. This allows the dispatcher to take required actions manually based on return driver messages for those devices flagged as Training Mode.
There is an extension to this feature handled within the Macro Definition program. Instead of disallowing automatic updates of dispatch altogether for a device, you can specify those fields you do not want to auto-update. This way you can mark a device as being in Training Mode but still allow some of the low risk fields to be updated.
Equipment Type
Use the drop-down list to select the equipment type associated with this mobile device. The available options will vary depending on the specific account network.


Unit ID
Use the pick-list to enter the ID for the equipment where this mobile device is installed.

Device Alias
Enter a meaningful device alias name into this free form text field.
Distribution Group
Specifying a distribution group here indicates that all return messages from this device / power unit will only be returned to the members of the selected group meaning you can set up a device so it sends return communications only to a specific group of dispatchers. Leave this field empty to enable all users (who have the security permissions) to view the messages coming from this device.
These groups are created and managed using the Maintain Distribution Groups function found in the Tools menu. These groups are not the same as the distribution groups associated with the devices.
This is a complementary reverse function to the logic of the devices groups, which allows dispatchers to broadcast forward communications to a specific group of devices (e.g. power units).
Firmware
Use this free form text field to indicate the firmware used by this device.
Comments
Use this free form text field to enter any additional text such as notes regarding repairs and/or upgrading of the device hardware.
-
Ensure the Enabled checkbox is selected for each active device.
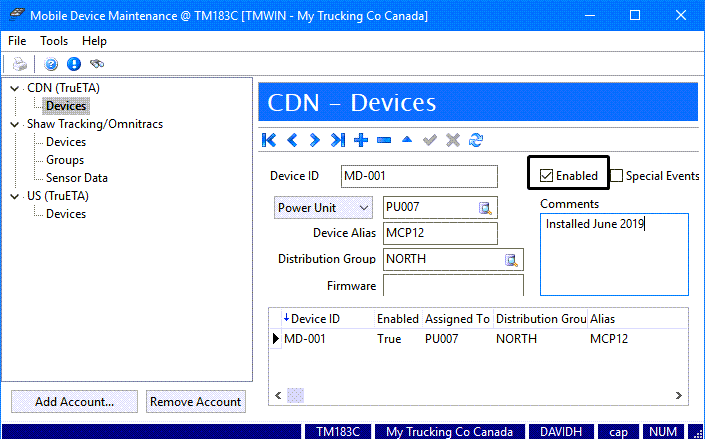
Note: A device must be associated with a specific unit before it can be enabled.
-
Click the Post
 button to save your entry.
The bottom grid lists all the devices currently entered and associated with this mobile device network account for easy reference.
Assigning a mobile device to a power unit, trailer, etc.
When assigning a mobile device to equipment such as a power unit, trailer, chassis, etc., all position updates returned from this device will be used to update the equipment’s position in Dispatch. Similarly, all messages forwarded to the power unit, trailer, etc. will be sent to this device, and all messages returned from this device will be displayed as returning from the power unit, trailer, etc.
| TruckMate does attempt to match a driver to a power unit based on the current dispatch assignments, so some return messages may be displayed as having come from a particular driver. However, in cases of ambiguity (i.e. a team driving situation), the power unit is the most reliable indicator of what device originated a return message or position update. |
-
In Mobile Device Maintenance, select Devices for the network account.
-
Locate the Device ID.
-
Ensure the equipment type is correct. If not, use the drop-down list to select a different equipment type. The available options will vary depending on the specific account network.
-
Use the pick-list to enter the ID for the equipment where this mobile device is installed.
-
Ensure the Enabled checkbox is selected for each active device.
-
Click the Post
button to save your entry.
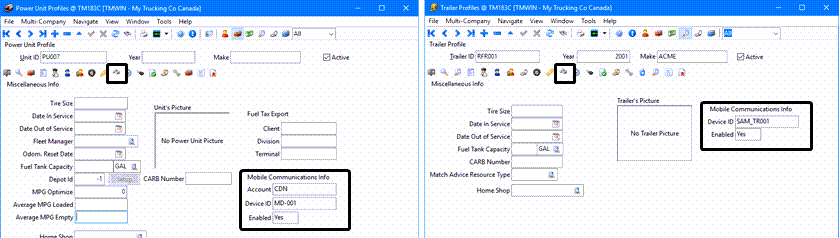
After a device has been assigned the Miscellaneous Info tab on the Profiles > Power Unit Profiles and Profiles > Trailer Profiles windows will display the status and the mobile device ID currently assigned to this unit.
Creating groups for sending to multiple devices
Groups are used by programs like the Message Center and Driver Call In to broadcast a message simultaneously to several devices (users), within a specific group. These groups will be unique to each mobile device network account. (These groups are not the same as the distribution groups created by using the Maintain Distribution Groups function found in the Tools menu that can control messages coming from the devices.)
To define groups (e.g. fleets) for the dispatchers to broadcast messages to:
-
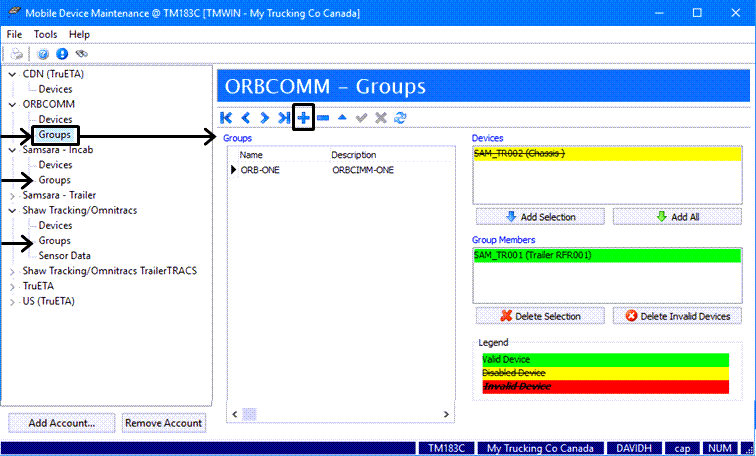
In Mobile Device Maintenance, select Groups for your mobile device network if it supports groups. (Not all mobile device network accounts support groups.)
-
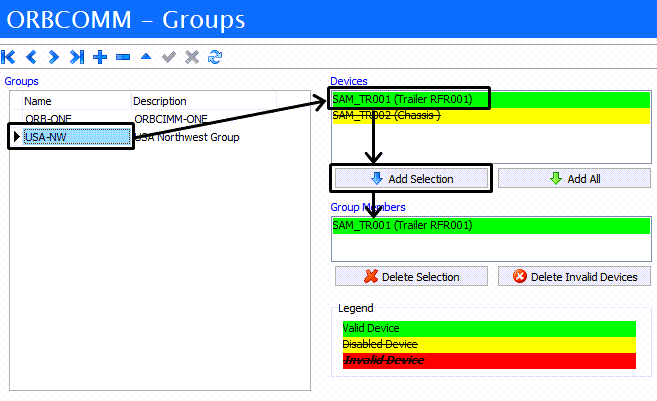
The Groups window is displayed.
The Legend color green identifies which devices are active and enabled.
Note: An invalid device may be a device that was created belonging to one network, assigned to a broadcast group, and then reset to belong to another network, whether purposefully or accidentally. Either the device configuration should be fixed or the device removed from the group to resolve the problem.
-
Click
Insert. -
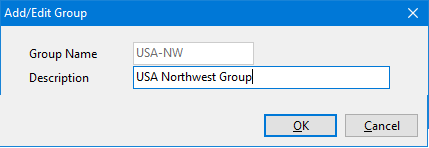
The Add/Edit Group window is displayed.
-
Enter a Group Name and Description and click OK.
Keep the group names short and descriptive to allow dispatchers to quickly identify which group to broadcast a message to.
-
Select the group you just created.
-
Select a mobile device from the Devices list and click the Add Selection button to add this device to the group.
-
Use the Delete Selection button to remove any devices from the group
Note: Devices can belong to more than one group at the same time. Invalid and disabled devices should be removed from the group to prevent unnecessary messages from being generated and sent to those units.
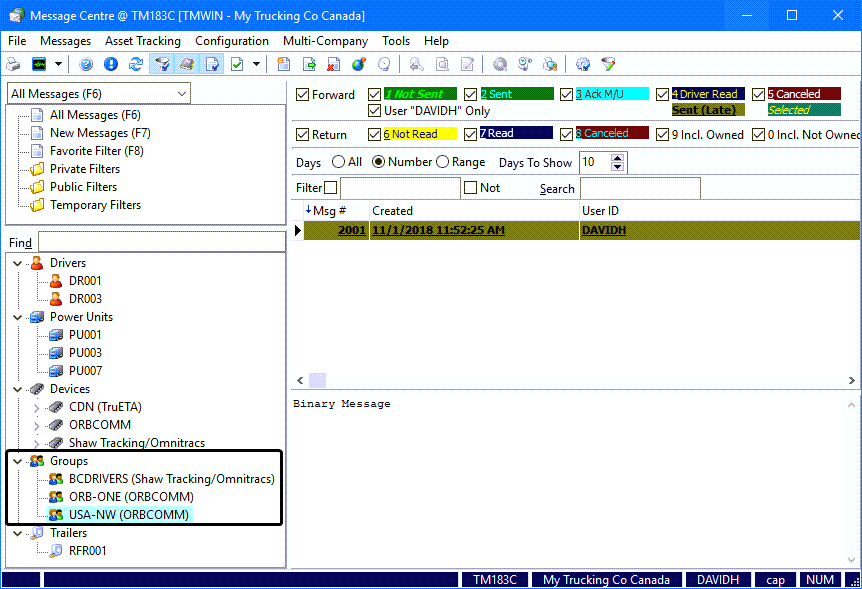
The groups created here will be immediately available in other programs like the Message Center and Driver Call In.
For example, here is the groups section as it is displayed on the Message Center.
Creating user distribution groups
Distribution groups can also be setup to control which TruckMate users (e.g. a specific group of dispatchers) will simultaneously receive messages transmitted from the devices.
These distribution groups are not the same as the groups associated with the devices that allow dispatchers to broadcast forward communications to a specific group of devices (i.e. power units, drivers).
| Users can belong to more than one distribution group at the same time. |
-
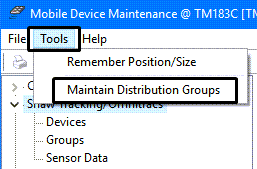
In Mobile Device Maintenance, go to Tools > Maintain Distribution Groups.
-
The Distribution Group Setup window is displayed.
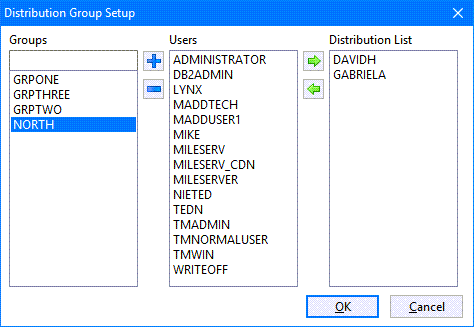
Note: The Distribution Group Setup window can also be opened within the Communications Manager program by selecting Configuration from the File menu, going to the Distribution tab and clicking the Setup button for Addressed Messages.
-
Create a new group by entering text (uppercase to a maximum of ten characters), and clicking the
 Insert button.
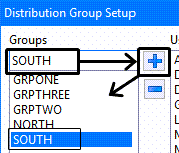
-
Use the
 Copy button to add users to the selected distribution list for this group.
(Use the Delete button to remove users.)
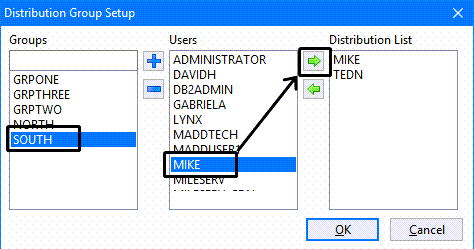
Configuring additional device settings
Consult your third party vendor regarding any additional device settings specific to their Mobile Device Network.
Reefer Monitoring
Because of the sensitivity involved when operating reefers and the amount of damage that might be caused if something goes wrong with the temperature or the planned rout of the trip, there are devices that can monitor both the temperature and the mileage of the reefer. TruckMate through this option allows the user to set up a Reefer Monitoring instance. A device that supports such monitoring must be available. (e.g. Shaw Tracking/Omnitracs TrailerTRACS)
Refer to the specific mobile device network documentation from the manufacturer or third party supplier for details about how to configure these devices.
For example, Shaw Tracking/Omnitracs TrailerTRACS offers a specific checkbox to indicate the device will be used with a Tethered Reefer type of trailer.

