MACRODEF.EXE to OTCALC.EXE

MACRODEF.EXE - Communications Macro Set-up
Script Version
This value sets the version number of script files used in the Communications Macro Setup program. Currently only '1' (default) and '2' are accepted.
MAGMEDIA.EXE - Payroll and Returns Generator
Calc. Box 18 on W2 by
This option controls how 'Box 18' (Local Tax Wages) of the W2 IRS form is calculated by the Payroll and Returns Generator program. Currently when calculating the W2 amounts, the Payroll and Returns Generator program will sum up the codes that have the checkboxes in Payroll Setup checked and linked to the W2 fields. This config option will be checked to determine whether to use current method of calculating Box 18 ('Linking') or to use 'Summing' (to sum up TAXABLE_WAGE_PORION field- useful for US employees paying multiple local taxes).
If 'Summing' is used, the Payroll & Returns Generator program will issue a warning if a Local Tax with TAXABLE_WAGE_PORTION = 0 is found (this should not happen if the Record Taxable Wage Portion program was run to recalculate these missing values).
Incl. voided Amounts
This option is used to determine wether the Payroll and Returns Generator should include voided checks in the 'Get US Tax Liability and Reca' function. When set to 'False' (default), voided amounts will not be included in tax total calculations and/or magmedia submission data. When set to 'True' voided amounts will be included in an employee’s tax data.
MESSAGECENTRE.EXE - Message Centre
AllowPing
This setting controls how your system handles Ping requests against it: entering a value of '0' will totally disallow all Ping requests, while a value of '1' will prompt you to accept a Ping each time it is requested, and a value of '2' will always allow Pings, without a prompt.
Default Snooze Time
Valid values are 1 - 1000. Enter the allowed minutes for tracking request to complete.
FilterOutPING
When a ping request is sent, it returns an 'A' Acknowledge status to message center. The driver does not read ping requests, which keeps ping messages in Acknowledge status all the time. When a dispatcher is trying to track unread messages, ping requests constitute a large chunk of what the dispatcher needs to sift through. To make the process easier for dispatchers, you can filter out ping requests from the rest of the messages. To do so, set this option to 'True'. The default value is set to 'False'.
Leave Return Message as Canceled
When this config is set to 'True' and a Dispatcher reads a cancelled return message, the message will change from 'X' (canceled) status to 'XR' (cancelled read) status, which can then be used for reporting purposes. When this config is 'False', cancelled messages that are read will change to 'R' (read) status.
Orig Msg Text
This setting will toggle on/off the option of including the text of the original message in your replies. Default is set at 'True' (include original text in reply).
MOBCOMMSVC.EXE - Mobile Communications Service
Remove Schedule on Arrive at Dock
When defaulted to true, trip schedule will be removed from device and driver will be notified when driver sends "Arrive At Dock" macro. Default is set to False.
NOTES - Freight Bill Notes (Not an exe)
These values are used to configure the 'Notes' window used to record Freight Bill notes in a variety of TruckMate applications.
ARRA Journal-Style 1
Setting this option to 'True' will set the AR Inquiry program > Customer Collection Information window > Collection Notes Tab to 'Journal-Style' (i.e. Notes are Date/Time stamped upon entry and cannot be deleted). Default is 'Blank'.
ARRA Journal-Style 2
Setting this option to 'True' will set the AR Inquiry program > Customer Collection Information window > Credit Notations Tab to 'Journal-Style' (i.e. Notes are Date/Time stamped upon entry and cannot be deleted). Default is 'Blank'.
ARRA Tab 1
This option is used to rename the AR Inquiry program > Collection Notes Tab. You may enter any text string for this option, and the Tab will be renamed thusly. Default is 'Blank' ("Collection Notes").
ARRA Tab 2
This option is used to rename the AR Inquiry program > Credit Notations Tab. You may enter any text string for this option, and the Tab will be renamed thusly. Default is 'Blank' ("Credit Notations").
Caller Notes
In Customer & Vendor Profiles program > Customer Tab, there is a tool Bar button called 'View Notes'. When the User selects this button, a Notes window with six sub-Tabs (labelled 'Caller', 'Consignee', 'Shipper', 'Sales', 'Collection Notes' and 'Credit Notation') displays. This window allows you to enter various Notes to be viewed depending on how the selected Customer is added to a Freight Bill (i.e., in the event they are chosen as a Caller, Consignee or Shipper).
This configuration option allows you to specify where the Notes entered on the 'Caller' sub-Tab of the Notes window will appear in the Customer Service program > Summary Tab > Notes button window when the selected Client is chosen (and has Notes in the 'Caller' sub-Tab, of course). This does not copy the Notes data from the CLIENT table to the TLORDER table, but simply displays the Note in the Billing Tab Notes window sub-Tab you specify. The available sub-Tab location options are as follows:
-
Blank: when set to blank, the Notes entered in the Notes window > Caller Tab are not viewable from the Customer Service program. This is the default for this config.
-
B: when set to 'B', the Notes entered in the Profiles Notes window > Caller Tab will be viewable on the 'Billing Tab' of the Notes window accessed by the 'Notes' button on the Customer Service program > Summary Tab.
-
C: when set to 'C', the Notes entered in the Profiles Notes window > Caller Tab will be viewable on the 'Container Tab' of the Notes window accessed by the 'Notes' button on the Customer Service program > Summary Tab.
-
D: when set to 'D', the Notes entered in the Profiles Notes window > Caller Tab will be viewable on the 'Driver Tab' of the Notes window accessed by the 'Notes' button on the Customer Service program > Summary Tab.
-
S: when set to 'S', the Notes entered in the Profiles Notes window > Caller Tab will be viewable on the 'OSD Tab' of the Notes window accessed by the 'Notes' button on the Customer Service program > Summary Tab.
-
O: when set to 'O', the Notes entered in the Profiles Notes window > Caller Tab will be viewable on the 'Other Tab' of the Notes window accessed by the 'Notes' button on the Customer Service program > Summary Tab.
-
W: when set to 'W', the Notes entered in the Profiles Notes window > Caller Tab will be viewable on the 'Write-Off Tab' of the Notes window accessed by the 'Notes' button on the Customer Service program > Summary Tab.
-
1: when set to '1', the Notes entered in the Profiles Notes window > Caller Tab will be viewable on the 'User1Tab' of the Notes window accessed by the 'Notes' button on the Customer Service program > Summary Tab.
-
2: when set to '2', the Notes entered in the Profiles Notes window > Caller Tab will be viewable on the 'User2 Tab' of the Notes window accessed by the 'Notes' button on the Customer Service program > Summary Tab.
-
3: when set to '3', the Notes entered in the Profiles Notes window > Caller Tab will be viewable on the 'User3 Tab' of the Notes window accessed by the 'Notes' button on the Customer Service program > Summary Tab.
CLIENT Journal-style 1 - CLIENT Journal Style 4
The following options will change the characteristic of the Notes window available via the Customer & Vendor Profiles program > Customer > Notes Tab > 'Customer Service Notes' button. When set to 'True', the following Tabs on the Notes window (here labelled 'Tab 1 - Tab 4') will be changed to 'Journal' styled Notes (every time a Note entry is added, it will be Date/Time stamped):
-
Tab 1: 'Caller' Tab
-
Tab 2: 'Shipper' Tab
-
Tab 3: 'Consignee' Tab
-
Tab 4: 'Sales' Tab
CLIENT Tab 1
This setting will set change the Tab Label of the 'Caller' Tab in the Notes window accessed by the Customer & Vendor Profiles program > Notes Tab > Customer Service Notes button. Default is Blank ("Caller").
CLIENT Tab 2
This setting will set change the Tab Label of the 'Shipper' Tab in the Notes window accessed by the Customer & Vendor Profiles program > Notes Tab > Customer Service Notes button. Default is Blank ("Shipper").
CLIENT Tab 3
This setting will set change the Tab Label of the 'Consignee' Tab in the Notes window accessed by the Customer & Vendor Profiles program > Notes Tab > 'Customer Service Notes' button. Default is Blank ("Consignee").
Client Tab 4
This setting will set change the Tab Label of the 'Sales' Tab in the Notes window accessed by the Customer & Vendor Profiles program > Notes Tab > Customer Service Notes button. Default is Blank ("Sales").
Consignee Notes
In Customer & Vendor Profiles program > Customer Tab, there is a button called 'View Notes'. When the User selects this button, a Notes window with six Tabs (labelled 'Caller', 'Consignee', 'Shipper', 'Sales', 'Collection Notes' and 'Credit Notation') displays. This window allows you to enter various Notes to be viewed depending on how the selected Customer is added to a Freight Bill (i.e., in the event they are chosen as a Caller, Consignee or Shipper).
This configuration option allows you to specify where the Notes entered on the 'Consignee' sub-Tab of the Notes window will appear in the Customer Service program > Billing Tab > Notes button window when the selected Client is chosen (and has Notes in the 'Consignee' sub-Tab, of course). This does not copy the Notes data from the CLIENT table to the TLORDER table, but simply displays the Note in the Billing Tab Notes window sub-Tab you specify.
The available sub-Tab location options are as listed for the 'Caller Notes' option (above).
Shipper Notes
In Customer & Vendor Profiles program > Customer Tab, there is a button called 'View Notes'. When the User selects this button, a Notes window with six Tabs (labelled 'Caller', 'Consignee', 'Shipper', 'Sales', 'Collection Notes' and 'Credit Notation') displays. This window allows you to enter various Notes to be viewed depending on how the selected Customer is added to a Freight Bill (i.e., in the event they are chosen as a Caller, Consignee or Shipper).
This configuration option allows you to specify where the Notes entered on the 'Shipper' sub-Tab of the Notes window will appear in the Customer Service program > Billing Tab > Notes button window when the selected Client is chosen (and has Notes in the 'Shipper' sub-Tab, of course). This does not copy the Notes data from the CLIENT table to the TLORDER table, but simply displays the Note in the Billing Tab Notes window sub-Tab you specify.
The available sub-Tab location options are as listed for the 'Caller Notes' option (above).
SVC_INCIDENT_INFO Tab 1 - SCV_INCIDENT_INFO Tab 5
These five options allows you to edit the labels of the Notes Tabs that appear in the Safety & Compliance program > Notes window (accessed via the 'Tools' menu and/or toolbar icon). Leave these options blank to maintain the default Tab labels.
TLORDER Journal-style 1 - TLORDER Journal-style 9
The following options will change the characteristic of the Notes window available via the Customer Service program > Summary Tab > Notes button. When set to 'True', the following Tabs on the Notes window (here labelled 'Tab 1 - Tab 9') will be changed to 'Journal' styled Notes (every time a Note entry is added, it will be Date/Time stamped):
-
Tab 1: 'Billing' Tab
-
Tab 2: 'Container' Tab
-
Tab 3: 'Driver' Tab
-
Tab 4: 'OSD' Tab
-
Tab 5: 'Other' Tab
-
Tab 6: 'Write-Off' Tab
-
Tab 7: 'User1' Tab
-
Tab 8: 'User2' Tab
-
Tab 9: 'User3' Tab
TLORDER Tab 1
This setting will set change the Tab Label of the 'Billing Tab' in any Notes window that pulls information from the NOTES Database Table. Text inserted into this setting will override the label 'Billing Tab' in the Notes window of applications such as Customer Service, Quick Bill Entry, and many others. Default is Blank ("Billing").
TLORDER Tab 2
This setting will set change the Tab Label of the 'Container Tab' in any Notes window that pulls information from the NOTES Database Table. Text inserted into this setting will override the label 'Container Tab' in the Notes window of applications such as Customer Service, Quick Bill Entry, and many others. Default is Blank ("Container").
TLORDER Tab 3
This setting will set change the Tab Label of the 'Driver Tab' in any Notes window that pulls information from the NOTES Database Table. Text inserted into this setting will override the label 'Driver Tab' in the Notes window of applications such as Customer Service, Quick Bill Entry, and many others. Default is Blank ("Driver").
TLORDER Tab 4
This setting will set change the Tab Label of the 'OSD Tab' in any Notes window that pulls information from the NOTES Database Table. Text inserted into this setting will override the label 'OSD Tab' in the Notes window of applications such as Customer Service, Quick Bill Entry, and many others. Default is Blank ("OSD").
TLORDER Tab 5
This setting will set change the Tab Label of the 'Other Tab' in any Notes window that pulls information from the NOTES Database Table. Text inserted into this setting will override the 'Other Tab' in the Notes window of applications such as Customer Service, Quick Bill Entry, and many others. Default is Blank ("Other").
TLORDER Tab 6
This setting will set change the Tab Label of the 'Write-Off Tab' in any Notes window that pulls information from the NOTES Database Table. Text inserted into this setting will override the label 'Write-Off Tab' in the Notes window of applications such as Customer Service, Quick Bill Entry, and many others. Default is Blank ("Write-Off").
TLORDER Tab 7
This setting will set change the Tab Label of the 'User1 Tab' in any Notes window that pulls information from the NOTES Database Table. Text inserted into this setting will override the label 'User1 Tab' in the Notes window of applications such as Customer Service, Quick Bill Entry, and many others. Default is Blank ("User1").
TLORDER Tab 8
This setting will set change the Tab Label of the 'User2 Tab' in any Notes window that pulls information from the NOTES Database Table. Text inserted into this setting will override the label 'User1 Tab' in the Notes window of applications such as Customer Service, Quick Bill Entry, and many others. Default is Blank ("User2").
TLORDER Tab 9
This setting will set change the Tab Label of the 'User3 Tab' in any Notes window that pulls information from the NOTES Database Table. Text inserted into this setting will override the label 'User1 Tab' in the Notes window of applications such as Customer Service, Quick Bill Entry, and many others. Default is Blank ("User3").
TRIPS Journal-Style
This setting, when set to 'True', enables Journal-styled (Date/Time stamped) Notes in the City Dispatch program > Trip List when using the 'Trip Notes' context menu option. When Notes are added to a Trip in the Trips List, you will see a 'Notes' icon in the lower-right section of the Trip’s detail box (next to the 'Terminal' designation). When set to 'False,' Notes are recorded without adding a Date/Time stamp. Default set at 'False'. With this option activated, an icon will now appear on the Trip grid if there are notes on a trip (notebook icon in lower-right corner). If the mouse is held over this icon, the notes will show up as the "hint", rather than the trip info.
VENDOR Journal-style 1 - Vendor Journal-style 3
These settings, when set to 'True' will set the three available Vendor Notes Tabs (in the Customer & Vendor Profiles program > Vendor > Tools Menu > Notes option, AP Inquiry program > Vendor Menu > Notes option, and the IP Audit > Vendor Grid > Notes option) to 'Journal' style, meaning that any notes entered on the Tabs will have a Date/Time stamp applied upon saving the Note records. If set to 'False', the Notes Tabs will behave as normal (simple text entry with no Date/Time information).
VENDOR Tab 1 - Vendor Tab 3
These settings control the text label of the three available Vendor Notes Tabs (in the programs described for the 'VENDOR Journal-style' options, above.) Enter any text string you would like to change the Tab labels to. If left at blank (default), the labels will appear as normal.
ORDERPREPRO.EXE - EDI Order Pre-Processor
Call AP DLL
This option, when set to 'True', will call any setup After Post DLL in your system. Default is set at 'False'.
Note Entry Style
This option controls how the Notes Tab (or Notes window if using 'Multiple' Note Style) is configured. Enter '0' for normal styled Notes (a simple text entry field) or enter '1' for Journal styled Notes, which include Date/Time and User entry information.
Note Style
This option controls how Notes are entered into the ORDERPREPRO.EXE application and what kinds of Notes can be entered. If you enter 'Single' here, Notes will be entered via the Notes Tab and will be the 'Type' of Note as dictated by the 'Notes Type' option below. If you enter 'Multiple' here, Notes will be entered via the Order Summary Tab > Notes button, and you can enter a variety of Notes on different Tabs, similar to the Customer Service program > Notes window.
Notes Type
This option sets the 'type' of the 'Notes' tab on the main program screen. Valid values are: B = Billing; C = Container; D = Driver; S = OSD; O = Other; W = WriteOff. Default is set at 'D'.
Post on Accept
When this option is set to 'True', the ORDERPREPRO.EXE application will post the displayed Freight Bill when the 'Accept' button is selected (saving the User a step).
Update By User
When set to 'True', this option will update orders only for the current user. Default is set at 'False'.
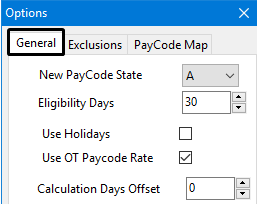
OTCALC.EXE - Overtime Calculator
Indicates this application configuration option can also be edited within the Overtime Calculator program using the Tools menu > Options > General tab.
| Option | Definition |
|---|---|
Days Offse |
The Overtime Calculator program works on a weekly basis, but this configuration allows you to specify which day of the week it starts on. 0 = Sunday, 1 = Monday, etc…
|
Eligibility Days |
The number of days from the hire date to qualify for Overtime eligibility. If a statutory holiday falls after this configuration value, the driver will get the statutory holiday.
Note: Only applies if 'Stat Worked OT Factor' configuration option is set to 0. |
Enable Logging |
Determines if the system will write to a log file when you save.
|
Generation Mode |
Determines the tables where the Overtime Calculator program will generate entries.
|
Join Employee Table |
Determines which TruckMate application will be used to obtain the daily/weekly hours considered as normal hours before overtime is applied. * True (default)
|
New Payment State * |
Indicates which status is considered a valid payment state. This is the status that generated DRIVERPAY records should be in to ensure the General Ledger is correctly updated. Values include:
|
OT Rate Formula |
Determines the formula by which the Overtime is calculated.
For example, if multiple DRIVERPAY records existed for a given day with one of more of them having a timestamp, the system will use the # of hours for the last entry of the day first, for the # of hours on that record. If there are more hours left, it will then use the next to last record for that # of hours, etc. If no entries for that day have a timestamp on it, it defaults back to the lowest rate worked. |
Stat Worked OT Factor |
Determines the overtime factor to be applied for time entered during a statutory holiday. For example, regular overtime may be paid out using a factor of 1.5 but time worked during a statutory holiday might be calculated using an OT factor of 2.5.
|
Use Holidays * |
This option is for future development and is not enabled yet. The system will currently always use Holidays as defined in the Codes Maintenance program.
|
Use OT Paycode Rate * |
This option is for future development and is not enabled yet. The system will currently always use the Overtime Paycode rate of 1.5.
|