EDI Audit

The intended purpose of the EDI Audit program is to allow changes to different status messages which have been placed on HOLD (See EDI Communication Manager) prior to releasing the information to your trading partner (customer / vendor). Under normal circumstances, status updates would flow freely from the order update through the EDI system to your trading partner. In some cases, such as late deliveries, or OSD issues, it may be desirable to verify the issue and usage of proper EDI codes prior to releasing the status update to your trading partner. In the case of short shipments or damage, the EDI Audit program gives the auditor a chance to review, verify, and enter the quantities affected. In the case of a late delivery, there may be issues where the load was in fact not late at all, or the reason the load was late needs to be entered along with the status update to the customer. In the case of payments the normal flow for payment records generated from the Check Register post through the EDI system to your trading partner. If you wish to verify payment records before they are sent, you can configure the 820 Outbound messages to be held in the EDI Communication Manager and then be audited and verified before sending.
The EDI Audit program is readily configurable to only view messages, which are on-hold for review (Default setting). Once the auditor is satisfied with the information’s accuracy, the 'hold' is released. The EDI Communication Manager program will now send the message with the next timed update. The EDI Audit program’s main purpose is to work with held messages and is strictly an optional program. If your situation is such that auditing messages for accuracy is not necessary, you may not require its use. If you have any status codes in the EDI Communication Manager set to other than Hold = 'Never', you will need to use and monitor the EDI Audit program. The only way to release a held message is through the use of the EDI Audit program.
To access EDI Audit:
| From this location | Go to |
|---|---|
TruckMate Menu and TruckMate Task List |
EDI > EDI Audit |
Windows Start Menu |
TruckMate 20xx > EDI Audit |
Windows Explorer |
C:\Program Files (x86) > TruckMate 20xx > EDIAudit.exe |
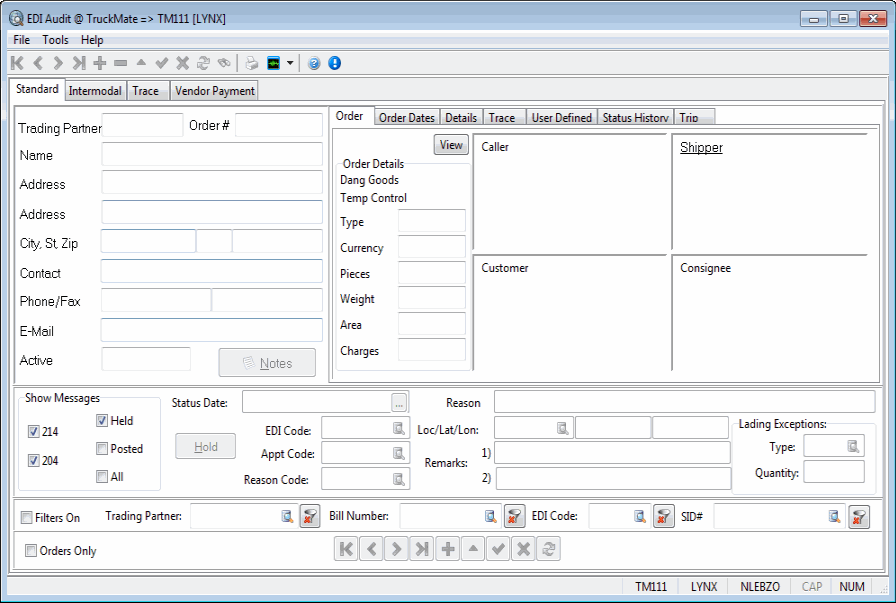
Ensure you have completed the steps shown in the EDI Audit program overview in order to view data in the EDI Audit header section. Header and Footer information for the main screen of the EDI Audit program are shown below.
The EDI Audit program screen is broken into three parts: trading partner information, EDI message information, and the tabbed areas of Order, Order Dates, Details, Trace, User Defined, Status History, and Trip. The header area will itemize and define the trading partner information and EDI message information areas. Separate online help topics are available for each of the tabbed items.
The EDI Audit program has been expanded to include Intermodal functions, which can be accessed by selecting the Intermodal Tab option at the top of the window. It has also been expanded to include Trace functionality for all EDI message types. See the Trace Tab, below, for more information.
How Do I?
How do I Edit an On-Hold 214 EDI Outbound Message?
-
Open the EDI Audit program (EDIAUDIT.EXE).
-
Go to the Filter section and select all filters on-hold. The reason this message has been placed on-hold might be if this load was delivered late. This allows the operator to see a brief description of why the load is late, and he might contact the driver to find out why he’s late, or contact dispatch to notify the customer. These descriptions would all be configured in the EDI program.
-
The bottom grid shows all of the on-hold messages. The top area shows the description of the on-hold. In the center section of the screen, there are a few areas you’re able to edit. These are: the status date and time, the EDI code, the appointment code, the reason code, and the lading exception code. You can also edit the location of where the status occurred, the latitude and longitude, and you can add in free-form remarks (depending on the version the trading partner has installed).
How do I Resend a 214 Freight Status message?
-
Open the EDI Audit program (EDIAUDIT.EXE).
-
Check the 'Filters On', select the particular 'Trading Partner' (use the search button menu), select the 'Bill Number (use the search button menu), and in the 'Show Messages' section, select: 'All'.
-
The freight bills status will show up in the bottom of the screen
-
Locate the particular status you would like to resend. Access the Context Menu (right-click) on the status and select the 'Toggle Posted Status' option. This will set the 'Posted' status to 'False' from 'True' and will force the message to be resent the next time that the EDI Communications Manager program is run.
-
You will need to repeat this process for all the 214 Status messages you want to resend.
EDI Audit setup and configuration
The EDI Audit program deals with EDI messages . For information to appear in the EDI Audit program, you have to have a few items set up:
-
In the EDI Communication Manager program, you must have a trading partner set up for the status messaging type you want to use, and that trading partner must be marked as 'Active'.
-
At least one rule must be set up for the type you want to use.
-
At least one 'Status Code' must be set up.
-
If the rules apply, an entry is added to the appropriate staging table (EDI_PENDING or EDI_208_PENDING).
-
The EDI Audit program reads from the staging tables.
For DB2: EDI Communication Manager needs to be running before any staging table can be updated.
Here’s how it works: You prepare a Freight Bill in Customer Service, and every time you perform a status update in Customer Service (and you have a matching Status Code in the EDI Communication Manager), then you should be able to see your trading partner in the EDI Audit program. If you have completed the above steps, then when you first open the EDI Audit program, draw your eye to the bottom grid. Highlight one of the items shown there, and all relevant information pertaining to that item will appear in the top portion of the program. If you’re interested in viewing the 'On Hold' messages only, select that checkbox. Or, if you’re interested in viewing 'Posted' messages only, select that checkbox. You would only use the 'Posted' information if you wanted to re-send messages.
If the EDI Communication Manager program is running, information won’t stay long in the EDI Audit program.
Menu Bar / Toolbar
Multi-Company
For more information on the Multi-Company options available from the Menu Bar, see the Multi-Company documentation.
Tools Menu
TruckMate Monitor
![]() Click the down arrow next to this button to access the various functions of the new TruckMate Monitor.
Click the down arrow next to this button to access the various functions of the new TruckMate Monitor.
Remember Position / Size
Selecting this option will maintain the program window position and size upon close. When the program is re-opened, it will appear the same.
Help Menu
TruckMate Help
![]() Selecting this button will open the EDI Audit topic in the TruckMate Online Help file (the page you are currently viewing).
Selecting this button will open the EDI Audit topic in the TruckMate Online Help file (the page you are currently viewing).
Service Portal
![]() Selecting this button will open an instance of your default Internet browsing software, with the https://www.tmwcare.com login page displayed.
Selecting this button will open an instance of your default Internet browsing software, with the https://www.tmwcare.com login page displayed.
About
![]() Selecting this button will open the standard TruckMate About window, which contains important information about the application you are currently using, including its version number (important for support calls).
Selecting this button will open the standard TruckMate About window, which contains important information about the application you are currently using, including its version number (important for support calls).
Standard Tab
Trading Partner Information
Trading Partner
Auto-populated information based on the Client Profile.
Order #
Auto-populated information based on the Client Profile.
Name
Auto-populated information based on the Client Profile.
Address:
Auto-populated information based on the Client Profile.
City, St., Zip
Auto-populated information based on the Client Profile.
Contact
Auto-populated information based on the Client Profile.
Phone/Fax
Auto-populated information based on the Client Profile.
Auto-populated information based on the Client Profile.
Active
Auto-populated from the EDI Communication Manager program > 214 Tab.
Notes
This is the same option as in Customer Service displaying the notes for the order. Notes may be viewed, entered, and modified from within EDI Audit program. The notes are the only item other than the EDI status message, which can be modified in EDI Audit program.
EDI Message Area
The EDI Message Area contains options and fields that allow you to view and control the content of your EDI Messages.
Held
Depending on the timing, you will seldom catch a glimpse of '214' messages not on hold. Once the held '214' message is validated and checked for accuracy, the hold is removed by un-checking this box. Here’s the basis of the EDI Audit program- it’s an optional program allowing editing of the '214' EDI outbound messages, which have been placed on 'HOLD', prior to releasing the message to the trading partner. Messages involving service failures can optionally be placed on 'HOLD'. A customer service agent can then investigate and qualify the '214' EDI status message with the proper (reason) codes.
Reason
Displays a textual abbreviated reason offering why the EDI Communication Manager program put the message on hold.
Example:
Status Change Date [3-MAR-2002 17:05:] > DELIVER_BY_END [2-MAR-2002 17:00].
This means the load was delivered late. The load was supposed to be delivered no later than 5:00 pm on March 2. The load was actually delivered a full 24 hours later at 5:05 pm on March 3. It’s now up to the EDI auditor to determine if this was a data entry mistake and correct the delivery information before releasing it, or perhaps qualify the late delivery with an appropriate reason code before releasing the message from being held.
Status Date
This is the date applicable to the status change being sent to the trading partner. It is usually the date and time the status change occurred, but it may be another date/time purpose such as an appointment date/time for pick up or delivery.
Show Messages
Allows you to select the regular EDI messages, or the ones on-hold, or posted.
Hold
Select this option if you wish to view messages currently on-hold.
Posted
Select this option if you wish to view posted messages.
EDI Code
Select the search button and you’ll see a list of EDI Codes. Select the appropriate EDI Code.
| Only codes configured for this trading partner will be listed as configured in EDI Communication Manager program’s 214 EDI Tab, EDI Status Codes grid. The code may also be entered in free format if required. |
Appt. Code
Select this option if you wish to add an appointment code to this message. Simply select the search button and a list of available appointment codes will appear. Ensure no characters are present in the filter field.
Reason Code
If you have imported EDI Reason Codes into your EDI Communication Manager, a list of selections will appear here.
| Only codes configured for this trading partner will be listed as configured in EDI Communication Manager program’s 214 EDI Tab, EDI Status Codes grid. The code may also be entered in free format if required. |
Loc / Lat / Lon
Location information as per your zone codes. Latitude and longitude as per your zone code setup.
Remarks
Fields offering a place for relevant remarks.
| In most EDI '214' versions, there is an option to send two short text messages with the status update. |
Lading Exceptions
Allows you to enter Exception Codes, and a particular quantify.
Type
Select the search button to view potential Exception Codes.
Quantity
Enter the quantity in the field provided.
Filters On
You may wish to set particular filters for certain trading partners. Selecting this option will enable this filter feature.
Trading Partner
Select the search button to see a list of available trading partners. Use the 'Clear' button to the right of the search button, if you’ve mistakenly selected an incorrect trading partner.
Bill Number
Select the search button to see a list of Freight Bills. Use the 'Clear' button to the right of the search button, if you’ve mistakenly selected an incorrect Freight Bill.
EDI Code
Select the search button to see a list of available EDI Codes. Use the 'Clear' button to the right of the search button, if you’ve mistakenly selected an incorrect EDI Code.
Orders Only
When checked, this feature, disables all screen items and allows searches on all Freight Bills. Plus, this option gives the ability to display a Freight Bill which normally cannot be located in the EDI Audit program due to no EDI status history. Once located, on the Freight Bill status tab, an EDI status entry in can be created manually.
Find Order
Brings up the 'Find Freight Bill' dialog box where you can search using a variety of methods.
Navigation Bar
Use the scrolling buttons to navigate through the EDI Audit records.
Grid Details
All of the fields in the EDI Message Area Grid are auto-populated based on the EDI message information.
Context Menu
Assign Lat/Lon
Assigns the Latitude and longitude for this zone '*.DBB' performs a look up of the zone and retrieves the specified latitude and longitude for the zone code.
View Freight Bill
Opens the Customer Service program with the details of the selected Freight Bill displayed.
Toggle Posted Status
Select this option if you wish to change this message from the default Posted status of 'False' to 'True' meaning that this message will now be posted and re-sent. You will receive a confirming message on-screen.
Toggle Held Status
Select this option if you wish to change the 'Held' status from 'False', which is the default, to 'True' which would place this EDI message on hold.
Detail Tabs
Order Tab
All of the information on the Order Tab is taken from the Customer Service program and is available in condensed format here in the EDI Audit program.
View
Selecting this button will bring you to this Freight Bill in the Customer Service program.
Order Details
Auto-populated based on the Customer Service program information. 'True' or 'False' will display next to 'Dang Goods' and 'Temp Control' if they meet these criteria, and the fields below will populate with values based on the information passed from Customer Service.
Caller
Auto-populated based on the Customer Service program information.
Shipper
Auto-populated based on the Customer Service program information.
Customer
Auto-populated based on the Customer Service program information.
Consignee
Auto-populated based on the Customer Service program information.
Order Dates Tab
All information on the Order Dates Tab is taken from the Customer Service program and is available in condensed format here in the EDI Audit program. The purpose of this tab is to present all date-specific items on one tab to make it easier to determine if there were any problems with the delivery or pick up dates
Details Tab
The Details Tab automatically populates with the Freight Bill Detail Line details from the Customer Service program.
Trace Tab
The Trace Tab displays the Trace numbers associated with the Freight Bill. Trace Types are set up in the Codes Maintenance program > Trace Number Types Tab.
User Defined Tab
The User Defined Tab will display all data entered into the User Defined fields of the Customer Service program > User Defined Tab. You have the ability to edit the values contained in these fields by selecting the 'Edit' button at the bottom of the Tab window.
Status History Tab
All information on the Status History Tab is taken from the Customer Service program > Status Tab and is available in condensed format here in the EDI Audit program.
Current Status
Highlight one of the records in the grid and the current status of that record will appear in this box.
Add New Status
Select the search button to view status' option for this Freight Bill.
-
EDI Status Code
Select the search button to review status codes entered on your system.
-
Effective Date
Double-click to bring up a calendar. Scroll to the desired date.
-
Comment
Enter any relevant comments in the field provided.
| A valid order must be displayed prior to selecting this option. If you have the 'Orders Only' checkbox selected (located in the bottom part of the screen lower left corner) you may get a message saying 'This order does not quality for EDI '214' status updates'. This means that the order selected does not have a '214' EDI Communication Manager program trading partner associated with it and so adding a status here would have no effect. |
Intermodal Tab
Trading Partner Information
The Trading Partner Header section is very similar to the one used in the Standard Tab of the EDI Audit program, with the exception of the Filter options within the 'Show Messages' section near the bottom. Instead of having options to view the '214' and '204' EDI Messages, there are options to view Intermodal 'InGate' and 'OutGate' messages.
Intermodal Message Area
The Intermodal Message Area contains several options for Filtering and controlling your Intermodal EDI Messages.
Filters On
Check this box to apply the Filters chosen in the Trading Partner Header to the Intermodal Messages within your system. If this box is unchecked, no Filters will be applied (all Intermodal Messages will be displayed).
Trading Partner
Displays the Trading Partner ID being used to Filter the Messages in the bottom Grid. Clicking the search button will open a form where you may search the Trading Partners set up on your system. The button to the right of the search button will clear the current Trading Partner ID from the Filter box.
Control Number
Displays the Control Number being used to Filter the Messages in the bottom Grid. Clicking the search button will open a form where you may search the Control Numbers set up on your system. The button to the right of the search button will clear the current Control Number from the Filter box.
Grid Details
Control Number
Displays the Control Number of the Intermodal Message.
In / Out Gate
Displays either 'InGate' or 'OutGate', depending on the type of Intermodal Message.
In / Out Date
Displays the Date associated with the Intermodal Message of the current Detail line.
Held
Displays 'True' or 'False' depending on the 'Held' status of the current Intermodal Message.
Posted
Displays 'True' of 'False' depending on the 'Posted' status of the current Message.
Comments
Displays any Notes associated with the current Intermodal Message.
Intermodal Tabs
The Intermodal Tabs within the EDI Audit program will populate with data from the Intermodal Container Inventory Control program.
Container Tab
The Container Tab will automatically populate with data from the Container Inventory program For more information on the specific fields within this Tab, see the Container Inventory Control program.
Chassis Tab
The Chassis Tab will automatically populate with data from the Container Inventory program For more information on the specific fields within this Tab, see the Container Inventory Control program.
Driver Tab
The Driver Tab will automatically populate with data from the Container Inventory program For more information on the specific fields within this Tab, see the Container Inventory Control program.
Misc Tab
The Misc Tab will automatically populate with data from the Container Inventory program For more information on the specific fields within this Tab, see the Container Inventory Control program.
User Defined Tab
The User Defined Tab will display all data entered into the User Defined fields of the Container Inventory Control program, which are stored in the CD_INGATE_OUTGATE Table.
User Field 1 - User Field 10
If no data exists in the CD_INGATE_OUTGATE Table, you may enter the information in these fields using your keyboard. You have the ability to edit the values contained in these fields by selecting the 'Edit' button at the bottom of the Tab window.
Select the 'Checkmark' button to save any modified data.
Trace Tab
Trace Tab support logistics EDI functionality. As Inbound data from outside Carriers can easily be lost due to mismatched or unexpected data, the Tracing features available on the Trace Tab provide visibility for ALL transactions (Inbound and Outbound,) not just for Logistics purposes, but for all EDI transactions.
The EDI Audit program’s Trace Tab has been designed to function similar to the Trip Tracer program. For a general overview of using the EDI Audit program > Trace Tab, Users should view the help for the Trip Tracer program. The major difference between the two programs is that the EDI Audit program’s Trace functionality will facilitate reporting of the EDI_AUDIT and EDI_AUDIT_FA Tables. Each time a regular EDI transaction occurs, an entry is inserted into EDI_AUDIT, and each time a functional acknowledgement is generated (or received,) an entry is inserted into EDI_AUDIT_FA. As the 997 relates to an original EDI tx set, there is a link between the EDI_AUDIT_FA record and the EDI_AUDIT record.
Running Traces
To create a Trace, simply select the checkboxes of the filtering values you wish to use ('Trading Partner', 'EDI Type', and so on). Once you have specified any number of Trace filters, select the 'Run Trace' button. EDI records that match the filtering criteria will be displayed in either the 'EDI History' or '997 Functional Acknowledgements' grids, depending on the type of EDI they are.
997 Only
Flagging this option will limit the Trace to only 997 Functional Acknowledgement messages.
Vendor Payment Tab
This tab is to provide the user with the ability to check and audit the outbound payment messages made through the EDI 820 outbound messaging before they are actually sent, the user can select a setup option in the EDI Communication Manager program to set all EDI 820 outbound messages to 'Hold' in which case no messages will be sent except the ones audited and approved through the EDI Audit program.
Trading Partner
Auto-populated information based on the Vendor Profile.
Name
Auto-populated information based on the Vendor Profile.
Address:
Auto-populated information based on the Vendor Profile.
City, St., Zip
Auto-populated information based on the Vendor Profile.
Contact
Auto-populated information based on the Vendor Profile.
Phone/Fax
Auto-populated information based on the Vendor Profile.
Auto-populated information based on the Vendor Profile.
Active
Auto-populated from the EDI Communication Manager program > 820 Tab.
Hold
This button toggles the 'Hold' status between 'Hold' and 'Release', to resend a message that was put on-hold select the desired on-hold message and click the hold button, the next time the EDI Communication Manager program runs the message will be resent.
Payment Details
Total Amount
This is the total amount of all payment transactions displayed in the payment details section for the selected vendor ('Trading Partner'), this will be populated automatically when the transactions are displayed.
Bank
This the bank used for making the displayed payments.
Payment Details Grid
This grid contains information populated from the APNI.exe Payment Details Grid.