GL Distribution


The information in these topics applies to the following Accounting and Finance applications:
-
Accounts Payable
-
General Ledger
-
Interline Payables
GL Distribution Setup allows you to create 'Distribution Codes' that represent a set of General Ledger accounts that constitute a distribution profile. The purpose of the distribution profile is to provide a default set of accounts to designate portions of A/R or A/P billings to. This apportioning of the charges on billings is called a distribution. All A/R and A/P billings, if they are to be posted into the TruckMate accounting system, must have a balanced GL distribution showing the entries to an appropriate A/R or A/P control account and revenue or expense accounts.
In a Multi-Company scenario, you can create a variety of Distribution Codes that will tie to the different Company Entities that make up your corporate organizational structure.
The program screen offers information on four main Tabs: Billing, Accounts Payable, Fuel Import Distribution and GL Reset.
-
The Billing Tab allows users to configure distribution codes to be used for TruckMate accounting, or distribution codes to be used if the freight bill is exported to a 3rd party accounting system.
-
The Accounts Payable Tab allows users to create distribution codes to be used when expensing foreign exchange in vendor billings.
-
The Fuel Import Distribution Tab allows users to create distributions codes to be used in the Fuel Card Data Import program.
-
The GL Reset Tab allows for the entry of the User Defined GL Reset rules.
To access GL Distribution:
| From this location | Go to |
|---|---|
TruckMate Menu and TruckMate Task List |
Accounting & Finance > General Ledger > GL Distribution |
Windows Start Menu |
TruckMate 20xx > GL Distribution |
Windows Explorer |
C:\Program Files (x86) > TruckMate 20xx > Bildist.exe |
How Do I?
How do I Configure GL Posting References?
Multiple codes can be set up and applied to your customers. Also, you have the ability to split the freight revenue between several GL revenue accounts on a percentage basis.
-
Open GL Distribution.
-
Use the "+" button on the navigational bar to enter a new GL Setup Code.
-
Type in a name for your GL Setup Code.
-
Enter the appropriate GL accounts each items will be distributed to (distribution can be viewed in the Customer Service program, GL tab and will be based on the Bill-To Customer).
-
Press "Save" or the "checkmark" button on your navigational bar to apply this code to the Customer in the Customer and Vendor Profiles program, Billing Tab.
-
The Code specified as 'Default' will be used for any Customers that do not have an alternate Code entered in their Profile.
Menu and toolbar options
This topic describes menu and toolbar options and functionality that are specific to the GL Distribution window.
For information about common menu and toolbar options (i.e. File menu, Refresh, Multi-Company, etc.), see General menu and toolbar options in TruckMate basics.

Billing Tab
The TruckMate Accounting tab must be set up if the TruckMate General Ledger module is being used. The Third Party tab must be set up if a third-party accounting package, such as TruckMate Legacy or Great Plains, is being used. Postings for third party accounting packages are created on the Customer Service program > 3rd Party GL Tab.
Distribution Code
You can configure multiple distribution codes, but each code must be unique. When you set up a customer in the Customer & Vendor Profiles program, you may select any Distribution Code configured in GL Distribution, or you may leave the field blank to use the Default Code.
Default Code
Only one code can be flagged as the Default Code by checking this box. This is the "standard" distribution code which will be used for those customers where you do not assign a GL Distribution Code in the Customer & Vendor Profiles program.
Description
This field is used for reference and reporting purposes only, and is not used elsewhere in the system.
Third Party Accounting Tab
Unlike the fields in the TruckMate Accounting Tab, the fields on the Third Party Accounting Tab may be left blank if not required. Because these fields are only referenced if the freight bill is exported to a 3rd party accounting system, there is no validation on the values entered. You must ensure they correctly match the codes in your accounting system.
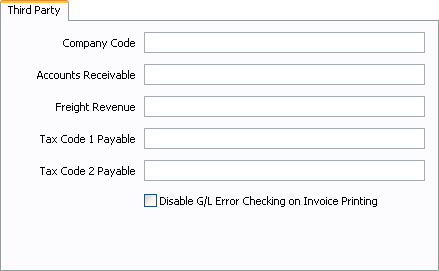
Company Code
This value is only used by your 3rd party accounting system and not by TM4WIN accounting. If one is required, enter the Company Code here. This code will display on the Customer Service program > 3rd Party GL Tab.
Accounts Receivable
Enter the general ledger account code that is used by the 3rd Party package as the Accounts Receivable control account.
Freight Revenue
Enter the general ledger account code that is used by the 3rd Party package as the Freight Revenue account. Note, there is no option here for splitting the revenue entry to different accounts.
Tax Code 1 Payable / Tax Code 2 Payable
As above, enter the general ledger account code that is used by the 3rd Party package as the Tax Code 1 or 2 payable account. For example, in the Tax Calculation Configuration program, if you have configured Tax Code 1 to be GST, enter the 3rd Party package’s account code for the GST payable account.
Disable G/L Error Checking On Invoice Printing
This flag references a function in the Invoice Printing program which prevents freight bills from being printed if the GL distribution is missing or out of balance.
The option is intended for customers that do not use TruckMate Accounting for their billing, and don’t want to bother setting up proper GL distributions/accounts. Under normal circumstances (option is OFF/unchecked), a bill will not print or post if it is out of balance (the result of BILLGL_IS_BALANCED- which you can see in the Customer Service program > Billing Tab). Turning this option ON/checked will effectively mark every bill as successfully balancing, whether it does or not.
| If any of the fields on the TruckMate Accounting Tab are populated, the user will not be able to select this flag, as it will cause the TruckMate GL to become out of balance. |
TruckMate Accounting Tab
Each of the fields displayed in the TruckMate Accounting Tab must have a valid account number. This is the case even if no tax, interline charges, or foreign exchange is to be processed in the system. If you are familiar with your chart of accounts, you may key the account codes in manually, or you double-click on the field to open a search form to find an appropriate account code.
Freight Revenue
The credit amount posted to freight revenue (or debited, in the case of "Void" bills) is the sum total of the charges on the freight detail lines. This value is displayed as 'Charges' in the Customer Service program > Billing Tab.
Split
Freight revenues can now be split between more than one account. If this box is checked, you must supply a valid split code representing the one or more accounts the revenue is to be divided among. These split codes are created in Codes Maintenance program > GL Splitting Tab.
Tax Code 1 Payable / Tax Code 2 Payable
If taxes are to be paid based on the freight charges, the total tax to be paid to tax codes 1 or 2 will be assigned to these accounts. These values are displayed as Tax - 1 & 2 in the Customer Service program > Billing Tab.
A/R Foreign Exchange
When a freight bill is entered in a currency that differs from the base currency unit (See the Codes Maintenance program), a GL posting is created that accounts for the exchange (based on the exchange factor specified in the GL Chart of Accounts program). Enter the account for the foreign exchange posting in this field.
Interline Expense
A debit posting for a bill’s interline charge is made to the account specified in this field.
IP Foreign Exchange
If the currency of an interline charge on a freight bill differs from the base currency unit in the Codes Maintenance program, a GL posting is created that accounts for the exchange (based on the exchange factor specified in the GL Chart of Accounts program). Select the account for the posting in this field. Double click for a code selection form.
Protected Revenue
When the charges from your interline vendor are passed onto your customer without discount, the interline carrier’s charges are said to be protected. This amount is usually posted to a separate revenue account since they are not true revenue, but will be passed to the vendor. Interline Charges can be reviewed on the Customer Service program > IP Tab, or in the Billing Tab charges as Interline.
Accounts Payable Tab
The Accounts Payable Tab refers only to TruckMate accounting; there is no export of Accounts Payable data to third party packages. The Foreign Exchange account specified on the Accounts Payable tab of GL Distribution is used by the A/P Invoice Entry program to automatically post foreign exchange amounts. For example, an invoice for $100.00 received from a US vendor might convert to $130.00 in Canadian funds, depending on the currency rate specified in the GL Chart of Accounts program. The Foreign Exchange account specified will determine which account is credited with the $30.00 exchange amount when the invoice is posted (the expense account selected would be debited $130.00, while the US control account is credited $100.00)
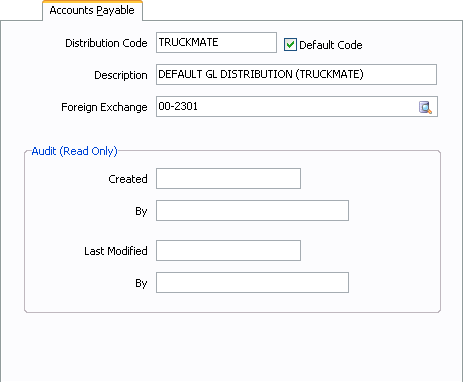
Distribution Code
You can configure multiple distribution codes, but each code must be unique. When you set up a vendor in the Customer & Vendor Profiles program, you may select any Distribution Code configured in GL Distribution, or you may leave the field blank to use the Default Code.
Default Code
Only one code can be specified as the Default Code using this flag. This will be the "standard" distribution code used in those cases where you do not specify a GL Distribution Code for a vendor in the Customer & Vendor Profiles program.
Description
The code description is displayed in the Distribution Code field on the Vendor tab of the Customer & Vendor Profiles program.
Foreign Exchange
When an invoice is entered in the A/P Invoice Entry program in a currency that differs from the base currency unit in the Codes Maintenance program, a GL posting is created that accounts for the exchange (based on the exchange factor specified in the GL Chart of Accounts program). Enter the account for the posting in this field. Double click for a code selection form.
Audit
The Audit section contains read only information generated when you edit the current GL account.
Fuel Import Distribution Tab
The Fuel Import Distribution Tab is used to set up standard distribution codes that can be utilized in the Fuel Card Data Import program. Now, you don’t have to use the usual method of specifying a GL Accounts and Driver Deduction code in the Fuel Card program for the entire batch of fuel cards.
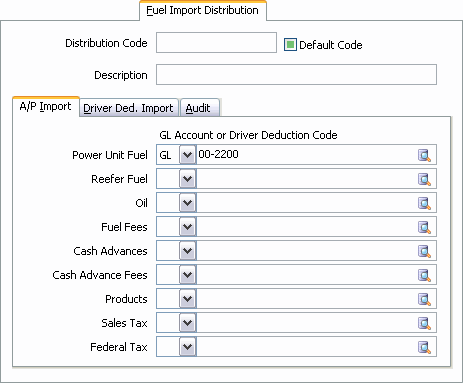
Distribution Code
You can configure multiple distribution codes, but each code must be unique. When you set up a customer in the Customer & Vendor Profiles program, you may select any Distribution Code configured in GL Distribution, or you may leave the field blank to use the Default Code.
Default Code
Only one code can be flagged as the Default Code by checking this box. This is the "standard" distribution code which will be used for those customers where you do not assign a GL Distribution Code in the Customer & Vendor Profiles program.
Description
This field is used for reference and reporting purposes only, and is not used elsewhere in the system.
A/P Import Tab
In TruckMate 20xx you can specify if you are using a GL Account (for an expense) or a Driver Deduction Account (for a driver deduction) by choosing either 'GL' or 'DD' from the pull-down menu field next to the account selection field.
Also, the 'Custom' field has been removed as per 8.0, and the 'Tax 1' and 'Tax 2' fields have been renamed 'Sales Tax' and 'Federal Tax', respectively.
Power Unit Fuel
Enter the general ledger account code that is used by Fuel Card as the A/P 'Power Unit Fuel' account.
Reefer Fuel
Enter the general ledger account code that is used by Fuel Card as the A/P 'Reefer Fuel' account.
Oil
Enter the general ledger account code that is used by Fuel Card as the A/P 'Oil' account.
Fuel Fees
Enter the general ledger account code that is used by Fuel Card as the A/P 'Fuel Fees' account.
Cash Advances
Enter the general ledger account code that is used by Fuel Card as the A/P 'Cash Advances' account.
Cash Advance Fees
Enter the general ledger account code that is used by Fuel Card as the A/P 'Cash Advances Fees' account.
Products
Enter the general ledger account code that is used by Fuel Card as the A/P 'Products' account.
Sales Tax / Federal Tax
Enter the general ledger account code that is used by Fuel Card as the A/P 'Sales Tax' and 'Federal Tax'.
Discount/Rebates
Enter the general ledger account code that is used by Fuel Card as the A/P 'Discount or Rebates'
Driver Deduction Import Tab
Power Unit Fuel
Enter the general ledger account code that is used by Fuel Card as the Driver Deductions 'Power Unit Fuel' account.
Reefer Fuel
Enter the general ledger account code that is used by Fuel Card as the Driver Deductions 'Reefer Fuel' account.
Oil
Enter the general ledger account code that is used by Fuel Card as the Driver Deductions 'Oil' account.
Fuel Fees
Enter the general ledger account code that is used by Fuel Card as the Driver Deductions 'Fuel Fees' account.
Cash Advances
Enter the general ledger account code that is used by Fuel Card as the Driver Deductions 'Cash Advances' account.
Cash Advance Fees
Enter the general ledger account code that is used by Fuel Card as the Driver Deductions 'Cash Advance Fees' account.
Products
Enter the general ledger account code that is used by Fuel Card as the Driver Deductions 'Products' account.
Sales Tax / Federal Tax
Enter the general ledger account code that is used by Fuel Card as the A/P 'Sales Tax' and 'Federal Tax'.
Discount/Rebates
Enter the general ledger account code that is used by Fuel Card as the A/P 'Discount or Rebates'
GL Reset Tab
The GL Reset Tab allows for the creation of GL Reset rules that allow you to setup the automatic substitution of entire GL Accounts (or specific digits in the various segments that make up a GL Account) when certain user-defined conditions are met. The user can enter (per 'Account Type' [i.e. 'Revenue', 'Expense' or both]), any number of rules to specify what is to trigger the GL Reset, and which characters in the GL Account should be replaced (and with what data, etc.). These GL Reset rules can be defined on a per-Company basis.
When the Application Configurator program > BILDIST.EXE > 'Enable GL Reset' option is set to 'True', the GLDIST_BILLINGCUR procedure will determine the GL Distribution according to the user definable GL Reset rules that have been setup on this Tab, with allowance for custom hooks (for overriding GL Distribution Codes) or GL Splitting definitions.
| The Data entered into the GL Reset Tab is stored in the GL_RESET Table. |
Auditing View / Filter
At the top of the GL Reset Tab, there is a radio button group with 3 choices: 'Active', 'Deleted', and 'History'. Active is the default. It is to be used for all data entry: the insert, edit, and delete buttons will be disabled if 'Active' is not selected.
When you delete a row (with filter=Active), the row will disappear from the screen. However, it is not actually deleted; rather, it is only flagged as deleted. To see if there are any rows that were previously "deleted", set the filter to 'Deleted'. There are 2 new columns showing who deleted the row and when ('Deleted On/By'). Remember, you must change the filter back to 'Active' to do any data updates.
Whenever you insert a new row, a new column, 'Revision', is set to '1' and two new columns 'Last Modified By' and 'Last Modified' are set to your login user ID and current date/time.
When you edit and save changes to an existing row, the revision column increments. The 2 new "last modified" columns are also updated. It appears like you over-wrote the row as the number of rows in the grid is unchanged. However, what actually happened is that a copy of the row before your changes was created in the table. It was stamped with status = "Modified" so it does not show up in the grid with the filter set to Active.
To view the history of changes to a row (only really useful if the revision number is not 1), select the row you want to see the history for (if it is for a deleted row, first set filter to 'Deleted' so you may select the desired row) and set the filter to 'History'. The grid will then show all the entries for the selected ID- in other words, a history of all changes made to the row. Only the last one will be 'Active' (or 'Deleted'); all prior ones will be show status = Modified. The 'Last Modified' fields for the first revision row shows who originally created the entry (and when). All subsequent rows show who made changes to the row (and when). You may scroll over to the right and then up/down in the grid and visually see which field or fields were changed (when and by whom).
All six new columns ('Revision', 'Status', 'Modified On/By', and 'Deleted On/By'), as well as the 'ID' column (which is not a new field but was not previously displayed in the grid) are read-only (you cannot make changes to them).
| All the logic for this feature is done within the application, not by schema (triggers). So, any changes done via the SQL Execute program will not retain the history (i.e. if you delete a row via SQL, it really is deleted, and if you update a row via SQL, no row is inserted to show what the row looked like before your changes). |
GL Reset Grid
Group
The 'Group' field is used to assign a numeric value to the GL Reset rule, starting with '1'. Users can leave gaps between Group numbers for ease of future insertions. Typically- though not necessarily- Groups correspond with your GL Segments, so all rules that are used in the setting of any given segment would all contain the same Group.
Sequence
Assign a numeric value to the GL Reset rule, restarting with '1' when beginning a new Group of rules. User can leave gaps between the sequence numbers for ease of future insertions.
Account Type
This field is used to isolate rules to certain types of accounts. If rule applies to more than one type, you can opt to separate each value with a comma or not (i.e. 'R,C,P' or 'RCP'). By omitting the comma, you can have a maximum of 30 account types per rule.
Type 'C' and 'X' were created to distinguish the two revenue types from each other and the two expense types from each other. This change has not impacted the BILLGL.ACCT_TYPE though. This allows GL Rules against any of the BILLGL Account Types as well as the Accounts Payable Control account (automatically assigned in the Customer Service program but applied in the Interline Payable Audit program).
|
See the following table for the Account Type of the available GL Accounts:
| Account Description | TABLE.COLUMN UPDATED | BILLGL.ACCT_TYPE | GL_RESET.ACCT_TYPE |
|---|---|---|---|
Accessorial Charge Revenue |
R |
C |
|
Accounts Payable Control |
ORDER_INTERLINER.AP_CONTROL_ACCT |
D |
|
Accounts Receivable Control |
A |
A |
|
COD Receivable |
L |
I |
|
COD Payable |
L |
J |
|
Driver Pay Expense * |
E |
M |
|
Driver Pay Control * |
K |
K |
|
Freight Revenue |
R |
R |
|
Foreign Exchange (Driver Pay Expense) * |
F |
N |
|
Foreign Exchange (Freight & Acc Charge Revenue) |
F |
F |
|
Foreign Exchange (Interline Expense) |
F |
B |
|
Foreign Exchange (Interline Acc Charge Expense) |
F |
G |
|
Interline Accessorial Charge Expense |
ACHARGE_INTERLINER.AINT_ADJ_EXPENSE_ACCT |
E |
X |
Interline Expense |
ORDER_INTERLINER.INT_EXPENSE_ACCT |
E |
E |
Interline Payable Control |
ORDER_INTERLINER.INT_PAYABLE_ACCT |
L |
L |
Protected Charge Revenue |
R |
P |
|
Supplier GL |
S |
S |
|
Tax 1 |
1 |
1 |
|
Tax 2 |
2 |
2 |
* Applies only when the Application Configurator program > BILLBR.EXE > 'Post Drv Pay Now' option is set to 'True'.
Trigger Type
Select the origin of the Trigger Item (i.e. according to what type of field does the user wish to use when checking for any GL Account segment(s) requiring substitution). The valid values are as follows:
| Trigger Type | Short Description | Long Description |
|---|---|---|
TDF |
TruckMate Defined Field |
A Table/column in TruckMate |
CDF |
Custom Defined Field |
A Table/column in Custom Defined Fields |
IDB |
ID Based |
A Table/column in TruckMate where characters within the field itself are then used for the subbing to create the GL Account |
GLA |
GL Account |
Certain characters of the GL Account are to be substituted with another specified value |
Trigger Table
Select the TruckMate Table that matches the value entered in the 'Trigger Type' field. The User will not have access to every Database Table used by TruckMate- only those tables certified for the GL Reset procedure.
-
If Trigger Type is 'TDF' or 'IDB', select the TruckMate Table from the pull-down list (i.e. TLORDER).
-
If Trigger Type is 'CDF', select an appropriate 'Table Name' from the pull-down list containing all distinct CUSTOM_DEFS Tables where 'Type' = 'LIST' (i.e. OPERATION_CODES).
-
If Trigger Type is 'GLA', field is fixed as 'GL Account'.
Match
Double-clicking in this field will toggle between two options: 'In' and 'Not In'. These options allow the user to specify that a rule should, or should not, apply to everything listed in the 'Match List' field. The options behave as follows:
-
In: apply the rule only when the value of the 'Trigger Table' is found in the 'Match List' values.
-
Not In: apply the rule only when the value of the 'Trigger Table' is not found in the 'Match List' values.
Match List
Enter the value(s) you want the system to use as criteria when applying the GL Reset rule. A series of values may be entered by separating each with a comma. The options available in this field are dependent on the 'Trigger Type' of the detail line:
-
If Trigger Type is 'TDF', select the value(s) from the pull-down list according to the Trigger Item (Column) e.g. SITE1,SITE3.
-
If Trigger Type is 'CDF', select the value(s) from the pull-down list containing all CUSTOM_LIST_VALUES according to the Trigger Item (Column) e.g. LOCAL.
-
If Trigger Type is 'IDB', leave this field empty.
-
If Trigger Type is 'GLA', enter the GL Account (or portion thereof) for what the GL Account matches to (this represents what the GL Account contains up to this point only so its value after all prior rules have been applied). The user may want to start the GL Reset with a rule that changes all but the natural account to '9' and so enters here what the value of the GL Account will be when first passed into GL Reset.
For example: Freight Revenue passes in as '10-100-100-100-4000' and so enter '10100100100' here (together with 'Start' = '1' and 'Length' = '11'). Thus it will be easier to spot the problem should GL Reset return an invalid GL Account.
Note: Leave the 'Start Pos', 'Length' and 'New Value' fields empty if this rule forms part of a bundle of rules that all must resolve to 'True' before performing the GL Account substitution. In any given bundle of rules, it is the rule where the 'Start Pos' is not empty that will be considered to be the last rule in that bundle of rules. If user is utilizing the 'IDB' and/or 'GLA' Trigger Types, then it is expected these will always be set as either the only rule or the last rule in the bundle, respectively.
Start Pos
This option specifies the position at which substitute digit(s) are to be inserted as replacement character(s) in the GL Account that is being reset.
The default GL Accounts established in GL Distribution, Accessorial Charges, and G/L Splitting Definitions serve merely as 'templates': suppose the GL Account in the template is to remain unchanged, except the third to fifth digits are to be replaced by substitute digits that represent a particular Site ID. Since the replacement is to begin with the third character, the user would enter '3' as the value here.
| For the 'Start Pos' value, do not count/include the dashes that TruckMate will have inserted between the segments of the GL Account. |
Length
Specify the number of digits to be replaced by the GL Reset procedure. To continue on with the previous example (see the 'Start Pos' description), the user would enter '3' as the value here (i.e. the substitution encompasses third, fourth and fifth digits of the GL Account segment).
| For the 'Length' value, do not count/include the dashes that TruckMate will have inserted between the segments of the GL Account. |
New Value
Enter the substitute digit(s) to be inserted as replacement character(s) in the GL Account. If the 'Trigger Type' is set to 'IDB', do not enter a value here.
For example: suppose the user wants the characters that make up TLORDER.PICK_UP_TRAILER to be used as the substitute characters within the GL Account. If the PICK_UP_TRAILER field contained the value 'TRAIL11122' and the 'Start Pos' = 6 and 'Length' = 3, then digits 6, 7 and 8 in the GL Account would become '111'.
Nat GL
In addition to the entries made in the previous fields, the 'Nat GL' field allows the user to specify an additional restriction for when a reset rule should be applied. Double-clicking in this field will toggle between two options: 'Nat GL In' and 'Nat GL Not In'. These options allow you to specify that a rule should (or should not) apply to everything listed in the 'Nat GL List' field. The options behave as follows:
-
Nat GL In: applies the rule only when the Natural Account appears in the 'Nat GL List' field.
-
NatGL Not In: applies the rule always, except when the natural account appears in the 'Nat GL List' field. Natural GL Accounts are thus useful for when user needs to apply a rule to Freight Revenue but not Accessorial Revenue, etc.
Nat GL List
Enter the list of 'Natural Accounts' that are to be used for the selected condition. Separate the Natural Account numbers by commas. The Natural Account is determined by the template (i.e. what the GL Account contains when first passed into the GL Reset so before any reset rules have been applied).
Loop
The Loop field is used when splitting your GL revenue. When calculating the revenue with spliting, a counter will be added to the for loop and the value passed to the GL_RESET procedure. If the Loop field in the GL_RESET Table is zero, the line will be processed. If the loop value is not zero, then the record in the GL_RESET Table will only be processed if it is the same value as the parameter passed to the procedure (i.e. the counter).
The default value of this field is zero.
Description
The 'Description' field allows a user to add a brief note/description against a created GL Reset rule for easy identification.
Context Menu
View GL Reset Log
Every time a GL Reset rule causes a GL account number to be changed on a FB, an entry is logged to a log table (GL_RESET_LOG). Selecting this option invokes the GL Reset Window with a read-only grid containing all the GL reset instances for a specific freight bill. Information on the grid include the GL account number before and after applying the rule. In addition, the grid contains two columns indicating when and by whom the rule was applied. The grid also show’s basic information about the reset rule.
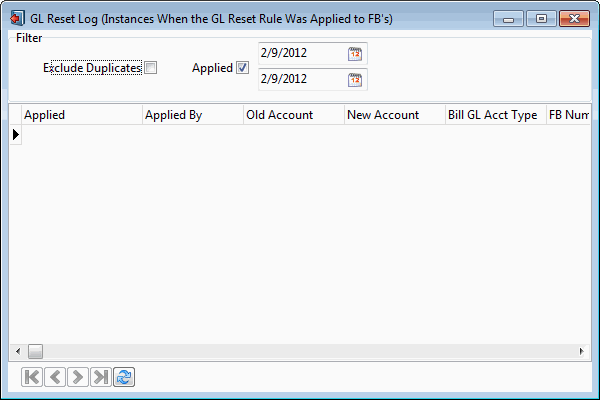
Filter
Exclude Duplicates
Every time a FB is updated and saved in Customer Service, the GL is re-calculated. So, a single FB may have the same account change (from account A to account B due to rule N) many times. To see all the changes, leave this filter unchecked. But to see just the unique/distinct changes, check this filter. If the filter is checked and some duplicates are hence hidden, the who/when data displayed will be from the most recent change (for the FB/GL account/rule combination).
Applied
If checked, the first grid column, 'Applied', is filtered for the specified date range. This is most useful when the selected rule is applied to a huge number of freight bills. Selecting a date range can make it easier for you to track GL Reset instances, you can even pin point a specific instance you are looking for.
Grid Data
Applied
This field answers the When? question, it display’s the date the rule was applied.
Applied By
This answer the Who? question, it displays the user name of the person who applied the rule.
Old Account
This the account before applying the reset rule to the freight bill.
New Account
This is the new account after applying the rule.
| The rest of the fields on this grid provide additional information about the freight bill details as defined in the Customer Service program. |