Chassis Billing
The Chassis Billing program is used to create freight bills that handle the accessorial charges accrued when using a chassis through an intermodal company or chassis pool. This program works in concert with the Customer Service program > Intermodal tab to ensure that all extra charges applied to a chassis can appear on the original freight bill or be assigned to a separate freight bill generated by running the Chassis Billing program.
This program also works together with the Chassis Invoice Reconcile program (ChassisAP.exe) which provides a means to reconcile chassis usage charges from the chassis owners to the actual chassis usage billed to the customers.
To access Chassis Billing:
| From this location | Go to |
|---|---|
TruckMate Menu and TruckMate Task List |
Billing > Chassis Billing |
Windows Start Menu |
TruckMate 20xx > Chassis Billing |
Windows Explorer |
C:\Program Files (x86) > TruckMate 20xx > ChassisBilling.exe |
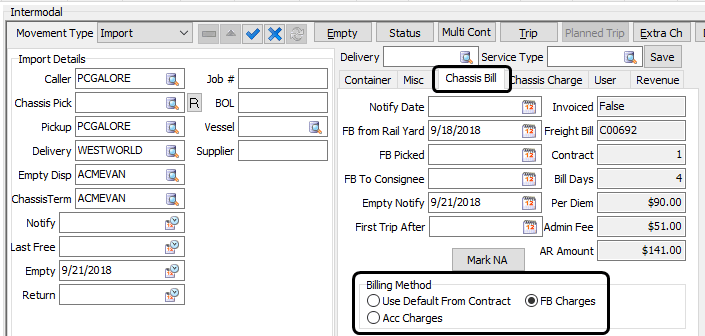
When an intermodal bill in Customer Service is assigned a chassis, the selection of available rates sheet contracts are searched for a match based on the criteria (Chassis Owner, Caller, etc.) and the Contract field on the Customer Service > Intermodal tab > Chassis Bill sub-tab will display the ID number of the matching Intermodal Configuration rate sheet.
When you run the Chassis Billing program, it searches for a suitable contract (as defined in the Intermodal Configuration program) which matches any freight bills where the intermodal freight bill has already been created based on the criteria of the contract and the sequence number and generates the chassis billing charges. If the freight bill has been already been amended and saved, the charges are re-calculated.
|
There are some exceptions to the chassis billing contract values being recalculated after saving:
|
For the Chassis Billing program to determine which rate sheet contract to use, the following criteria are used:
-
For each of the Steamship Line, Chassis Owner, Caller, Shipper, Consignee fields on the contract, they must either match what is on the fright bill order, or be blank on the rate sheet contract (meaning it applies to all).
-
The current timestamp must fall within the effective dates of the contract.
-
The rate sheet contract must be marked as approved.
-
In the case that multiple contracts apply, the rate sheet contract with the lower sequence shall be used.
-
Whenever an freight bill is saved, the appropriate chassis billing contract is re-determined based on the criteria above, in case any criteria has changed with the saving of the order.
-
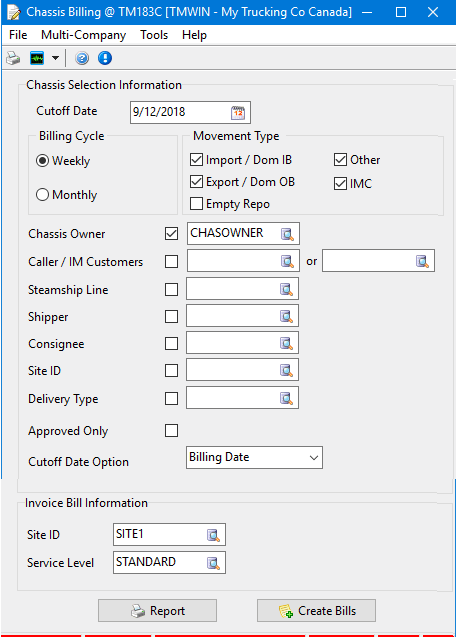
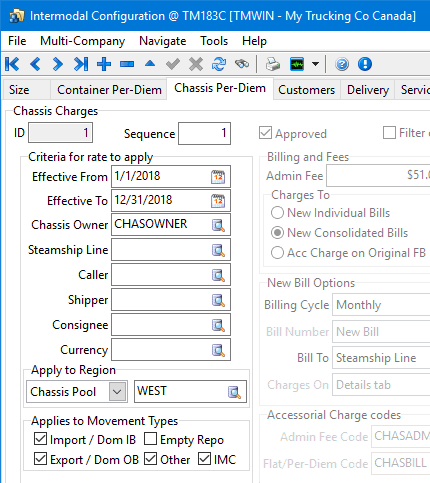
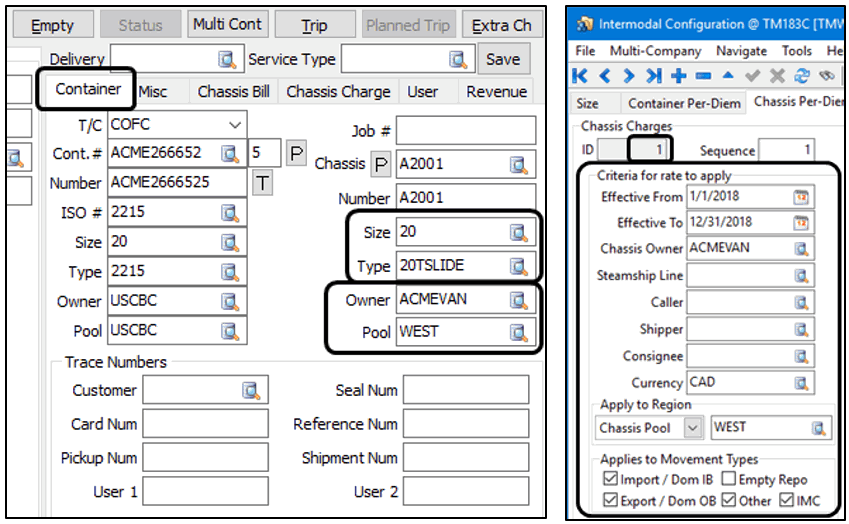
For example, here are some images comparing the Chassis Billing program selection information against what is set up in the Criteria for rate to apply section on the Chassis Pre-Diem tab of the Intermodal Configuration program. These values are also similarly used by the intermodal portion of the freight bill to determine which chassis per-diem rate sheet contract will be applied to the freight bill.
< > 
Setting up Chassis Billing
General Process Overview
The initial setup within TruckMate to properly track and process the charges and fees associated with chassis billing includes the following steps:
-
Setting up chassis ownership
-
Setting up chassis pool facilities
-
Linking chassis owner / chassis pool to a vendor profile
-
Linking chassis trailers to owner
-
Setting up accessorial charge codes
-
Setting up Application Configurator for chassis billing
-
Setting up Intermodal Configuration for regions
-
Setting up Intermodal Configuration for chassis billing contracts
Once the configuration and setup is finished, the Chassis Billing program is used to:
-
Generating and displaying chassis billing charges
-
Monitoring chassis charges on the fly
-
Creating new chassis freight bills
Chassis Invoice reconciliation is the next part of the chassis billing process. The Chassis Invoice Reconciliation program is used to:
-
Import chassis owner invoice details
-
Auto or Manually match chassis owner invoice payables with chassis receivables
-
Un-match chassis bill associations
-
Change status for chassis owner invoice
-
Post chassis owner invoice information to AP
Setting up chassis ownership
The chassis owner refers to the company who owns the chassis and invoices you for the chassis usage charges.
In order to set up chassis billing rate sheet contracts, chassis owners need to be set up as both vendors and customers and the individual chassis need to be associated with a specific owner. Chassis ownership is critical for managing and matching chassis billing rate sheets.
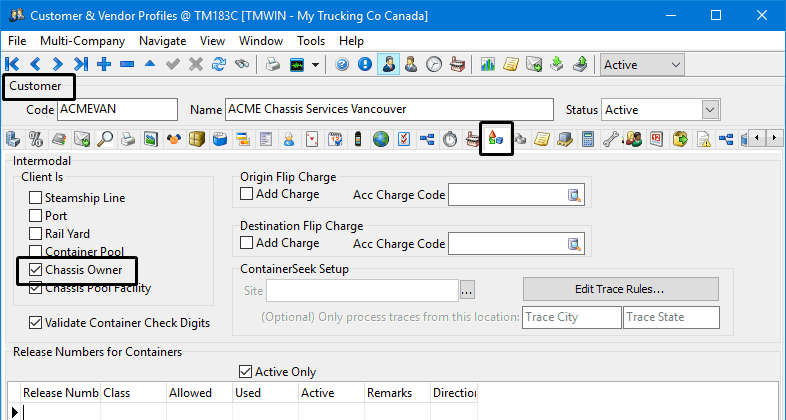
The Chassis Owner checkbox is set in the Customer & Vendor Profiles > Customers > Intermodal tab.
To set up a chassis owner:
-
Go to Profiles > Customer & Vendor Profiles > Customers > Intermodal tab.
-
Locate (or create) the chassis owner in the Customer Profile window and select the Chassis Owner checkbox.
-
Click
 Post to save.
| Each of the chassis trailers must be linked to their owners using the Profiles > Trailer Profiles program > Ownership tab as described in Linking chassis trailers to owner. |
Setting up chassis pool facilities
Most chassis in North America are now owned by one of several chassis pools. These are companies that lease and maintain chassis, as well as maintain balance across a set of locations by forecasting chassis supply and demand.
The Chassis Pool Facility checkbox indicates that this is a location where a chassis can be picked up and where it can be returned. A chassis pool facility is not required to be a chassis owner.
To indicate a chassis pool facility:
-
Go to Profiles > Customer & Vendor Profiles > Customers > Intermodal tab.
-
Locate the customer profile (or create if necessary), and select the Chassis Pool Facility checkbox.
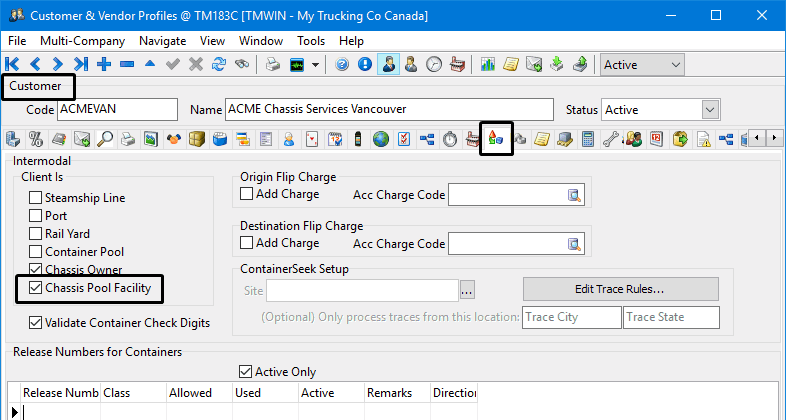
Note: In this example, this chassis pool facility also owns some of the chassis in the pool so it is also flagged as a chassis owner.
-
Click
Post to save.
Linking chassis owner / chassis pool to a vendor profile
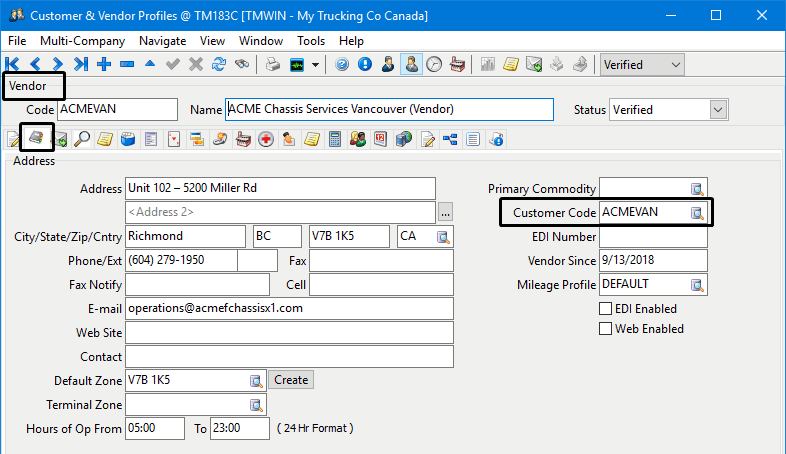
Since the invoices related to chassis usage will be received from the chassis pool or the chassis owners, the chassis owners and chassis pool facilities will also be set up as vendors. The vendor profiles will be linked to their corresponding customer profiles via the customer profile code.
To link the chassis vendor to the chassis owner / chassis pool:
-
Go to Profiles > Customer & Vendor Profiles.
-
Go to the Window menu and select Vendor Profiles to view the vendor profiles.
-
Locate the chassis vendor profile (or create one if necessary).
-
Go to the Address tab.
-
Select the corresponding customer profile to link the vendor profile to the chassis owner or the chassis pool facility.
-
Click
Post to save.
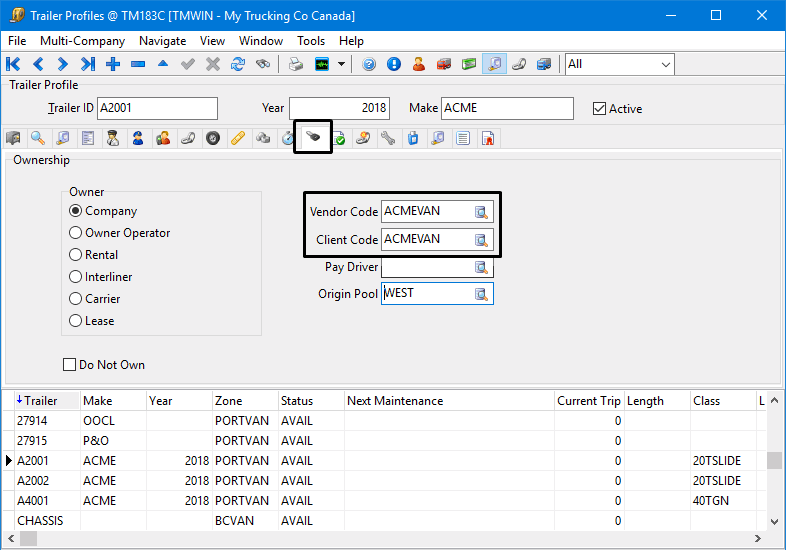
Linking chassis trailers to owner
To link a chassis trailer to the chassis owner:
-
Go to Profiles > Trailer Profiles program > Ownership tab.
-
Select the customer profile to indicate the chassis owner in the Vendor Code and Client Code fields.
-
Click
Post to save.
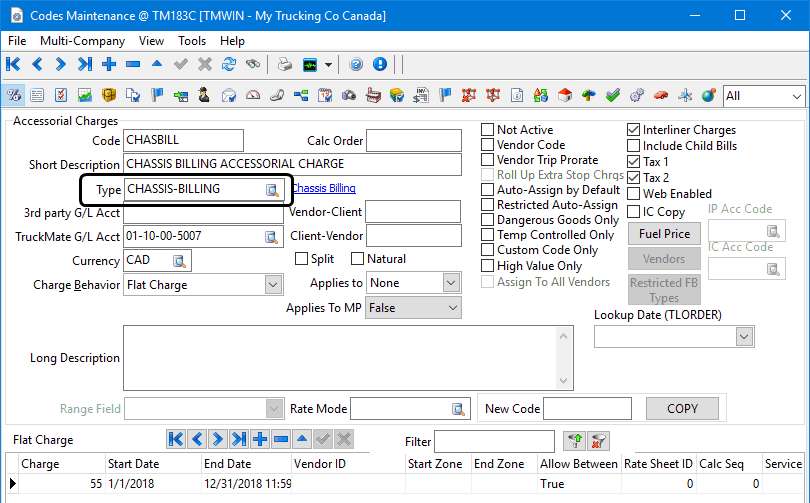
Setting up accessorial charge codes
Chassis billing per-diem charges can be generated as accessorial charges and displayed on the Acc Chgs tab in the Customer Service program for the relevant freight bill.
In order to use this feature, an accessorial charge code with the type of CHASSIS-BILLING must be created.
-
Go to the Profiles > Codes Maintenance program > Accessorial Charge Codes tab.
-
Click
 Insert.
 -
Make the appropriate entries to these fields. (See Codes Maintenance > Accessorial Charges for more information.) In some cases you may need to create a new general ledger account.
-
Set the Type to CHASSIS-BILLING.
-
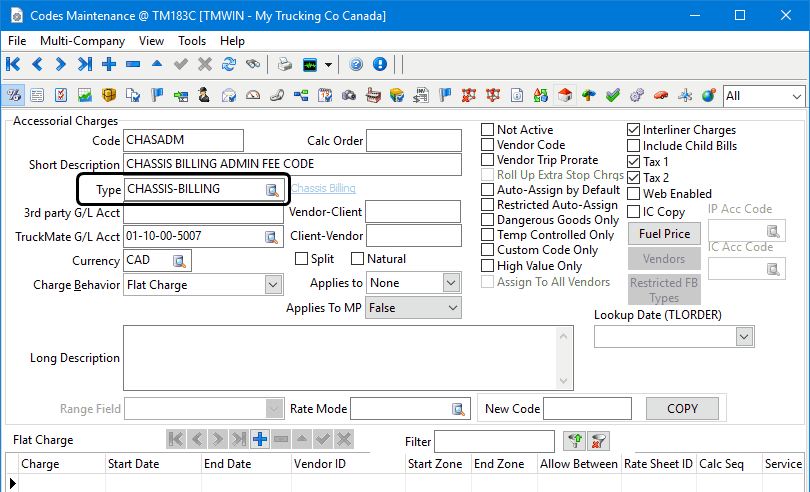
Click
Post to save.You can similarly use this approach to apply an administration fee as part of the standard chassis billing process. To create an Accessorial Charge code for the admin fee, the type must also be set to CHASSIS-BILLING. For example:
These accessorial charge codes are used later by the Customer Service and Chassis Billing programs when the charges are generated.
-
Go to Utilities > Application Configurator.
-
Go to CHASSISBILLING.EXE and set the values to use the accessorial charge codes
Note: If you intend to generate intermodal chassis pre-diem charges on the original freight bill automatically without having to use the Chassis Billing program, go to Dispatch > Intermodal > Intermodal Configuration and set the values for the accessorial charge codes.
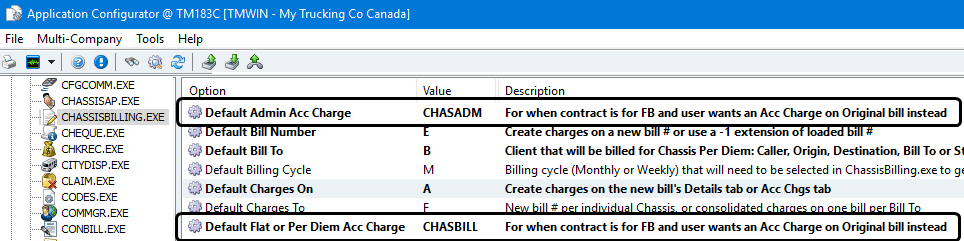
Setting up Application Configurator for chassis billing
The following Application Configurator options are listed under Configuration Options > CHASSISBILLING.EXE.
Default Admin Acc Charge |
Sets the default accessorial charge to use as the default Admin Fee Code on the rate sheet. Used when the Intermodal chassis billing method is set to generate a new freight bill to contain the charges but you want this administration accessorial charge to be part of the original freight bill instead. |
Default Bill Number |
Determines whether to create the charges on a new bill or use the original loaded bill for the charges associated with the chassis usage.
|
Default Bill To |
Determines which client will be billed for the Chassis Per Diem charges.
|
Default Billing Cycle |
Indicates which billing cycle (Monthly or Weekly) must be selected in the Chassis Billing program in order to generate the chassis charges.
|
Default Charges On |
Determines the default setting to indicate where the chassis charges will be displayed when they are created.
|
Default Charges To |
Determines the default setting for whether the chassis charges will appear on a new separate bill number for each individual chassis or as consolidated charges appearing on one single bill.
|
Default Flat or Per Diem Acc Charge |
Sets the default accessorial charge to use as the default Flat or Per Diem Code on the rate sheet. Used when the Intermodal chassis billing method is set to generate a new freight bill to contain the charges but you want this administration accessorial charge to be part of the original freight bill instead. |
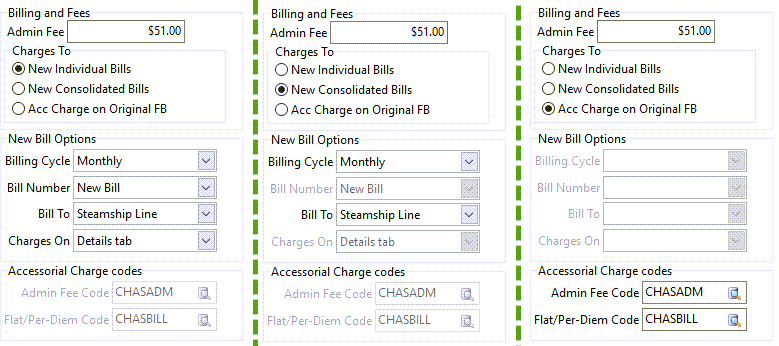
The combination of these application configuration options forms a default collection of settings matching the Billing and Fees section of the chassis billing contract normally defined within the Intermodal Configuration program.
|
Setting up Security Configuration for chassis billing
There are no specific options available in the Security > Business Events section of Security Configuration directly related to the Chassis Billing executable.
Setting up Intermodal Configuration for regions
When leasing containers or chassis, the rates received depend on the market (i.e., the "region"). Not only do equipment providers set their rate structures by region, but steamship lines also have different pool alliances in different regions.
Each region is made up of either a collection of chassis pool facilities or a collection of zone codes. These intermodal regions are defined on the Region tab in the Intermodal Configuration program.
To configure intermodal regions:
-
Go to Dispatch > Intermodal > Intermodal Configuration > Region tab.
-
Click
Insert at the top of the window. -
Enter a Region Code and a Region Name.
-
Select the Is a Chassis Pool checkbox if the region is a collection of chassis pool facilities or leave the checkbox cleared if the region is defined as a collection of zone codes.
-
Click
Post to save. -
Add the members to define the region. (i.e. create the list of chassis pool facilities or the list of zone codes)
To add chassis pool facilities:
-
Select the Is a Chassis Pool checkbox.
-
Click
Insert at the bottom of the window.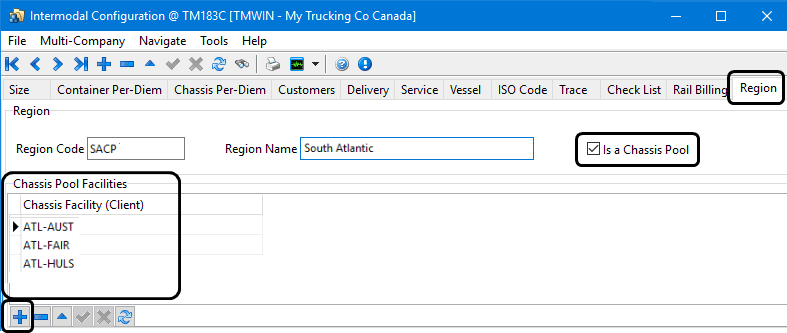
-
Double-click the new record to display the Select Client window.
-
Select the chassis pool facilities that are part of this region.
-
Click
Post to save.
To add zone codes:
-
Verify the Is a Chassis Pool checkbox is not selected.
-
Click
Insert at the bottom of the window.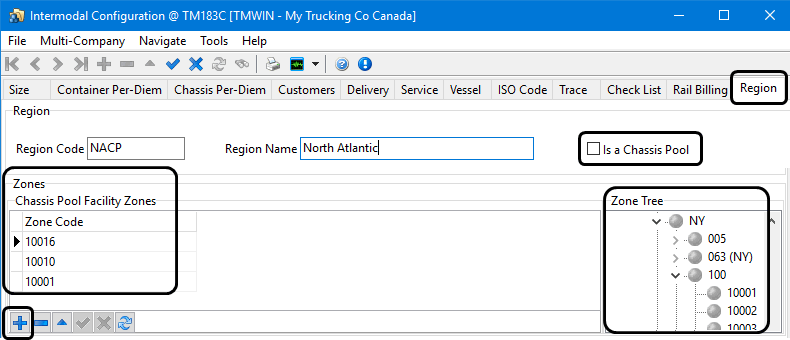
-
Locate the zone using the Zone Tree on the right side of the window.
-
Drag and drop the zones to the right to add them to the list of zones that are members of this region.
(You can also double-click the field in the grid and use the Find Zone window to add members to the list.)
-
Click
Post to save.
Setting up Intermodal Configuration for chassis billing contracts
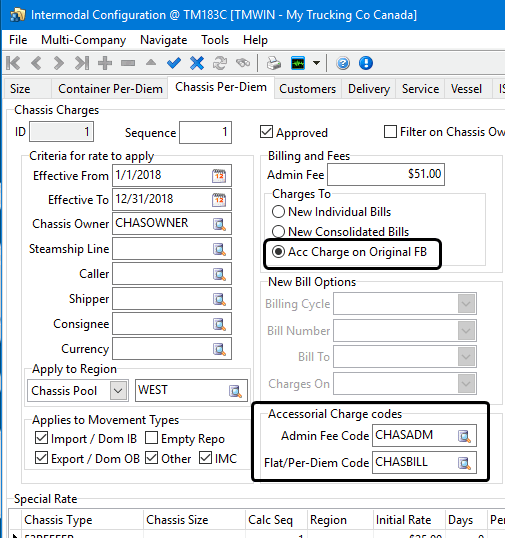
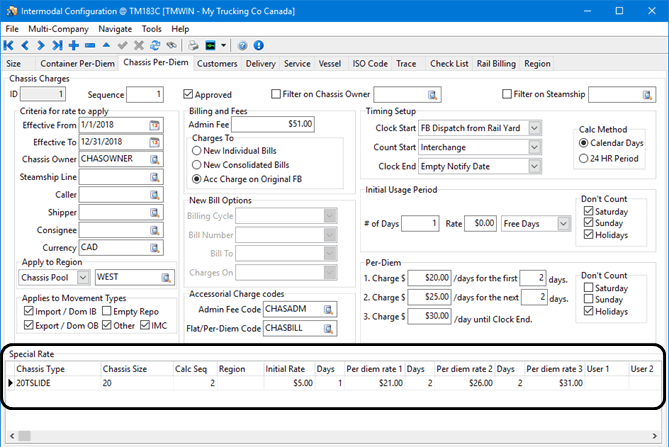
The Intermodal Configuration program > Chassis Per-Diem tab is used to define the chassis billing contract rate sheets determining how the customer charges will be calculated and where they will be displayed on the freight bill. (I.e. as an accessorial charge, as a line item on the details tab or as a separate freight bill).
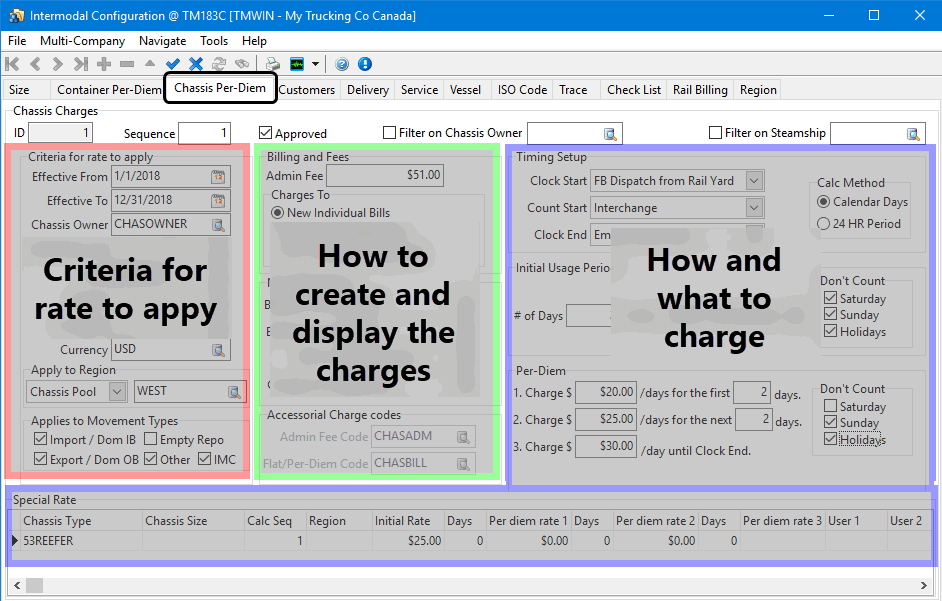
Criteria for this rate to apply
The Chassis Billing program uses the Intermodal Configuration program > Chassis Per-Diem tab to compare the values against the information entered on the Customer Service > Intermodal tab. If it matches, the Chassis Billing program uses this Chassis Per-Diem rate sheet to create the chassis billing values for the matching Intermodal freight bills.
For example, if the chassis owner and chassis pool (and any other indicated criteria like shipper, currency, movement type, etc.) on an approved Intermodal Configuration > Chassis Per-Diem rate sheet match what is shown on the Customer Service > Intermodal tab > Container sub-tab, the matching contract ID number will be displayed on the Customer Service > Intermodal tab > Chassis Bill sub-tab.
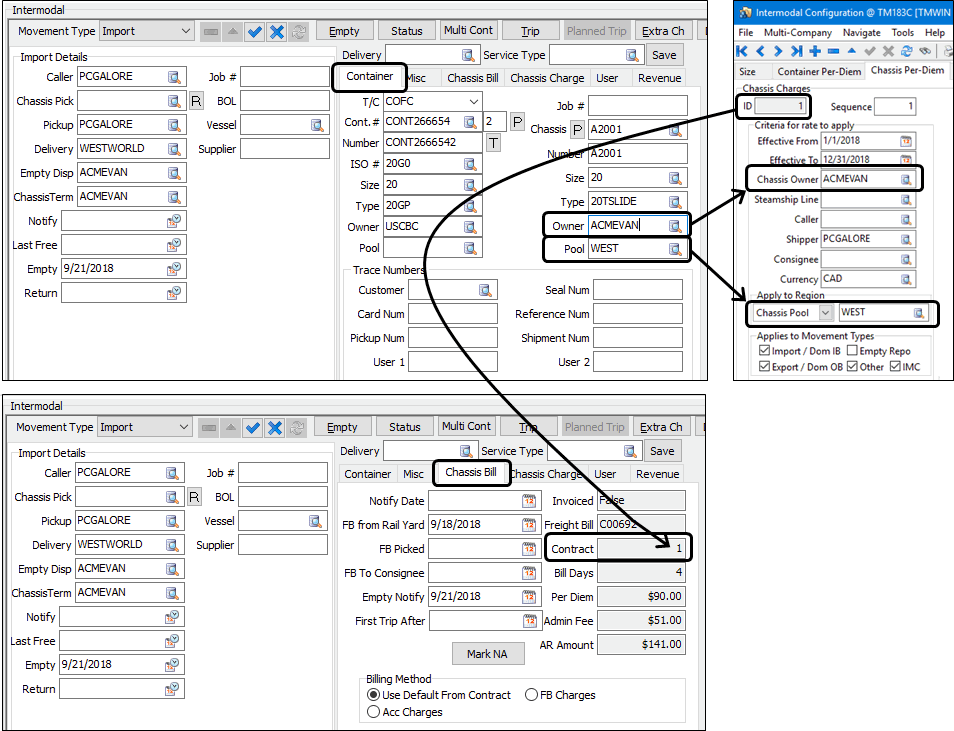
| If there are more than one rate sheets with matching criteria, the system will select the rate sheet with the lower sequence number. |
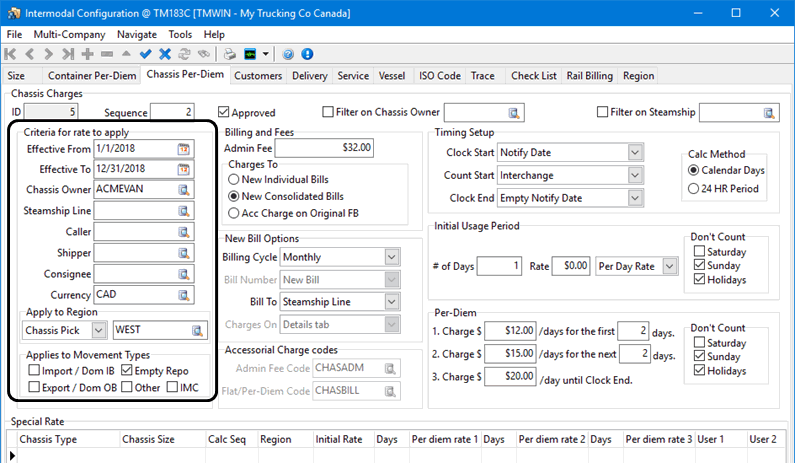
Billing and Fees - How the charges are created and displayed
The Chassis Billing program will use the Intermodal Configuration program > Chassis Per-Diem tab settings to determine whether to apply a flat admin fee and if the chassis billing charges should be created as separate freight bills or included within the original freight bill and if so, where the data is displayed; on the Customer Service > Acc Chgs tab or the Customer Service > Details tab.
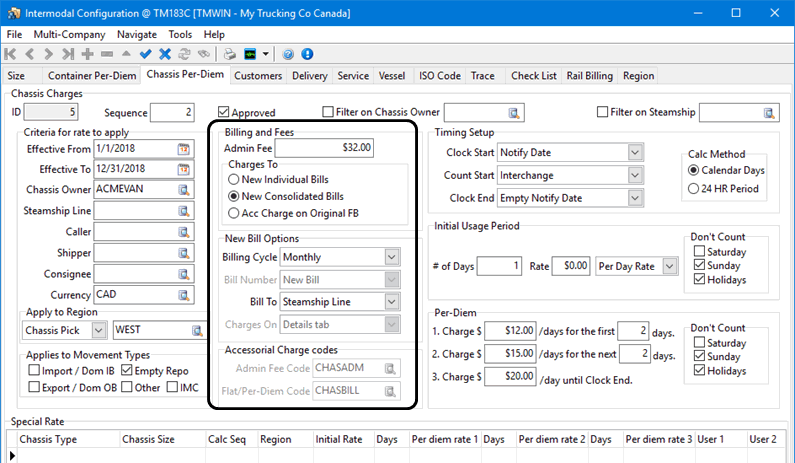
Customer Service override capability
The Customer Service program can override the default Intermodal Configuration > Chassis Per-Diem > billing and fees settings by selecting FB charges or Acc Charges on the Intermodal tab > Chassis Bill sub-tab. See Customer Service billing method override for more information.
| If the Billing Method is set to Acc Charges or Acc Charges on Original FB, the charges can be calculated automatically and immediately to be displayed as accessorial charges on the original freight bill when the freight bill is posted and saved. Otherwise, the Chassis Billing program must be run manually and new separate (or consolidated) freight bill(s) will be created containing the chassis billing charges generated by running the Chassis Billing program. |
How and what to charge
The Intermodal Configuration program will also use the Chassis Per-Diem settings to determine the values for the per-diem charges and which date entries will be used to signify the clock start and end dates.
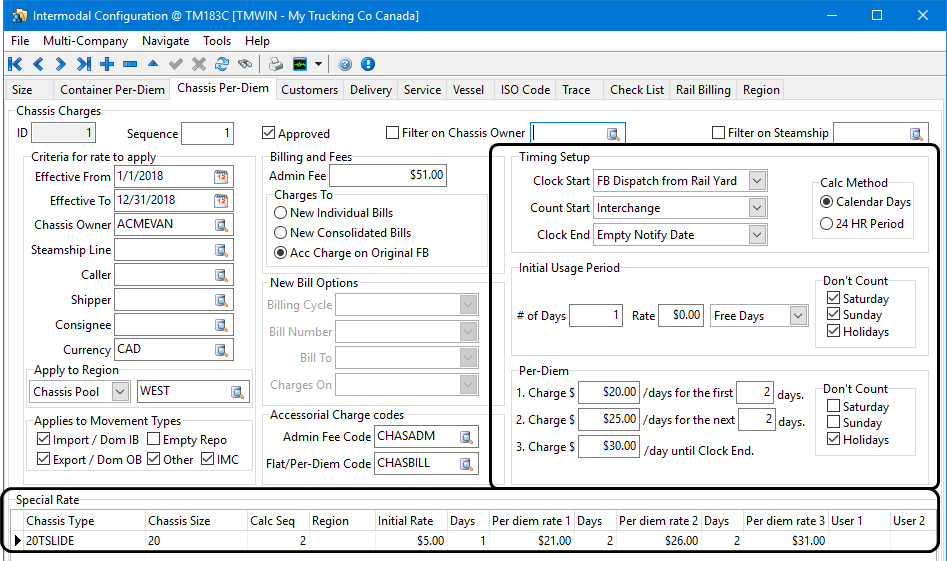
Timing Setup
The timing setup determines what values will be used to define the start and end dates used for calculating the chassis charges. If using Calendar Days, the time is ignored. If you are using the 24 HR Period setting, then the exact times are considered in the calculations.
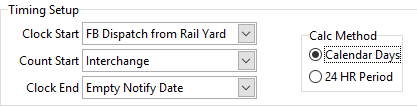
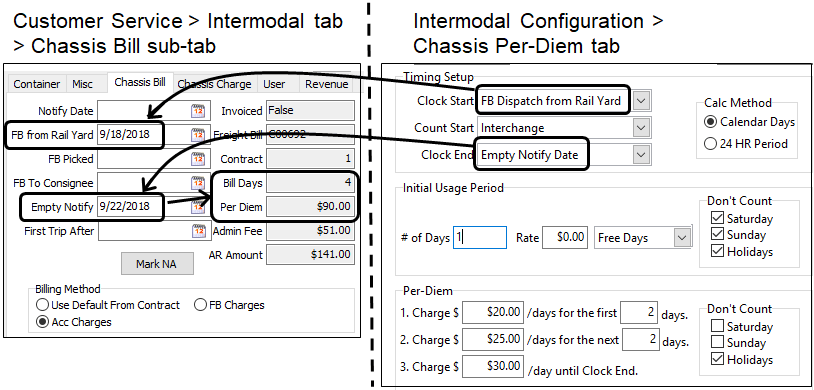
For example, if the Calc Method is Calendar Days, the Clock Start was set to FB Dispatch from Rail Yard and the Clock End is set to Empty Notify Date, as soon as this information is available in the Customer Service program, the chassis billing charges can be calculated. (The calculated chassis billing charges can even be displayed immediately in Customer Service if the Billing is set to display them as accessorial charges on the Acc Chgs tab.)
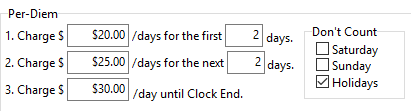
Mon. Sep. 18 to Sat. Sep. 22 (5 days) is calculated as:
1 free day + 2 billed days @ $20/day + 2 billed days @ $25/day = $90 in per diem charges.
Initial Usage Period
The initial usage period allows you the flexibility to define a set of time where a special set of rules are applied before the regular Per-diem charges will start. For example, you could define the first day of usage as being free of charges. The Don’t Count section determines whether weekends and holidays will be a part of the charge calculations or free of charges.
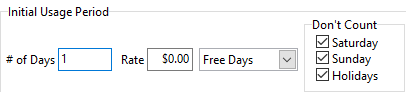

If the initial usage period rate is set to a Per Day Rate, this rate only applies if the total number of days is ⇐ the initial period # of days, otherwise the Per-Diem rates will be applied and this initial period rate is ignored.
If the initial usage period rate is set to Free Days, the initial period free days will apply even if the total number of days exceeds the initial period # of days. Same for Flat Rate.
Per-Diem
The Per-Diem charges provide three tiers of daily calculation rates. The Don’t Count section determines whether weekends and holidays will be a part of the charge calculations or free of charges if the contracts only apply to working days.
Special Rate
The Special Rates grid allows you to override the standard rates with a specific set of rates for exact Chassis Type, Size and Region criteria as applicable. It can be as specific as you need.
![]()
When calculating chassis per-diem charges, once a valid contract has been selected, the calculation routine checks against the Special Rates grid for the contract to see if there are any special rates that exactly match the Chassis Type, Size and Region field etc. If a matching special rate is found, it will use this special rate rather than the regular per-diem contract rates.
Monitoring chassis charges on the fly
Once the chassis information is added to the freight bill, it is possible to see what the chassis billing charges would be based on specific Clock Start / Clock End values.
To see an example of this:
-
Create a new intermodal freight bill and enter the basic information.
-
Go to the Customer Service > Intermodal tab > Container sub-tab and select a chassis.
The Owner, Pool and other information such as Size and Type is used to determine which intermodal configuration billing rate sheet contract ID will be applied to this freight bill.
-
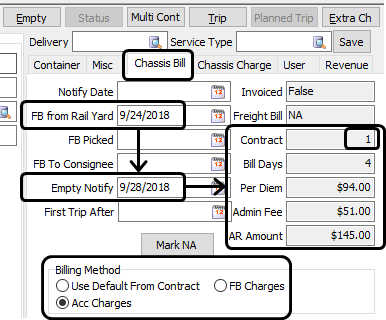
Go to the Customer Service > Intermodal tab > Chassis Bill sub-tab and verify the Contract ID field displays the correct intermodal configuration billing rate sheet Contract ID.
-
If the default billing and fees method is not already set to display the charges as Acc Charges on the original freight bill you can temporarily override the setting by selecting Acc Charges as the billing method.
-
Enter the dates required by the contract rate sheet to indicate the Clock Start / Clock End values to trigger the chassis billing calculations. This process is using the same formulas that would be performed if the charges were being calculated later using the Chassis Billing program to manually generate new freight bills containing just the chassis billing values.
-
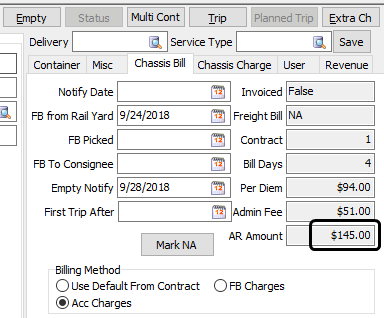
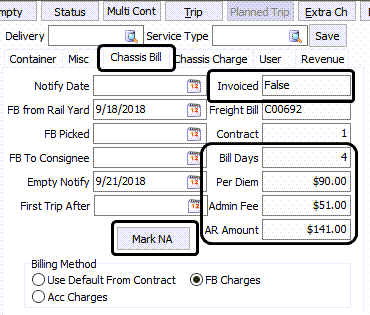
Notice the Bill Days, Per Diem, Admin Fee and AR Amounts are displayed on the Chassis Bill sub-tab allowing you to view and monitor the expected chassis charges on the fly. You can also see the charges as line items on the Customer Service > Acc Chgs tab.

-
You can verify the values are being calculated correctly by reviewing the Intermodal Configuration rate sheet for this contract ID.

In this example, the chassis type and chassis size match one of the values set up in the Special Rates grid so the calculation would look like this:
  $ 0.00 (1 free day of initial usage)
+ $ 42.00 (2 days x $21.00/day for next 2 days)
+ $ 52.00 (2 days x 426.00/day for next 2 days)
-------------
= $ 94.00 (Chassis Per Diem fees)
+ $ 51.00 (Chassis Admin Fee)
-------------
$145.00 (AR Amount for chassis billing)
|
If you normally generate the charges on a separate freight bill, you can still set the freight bill’s billing method to Acc Charges temporarily to get a preview for this specific freight bill and reset the Billing Method back to it’s original billing method. When changing the Billing Method on the Customer Service > Intermodal tab > Chassis Bill sub-tab, going to the Customer Service > Acc Charges tab will force a calculation refresh. Return to the Intermodal > Chassis Bill sub-tab to view the results. |
Generating and displaying chassis billing charges
There are three chassis billing invoicing methods that can be selected for a freight bill as indicated on the Customer Service > Intermodal tab > Chassis Bill sub-tab and defined in the Intermodal Configuration program > Chassis Per-Diem tab.
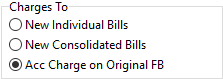
Generating the fees as accessorial charges on the original freight bill is considered an automatic process since you can see the results immediately and there is no need to run the Chassis Billing program. Generating the fees onto new freight bills requires you to run the Chassis Billing program manually in order to generate and view the charges.
Each of these Intermodal Configuration program billing options is associated with some additional configuration that is used by the Chassis Billing program to generate the billing charges according to the associated contract rate sheet.
The Chassis Billing program will use the selection information you enter into the Chassis Billing program window to determine which freight bill chassis billing charges need to be created. The contract rate sheet will have already been matched and entered when the chassis was selected for the freight bill so the Chassis Billing program will use this associated chassis per-diem rate sheet billing contracts to determine how to generate the charges and where to display them.
If the freight bills are using the Acc Charge on Original FB setting, the chassis billing charges are already included in the original freight bill so these will not be processed by the Chassis Billing program. Only freight bills set to generate new freight bills will be processed by the Chassis Billing program.
| Every Intermodal frieight bill using a chassis trailer MUST be associated with a chassis per-diem contract rate sheet. The contract field on the Customer Service > Intermodal > Chassis Bill sub-tab must contain a valid ID for billing charges to be calculated. It must not be empty or zero. |
Chassis Billing window field descriptions
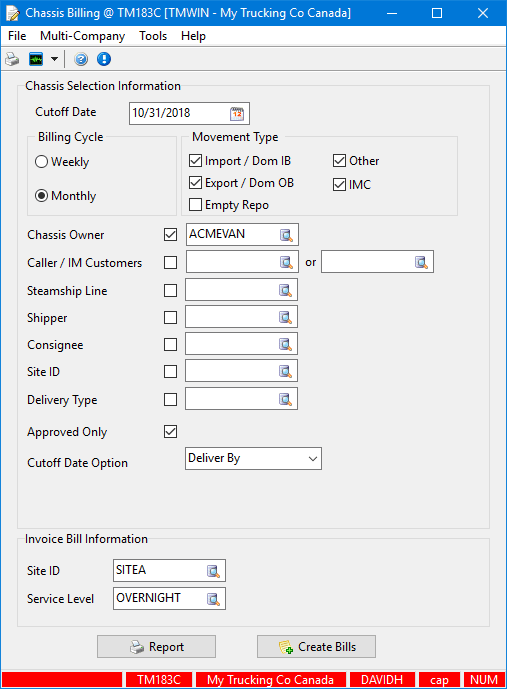
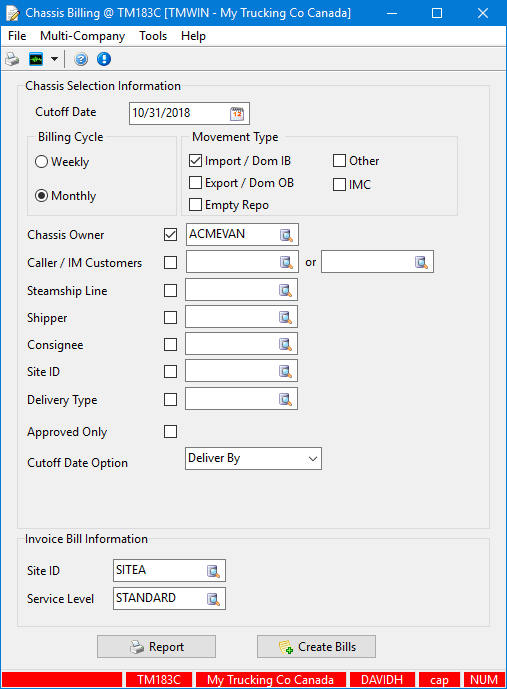
Chassis Selection Information
| Cutoff Date | Restricts which records to include when generating the chassis billing charges based on whatever value is selected in the Cutoff Date Option field. |
|---|---|
Billing Cycle |
Indicates whether you would like to include just the 'Weekly' or 'Monthly' Billing cycles. |
Movement Type |
If your Chassis has a Usage billing mode option, you can specify if it is being used for Export or Import usage by selecting the appropriate checkbox. Depending on the option chosen, the Chassis Billing Rates may be* different. |
Chassis Owner |
Restricts to include only chassis billing charges associated with a specific customer code selected from the list of customers who are set up as a Chassis Owner in the Customer & Vendor Profiles program > Intermodal tab. |
Caller / IM Customers |
Restricts to include only chassis billing charges associated with a specific customer code selected from the list of customers who are set up as a Caller in the Customer & Vendor Profiles program > Address tab or the customer code selected from the list of Intermodal customers set up in the Intermodal Configuration > Customers tab. |
Steamship Line |
Restricts to include only chassis billing charges associated with a specific customer code selected from the list of customers who are set up as a Steamship Line in the Customer & Vendor Profiles program > Intermodal tab. |
Consignee |
Restricts to include only chassis billing charges associated with a specific customer code selected from the list of customers who are set up as a Consignee in the Customer & Vendor Profiles program > Address tab. |
Site ID |
Restricts to include Chassis Billing charges from those Customers that are attached to a specific Site ID. (Setup in the Codes Maintenance program > Site Tab). |
Delivery Type |
Restricts to include only chassis billing charges associated with a specific delivery type. |
Approved Only |
When selected, the Chassis Billing program will only include freight bills where the billing charges have an Approved status on the Customer Service > Billing tab. |
Cutoff Date Option |
Indicates which program field will be compared against the Cutoff Date to determine which freight bill records to generate charges for. |
Invoice Bill Information
| Site ID | Indicates which Site the generated freight bills will be applied to |
|---|---|
Service Level |
Indicates the Service Level that will be applied to the created Freight Bills. |
Report |
This button generates a report listing the freight bills that are due to be generated based on the values entered into the Chassis Billing window. |
Create Bills |
This button creates all the freight bills based on the values entered into the Chassis Billing window. These freight bills are handled as any other Customer Service Freight Bill would be handled via the billing register. |
|
If the Chassis Billing program cannot find any matching records that require chassis billing charges to be generated, it will display a "No records." error message. Either there are no records to generate or you need to revise the selection criteria.
|
Creating charges on accessorial tab of original freight bill
Generating the fees as accessorial charges within the original freight bill is considered an automatic process since you can see the results immediately and there is no need to run the Chassis Billing program.
To create the chassis billing fees as accessorial charges displayed on the original freight bill:
-
Go to Intermodal Configuration and locate the rate sheet contract(s).
-
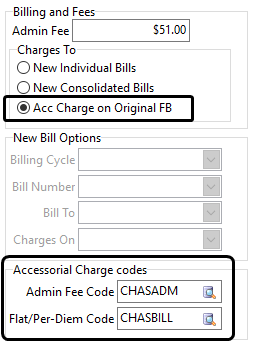
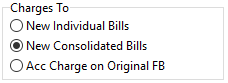
Select Acc Charge on Original FB in the Charges To section.
-
Select the Accessorial Charge Codes to indicate which charge code to use on the freight bill, if an admin fee or flat/per-diem fees will be applied. (These accessorial charge codes are defined using the Profiles > Codes Maintenance program > Accessorial Charge Codes tab.)
-
Go to the Customer Service > Intermodal tab > Container sub-tab and select a chassis.
The Owner, Pool and other information such as Size and Type is used to determine which intermodal configuration billing rate sheet contract ID should be applied to this freight bill.
-
Go to the Customer Service > Intermodal tab > Chassis Bill sub-tab and verify the Contract ID field displays the selected intermodal configuration billing rate sheet contract ID.
-
Enter the dates required by the contract rate sheet to indicate the Clock Start / Clock End values to trigger the chassis billing calculations.
-
Notice the Bill Days, Per Diem, Admin Fee and AR Amounts are displayed on the Chassis Bill tab allowing you to view and monitor the expected chassis charges on the fly. You can also see the charges as line items on the Customer Service > Acc charges tab.
When the freight bill is created and saved, chassis billing accessorial charges are calculated or re-calculated and added or updated on the original intermodal freight bill and displayed on the Acc Chgs tab.
This uses automatic billing, and does not require the Chassis Billing application to be run to generate the charges.
Note: Selecting Acc Chgs on the Customer Service > Intermodal tab > Chassis Bill sub-tab can override the Intermodal settings for this rate sheet if they are set to New Individual Bills or New Consolidated Bills. This can be used to simulate or monitor chassis charges on the fly.

Creating charges onto new freight bill(s)
Generating the fees onto new freight bills requires you to run the Chassis Billing program manually in order to generate and see the charges.
When the Chassis Billing application is run, a separate bill will be generated for each instance of chassis usage. The charges can be displayed on the Customer Service > Details tab or on the Customer Service > Acc Chgs tab of the new freight bill. The new freight bill can have an independent freight bill number or it can be created using the original freight bill number and applying a suffix (e.g. IM234567-1) depending on the contract settings.
To create the chassis billing fees on a separate new freight bill and display them as accessorial charges within this new freight bill:
-
Go to Intermodal Configuration and locate the rate sheet contract.
-
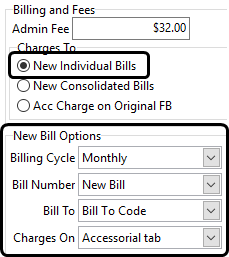
Select New Individual Bills in the Charges To section.
-
Select the Billing Cycle.
-
Set the Bill Number value to New Bill.
Note: If you set the Bill Number value to Original FB with Suffix, the new freight bill will be created using the original fright bill number and a dash number one appended to the end. For example, if the original freight bill number was M00041, it will assign M00041-1 to the new freight bill.
-
Select the Bill To option to indicate who will receive the chassis billing invoice.
-
Set the Charges On value to Accessorial tab.
Note: If you set the Charges On value to Details tab, the chassis billing charges will be displayed on the Details tab within the new freight bill once it is created.
-
Create a new Intermodal freight bill, assign a container and chassis to it and complete the trip. Make sure the billing method is set to Use Default From Contract on the Customer Service program > Intermodal tab > Chassis Bill sub-tab.
Note: If you use the FB Charges override option, it will ignore the contract rate sheet settings defined in the Intermodal Configuration program > Billing and Fees section and use the settings defined in the Application Configurator program for CHASSISBILLING.EXE.
-
Go to the Customer Service > Billing tab, verify the billing information and the Billing Date is correct and click the APPRVD button to set the Freight Bills billing status to APPROVED.
-
Run the Billing Register program to create entries for each invoice in the Accounts Receivable module (which can be viewed using the AR Inquiry program).
-
Go to Chassis Billing and enter the selection information necessary to include the desired set of freight bills. (See Chassis Billing window field descriptions.)
-
Click the Report button if you want to generate a report listing the bills that would be acted on by the Create Bills function.
-
Click the Create Bills button.
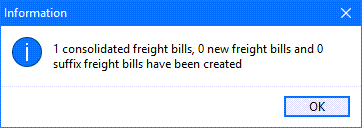
A confirmation message box is displayed summarizing how many freight bills were created and of what type they were.
-
Click OK.
-
Go to Customer Service and verify a new Freight bill has been created and the chassis billing charges are displayed on the Details or Acc Chgs tab within the new freight bill.

Creating charges on a consolidated freight bill
Generating the fees onto new freight bills requires you to run the Chassis Billing program manually in order to generate and see the charges.
When the Chassis Billing application is run, a separate bill will be generated containing a consolidated summary of chassis usage. The charges will be displayed on the Customer Service > Details tab of the new freight bill. The new freight bill will be assigned a new independent freight bill number.
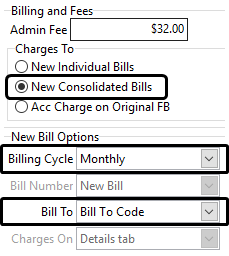
To create the consolidated chassis billing fees on a separate new freight bill and display them on the Details tab within this new freight bill:
-
Go to Intermodal Configuration and locate the rate sheet contract.
-
Select New Individual Bills in the Charges To section.
-
Select the Billing Cycle.
-
Select the Bill To option to indicate who will receive the chassis billing invoice.
Note: In the case of a consolidated bill, the Acc Chgs tab cannot be used for placing charges on, because numerous chassis could be billed and we can only display one accessorial charge record for the relevant accessorial charge code.
-
Create several new Intermodal freight bills, assign a container and chassis to it and complete the trip. Make sure the billing method is set to Use Default From Contract (or FB Charges) on the Customer Service program > Intermodal tab > Chassis Bill sub-tab.
-
Go to the Customer Service > Billing tab, verify the billing information and the Billing Date is correct and click the APPRVD button to set the Freight Bills billing status to APPROVED.
-
Run the Billing Register program to create entries for each invoice in the Accounts Receivable module (which can be viewed using the AR Inquiry program).
-
Go to Chassis Billing and enter the selection information necessary to include the desired set of freight bills. (See Chassis Billing window field descriptions.)
-
Click the Report button if you want to generate a report listing the bills that would be acted on by the Create Bills function.
-
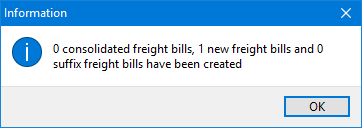
Click the Create Bills button.
A confirmation message box is displayed.
-
Click OK.
-
Go to Customer Service and verify a new Freight bill has been created and the chassis billing charges are displayed on the Details tab.

Marking chassis billing as NA
As long as the freight bill is not yet interfaced to billing, you can use the Mark NA button to clear the chassis billing charges and set the associated invoicing = NA to prevent any chassis billing charges from being generated for this freight bill.
-
Go to the Customer Service > Intermodal tab > Chassis Bill sub-tab.
-
Make sure you are on the correct freight bill.
-
Click the Mark NA button.
An "Are you sure you want to mark Chassis Billing as NA?" message is displayed.
-
Click OK.
-
The Invoiced value will change from False to True and the Bill Days, Per Diem, Admin Fee and AR Amount fields will all be cleared.
-
As long as freight bill is not yet interfaced to billing, the Mark NA button label will change to Unmark NA to allow you to recalculate the charges after saving and reset the Invoiced value back to False.
Customer Service billing method override
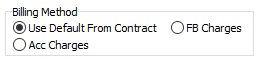
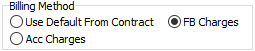
On the Customer Service > Intermodal tab > Chassis Bill sub-tab, there are three billing methods, two of which can override the settings defined for the chassis per-diem rate sheets defined within the Intermodal Configuration program.
For example, If the Intermodal Configuration rate sheet was set to Acc Charges on Original FB, you could override this by selecting FB Charges on the Customer Service > Intermodal tab > Chassis Bill sub-tab. Similarly, if the rate sheet was set to New Individual Bills or New Consolidated Bills, you could override this by selecting Acc Charges on the Customer Service > Chassis Bill sub-tab.

Use Default From Contract |
Use the invoicing method stipulated in the contract defined within the Intermodal Configuration program as one of the following:
|
FB Charges |
Generate a new freight bill, or freight bills, against which to put the chassis billing charges either on the Details or the Acc Chgs tab depending on the settings in the contract defined within the Intermodal Configuration program. Note: This will override the billing method defined in the contract and use the settings defined in the Application Configurator program for CHASSIBILLING.EXE. |
Acc Charges |
Use the existing Intermodal freight bill and display the charges as an Accessorial charge on the Customer Service > Acc Chgs tab. Note: This will override the billing method defined in the contract. |
| When copying a freight bill, the Billing Method of the newly copied bill will be set to Use Default From Contract, and not the billing method used by the original bill (e.g. FB Charges or Acc Charges). |
Creating chassis billing charges after the FB has been processed by the billing register
If the original freight bill Billing Method displayed on the Customer Service > Intermodal tab > Chassis Bill sub-tab is set to Use Default from Contract but the intermodal freight bill has already been run through the billing register before the appropriate clock end date has been entered, the freight bill’s accessorial charges will be missing from the original freight bill. The procedure to remedy this and create a new freight bill containing the chassis billing charges is to change the billing method on the freight bill to FB Charges and run the Chassis Billing program.
-
Go to the Customer Service > Intermodal tab > Chassis Bill sub-tab.
-
Change the freight bill to Billing Method = FB Charges.
-
Add the end date to the freight bill to indicate the clock end date. (The required end date field to use is configured using the Intermodal Configuration program in the Chassis Per Diem tab.)
-
Run the Chassis Billing program to create the charges onto a new freight bill.
The Chassis Billing program will use the Application Configuration > CHASSIS BILLING.EXE settings to control how the charges are created and where they will be displayed since there is no Chassis Bill contract on the new freight bill, just the accessorial charge.
Reconciling the chassis invoice payables against receivable income
If you are receiving invoices from chassis owners or chassis pools, use the Accounting & Finance > Accounts Payable > Chassis Invoice Reconciliation (ChassisAP.exe) program to compare and reconcile the chassis rental charges against the chassis billing charges and income.
The Chassis Invoice Reconciliation (ChassisAP.exe) program allows you to review the billing charges, automate the payment approval process, set rules to dispute usage charges and determine chassis usage profitability.
Troubleshooting - Chassis Billing
Intermodal chassis bill has no contract ID
Usually this is caused by one of the criteria associated with the Intermodal Configuration program > Chassis Per-Diem tab rate sheet contract preventing a match with the Intermodal freight bill.
The solution is to modify the Chassis Per-Diem contract rate sheet in the Intermodal Configuration program (if appropriate), or to create a new rate sheet to make sure there is a contract that matches the Intermodal chassis bill.
Chassis bill amount is zero on the freight bill
There are a few reasons why the fees are displaying a 0 value in the Customer Service > Intermodal tab > Chassis Bill sub-tab.
-
If the freight bill is set to have the chassis billing charges generated within a new fright bill the values will remain at zero until the Chassis Billing program is run to generate the charges.
-
If the freight bill is set to display the accessorial charges on the original freight bill but the values are all still set to zero, the typical reason is a missing value for the field associated with the Clock Start or Clock End date.
In this case, the solution is to review the associated contract rate sheet in the Intermodal Configuration > Chassis Per-Diem tab and make sure there are dates matching the required fields entered in the Customer Service > Intermodal tab > Chassis Bill sub-tab.
-
If the contract rate sheet is set up to include a few free days for the initial usage period, it may be that the chassis Clock Start and Clock End dates all occur within the free day’s period. Review the contract rate sheet and verify the values are correct.
-
If the chassis is associated with a rate setup in the Special Rate grid at the bottom of the Intermodal Configuration > Chassis Per-Diem tab, this might include an initial usage period with free days or the values might be incorrect.
-
Review the contract rate sheet and verify if this chassis is associated with a special rate and that the values are set up correctly.
-
It could also be that the chassis is associated with the wrong chassis owner or the freight bill is associated with a different site ID, service level or movement type etc. causing the Chassis Billing program to exclude it based on the chassis selection criteria entered into the Chassis Billing program main window.
No Records error message
Clicking the Report or Create Bills button on the Chassis Billing program window displays a "No records" error message.
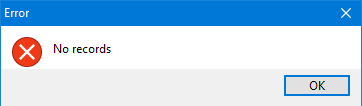
If the Chassis Billing program cannot find any matching records that require chassis billing charges to be generated, it will display a "No records" error message. Either there are no records to generate or you need to revise the selection criteria on the Chassis Billing program main window.