Payroll Timeclock
The Payroll Timeclock program automates the process of updating employee hours and related information within the TruckMate Payroll feature for processing by importing a file from a third party time clock hardware/software vendor.
It also includes setup and other data to accommodate scheduling, shifts, absences, adjusted time worked per rules and posted time for all employees on payroll. The Payroll Timeclock program can automatically approve imported time sheet entries based on specified tolerances and flag the exceptions requiring attention (with an explanation) to reduce manual verification.
Once the initial setup and configuration is ready, the process (which can be setup as an automated service) is:
-
creating a payroll timesheet batch;
-
importing the timeclock timesheet data;
-
validating and reviewing the data;
-
posting the information into the regular TruckMate Payroll Time Sheets program for further processing using your standard accounting procedures.
| Payroll Timeclock is only intended to handle hourly time for hourly employees and the hourly time for drivers outside of the driver pay contracts. Do not use the Payroll Timeclock to update driver timesheet hours that are normally updated via driver pay. This should be handled by the Driver Payables functions. |
To access Payroll Timeclock:
| From this location | Go to |
|---|---|
TruckMate Menu and TruckMate Task List |
Accounting & Finance > Payroll > Payroll Timeclock |
Windows Start Menu |
TruckMate 20xx > Payroll Timeclock |
Windows Explorer |
C:\Program Files (x86) > TruckMate 20xx > TimeClock.exe |
Setting up Payroll Timeclock
| The Payroll Timeclock program requires the Payroll Timeclock TruckMate license #31500. See License Registration. |
Setting up Application Configurator for Payroll Timeclock
The following Utilities > Application Configurator options are listed under Configuration Options > TIMECLOCK.EXE.
| Option | Definition |
|---|---|
Import sch Files Directory |
Specifies the directory location for the import map file: ImportAuditWorkedData.sch file. |
Setting up Security Configuration for Payroll Timeclock
The following options are available in the Security > Tabs Setting > Payroll section of Security Configuration to control which of the tabs are visible to this user or user group.
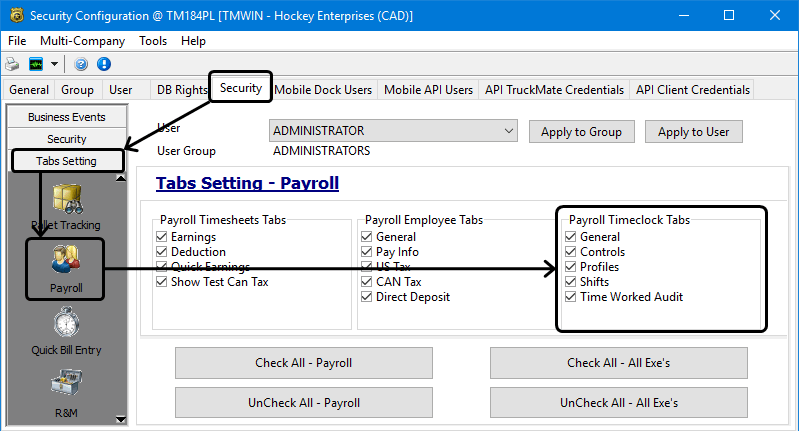
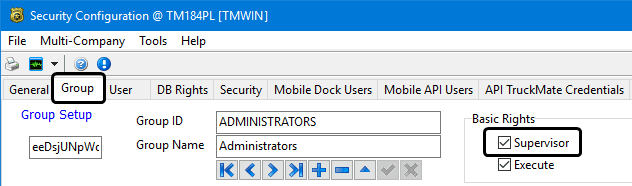
The Payroll Timeclock > Admin tab is only visible to users who belong to a security group with Supervisor rights.
Only system administrators have access to the Security Configuration > Group tab where the Supervisor permission checkbox is set.
Setting up Payroll Timeclock as an automated service
It is possible to have the Payroll Timeclock run as an automated service at a specified time when it will look for an import data file, process it, note any errors, create a log file and move the file into an archive files directory after it has been processed.
|
To set up and configure Payroll Timeclock to run as an automated service:
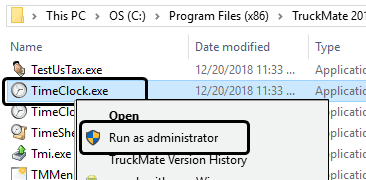
-
Run the TimeClock.exe as an administrator in order to enable the Payroll Timeclock > Windows Service Menu functions.
-
Select Setup Configuration from the Windows Service menu.

The Windows Service Setup window is displayed.
-
Enter the database configuration information and use the Test button to verify the connection is successful.
-
Ensure Startup is set to Automatic and click
 Install Service.
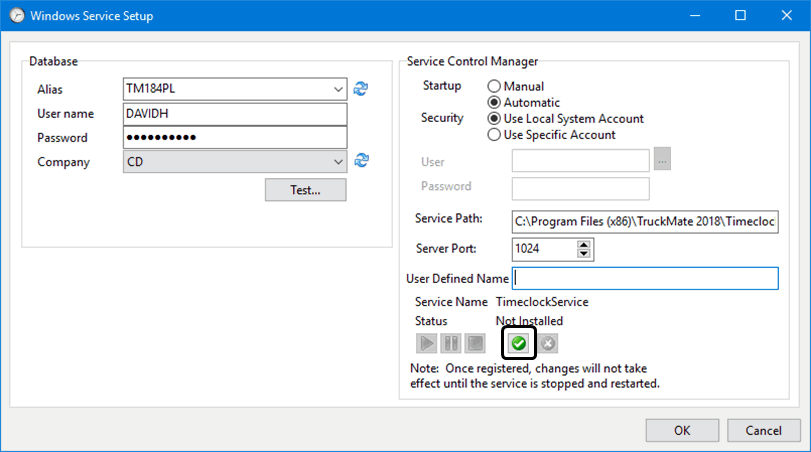
-
 Start the service.
 -
Click OK to save your entries and return to the Payroll Timeclock program window.
-
Select Setup Options from the Windows Service menu.
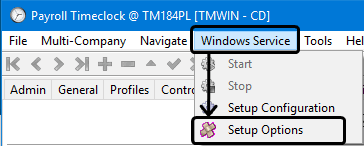
The Timeclock Windows Service Setup window is displayed.

-
Make the appropriate entries to these fields:
Required field: *
Field Definition Service Schedule *
Determines how often or when the Payroll Timeclock program will run automatically.
Import File Name *
This name must match the expected naming format for the time clock data transfer files containing the data to be imported. (Default is Timeclock*.*).
The system expects only a single file to exist in this folder at any given time since the files are moved to the Error or Archive files directory after they are processed.
Transfer Files Directory *
The location where the time clock system data transfer files will be deposited and made available for processing.
Error Files Directory *
The location where the time clock system data transfer files will be moved into if there is an error preventing this file from being successfully processed.
Archive Files Directory *
The location where the time clock system data transfer files will be moved into once this file is successfully processed.
Activity Files Directory *
The location where the automated data import activity logs will be created.
Archive Rotate Days *
Determine the number of days to keep the import data files in the Archive folder on the hard drive.
For example, a setting of 10 days means that the hard drive will keep the previous 10 days' worth of data files. Files older than 10 days (from the current date) are automatically deleted from the Archive Files Directory.
Log Rotate Days *
Determines the number of days to keep the activity log files on the hard drive.
For example, a setting of 10 days means that the hard drive will keep the previous 10 days' worth of log files. Log files older than 10 days (from the current date) are automatically deleted.
-
Click OK to save your settings.
Configuring the Payroll Timeclock
The basic steps are:
-
Review employee pay codes and pay rate data to ensure it is correct.
-
Review general statutory holiday information to ensure it is correct.
-
Review employee data for vacation pay and sick days to ensure it is correct.
-
Configure Admin tab > line manager assignments.
-
Configure General tab > profiles assignments.
-
Configure Profiles tab > profiles.
-
Configure Controls tab > timesheet controls, approval codes and paycode mapping.
-
Configure Shifts tab > employee shift scheduling.
Review employee pay codes and pay rate data
In order for the Payroll timeclock integration to work correctly, you must ensure that the pay codes and hourly pay rate information is set up for each of the hourly payroll employees.
-
Go to Profiles > Employee Profiles > Pay Info > Pay Info.
The Employee Data > Pay Info window displays the payroll parameters for pay entries.
-
Ensure that the pay info for each payroll employee is configured and that hourly rates are defined for any hourly pay codes being used.
Note: Any payroll drivers being paid hourly must also be set up as employees.
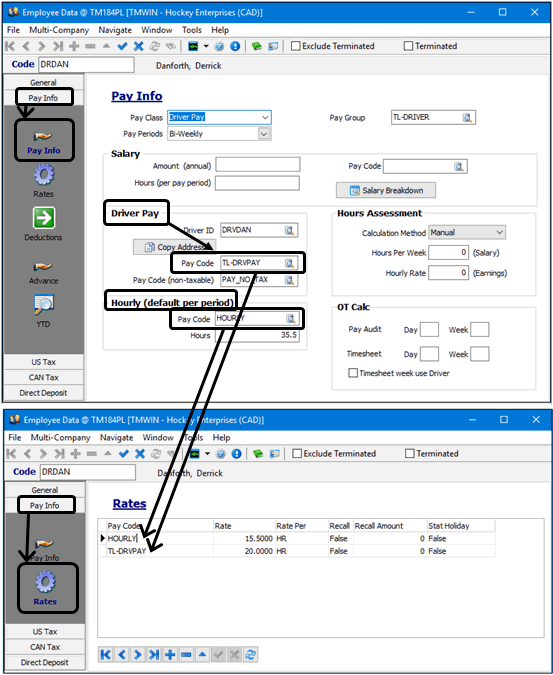
Note: These are the pay codes and pay rates that will be associated with employees when the Driver or Hourly shift types for the shift templates are set up in the Payroll Timeclock program. These can be configured differently for each employee but typically, there will be common groups.
Review general statutory holiday information
Ensure the standard statutory holidays are set up.
Go to Profiles > Codes Maintenance > Holiday Setup view tab.
The Holiday Setup window is used to define the standard set of holidays for your company.

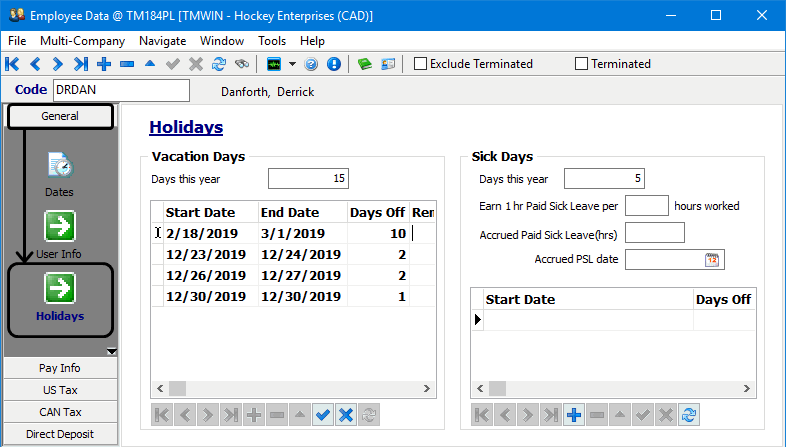
Review employee data for employee vacation pay and sick days
Ensure the vacation and sick day information is set up and current for each employee. This is used to define any paid time off hours and the Payroll Timeclock scheduling feature uses this data to limit the creation of shifts for this employee.
-
Go to Profiles > Employee Profiles > Holidays tab.
-
The Vacation Days and Sick Days information is displayed for each individual employee.
Notes:
-
Line Managers manage any scheduled time off that is unpaid by removing the Scheduled Shift.
-
The Drivers Days Off information in the Driver Profiles program is independent. It is not updated by the Payroll Timeclock program or by the Employee Profiles data.
-
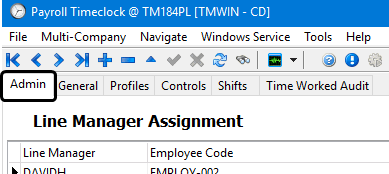
Configuring Admin tab > line manager assignment
Line Managers are selected employees responsible for managing staff shift schedules for a specific set of employees defined as their Span of Control (SOC). They are not necessarily required to be dispatchers or shop supervisors.
| Line Managers cannot manage the schedules of other Line Managers. |
To create the list of line managers and to assign employees to each line manager:
-
Go to Accounting & Finance > Payroll > Payroll Timeclock > Admin tab.
-
Click
 Insert from the navigation bar at the top of the window.
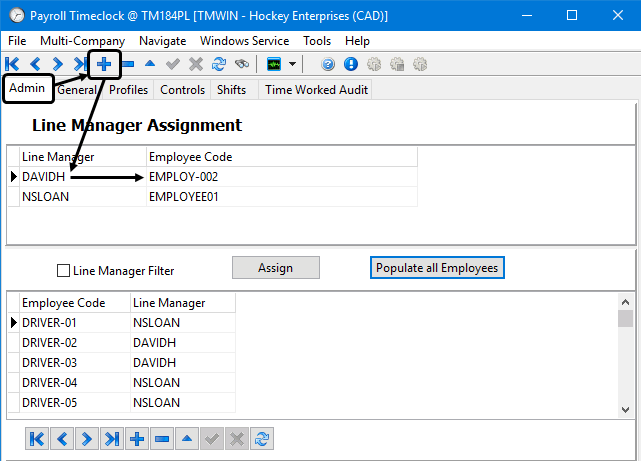
-
Double-click the Line Manager field and select the line manager from the list of TruckMate user names:
-
Double-click the Employee Code field and select the employee code associated with this line manager’s name. Choose carefully since your selections cannot be automatically verified as the same individual.
-
Click
 Post to save your entry.
Once all the line managers have been defined, each of the employees must be assigned to their designated line manager.
-
Double-click the Line Manager field beside the Employee Code on the bottom grid and select the line manager.
To assign a line manager to more than one employee at a time, use <CTRL><CLICK> to select and highlight a group of employees, select the line manager name from the grid at the top and click the Assign button.
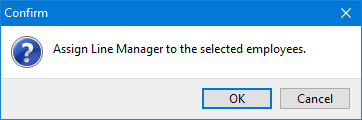
A confirmation message will appear.
-
Click OK.
Configuring Profiles tab > profiles
The time clock profile defines work schedule rules and tolerances for check in, check out, overtime and lunch times. Once the profiles are configured, they are assigned to employees. Each employee should belong to a profile group and can only be a member of one group.
To create a time clock profile:
-
Go to Accounting & Finance > Payroll > Payroll Timeclock > Profiles tab.
-
Click
Insert.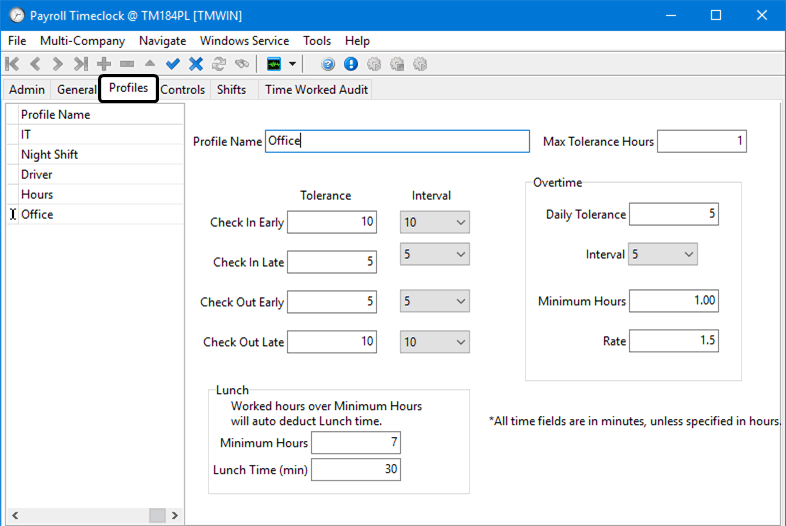
-
Make the appropriate entries to these fields:
Required field: *
Field Definition Profile Name *
Enter a descriptive title to define a profile group name.
Max Tolerance Hours
Max Tolerance field is used to tell the system not to process a comparison as the same shift if the employee started their shift more than the indicated max hours late or early. Exceeding this value causes the feature to not process the record and flag it as "Exceeds Tolerance Limit".
Tolerance
All Tolerance fields are the maximum number of time in minutes to allow on any validated field when comparing worked time and scheduled time to allow the automatic approval to occur.
If the entries exceed the tolerance time, they will not be approved automatically.
Interval
Note: Interval adjustments are a future feature not fully implemented yet.
Interval fields are used to increment and adjust the time:
-
Positive numbers move the time to the next interval.
-
Negative numbers move the time to the previous interval.
-
All intervals must be values where 60 divided by the value is a whole number so entries are selected from a drop-down list:
(2, 3, 4, 5, 6, 10, 12, 15, 20, 30).
Lunch >
Minimum Hours
Set the minimum hours to determine when the lunch duration time can be deducted from the time worked.
Lunch duration time is time automatically deducted from the time worked when the specified Minimum Hours' time has been reached. (This is a 2 decimal field.)
Lunch Time (min)
Defines the lunch duration time in minutes.
Overtime >
Minimum Hours
The overtime minimum number of hours defines how many hours must be worked before the feature will calculate overtime. (This is a 2 decimal field.)
Overtime >
Rate
Overtime rate value is used to hold an optional monetary amount as a fixed dollar amount to be used when overtime factor is not set up in Employee Profiles > Pay Info > Rates. These records will be marked as an Exception: "Overtime Rate Defaulted".
-
-
Click
Post to save your entry.
Configuring General tab > profiles assignment
Once the line managers have been set up on the Admin tab and the group time clock profiles set up on the Profiles tab, each line manager needs to associate their associated employees to one of the time clock profiles.
| Line Managers cannot manage the profiles of other Line Managers. |
For a line manager to associate employees to a time clock profile:
-
Go to Accounting & Finance > Payroll > Payroll Timeclock > General tab.
The Profiles Assignment window is displayed. The top grid contains the list of time clock profiles and the bottom list contains the list of employees associated with this line manager.

-
Double-click the Profile Name field in the bottom grid beside the Employee Code and select the profile name from the list.
To assign a time clock profile to more than one employee code at a time, use <CTRL><CLICK> to select and highlight a group of employee codes, select the profile name from the grid at the top and click the Assign button.
A confirmation message will appear.
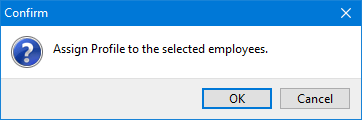
-
Click OK.
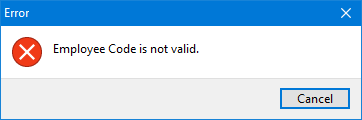
Note: If a line manager tries to add an employee who is not assigned to them and tries to associate this employee to a profile name, an "Employee Code is not valid" error message will be displayed. The employee must be assigned to a line manager using the Admin tab.
Configuring Controls tab > timesheet controls, approval codes and paycode mapping
The Payroll Timeclock > Controls tab allows line managers to create payroll batches without having to use the Payroll > Payroll Time Sheets program. It uses a stripped down set of fields to reflect only the simplest set of required information.
| The profiles, shifts, approval codes and paycode mapping should all be set up and configured before you use the Payroll Timeclock program to create payroll timesheet batches. |
The top Timesheet Controls section allows you to create separate timesheet batches for employees and drivers if necessary or desired.
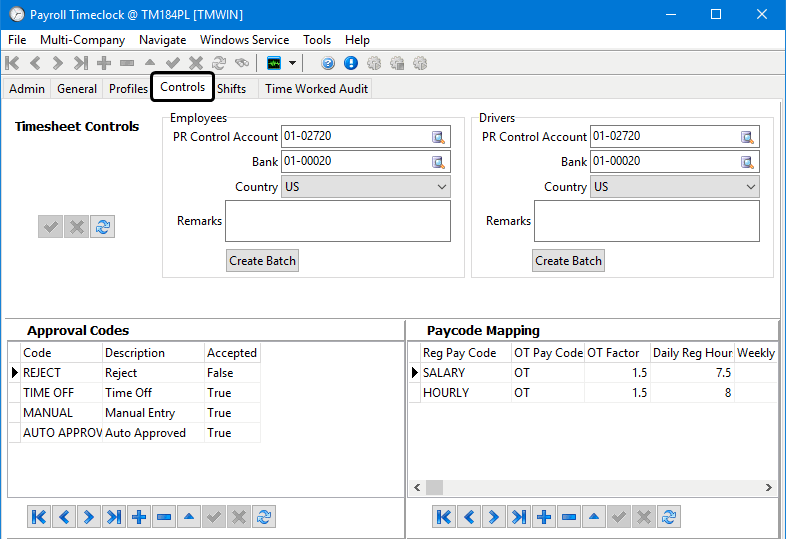
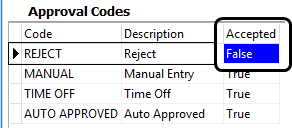
The Approval Codes are required by the functions on the Time Worked Audit tab for auditing purposes to document the reasons for approval, and to gather metrics for auditors. You can edit the existing default codes and create additional approval codes.
If the approval code Accepted column is set to False, any record assigned this code will not be imported into the timesheet batch.
The Paycode Mapping section is used to tell the Payroll Timeclock program which Paycodes to use for overtime payments. Entries here are a global setting for all employees. If there are no paycode mapping entries, the Payroll Timeclock program will use the regular time paycode with a 1.5 overtime factor.
The Combine Hours column setting in the Paycode Mapping grid will affect how overtime hours will be calculated.
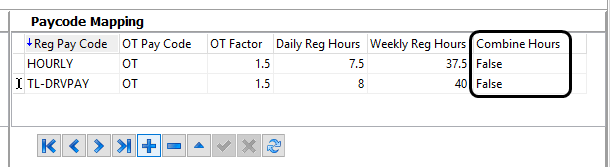
True |
Hours are added together regardless of paycode and the system will use all hours for any paycode on a given day/week to calculate overtime. |
False |
The hours associated with a paycode are tracked separately and the system will use only the hours within each paycode to calculate overtime. |
|
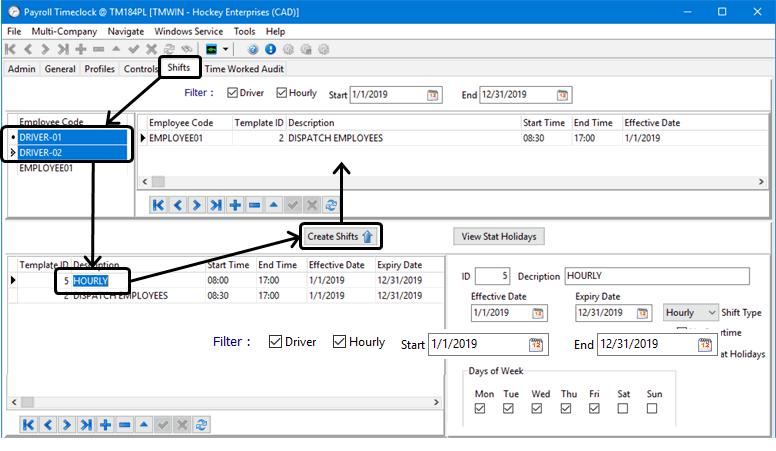
Configuring Shifts tab > employee shift scheduling
The Payroll Timeclock Shifts tab allows line managers to create shift templates and use these templates to create shift schedules for any selected group of employees. You can adjust the shift schedule for each employee individually if it differs from the template.
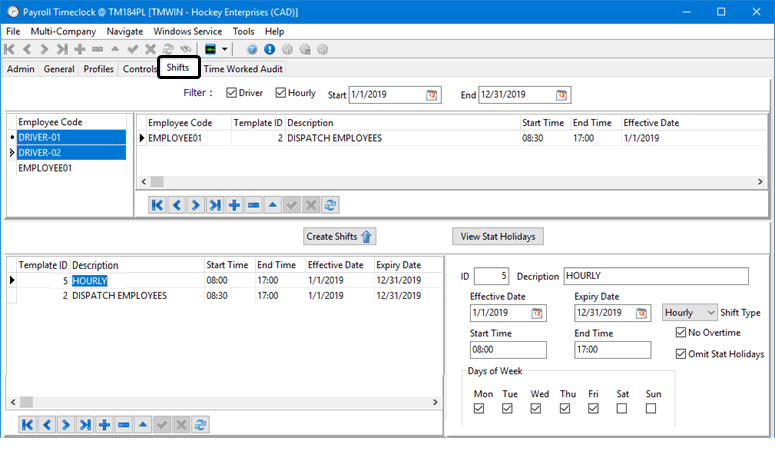
Before you can use this window to create the shifts, the shift templates must be created and configured. The shifts are created by selecting an employee (or several), selecting a shift template and clicking the Create Shifts button.
To create a shift template
-
Go to Accounting & Finance > Payroll > Payroll Timeclock > Shifts tab.
-
Click
Insert on the bottom left navigation bar.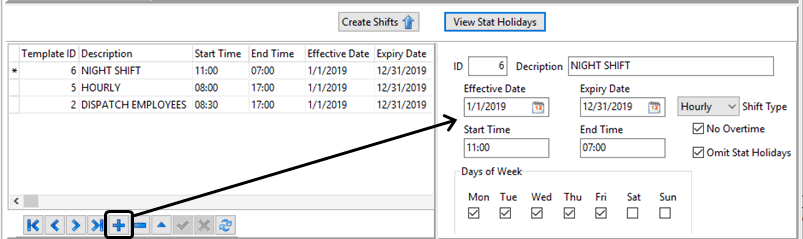
-
Make the appropriate entries to these fields:
Required field: *
ID * Auto-assigned by the system. Description
Name of the shift template
Effective Date /
Expiry DateDefine the date range when this shift template will be in effect.
Shift Type
Use the pull-down list to indicate the shift type as Hourly or Driver.
Note: The shift types are used to link to the employee pay codes and pay rate data for each employee.
Start Time /
End TimeDefine the starting and ending times for this shift.
No Overtime
When shifts are created, they will try to avoid creating overtime hours and any shift that would include overtime will NOT be created when this checkbox is selected.
The Combine Hours column setting in the Paycode Mapping grid will affect how overtime hours are calculated.
Weekly hours are adjusted down by 20% for each statutory holiday in the week being scheduled.
Omit Stat Holidays
When shifts are created, they will NOT be created on statutory holiday dates when this checkbox is selected.
Days of Week
Determines which days of the week shifts will be created for when creating shifts using this template.
-
Click
Post to save your entry.
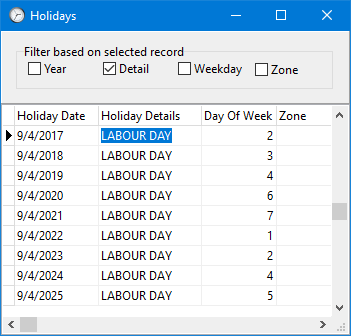
To view the statutory holiday information:
-
Go to Accounting & Finance > Payroll > Payroll Timeclock > Shifts tab.
-
Click View Stat Holidays to open the Holidays window.
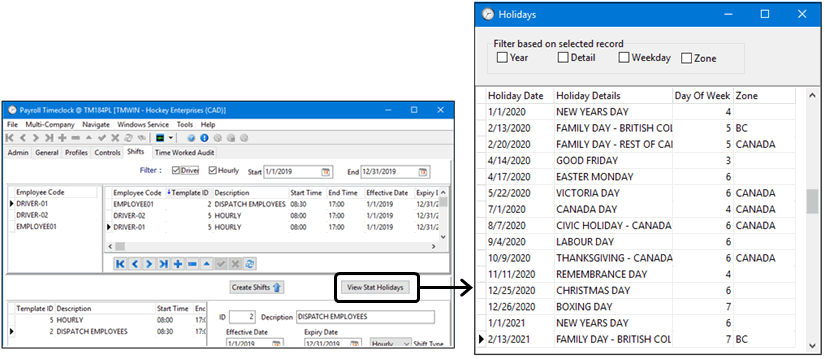
-
Select a record and use the filter checkboxes to restrict the list to a related subset of data.
Creating shifts for an employee using a shift template:
-
Go to Accounting & Finance > Payroll > Payroll Timeclock > Shifts tab.
-
Use <CTRL><CLICK> to select more than one employee at a time from the list on the left.
-
Select the shift template to be assigned.
-
Click the Create Shifts button.
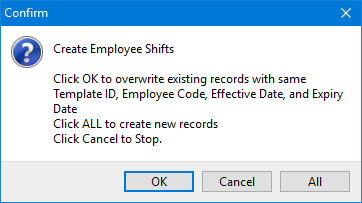
A confirmation message is displayed.
-
OK will overwrite any existing schedule entries with these new entries if the employee codes, shift template IDs and dates are the same.
-
All will leave any existing records as is and create a new set of schedule entries for that employee even if they occur on the same date and time.
-
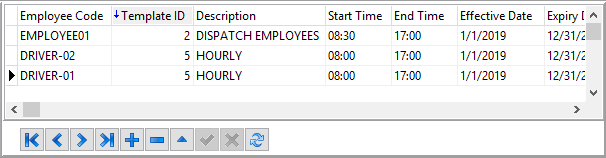
-
The new shift schedule entries will be added to the grid.
Notes:
-
There are no warning or activity log entries when shifts are blocked due to vacation days.
-
Authorized Time Off prevents adding scheduled shifts to specified date(s) but it will not remove any previously scheduled shifts.
-
The time off in Employee Profile and Driver Profile will overrides the scheduled time and assumed to be accurate.
-
The Omit Stat Holidays checkbox must be cleared in order to create shifts on a statutory holiday.
-
-
Use the Driver and Hourly checkboxes and the
 calendar icons in the fields at the top of the window to enter start and end dates and restrict the list of existing schedules being displayed.
Manually importing Payroll Timeclock data
The basic steps are:
-
Line Managers update the department schedules, vacation, time off and sick day information and use Payroll Timeclock to assign schedules to employees and makes adjustments as required.
-
Create a payroll timesheet batch.
-
Import the timeclock timesheet data into a timeclock audit batch.
-
Validate the timeclock timesheet data against the configured profiles.
-
Review and revise the timesheet data and revalidate.
-
Post the timesheet data.
-
Lock the timesheet data.
Creating a payroll timesheet batch
Before you can import timeclock timesheet data, you must have an existing payroll timesheet batch to import the timeclock audit data into.
|
To create a payroll timesheet batch using the Payroll Timeclock program:
-
Go to Accounting & Finance > Payroll > Payroll Timeclock > Controls tab.
Note: The Payroll Timeclock program allows you to create separate timesheet batches for employees and drivers or you can create one batch for both.
-
Enter payroll control account, the associated bank, country and any remarks.
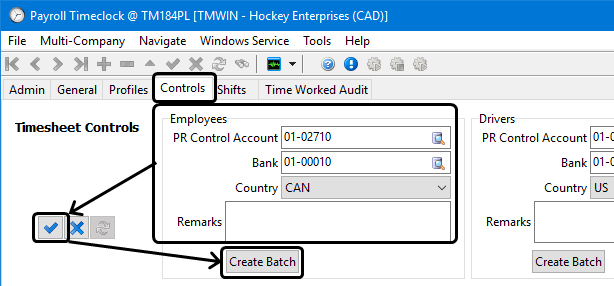
-
Click
Post. This will save the information as the default values for future batch creation. -
Click Create Batch.
-
A confirmation message is displayed. Click OK.
-
A confirmation message indicates the Batch ID number. Click OK.
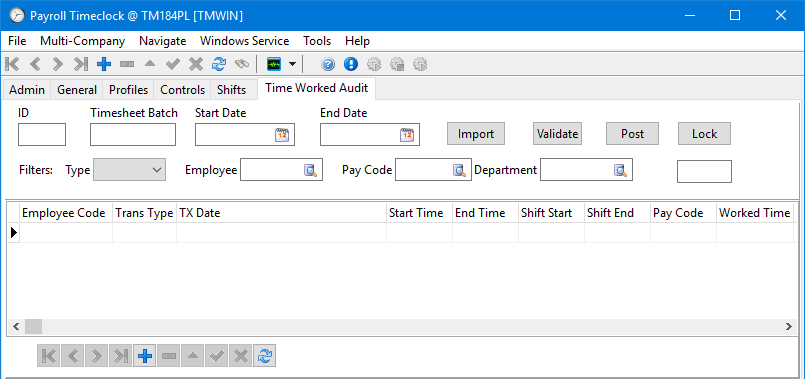
The next steps would be to go to the Time Worked Audit tab and import, validate and post the timeclock timesheet data into this batch.
Importing timeclock timesheet data
The raw data from a third party timeclock system must first be imported into the TruckMate Payroll Timeclock program so it can be reviewed, validated, adjusted and posted into the payroll timesheet batch file.
To start the process of importing timeclock timesheet data from an existing CSV file into an existing payroll timesheet batch:
-
Ensure the CSV file containing the raw timeclock data is in a file directory location that is accessible to the TruckMate Payroll Timeclock program.
-
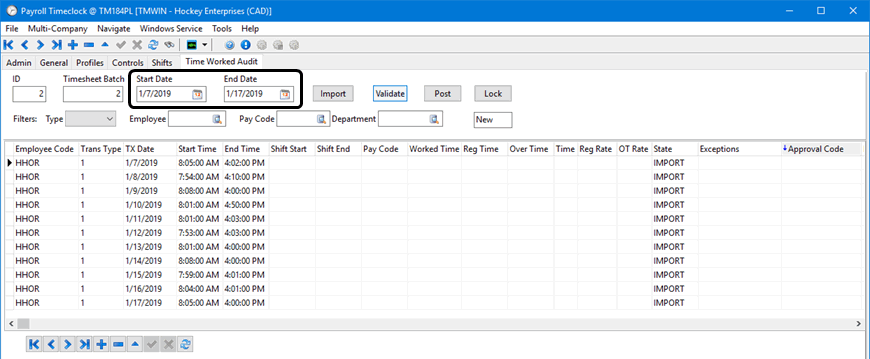
Go to Accounting & Finance > Payroll > Payroll Timeclock > Time Worked Audit tab.
-
Click
Insert. -
Double-click the Timesheet Batch field and select the unposted payroll timesheet batch created earlier. The timeclock audit batch ID is assigned automatically.
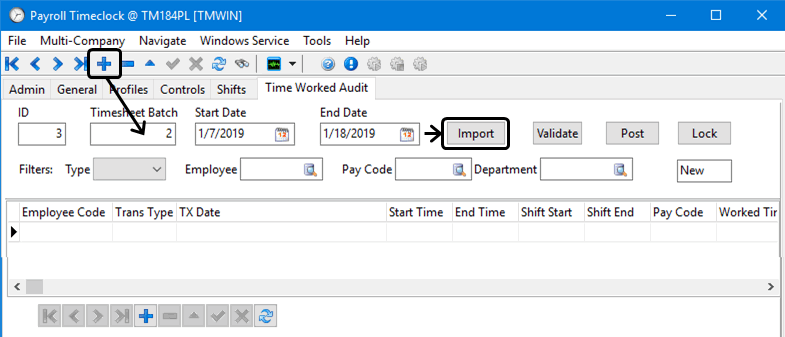
-
Enter the Start and End dates for this timesheet batch.
-
Click
Post. -
Click the Import button.
-
A confirmation message is displayed.
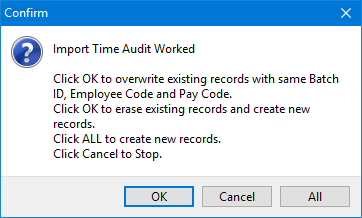
-
OK will overwrite any existing timesheet entries with these new entries if the payroll batch IDs, employee codes and pay codes are the same. This is useful when you need to make some changes to the configuration and re-import and re-validate the data before posting it.
-
All will leave any existing records as is and create a new set of timesheet entries for that employee even if they occur on the same date and time.
-
-
Browse to locate and select the import file containing the raw time clock data.
The raw time clock data within the import transfer file will look something like this (without the header row).

See Payroll Timeclock Import File specifications for more details.
-
The imported data will appear within the grid and the Start Date and End Date fields in the top header section will reflect the dates of the imported records.
Notes:
-
The data imported depends on the contents of the raw time clock data file. The import function is not restricted by the Payroll Timeclock header settings. These header settings and filters only affect what records will be displayed in the grid.
-
If the grid remains empty and shows no data imported, make sure there are no filters restricting the data being displayed in the grid.

The next step is to validate the data.
-
Validating the timeclock timesheet data
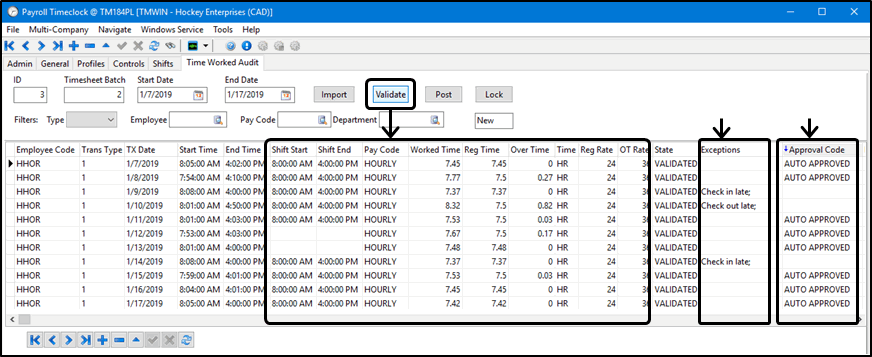
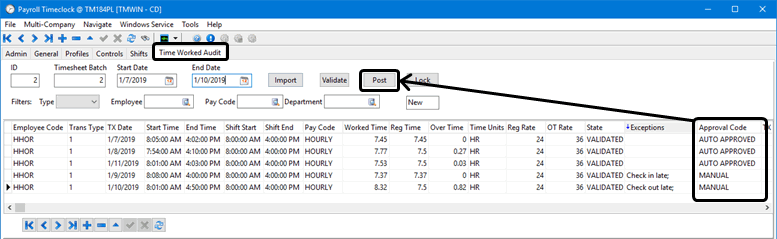
The validate function analyzes the imported time clock data to see if the entries are within the tolerances, compare the hours against the shift times setup for this employee, calculates overtime, notes any irregularities and marks the acceptable records as AUTO APPROVED.
To validate the timeclock timesheet data:
-
Make sure you are working on the correct set of imported data.
-
Click the Validate button.
Additional grid data is populated based on the settings and contents of the Profiles, Controls, and Shifts tabs.
Note: The State for each entry in the grid will change from IMPORT to VALIDATED.
If the records are within the defined tolerances for this employee’s profile and shift information, the Approval Code will be set to AUTO APPROVED, otherwise the Exceptions column will explain why this entry was not auto approved.
The next steps are to review, revise and re-validate the data.
Reviewing and revising the timesheet data
-
Use the information in the Exceptions column to review the entries and identify any records that require attention and possibly investigation or manual revision.
Items that may require manual correction typically include:
-
Statutory Holidays
-
Paid Time off
-
Add Time Worked that was not clocked on the hardware
-
Default Paycodes due to Driver Pay Contract conflicts
-
Overtime Paycodes that were not set up correctly for the intended usage
-
Overtime calculations, rates & time
-
Overtime is always a daily calculation. Total number of hours left in a week vs total number of hours available in a day (calculate against the lowest)
-
Hours remaining in a week are always a running total that does not include overtime calculated on a day in the week.
-
-
-
Double-click the Approval Code column to note the records as being manually approved, rejected or whatever codes are appropriate. The approval codes are set up on the Controls tab > Approval Codes grid and any codes associated with the Accepted column set to False will not be posted to the timesheet batch.
-
Click the Validate button to re-validate the revised data.
Note: If it ever became necessary to start all over, click the Import button and you can overwrite the existing set of records with the original raw data. You also have the option to delete and add records directly into the grid.
Once all the entries have been reviewed and assigned an approval code, the next step is to post the data into the actual timesheet batch.
Dealing with statutory holidays and time off
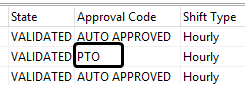
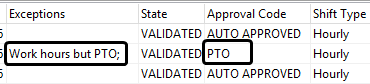
The Validate function will automatically make an entry for statutory holidays and assign them an approval code of PTO.
If the employee works on a statutory holiday, the Validate function will make an entry in the Exceptions field saying "Work hours but PTO:"
Line Managers will need to manually adjust the shift schedules prior to importing the time card data or to the records created with the Payroll Timeclock program if the employees are working on statutory holidays or to accommodate approved time off.
Line Managers would need to manage scheduled unpaid time off by removing the scheduled shift.
Posting the timesheet data
The timesheet batch already exists but it will remain empty until you use the Payroll Timeclock program to post the data.
To post the payroll timesheet data into the timesheet batch:
-
Go to Accounting & Finance > Payroll > Payroll Timeclock > Time Worked Audit tab.
-
Ensure that an Approval Code has been assigned to each entry to verify that the data has been reviewed and assessed as approved or rejected. If the Approval Code field is left empty, it will default as accepted and assumed to be approved.
-
Click the Post button.
-
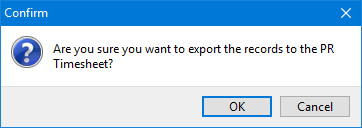
A confirmation message is displayed. Click OK.
-
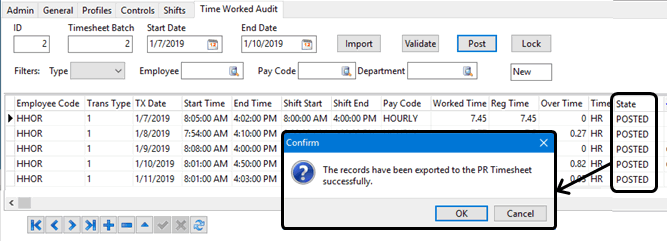
The State of the posted records will change from VALIDATED to POSTED and a second confirmation message appears. Click OK.
Note: Any unposted items will have a comment advising you as the reason why the posting failed. You can fix the data and re-post. See Handling last minute revisions for Payroll Timeclock timesheet entries.
-
The State of the posted records will change from VALIDATED to POSTED and a second confirmation message appears. Click OK.
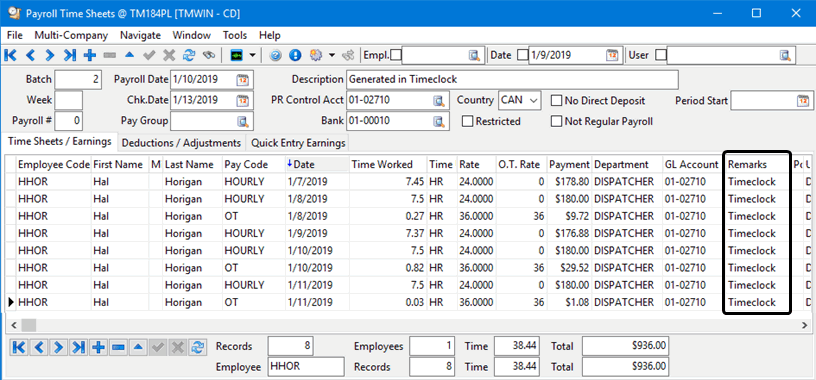
The records will have been created in the timesheet batch and the regular payroll processing procedures are applied by the accounting staff to complete the payroll process. If you have access to the Accounting & Finance > Payroll > Payroll Time Sheets program you can view the batch there and verify the records were successfully created.
Timesheet records created using the Payroll Timeclock will show the word "Timeclock" in the Remarks column on the Time Sheets / Earnings tab within the Payroll Time Sheets program.
Handling last minute revisions for Payroll Timeclock timesheet entries
Any missed items or revisions can be handled with the Accounting & Finance > Payroll > Payroll Time Sheets program but it is also possible to make the revisions using the Payroll Timeclock program and re-Post the data providing the timesheet batch is still open and it is appropriate to do so depending on your local process and procedures.
| Technically, it is possible to redo the entire process of importing, validating and posting into the timesheet batch if you are early enough in the process. |
If you try to re-post Payroll Timeclock records that already have a Posted state, you will be presented with a confirmation message warning you that the timesheet records already exist in the timesheet batch.
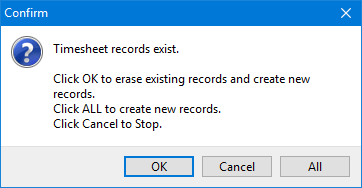
-
Clicking OK will overwrite any existing timesheet entries with the revised entries.
-
Clicking All will leave any existing records as is and create a new set of timesheet entries
Once you are certain no further changes are required, you can lock down the original data within the Payroll Timeclock program to prevent the data from being re-posted and to keep the data as reference information.
Locking the timesheet data
Locking the Payroll Timeclock audit batch data prevents any further revisions and prevents the changes.
To lock the payroll timesheet data within the Payroll Timeclock program:
-
Go to Accounting & Finance > Payroll > Payroll Timeclock > Time Worked Audit tab.
-
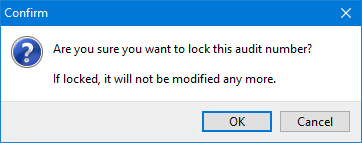
Click the Lock button.
-
A confirmation message is displayed. Click OK.
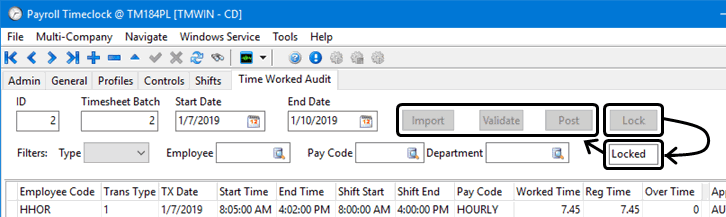
The records are now locked and cannot be deleted or revised.
The status for this payroll timeclock batch group will go from New to Locked and the Import, Validate, Post and Lock buttons will be disabled.
Payroll Timeclock Import File specifications
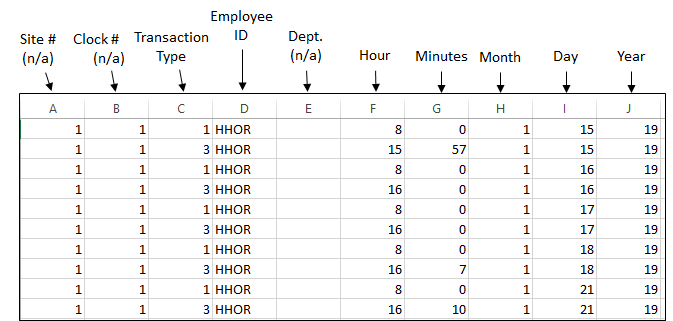
The raw time clock data import transfer file is typically a comma delimited (CSV) file with ten fields. For example, the layout for a timeclock CSV file as supplied by Enterprise Time Recording Solutions Inc. for their HandPunch Biometric Time & Attendance Terminal hardware would look like this:
| # | Description |
|---|---|
A. |
Site # |
B. |
Clock # |
C. |
Transaction Type: blank = non explicit (employee NOT required to identify transaction) 1 = IN record (time in or start time) 3 = OUT record (time out or end time) 2 = a MEAL OUT record (gone for a meal break) 5 = a BREAK OUT record (gone for a break) |
D. |
Employee ID: max of 4 digits (value is truncated - e.g., ADAMM will become DAMM) |
E. |
Used for 1 level department allocation/job cost: blank is OK |
F. |
Hour: 24 hour format (8 is 8:00 AM, 17 is 5:00 PM) |
G. |
Minutes: (00 to 59) |
H. |
Month: (1 to 12) |
I. |
Day: (1 to 31) |
J. |
Year: (2 digits, e.g., 19 is 2019) |
An example time clock data transfer file for five days of check-in and check-outs will look something like this:
| Some of the specifics may vary depending on which third party time clock system vendor you are using to collect the raw data. Be sure to create the .csv import files to conform with the Payroll Timeclock Import File specifications. |
Terminating an employee
When an employee is terminated:
-
Go to Accounting & Finance > Payroll > Payroll Timeclock > General tab.
-
Clear the Profile Name and ensure it is left blank to stop any further automated processing for that employee.
Any time worked would appear in the Time Worked Audit grid with a "No Timeclock Profile" Exception message.