COD Payable Audit

The COD Payable Audit program is used to view and audit COD transactions, receive payments, and prepare the transactions for update via the COD Payable Register program. COD Payable transactions are created on the COD Tab in the Customer Service program, or in the COD section of the Quick Bill Entry program. While you can enter check details on the COD tab of the Customer Service program, you still must audit the transaction in the COD Payable Audit program to assign a bank account for the deposit. Freight bills must be updated using the Billing Register program before their COD transactions will appear in the COD Payable Audit program.
To access COD Payable Audit:
| From this location | Go to |
|---|---|
TruckMate Menu and TruckMate Task List |
|
Windows Start Menu |
|
Windows Explorer |
C:\Program Files (x86) > TruckMate 20xx > Codview.exe |
Configuration
Before you can add CODs to Freight Bills, you must create at least two new General Ledger accounts in the GL Chart of Accounts program for 'COD Receivable' and 'COD Payable' postings. If you handle CODs in more than one currency, you must create COD Payable and Receivable accounts for each currency, as well as a 'COD Foreign Exchange' account (unless you choose to use your normal foreign exchange account).
Transaction Types for COD receipts and payments are set up in the A/R Transaction Types program. Default entries for COD Receivable and COD Payable are created during installation.
Service charges for handling CODs are configured in the Codes Maintenance program on the Accessorial Charges Tab.
The COD Payable Register program creates an entry in the check file for the purpose of the paying out the shipper for the COD amount (if the COD transaction has a Check Type of Company rather than Direct). The check can be printed from the Check Printing program or Instant Check program in the same manner as a normal check.
How Do I?
How do I View COD Transactions?
| Freight bills must be updated using the Billing Register program before their COD transactions will appear in the COD Payable Audit program. |
-
Open the COD Payable Audit program (CODVIEW.EXE).
-
Highlight the Customer with a COD Payment, and place a checkmark beside the 'Unaudited' checkbox in the 'COD Details' Filter Area. A list of COD Transactions will appear in the below Grid, containing your new COD Entry.
How do I change the Status of a COD transaction from 'Audited' to 'Interfaced'?
This process involves the use of the COD Payable Register program. See How do I Post/Interface COD Transactions?
How do I Audit a COD Payable Transaction?
| Freight bills must be updated using the Billing Register program before their COD transactions will appear in the COD Payable Audit program. |
-
Open the Customer Service program (CSERV.EXE), click: Start > Programs > TruckMate > Billing > Customer Service.
-
Enter the Freight Bill details, including the COD details on the 'COD Tab'. Post, Approve, Print and send the Freight Bill through the Billing register.
-
Open the COD Payable Audit program (CODVIEW.EXE).
-
Highlight the Customer with a COD Payment, and place a checkmark beside the 'Unaudited' checkbox in the 'COD Details' Filter Area. A list of COD Transactions will appear in the below Grid, containing your new COD Entry.
-
Use the Context Menu (right-click) and select 'Receive Payment'. The 'Adjust COD Payable' window will appear. Record your payment information here, and select a 'Bank' GL Account and click 'OK'.
-
You have now created a Deposit Entry, and all you need to do is go to the Instant Check program to print out a check for payment.
-
Run the COD Register program to move Post this payment to your Accounting system. Click here for more information.
How do I Void / Cancel a COD?
-
Open the COD Payable Audit program (CODVIEW.EXE).
-
Highlight the Customer you’re seeking and use your Context Menu (right-click) in the bottom Grid to select 'Receive Payment'.
-
Select the 'Direct' option in the 'Check Type' section.
-
Set both the COD Amount and Payment amount to $0. This will become your 'Void COD'.
-
Run the COD Payable Register program and process the 'Void COD'.
How do I Adjust 'Interfaced' COD Transactions?
Normally, 'Interfaced' ('Audited'/'Posted') COD Transactions cannot be edited. Following this process will, in effect, allow you to 'Cancel' the COD amounts Posted to your GL and enable you to re-enter the COD information.
-
Open the COD Payable Audit program (CODVIEW.EXE).
-
Highlight the Customer with a COD Payment, and place a checkmark beside the 'Audited' checkbox in the 'COD Details' Filter Area. A list of 'Audited' COD Transactions will appear in the below Grid.
-
Use the Context Menu (right-click) and select 'Set to UnAudited'. The 'Audited' COD will be now only be viewable if the 'Unaudited' checkbox is set in the 'COD Details' Filter area. At this point, you have the option of un-checking the 'Audited' checkbox in the COD Details Filter area, to avoid any possible confusion.
-
The now 'Un-Audited' COD will be viewable. Select 'Receive Payment' from the Context Menu (right-click) and enter the correct Payment Information on the Adjust COD Payable window.
-
Proceed to the COD Payable Register program to Post your COD Payable.
Menu Bar / Toolbar

Multi-Company
For more information on the Multi-Company options available from the Menu Bar, see the Multi-Company documentation.
Navigate Menu
The Navigate Menu contains the standard TruckMate Navigation Bar that is used to browse the records in your Database.
Tools Menu
TruckMate Monitor
 Click the down arrow next to this button to access the various functions of the TruckMate Monitor.
Remember Position / Size
Select this option to retain window size and position upon exit. When the program is re-opened, it will maintain its previous appearance.
Help Menu
TruckMate Help
 Selecting this button will open the COD Payable Audit topic in the TruckMate Online Help file (the page you are currently viewing).
Service Portal
 Selecting this button will open an instance of your default Internet browsing software, with the https://www.tmwcare.com login page displayed.
About
 Selecting this button will open the standard TruckMate About window, which contains important information about the application you are currently using, including its version number (important for support calls).
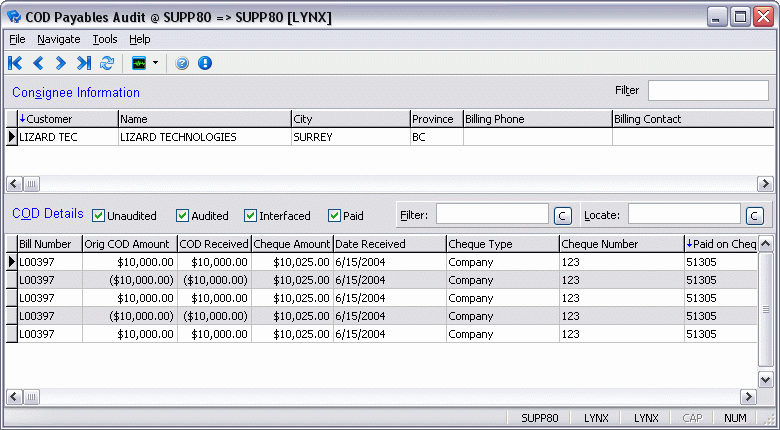
Consignee Information
In the Consignee Information Grid at the top of the screen, you can select the consignee for whom you wish to view COD transactions. To sort the items in the grid, click on the column header of the column by which you wish to sort. A blue arrow will appear that indicates that this column is the sort column, and the data will display in the order of the data in this column.
Filter
You can reduce the number of consignees displayed in the grid by applying a filter. The Filter field works in conjunction with the sort column, indicated by a blue arrow. When you enter characters in the Filter field, only records in the sort column that match the characters will be displayed.
Context Menu
Reporting - COD Report
Will display the Report Selection form. The Crystal Report template supplied with the TruckMate system is called CDCDOL.RPT. You will have the option to choose the status of transactions that you wish to report. The report will preview to the screen. Click the printer icon at the top of the screen to send the report to the printer that is configured as the default printer for your workstation.
See the Crystal Reports Reference for more information on Report Functions.
Attach / Open Related Files
Selecting this option will open the Attach / Open Related Files window, which will allow you to attach Images or Documents to this COD.
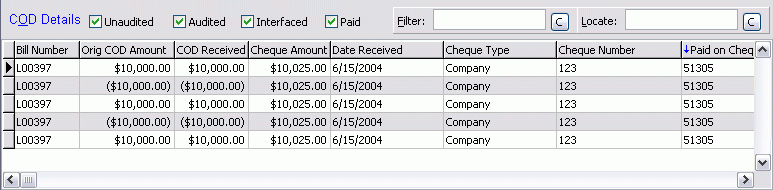
COD Details
The COD Details Grid displays all COD transactions for the Consignee selected in the top part of the screen.
Unaudited
Check this box to view transactions that have not been audited. The Audited status is applied to transactions when a Bank Account and Check Number have been assigned to the transaction using the Receive Payment option on the right mouse menu. Transactions cannot be updated by the COD Payable Register program until their status is changed from Unaudited to Audited using the right mouse menu option.
Audited
Check this box to view transactions that have been audited. The Audited status is applied to transactions when a Bank Account and Check Number have been assigned to the transaction using the Receive Payment option on the context menu. Only Audited transactions can be updated by the COD Payable Register program.
Interfaced
Check this box to view transactions that have been updated by the COD Payable Register program.
Paid
Check this box to view transactions that are complete- that is, a check has been printed using the Check Printing program or Instant Check program, and the check has been updated using the A/P Check Register program.
Filter
You can reduce the number of vendor records that are displayed by entering partial match data in the Filter field. The Filter field works in conjunction with the 'sort' column, indicated by a blue arrow. When you enter characters in the Filter field, only records in the 'sort' column that match the characters will be displayed.
Locate
The Locate field works in conjunction with the Filter field. That is, you must enter data in the Filter field before you can use the Locate field. To find a specific record, enter characters in the Locate field. As you enter characters, the selection indicator (the black arrow on the left grid margin) will move to the first invoice that matches the data entered in the Locate field. Use the 'C' button to clear any information entered into the Locate field.
Context Menu
Receive Payment
The Receive Payment menu option is only available if the transaction has the status of 'Unaudited'. To make an adjustment to an audited transaction, first set the status back to Unaudited using the 'Set to Unaudited' menu option. Once clicked, it will open the Adjust COD Payable window.
| Field | Definition |
|---|---|
Charge To |
The consignee customer code and name will display in the Charge To fields. This is a display-only field. |
Currency |
Displays the currency specified on the COD Tab of the Customer Service program. This is a display-only field, and cannot be changed. (Any changes made in this field will be reset) |
COD Charges |
Displays the total COD charge from the COD Tab of the Customer Service program. This is a display-only field. |
Balance |
Displays the total amount owed by the selected customer for the Freight Bill. This is a display-only field. |
Notes |
If notes were entered on the COD Tab of the Customer Service program, they will be displayed here. Add or change them as necessary. |
Payment Information |
|
Date Received |
Will default to today’s date. Click on the calendar button to the right of the field for a calendar selection form. |
Bank |
Select a general ledger bank account to which the check will be deposited. Only bank accounts of the same currency as the COD will be available for selection. General Ledger accounts are configured in the GL Chart of Accounts program. |
Check # |
If a check number was entered on the COD Tab of the Customer Service program, it will display here. Otherwise, enter the check number that was received from the consignee. |
COD Amount |
This field is used to input the dollar amount that the COD demands, as seen in the 'COD Charges' field above. The check created by the program will equal this amount. This field will default to the amount displayed in the 'COD Charges' field, but can be altered. |
Payment |
This field is used to enter the dollar amount of the total payment being made, including all of the other charges on the Freight Bill, as displayed in the 'Balance' field above. This field will default to the amount listed in the 'Balance' field, but can be altered by the User. |
Check Type |
The value specified on the COD Tab of the Customer Service program will display here. The difference between a Company and a Direct check is that a company check is made out to your company, while a Direct check is made out to the freight bill’s Shipper. If Check Type is set to Direct, the check amount will be set to zero. When the COD Payable Register program processes the transaction, rather than making a debit posting to the bank account, a debit posting will be made to the COD Payable control account. No check will be generated in the Accounts Payable module. |
Remit Information Manual Check |
|
Bank |
Enter the remittance bank information. Use the pull-down arrow to select the preferred bank account. |
Number |
If you issued a manual check to pay the shipper, enter the check number here. If you enter a Manual Check Number, when you post the transaction through the COD Payable Register program a check will be created with this check number and with the status of Printed (so it will not be included on later check runs). You must run the AP Check Register program to complete the transaction. |
Set to Unaudited
You can set the status of any audited transaction back to unaudited until it has been processed by the COD Payable Register program. By setting a transaction’s status back to Unaudited, you will be able to modify the transaction details.
View COD Details
Will show a summary of the COD transaction. See the Customer Service program > COD Tab for an explanation of the fields.
View Freight Bill
Will load the Customer Service program (if not already loaded) and display the freight bill associated with the COD transaction.
Attach / Open Related Files
Selecting this option will open the Attach / Open Related Files window, which will allow you to attach Images or Documents to this COD.