Zone Codes

Zone Codes are used to indicate geographical locations. They are used in the Customer Service program and Quick Bill Entry program to assign pickup and delivery locations to Freight Bills. They are used in the Dispatch program to analyze freight location and resource locations, and to create trip legs. Zone Codes are used in the Rates Maintenance program to configure rate tables as well as in Service Level Matrix program to define terminal delivery times and Advance/Beyond times. Zone Codes are organized into hierarchies. That is, the Zone at the top of your Zone hierarchy might be the North American continent; the next level might be Zone Codes that represent countries; the next level represents states and provinces; the next level represents cities; and the lowest level might represent freight terminals within cities.
Zone Code Definition
The section of the screen on the left is used to create Zone Codes.
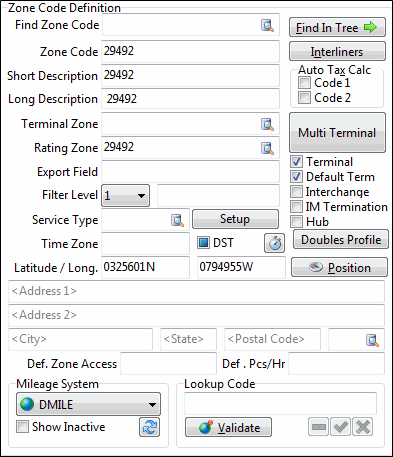
Find Zone Code
To display the Zone Code Definition for a previously defined Code, enter the Code in this field. You can enter the starting characters of the Zone Code and click the search button to display a search form.
Zone Code
Can be up to 10 characters in length. Both the Zone Code and the Code’s Short Description are used throughout the system to select Zone Codes, although the Short Description is more commonly used.
When you add a Zone Code, it will automatically appear in the right-side 'World' menu of the Zone Tree as an 'un-positioned' Zone. You will have to manually drag and drop it into its relative position on the Zone Tree’s left side (which contains all your already configured Zones) for it to be added to the Zone Tree.
Find in Tree
If you want to display the position of the selected Zone Code in the Zone Code hierarchy (on the right side of the screen), click this button.
Short Description
Enter a description for this Zone Code, up to 30 characters in length. Third Party mileage software, such as PC*Miler and Rand McNally, use the short description to perform mileage lookups, so you must enter the short description in the format that is used by your mileage software. In most cases, the city name, followed by a comma, followed by the two digit state or province Code is acceptable. For example, 'Washington, DC' is an acceptable format for third party mileage software.
Long Description
Is optional, and used for information and reporting purposes only.
Terminal Zone
Use this field to select the Terminal Zone for the selected Zone Code. This will often be the same Zone as the Zone Code itself, but some Zones may have their Terminals at other locations.
Rating Zone
Can be used to assign a substitute Zone for rating purposes. For example, if you wanted all the Zones in one province to be calculated using the same rate, you would enter the province’s Zone Code in the Rating Zone field of each of the province’s child Zones. Then, when you set up the rate table, your origin or destination Zones would be provincial Zone Code, and all the child Zones would be included in that rate sheet.
Export Field
Is used to specify Zone equivalencies for export to third-party programs, such as TruckMate Legacy. If your third-party product uses a different Zone Code than TruckMate Code, specify that product’s equivalent Code here.
Automatic Tax Calculation
To indicate that 'Code 1' and / or' Code 2' apply to Freight Bills using this Zone as a pickup or delivery point, check one or both of these boxes. These fields work in conjunction with the Tax Rules configured in the Tax Calculation Configuration program.
Interliners Button
You can automate the process of assigning Interliners by configuring the Zones that Interliners service using the Interliner Zone Setup window. In the Customer Service program > IP tab, the 'Determine Interliners and Rate' button will look for an Interliner assigned to the Start Zone of the Freight Bill. If it finds one, it will create an Interliner record using the Interliner assigned to the Zone Code, the Start Zone as the Interliner’s From Zone, and the Junction Zone as the Interliner’s To Zone.
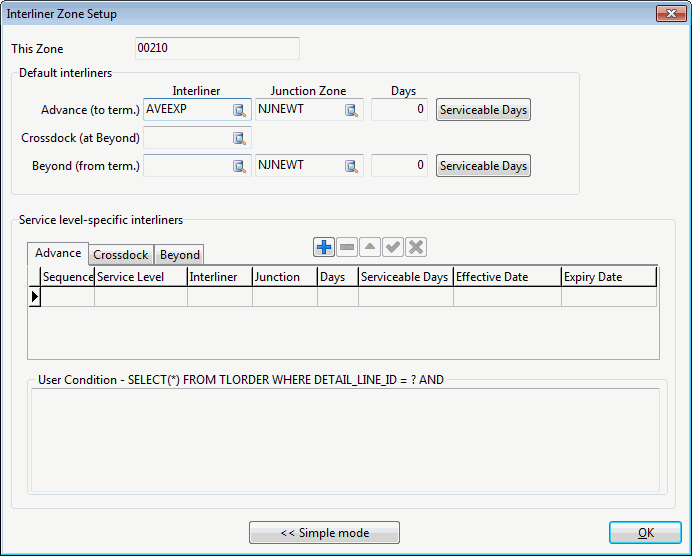
This Zone
Displays the Zone Code that was selected when the Interliner button was clicked.
Default Interliners
This section allows you to configure the default Interliner for several different shipping/movement circumstances: 'Advance (to terminal)', 'Crossdock (at Beyond)' and 'Beyond (from terminal)'.
Interliner
Select an Interliner Code from the search button menu list for the 'Advance', 'Crossdock' and 'Beyond' fields. Only vendors who are configured as the Interliner type in the Customer & Vendor Profiles program will be available for selection.
The Vendor selected here will become the default Interliner for the movement that this field corresponds to ('Advance', 'Crossdock' or 'Beyond') for the particular Zone Code that was selected on the main Codes Maintenance window.
Junction Zone
Select a Zone Code from the search button menu list for the 'Advance' and 'Beyond' fields. The Zone specified here will become the To Zone on the Interliner record in the Customer Service program.
Serviceable Days
For both the 'Advance' and 'Beyond' fields in turn; select the days of the week that the delivery or pickup is allowed, this functionality provides the flexibility to allow or decline a delivery or pickup operation in certain days of the week.
Service Level-Specific Interliners
These options become available when a User clicks the 'By Service Level' button on the main form. Setting a default Interliner by Service Level will make that Vendor responsible for the movement of Freight that has a Service Level Code that matches the one configured for the current Zone.
Advance tab
Double click the first three fields to select a 'Service Level', 'Interliner' and 'Junction' for the 'Advance' Leg of the Trip. Enter a numeric value in the 'Days' field for the approximate length of the Trip.
Crossdock tab
Double click the first three fields to select a 'Service Level', 'Interliner' and 'Junction' for the 'Beyond' Leg of the Trip. Enter a numeric value in the 'Days' field for the approximate length of the Trip.
Beyond tab
Double click the first three fields to select a 'Service Level', 'Interliner' and 'Junction' for the 'Beyond' Leg of the Trip. Enter a numeric value in the 'Days' field for the approximate length of the Trip.
User Condition
The User Condition section is an SQL entry field that allows the User to specify additional rules (against the TLORDER table) to determine whether or not to apply the Carrier chosen in the above 'Service Level-Specific Interliners' section.
For example, the User could input: SITE='SITE1' AND BILL_TO NOT IN ('r;D')
This condition would perform the automatic Inteliner assignment if the Freight Bill was a SITE1 bill (LTL, for example) and the charges are not collect.
Multi Terminal Button
This button can appear in one of four different forms described next:
The first form is being invisible (Hidden). This takes place when the 'Use Multi Terminals' configuration option of CITYDISP.EXE program is set to 'False'. In this case the button will not appear on the window and the user is only allowed to define a single terminal per zone.
![]() The second form for this button is to be visible and tagged with 'Multi Terminal' on its surface. This happens when the 'Use Multi Terminals' configuration option of CITYDISP.EXE program is set to 'True' and the zone has no defined terminals yet. Use this button to access the Multi Terminal Setup window, where you can use the '+' button to add multiple Terminal records to a single Zone.
The second form for this button is to be visible and tagged with 'Multi Terminal' on its surface. This happens when the 'Use Multi Terminals' configuration option of CITYDISP.EXE program is set to 'True' and the zone has no defined terminals yet. Use this button to access the Multi Terminal Setup window, where you can use the '+' button to add multiple Terminal records to a single Zone.
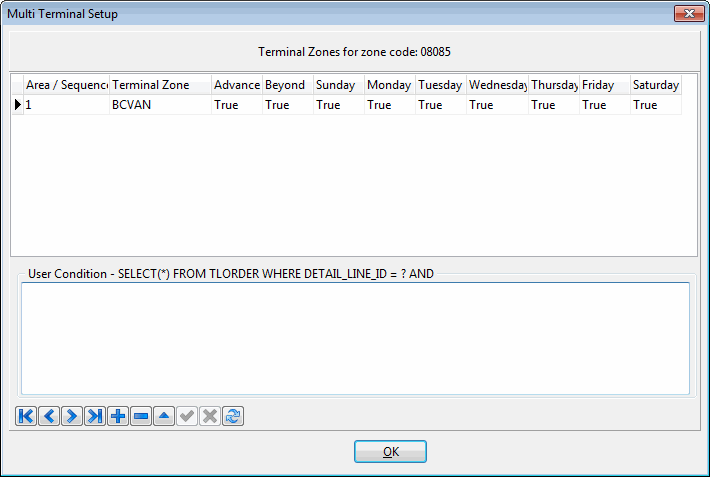
This window allows the user to define multiple terminals for a selected zone code. The upper part of the window is a grid to define the terminal, in addition, the week days with a 'True/False' value for each day are in the grid. This can be useful when defining the same terminal for different vendors where a vendor can be used on certain days and another is used on different days. The grid also has another two fields to define the terminal as being an 'Advance' or a 'Beyond' terminal.
The lower part of the window is to enter user defined SQL conditions (SQL where clause). If the user enters conditions in this area the system will use those conditions in determining pickup and delivery terminals for freight bills.
![]() The third form takes place if the 'Use Multi Terminals' configuration option of CITYDISP.EXE program is set to 'True' and the zone has a single terminal defined. The button in this case will appear tagged with 'Multi Terminal [\{Terminal Code}]' on its surface. The defined terminal code will appear on the button between the brackets '[ ]'. use the button to access the 'Multi Terminal Setup window' (described before) to edit the existing terminal or add additional terminals.
The third form takes place if the 'Use Multi Terminals' configuration option of CITYDISP.EXE program is set to 'True' and the zone has a single terminal defined. The button in this case will appear tagged with 'Multi Terminal [\{Terminal Code}]' on its surface. The defined terminal code will appear on the button between the brackets '[ ]'. use the button to access the 'Multi Terminal Setup window' (described before) to edit the existing terminal or add additional terminals.
![]() The fourth form of this button takes place when the 'Use Multi Terminals' configuration option of CITYDISP.EXE program is set to 'True' and the zone has already multiple terminals defined. In this case the button will appear tagged with 'Multi Terminal […]' on its surface. You cam access the 'Multi Terminal Setup window' (described before) by selecting this button to edit the existing terminals or add additional terminals.
The fourth form of this button takes place when the 'Use Multi Terminals' configuration option of CITYDISP.EXE program is set to 'True' and the zone has already multiple terminals defined. In this case the button will appear tagged with 'Multi Terminal […]' on its surface. You cam access the 'Multi Terminal Setup window' (described before) by selecting this button to edit the existing terminals or add additional terminals.
| As an extended feature the same terminal can be added more than once, this feature might be useful when dealing with multiple vendors serving the same zone where one vendor will handle deliveries / pickups on certain days of the week and the other on another set of days of the week. However, only a single record with 'Advance' = 'True' or 'Beyond' = 'True' is allowed. |
Filter Level
Use the pull down button to select a Filter Level for use with all Zone Codes. Filter Levels correspond as follows:
-
A Filter Level of '1' drills down to the State / Province Code (which is displayed in the adjacent field).
-
A Filter Level of '2' drills down to the Country Code.
-
A Filter Level of '3' will display any Code above the Country Code, in most cases this means that a Filter Level of '3' will display nothing in the adjacent field.
Terminal
If this Zone represents a freight terminal, check this box. Terminal Zones are used in the CrossDock program. They are also used for the Driver Check In function in the Dispatch program.
Default Term
If you selected the current Zone to be a Terminal (see 'Terminal' field description above), then you can set it to be the default terminal using this field. To do so, just check the checkbox. It’s important to set one terminal zone as the default terminal. TruckMate assigns the default terminal to any freight bill on a trip that is docked (its status changed to 'Docked') but does not have a terminal zone selected for its delivery record. The reason for such logic is to maintain freight bill visibility in Multi Mode Dispatch program. You can only have one terminal as the default terminal. If you select a Zone to be a terminal even though you already have one as a terminal, TruckMate will cancel the first terminal a being the default one and sets the newly selected one as the default terminal. To enforce this concept further, a pre-defined terminal is created called 'Defterm'. If you don’t assign any terminal to be the default one, TruckMate will assume that the predefined terminal, Defterm, is the default terminal. Defterm is a system internal default terminal.
Interchange
Added functionality to allow only configured vendors to interline freight. The user may now configure vendors.
IM Termination
Selecting this option will set any Containers to 'Inactive' Status once they are delivered to this Zone.
Hub
Selecting this option will indicate the zone you are creating is a hub zone (that is, it contains a port, a railyard, an airport, etc.).
Service Type / Setup
Before assigning a 'Service Type' to a specific TruckMate Zone Code, the user must select the 'Setup' button adjacent to the field to access the Service Type Setup window. There, the user must assign a 'Service Type' ID value, a 'Description' of that Service Type, and specify whether this Service Type will disallow the user of the Zone Code in the Customer Service program ('Stop Use').
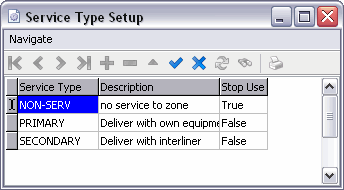
Once setup, the user can assign a 'Service Type' to the Zone. If the selected Zone is used on a Freight Bill, and it is set to 'Stop Use' = 'True', the system will prohibit a 'NA' Freight Bill from being posted, or an existing Freight Bill from being saved, providing a warning to the user.
Doubles Profile
This button pops up the Doubles Waypoint Profiles window, which can be used to enter the start profile for Segment 2, the end profile for Segment 2 and the Start profile for Segment 3. These three fields define the profiles to implement a doubles trip.
Location Info
Time Zone / DST
Click on the 'Watch' icon to open a window where you can select a Time Zone Code from a list of available Time Zones in your system. Check the 'DST' option to calculate for Daylight Savings Time.
| When calculating Time Zone offset values (such as a GMT offset), ensure that the offset value is entered in the '-X:XX' format (i.e. -6:00). This will ensure that other TruckMate applications that depend on this value will function correctly. |
Latitude / Longitude
These fields are used by the mapping function in the Driver Call In program, and by the Mobile Dispatch module. To use your third party mileage software to fill in the values, click on the 'Position' button.
Position
Selecting the 'Position' button will update the 'Latitude' and 'Longitude' fields.
| The Mileage Server program must be active to use the Position function. |
Address Fields
The 'Address 1', 'Address 2', 'City', 'State/Province' and 'Postal Code/Zip Code' can be used to enter the default address location for the currently selected Zone. If you are using third-party Mileage software’s 'Street Level' functionality, and have the Application Configurator program > MILESERV.EXE > 'Street Level' option set to 'True', these address fields will be used to validate the Zone instead of the 'Lookup Code' field value (below).
See the How do I setup street-level mileage calculations? topic for more information.
Country Code
Use the edit-pick to choose the two-character Country Code for the selected zone code. Country Codes are configured on the Countries tab. Only those Country Codes that are flagged as 'Active' will be available for assignment to Zone Codes.
Mileage System
The purpose of the Mileage System setup area is to assign lookup Codes from the mileage system to your Zone Codes. This only needs to be done if the Short Description of your Zone Code does not correspond to your mileage server’s lookup value for this Zone Code. Also, if your mileage software has multiple points that match your Zone’s short description, you can configure which of those points should be assigned to this Zone Code. If a value is entered in the Lookup Code field, the system will use this value when performing third party mileage lookups. If no value exists in this field, the system will use the Zone Code’s Short Description.
Show Inactive
Selecting this flag will make 'Inactive' Mileage software on your system available for selection.
Def. Pcs/Hr
This is for Terminal Zones only and is the loading and unloading speed in pieces per hour. This is the default when no specific customer is involved.
Def. Zone Access
Default number of minutes to access this Zone from the highway.
Mileage System
The drop-down menu at the bottom of the Zone Definition section allows you to select the Mileage System that will be used with your TruckMate Zone codes. 'DMILE' refers to the internal TruckMate mileage table that is accessible from the Customer Service program > Mileage tab. If you have a third party mileage system (and it is properly configured in the Mileage Server program) you will be able to select that software from the drop-down menu as well.
| The Codes Maintenance program will automatically select the Mileage System that your company uses, based on the tab that has been selected in Codes Maintenance previously. |
Lookup Code / Validate
Will send the Zone Code’s Short Description to the third party mileage software (selected in the Mileage Server program) and return a matching value, if found. The lookup is not case sensitive. If multiple matches are found, a window will be displayed where you can select the third party’s Code. This happens when there are multiple zip Codes for the same city / state combination. Be sure to select the 'Save' button (check mark) to post the Lookup Code record.
Zone Tree
The Zone Tree is a hierarchical structure of your Zone Codes. It is used for filtering in the Dispatch program. The Zone Tree can have as many levels of depth as you like. The Zone Tree is structured in a similar manner to Windows Explorer - sub levels are indicated by a plus symbol, collapsible levels are indicated by a minus symbol. On the right side of the Zone Tree display, Zone Codes that have not been positioned in the Zone Tree are displayed. The Zone Codes 'World' and 'PENDING' display in this area by default.
To position a new Zone Code in the hierarchy, expand the tree so that you can see the new Zone Code’s parent Zone. Then click and drag the new Zone from the right side of the screen into the desired tree position.
Rebuild
The 'Rebuild' button will Rebuild your Zone Tree data based on the Zone Codes available in the TruckMate system. When clicked, this button will generate a Warning window. If you are sure that you want to Rebuild your Zone Tree data, click 'Yes'. Otherwise, click the 'No' button.
Context Menu
Find Zone Code
To display the details of any Zone Code, click on the Zone Code in the Zone Tree, then click the right mouse button and select the Find Zone Code option. This will display the record in the Zone Code Definition section of the screen.
Update Terminal Zones (from Codes Maintenance Tools Menu)
Because in TruckMate 7.0 the Terminal Zone wasn’t used to determine what Terminal a Freight Bill would show in, it’s important that the Customer run the 'Update Terminal Zone' tool after an upgrade. This tool looks at the Parent Zone’s 'Terminal Zone' and then updates any Child Zones that do not have Terminal Zones already. The best practice would be for the Client to manually check their Parent Zones and then run the tool.
-
New Zone Code:* when creating a new Zone Code it will leave the Terminal Zone null until you drag it into the zone tree, at that point it will update the zone to be the same at the parent.
-
Updating Parent Terminal Zone:* when updating the Terminal Zone of a Parent you will be prompted the following options:
-
'No to All'* - will update only update Child Zones with the same Terminal Zone as the Parent.
-
'Yes to All'* - will update all Terminal Zones no matter what the Terminal Zone is.
-
Setting up street level validation and mileage calculations
If using PC*Miler Streets as your mileage calculation software, users can opt to validate their mileage from zone to zone at street level, meaning that the mileage calculations will be precise down to the actual address associated with a specific zone code.
| Once the following steps are completed, TruckMate will route your trips based on the street level information entered. In order to see the same distance values in the PC*Miler application itself (i.e. when you’re checking the distance values for accuracy) you must open the routing 'Options' menu and ensure that the 'Use Hwy Only' flag is un-checked. |
-
Ensure that the Mileage Server program is correctly setup and interfaced with your third-party mileage software. Follow the instructions on the Mileage Server manual page if you need to set this up.
-
Open the Application Configurator program > MILESERV.EXE section and turn the 'Street Level' config option to 'True'.
-
Open the 'pcmserve.ini' file (located in the C:\Windows\ directory) and update the 'UseStreets' value to 'True' (i.e. UseStreets=true).
-
Open the Codes Maintenance program > Zone Tab. For every zone code that you wish to validate at a street level, you must enter the exact address information into the 'Address 1', 'City', and 'State' fields on Zone Tab. You can enter the 'Postal Code' value if you know it, but PC*Miler may update this based on the validated location.
-
Once the address information has been correctly entered for the Zone, ensure that your correct mileage software application is chosen in the 'Mileage System' section in the bottom-left corner of the Zone Tab.
If your mileage software is not available for selection here, the Mileage Server program is not running or is not correctly setup
-
Select the 'Validate' button.
If PC*Miler returns a range of addresses (i.e. 100150 Broadway St.), ensure that you select the 'Validate' button a second time so that your entered address is correctly validated. -
Repeat steps 4 and 6 for all of the zone codes you wish to validate to the street level (i.e. terminal zones or zones that are associated with a specific customer).
-
Mileage calculations throughout TruckMate will now be accurate to the street addresses of the zone codes you have updated.
How do I load zone codes using Data Studio (DB 10.5 process)?
To load the ZONE.ixf file using Data Studio 10.5, follow these steps.
-
Open the DB2 Data Studio utility by selecting: Start
 Programs IBM Data Studio Data Studio Client.
 -
In the Administration Explorer, select your database to expand.
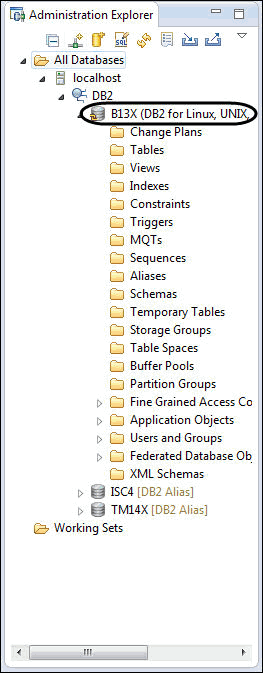
-
Right-click on Tables and select Database Catalog Filter.
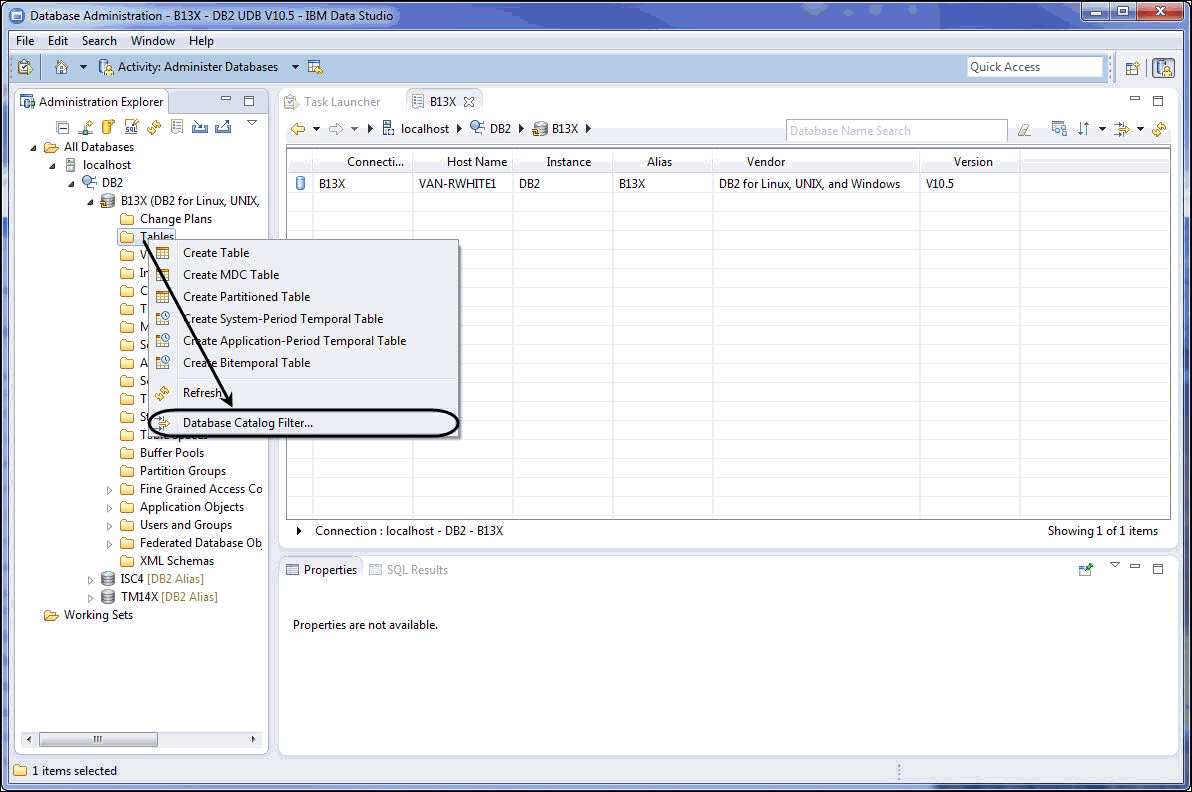
-
On the Database Catalog Filter for Tables screen, enter ZONE in the Value column to find a table and click Finish.

-
In the returned table results, right-click the ZONE table name. Point to Load and then click With Load Utility.
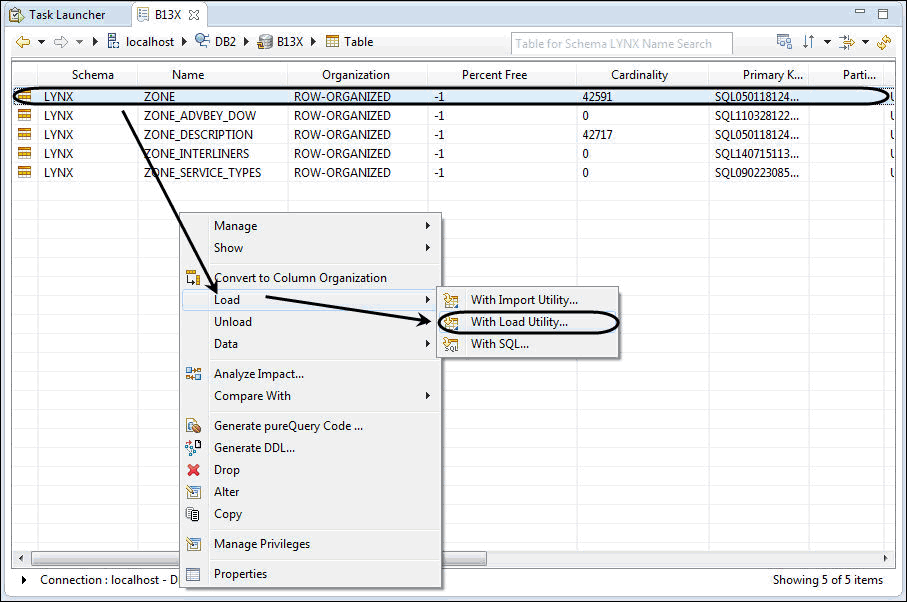
-
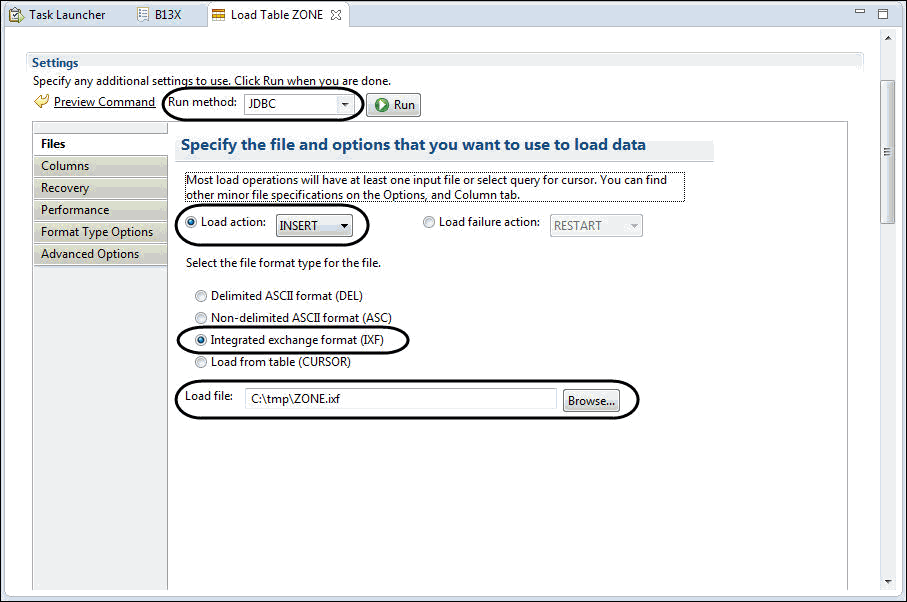
From the Files menu, under the Load Table ZONE tab, select the following file and options to load data:
-
Ensure the Run method: is JDBC.
-
Enure Load action is INSERT.
-
Select the Integrated exchange format (IXF) option as the file format.
-
-
On the Load file field, click Browse to the directory that contains ZONE.ixf file and click Open. It is recommended to keep the directory path short. For example, C:\tmp\ZONE.ixf.
-
Click the Columns tab.
-
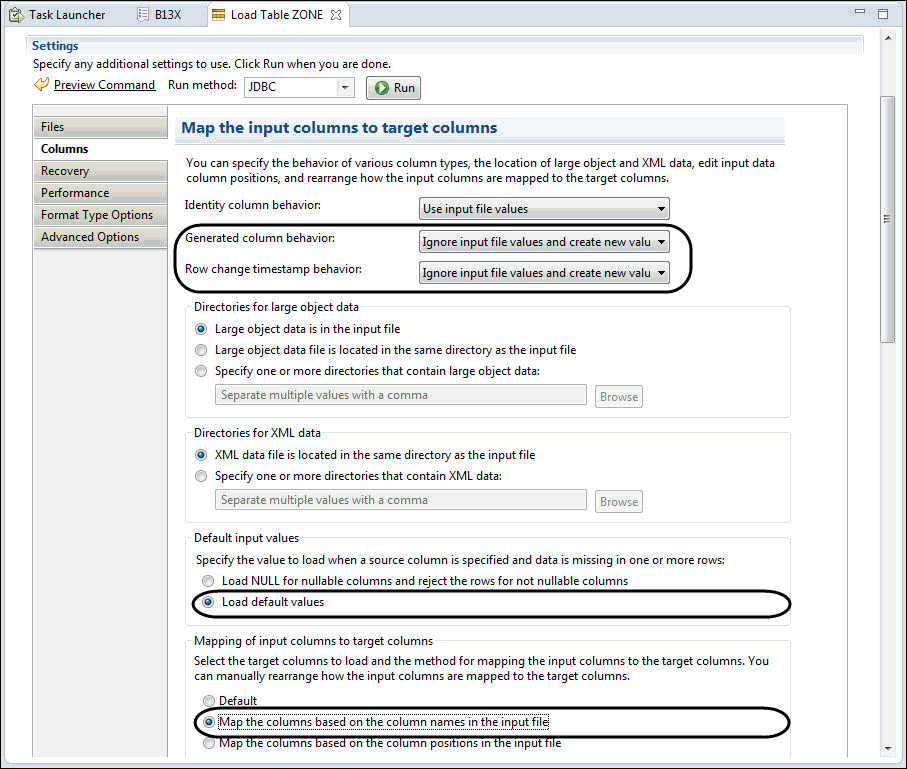
On the Columns tab, modify the following input options to target columns.
-
Generated column behavior* - Ignore input file values and create new values.
-
Row change timestamp behavior* - Ignore input file values and create new values.
-
In the Default input values section, select Load default values option.
-
In the Mapping of input columns to target columns section, select Map the columns based on the column names in the input file.
-
-
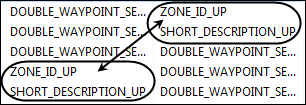
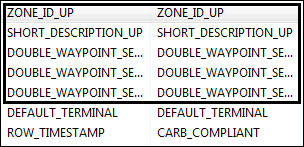
At the bottom of the column names, the Input Column Name and Target Columns Name are not lined up. Use Move Up to line them up.
-
Select ZONE_ID_UP and click Move Up three times and then select SHORT_DESCRIPTION_UP and click Move Up three times.
-
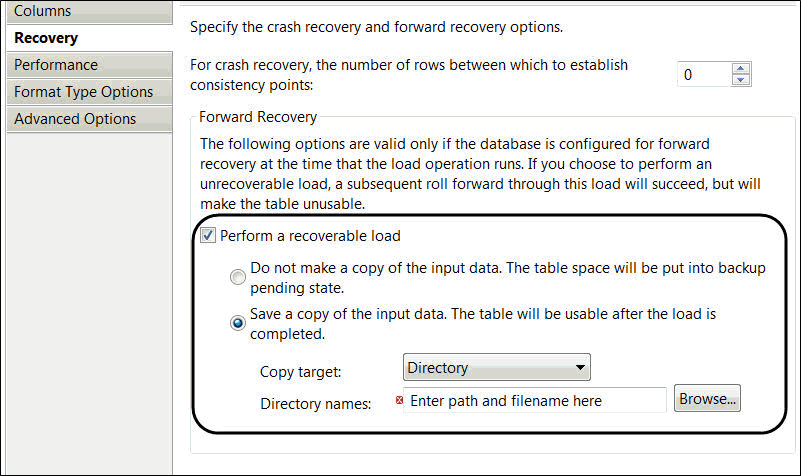
On the Recovery tab, when doing a LOAD action,select Perform a recoverable load and then select Save a copy of the input data option.This prevents the tablespace in the table you are loading into from requiring a backup.
-
Click Run at the top of the wizard.

Repeat the steps in the load the ZONE.ixf file procedure to load the FASTZONE.ixf file using Data Studio 10.5. Be sure to replace ZONE.ixf with FASTZONE.ixf.
| If you have issues importing the fast_zone table, you can run the REBUILD_FASTZONE procedure and will accomplish the same thing. Note that the REBUILD_FASTZONE procedure should be run after hours as it will most likely impact database performance. |