Working with a single card
In Card Management, you view, add, and update information for a single card on the Cards window. Depending on your fuel vendor, you have two choices for data entry:
-
You can add and update individual properties and options, as described in this set of topics.
-
You can assign a card to a group, which has preselected properties and options. Your system administrator sets up and configures groups.
Creating a new card manually
You can create a new card manually if one of the following is true:
-
You are using a non-real-time fuel vendor
-
You are using Fleet One and an initial set of card data has already been imported
If neither of these is true, you must import card data from a file provided by your vendor and update information for individual cards. If you attempt to create a new card following this procedure, the system displays an error message.
-
In Card Management, be sure the Cards window is displayed.
-
Click
 Insert.
The tab redisplays with blank fields.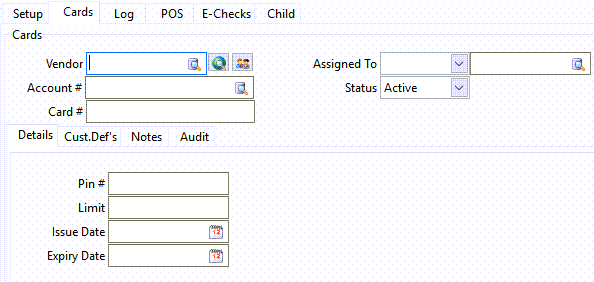
-
In the Vendor field, enter the fuel vendor.
-
To search for and select an active fuel vendor, click
 Pick List.
 -
To view the fuel vendor’s web site in your default browser, click
 Go to Vendor’s Website.
 -
To view the vendor’s profile, click
 Go To Vendor Profile.
-
-
In the Account # field, enter the account code. To search for and select an account code, click
Pick List. -
In the Card # field, enter the card number. If you are creating a new card, you may have to follow a specific format as defined during setup.
-
In the Assigned To field, select the resource to which you want to assign the card. Options are:
-
Driver
The specified driver is the only person who can use the card. -
Employee
The specified non-driver employee is the only person who can use the card. -
Power Unit
The operator of the specified power unit is the only person who can use the card.
To search for and select a resource ID, click
Pick List. -
-
In the Status field, select a status.
-
Do one of the following:
-
If you are setting up a new Fleet One card, enter information on the Details tab.
-
If you are using a non-real-time fuel vendor, you may be required to enter information in one or more of the following Details tab fields depending on your system setup.
Field Definition Pin#
Personal Identification Number (PIN). You can enter up to four digits.
Limit
Dollar limit
Issue Date
Card issue date
Expiry Date
Card expiration date
-
-
When you have finished entering data, click
 Post.
Post.
Looking up a fuel card
-
In Card Management, be sure the Cards window is displayed.
-
Click
 Find.
Find.
The Select Card window opens.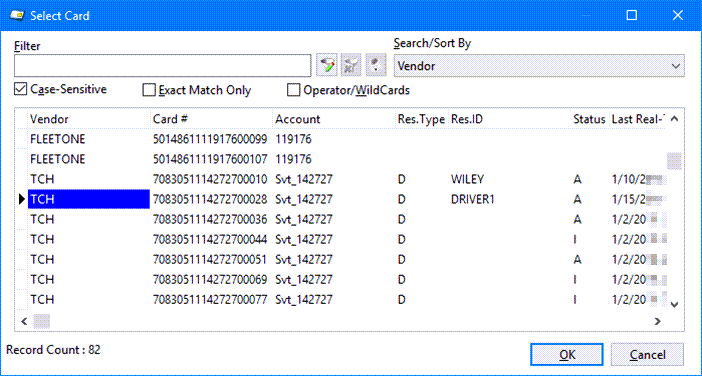
-
Select a card and click OK.
The Cards window redisplays with card information.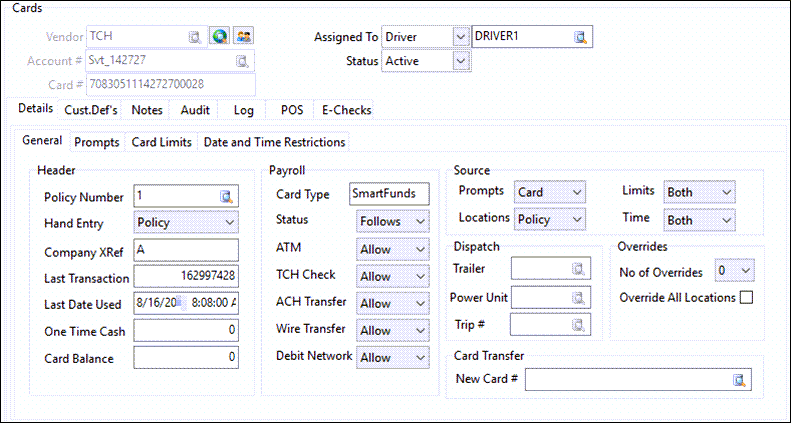
Assigning a card to a group
If you are using Comdata, TCH, or T-Chek as your fuel vendor, and your system allows it, you can assign a card to a group. Because all cards in a group share properties and options, you can save time configuring individual cards.
-
In Card Management, be sure the Cards window is displayed.
-
Look up a card.
-
On the Details tab, enter the group code in the appropriate field:
-
Comdata: Cust ID (Group).
-
TCH: Policy Number
-
T-Chek: Group #
The system populates fields with data automatically.
-
-
Click
Post.
Entering general fuel card information
-
In Card Management, be sure the Cards window is displayed.
-
Look up a card.
-
In the Vendor field, enter the fuel vendor. To search for and select an active fuel vendor, click
Pick List. To view the fuel vendor’s web site in your default browser, click Go to Vendor’s Website. -
In the Account # field, enter the account code. To search for and select an account code, click
Pick List. -
In the Card # field, enter the card number.
-
In the Status field, select a status.
-
Make additional entries depending on your fuel vendor.
-
When you have finished entering data, click
Post.
Entering details for non-real-time fuel cards
-
In Card Management, be sure the Cards window is displayed.
-
Look up a card.
-
In the Details tab, make entries in the following fields.
Field Definition Pin#
Personal Identification Number (PIN). You can enter up to four digits.
Limit
Dollar limit
Issue Date
Card issue date
Expiry Date
Card expiration date
-
When you have finished entering data, click
Post.
Entering details for real-time fuel cards
-
In Card Management, be sure the Cards window is displayed.
-
Look up a card.
-
In the Details tab, make entries in the fields provided.
Note: Depending on your system setup, some of the options discussed in this topic may not be available. For details, contact your system administrator.
-
When you have finished entering data, click
Post.
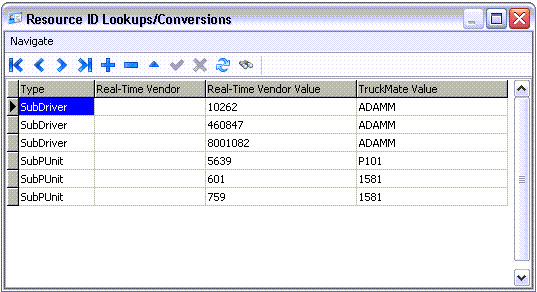
Looking up and converting resource IDs
To map resource IDs on the real-time vendor’s server with those available in your system:
-
In Card Management, be sure the Cards window is displayed.
-
Look up a card.
-
Click
 Resource ID Lookups/Conversions.
The system scans the values for the selected fuel card. If there are any values that do not have an equivalent value in your TruckMate tables, the Resource ID Lookups/Conversions window opens displaying these values. You must provide a resource to substitute for the card’s real-time vendor value from one available in your TruckMate database.
-
Double click the TruckMate Value field to select the TruckMate resource that you want to associate with the card vendor’s resource.
Assigning and removing a resource from a card
-
In the Assigned To field, select the resource to which you want to assign the card. Options are:
-
Driver
The specified driver is the only person who can use the card. -
Employee
The specified non-driver employee is the only person who can use the card. -
Power Unit
The operator of the specified power unit is the only person who can use the card.
To search for and select a resource ID, click
Pick List. -
-
With the Cards tab active, click
 Clear/De-Assign.
Changing a card’s status
-
Select the card with the status you want to change.
-
In the Status field, select one of the following options:
-
Active
Card is available for use -
Block
Card is blocked and unavailable for use -
Lost
Card is lost and unavailable for use -
Delete
Card has been deleted and is unavailable for use
-
Creating and removing card overrides
| This feature is available for TCH cards only. |
You can define the number of overrides allowed for a card. You can also remove overrides regardless of the number of outstanding transactions on the card.
-
In Card Management, be sure the Cards window is displayed.
-
Look up a TCH card.
-
In the Details > General tab, do either of the following:
-
Create overrides
-
In the No of Overrides field, select a number greater than 0.
-
If you want overrides to apply to all locations, select Override All Locations.
-
-
Remove overrides
Click Remove Overrides. You can also set the value in the No of Overrides field to 0 and deselect Override All Locations if it is already selected.
-
-
To save your changes, click
Post.
Transferring existing card data to a new card number
| This feature is available for TCH cards only. |
In some cases, you may want to transfer information from an expiring or expired card to a new card.
-
In Card Management, be sure the Cards window is displayed.
-
Look up the TCH card from which you want to transfer information.
-
In the Details > General tab, enter the number of the card to which you want to transfer information in the New Card # field. If you want, click
Pick List to search for and select an active card. -
Click
 Transfer Card.
A confirmation message appears. Click Yes to proceed.