Power Unit Profiles
The Power Unit Profiles program is used to create and edit Power Unit records. Along with general information about the Power Unit, this program is used to enter and view information about repairs and maintenance, permits, warranties, etc.
To access Power Unit Profiles:
Go to |
|
TruckMate Menu and TruckMate Task List |
Profiles > Power Unit Profiles Also, in TruckMate 2022.x and earlier: Repair & Maintenance > Power Units Trailers & Misc. |
Windows Start Menu |
TruckMate 20xx > Power Unit Profiles |
Windows Explorer |
C:\Program Files (x86) > TruckMate 20xx > Punit.exe |
Layout of the Power Unit Profiles window
The Basic Info tab containing general information about the power unit is displayed by default.
Security settings will limit which users can access the tabs listed below.
Menu and toolbar options
This topic describes menu and toolbar options and functionality that are specific to the Power UnitProfiles window.
For information about common menu and toolbar options (i.e. File menu, Refresh, Multi-Company, etc.), see General menu and toolbar options in TruckMate basics.
Header field definitions
![]()
Required field: *
Field |
Definition |
Unit ID * |
This field displays the Power Unit ID Code, which can be up to 10 characters in length. The Power Unit ID code is used throughout the TruckMate system, whenever a specific Power Unit is required for selection/assignment. |
Year |
Enter the year of manufacture of the Power Unit. This field is for information and reporting purposes only, and is not used elsewhere in the system. |
Make |
Enter the manufacturer of the Power Unit. The value entered here will display in the 'Make' column in the Dispatch program > Power Unit Tab. |
Active |
Determines whether the Power Unit is displayed in the Dispatch program > Power Unit Tab. If the TL Dispatch radio button is checked, the unit will be available for assignment to trips in the Dispatch program. If the 'Not Active' radio button is checked, the unit will not be displayed in the Dispatch program. This flag will automatically update based on changes made to the Rentals > In/Out Tab and if the Application Configurator options 'Auto-Deactivate Unit' and/or 'Auto-Activate Unit' are set to 'True':
|
Creating a power unit profile record
To enter a new power unit:
-
Go to Profiles > Power Unit Profiles.
-
The Power Unit Profiles window will open and display the Basic Info tab.
-
Click
 Insert.
 -
Use the View menu or the Tool Bar tab icons to go to each tab and make the appropriate entries and any general information about the power unit regarding repairs and maintenance, permits, warranties, etc.
-
Click
 Post occasionally as you proceed through each tab to save your entries.
Asset Info tab
The Asset tab is used to record information about the Power Unit’s value for the purpose of asset management and reporting. These fields are for information and reporting purposes only.
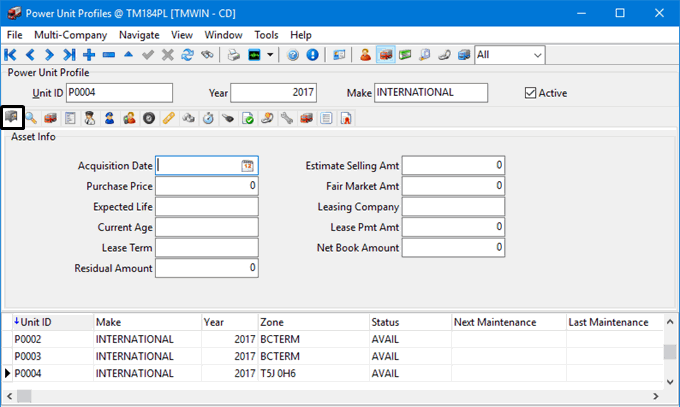
Acquisition Date
Enter the purchase date of this acquisition in the field provided.
Purchase Price
Enter the purchase price.
Expected Life
Enter the acquisition’s life expectancy in years.
Current Age
Enter the current age of the asset.
Lease Term
Enter the lease term (in months), if applicable.
Residual Amount
Enter any residual amount, if known, after the lease has finished.
Estimated Selling Amount
Enter the estimated selling amount, if known.
Fair Market Amount
Enter the fair market amount, if known.
Leasing Company
Enter the Leasing Company name.
Lease Payment Amount
Enter the monthly lease payment amount, if applicable.
Net Book Amount
Enter the net book amount, if known.
Audit (read-only) tab
The Audit tab displays read only data concerning the creation details of the selected power unit record. The read-only data displayed here is for informational purposes only.
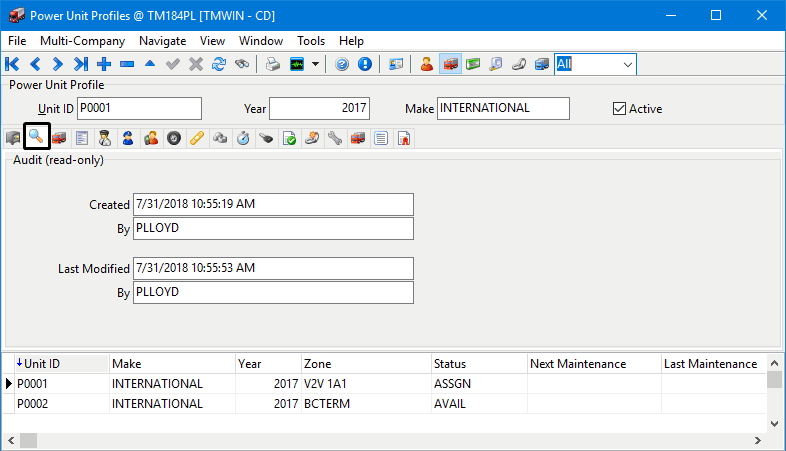
Created / By
Pre-populates with the Date and Time this entry was created, as well as the Username of the User who created the entry.
Modified / By
Pre-populates with the date and time this entry was modified, as well as the Username of the User who modified this entry.
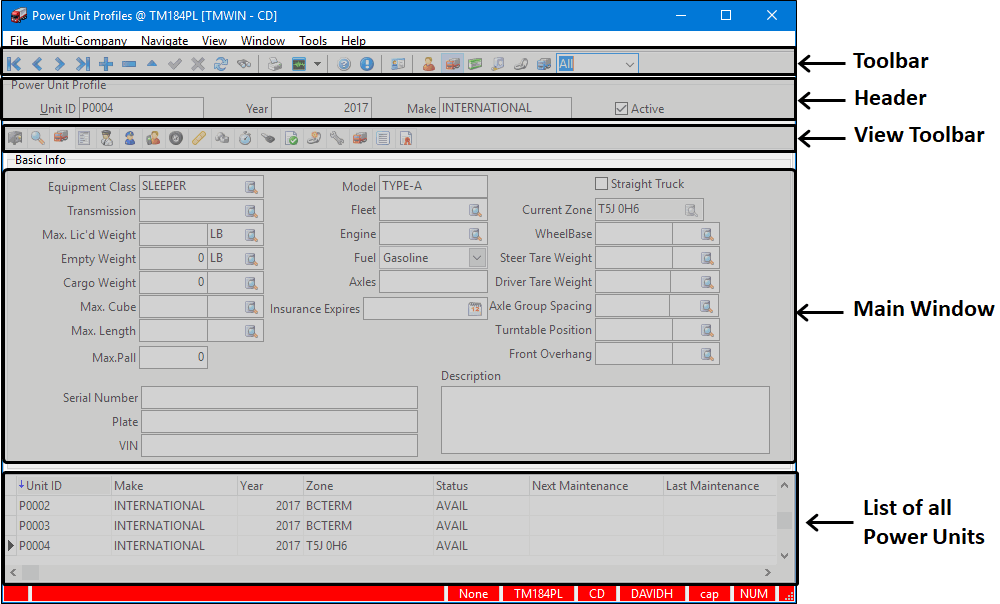
Basic Info tab
The Basic Info tab displays general information about the power unit.
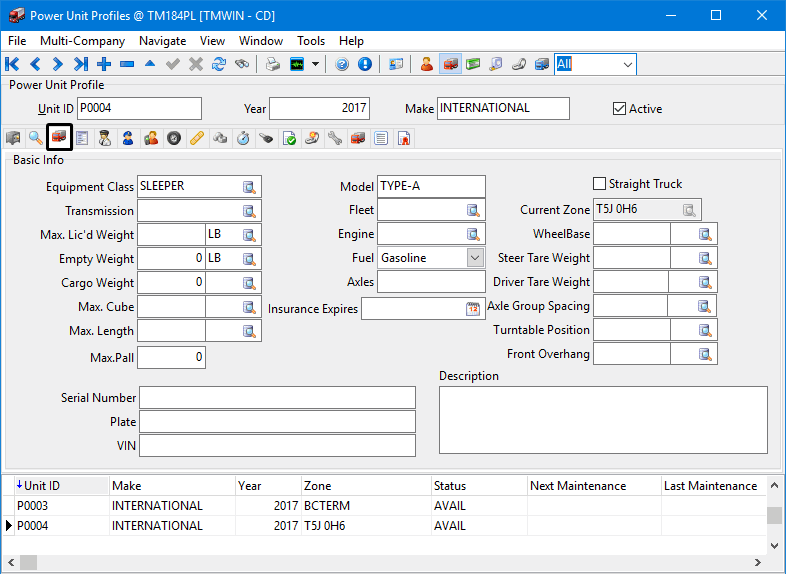
Equipment Class
Can be assigned to a Power Unit. Equipment Classes are configured in the Codes Maintenance program. Enter the equipment class code or click the search button to display a search form. The Requested Equipment field in the Details section of the Customer Service program also uses Equipment Classes; freight bills and resources can be matched based on a comparison of these fields.
Transmission
Select the transmission code, as configured in the Codes Maintenance program that applies to this Power Unit. This field is for information and reporting purposes only, and is not used elsewhere in the system.
Max. Lic’d Weight
Is used to store the maximum weight that this Power Unit can haul according to its licence. The value entered here will display in the 'Max. Weight' column in the Dispatch program > Power Unit Tab.
Empty Weight / Cargo Weight / Weight Units
Enter numerical values in these two fields, and select a Weight Unit using the search button in the smaller field to the right. These values are for information and reporting purposes only.
Insurance Expires
Enter the expiry date for this Power Unit’s insurance. Double-click for a calendar selection form. This field is for information purposes only, and is not used elsewhere in the system. You can create a special event based on a Power Unit’s insurance expiry that will generate a warning in the Dispatch program > Power Unit Tab when insurance renewal is pending or overdue. See the Special Events program for further information.
Model
Enter the model of the Power Unit. This field is for information and reporting purposes only, and is not used elsewhere in the system.
Fleet
To group Power Units together, enter a Fleet ID code in this field. Click the search button for a selection form. Fleets are configured in the Fleet Maintenance program.
Engine*
Select the engine code, as configured in the Codes Maintenance program that applies to this Power Unit. This field is for information and reporting purposes only, and is not used elsewhere in the system.
Fuel
For information and reporting purposes, enter the type of fuel that this vehicle uses. Select an applicable value from the drop down list box.
Axles
For information and reporting purposes, enter the number of axles on the Power Unit.
Max Pall.
Enter a numerical value representing the maximum number of Pallets usable by this Power Unit. For information and reporting purposes only.
Straight Truck
Check this flag if the selected Power Unit is of 'Straight Truck' configuration.
Current Zone
This field is only available when you are adding a new record. It is used to record the current location of the Power Unit, for the purpose of subsequent location updates in the Dispatch program > Power Unit Tab.
Serial Number
Enter the Power Unit’s serial number in this field.
Plate
Enter the Power Unit’s licence plate number in this field.
VIN
Enter the unit’s Vehicle Identification Number in this field. This field is for informational and reporting purposes only.
Description
Is a free-format field used to enter a general description about the Power Unit.
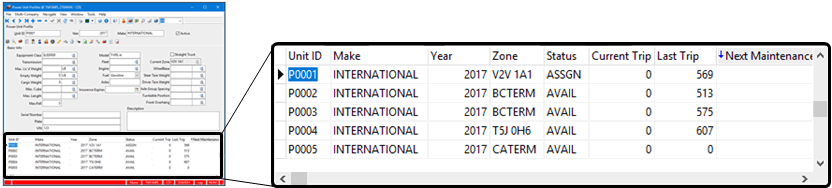
Power Unit Grid
The lower part of the Power Unit Profiles screen contains the Power Unit grid that displays all of the Power Units currently set up in your system. This Grid is for informational purposes only and cannot be edited.
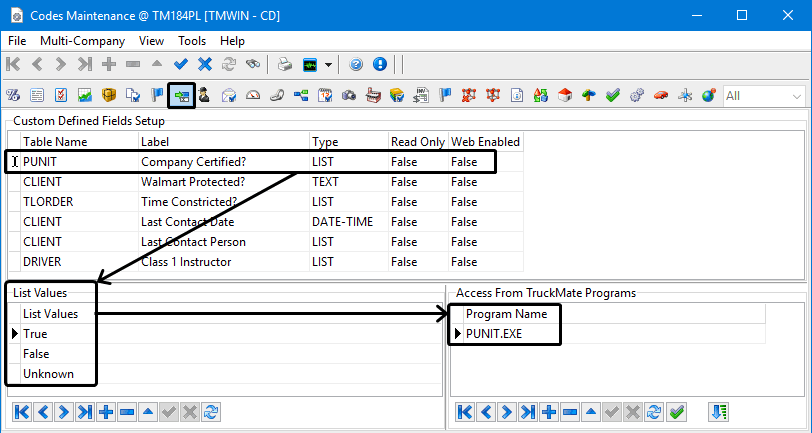
Custom Designed Fields tab
Displays any custom definitions that have been added to the Power Unit Profiles program.
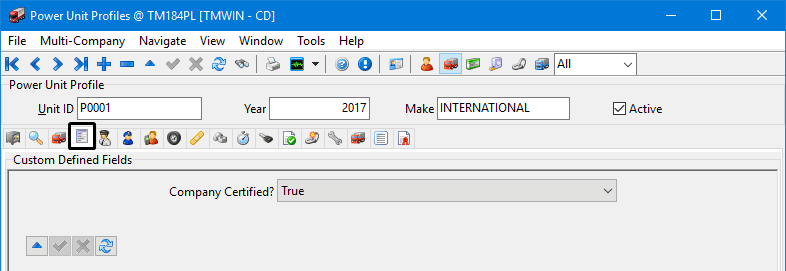
Adding and editing custom defined fields is done in the Codes Maintenance program > Custom Defined Fields tab.
Customs Compliance tab
Used to configure the ACE (CBP) US Customs Compliance data for the selected power unit.
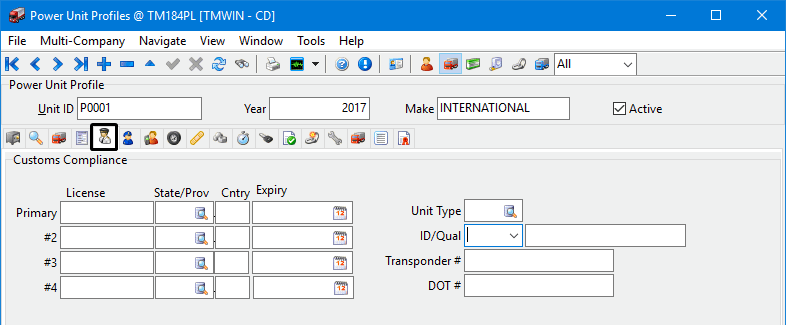
Enter your License information for the 'Primary', '#2', '#3' and '#4' Users, and use the search button to select a Jurisdiction. Double click the 'Ctry' field to select a Country, and click the Calendar button to select a date for the 'Expiry' field.
Unit Type
Click the search button to select a Unit Type for the selected piece of Miscellaneous Equipment.
ACE ID / Qual
Enter your ACE ID in the space provided.
Transponder #
Enter your Power Unit’s Transponder Number in the field provided.
DOT #
Enter your Power Unit’s DOT Number in the field provided.
Damage tab
The Damage tab allows you to record any damage that has been done to a power unit, as well as some details regarding the cause of the damage.
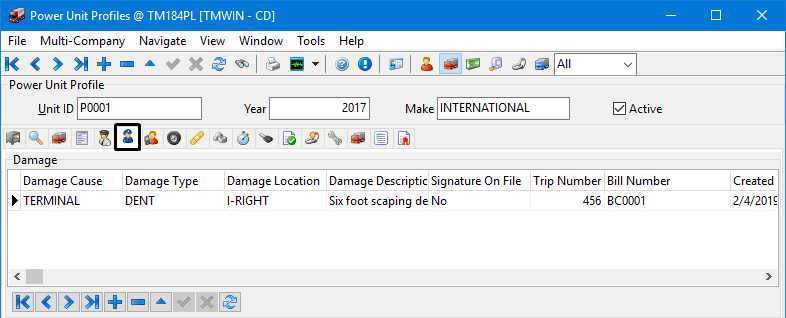
Note: The Damage tab works with the DAMAGE TruckMate table.
The Damage Tab works with the DAMAGE TruckMate Table. To create a new record, select the '+' button on the TruckMate Navigation bar. Existing records cannot be edited, so ensure that you take care when entering the details.
Damage Cause
Double click this field to select a value that best represents the cause of the Power Unit damage. Choose from one of the three available options: 'Customer', 'Driver' or 'Terminal'.
Damage Type
Double click this field to select a value that best represents the type of damage that was done to the Power Unit. Choose from one of the three available options: 'Cut', 'Dent' or 'Rust'.
Damage Location
Double click this field to select a value that best represents the primary location of damage to the Power Unit. Choose from one of the available options in your system (use the 'Location Description' field for clarification).
Damage Description
Enter a short description of the damage done to the Power Unit using your keyboard.
Signature On File
This field designates if the party referenced in the 'Damage Cause' field has signed a statement regarding the details of the damage to the Power Unit. This field displays "True" when a signature is received via the truck mounted devices. It cannot be modified.
Trip Number
This field will populate with a Trip number if it the Freight Bill selected in the 'Bill Number' field was attached to a Trip.
Bill Number
Double click this field to select the Freight Bill that the Power Unit was attached to when the damage occurred.
Created Time / Created By
These two fields will automatically populate when a new record is saved, and will contain the 'Date/Time' and the 'User ID' of the User who added the record.
Driver Call In tab
The Call In Tab is used for recording Driver Reports about required maintenance.
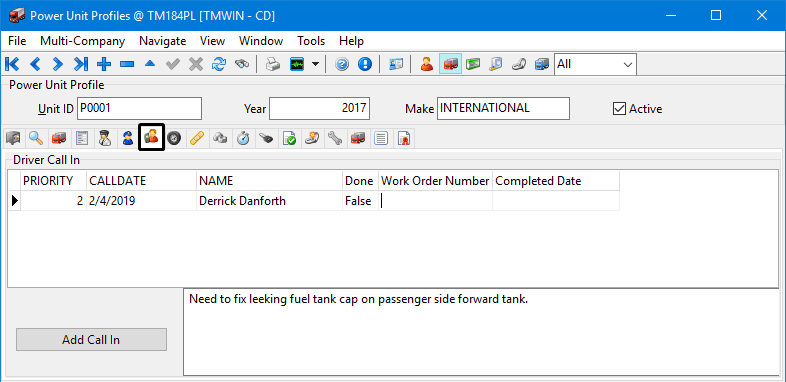
The Add Call In button is used for recording driver reports about required maintenance. Previous Driver Call In entries are displayed in the grid.
To add a Driver Call In entry regarding required maintenance:
-
Click the Add Call In button.
-
The Driver Call In window for noting required maintenance is displayed.
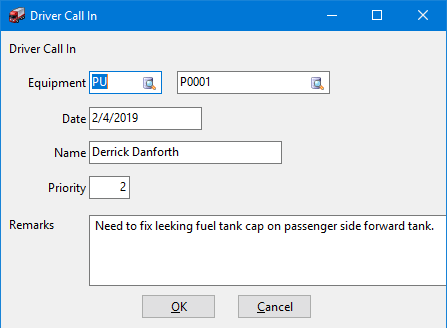
-
Enter the appropriate information and click OK.
-
The entry will appear in the Driver Call In tab for the power unit.
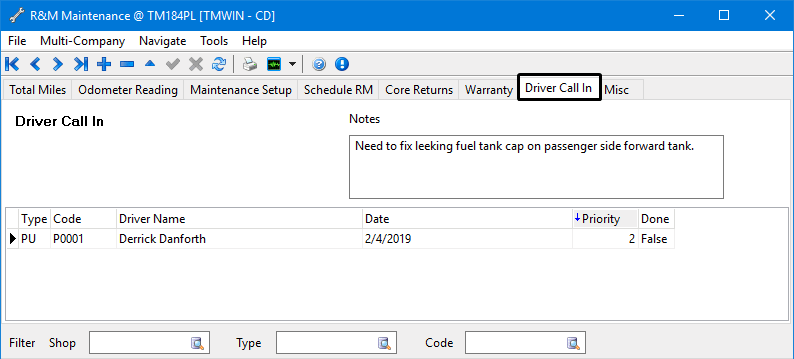
Driver Call In records can also be viewed and entered on the R&M Maintenance program > Driver Call In tab.
Equipment
Use the search buttons to select a resource type and Equipment name.
Date
Automatically populates with the current date.
Name
Enter a driver name.
Priority
Enter the Priority level for this call-in.
Remarks
In this text field you may enter any free-form notes concerning the details of this call-in .
Done / Work Order Number / Completed Date
These three fields will update once the Maintenance outlined by the Driver Call-In record on this Tab is attached to a Work Order in the R&M Work Orders program, and the R&M User selects the 'Mark as Done' button on the R&M Work Orders program > Maintenance Tab > Check Driver Call In Notes window.
Hub (Odometer Readings) tab
You can view and add Odometer and Hourmeter readings on the Hub tab.

The form displays the last Odometer 'Reading Date', as well as the 'Odometer' and 'Hourmeter' readings.
Enter New Odometer Reading
Clicking this button will bring up the Mileage / Hours entry form. See the R&M Maintenance program > Enter Odometer Reading window for more information.
Fuel Tax Default Odometer
This field is for information and reporting purposes only. Select a distance unit from the selection form. Units are configured in the Codes Maintenance program.
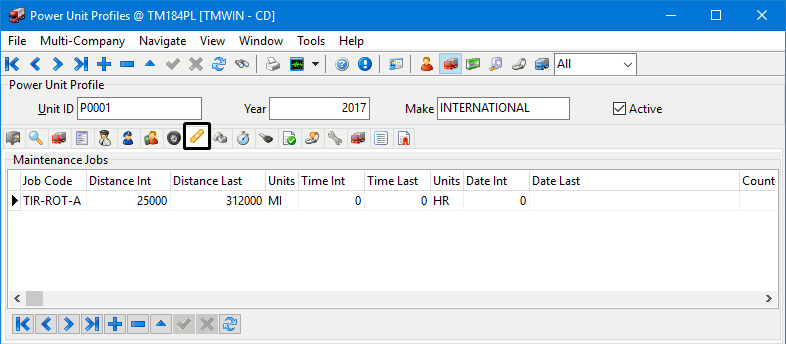
Maintenance Jobs tab
Use the Maintenance Jobs tab to add maintenance jobs to a piece of equipment in the Maintenance Jobs tab.
Double-click the 'Job Code' field to select a job code. Jobs are predefined codes that contain parts and labor details for a maintenance task. Job codes are configured in the R&M Configuration program. Adding a maintenance job to a Power Unit on this tab is the same as adding the job in the R&M Maintenance program.
Miscellaneous Info tab
The Miscellaneous tab is used to record miscellaneous information about the power unit. These fields are for information and reporting purposes only.
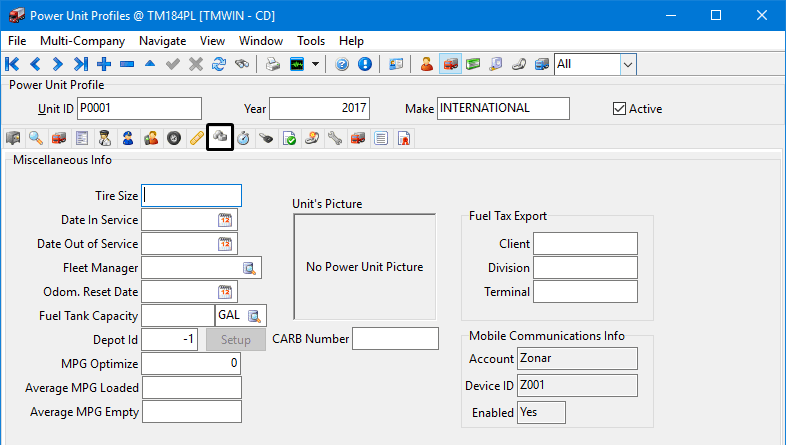
Tire Size
Enter the truck tire size.
Date In Service
Enter the date this piece of equipment started service.
Date Out Of Service
Enter the date this piece of equipment ended service.
Fleet Manager
Use the search button to select the Fleet Manager. The Fleet Manager field will only accept valid User IDs, as configured in the Security Setup program.
Odometer Reset Date
Enter the date the odometer requires re-setting.
Fuel Tank Capacity
Enter an integer value representing the power unit’s fuel tank capacity. Select the search button in the field to the right to select the default measurement unit, as configured in the Codes Maintenance program > Units Tab.
Depot ID
Double click this field to select the Depot ID where the power unit currently resides. Click the 'Setup' button to the right to configure your Depot ID codes.
MPG Optimize
This MPG field is a manual entry field used for reporting purposes and IDSC ExpertFuel optimization.
Fuel Tax Export
If required, enter this power unit’s Fuel Tax Export details. These three fields are utilized by the 'T-Check' and 'Inter-Tax' branches of the Fuel Tax Export Wizard program
Mobile Communications Info
This read-only section displays the Mobile Communications Device attached to the selected Power Unit (if applicable), and its 'Enabled' status. Changes cannot be made from here: they must be made using the Mobile Device Maintenance program.
Note: CARB (California Air Research Board) program refers to the clean air and emission control agency in the State of California.
The CARB Number from your CARB compliance certification is required if the Application Configuration option for DISPATCH.EXE > Require CARB Validation is set to Yes. If the application Configuration is set to WARNING, you will be able to override the warning and continue with the dispatching process.
Operating Charges tab
The fields on the Operating Charges tab are information and reporting purposes only, and are not used elsewhere in the system.
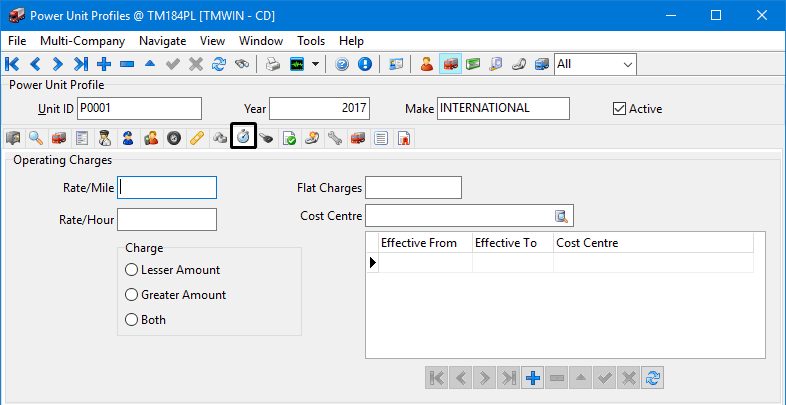
Rate / Mile
Enter the rate per mile.
Rate / Hour
Enter the rate per hour.
Charge
Select one of the radio buttons. Your choices are: lesser amount, greater amount, or both. By selecting one of these options, you are selecting the method of calculation required for this charge. In other words, if you entered amounts in both the rate per mile, and the rate per hour above, and then selected the radio button 'lesser amount', the charges applied to this piece of equipment would be the lesser of the two as entered above.
Flat Charges
Enter the flat charge, if applicable.
Cost Centre
Use the search button to open a General Ledger Account window where you can search by account or description. Select your preferred account.
Note: The Charge options are: Lesser Amount, Greater Amount, or Both. By selecting one of these options, you are indicating the method of calculation required for this charge. For example, if you entered amounts in both the rate per mile, and the rate per hour above, and selected 'lesser amount', the charges applied to this piece of equipment would be the lesser of the two as entered above.
Ownership tab
The Ownership tab allows you to specify the currently selected power unit’s owner (from the vendors listed in your system).
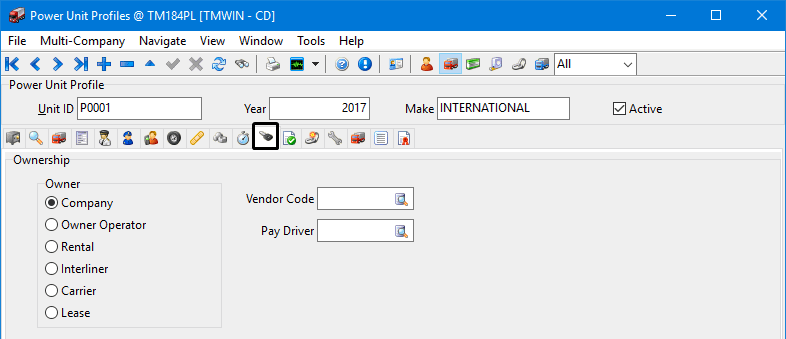
Owner
These radio buttons are used to indicate the owner of the Power Unit. A one-letter code will display in the Ownership column in the Dispatch program > Power Unit Tab that indicates the Ownership Type: 'C' indicates Company ownership, 'D' indicates Driver / Owner-Operator ownership, 'R' indicates Rental, 'I' indicates Interliner ownership, 'B' indicates Broker (Carrier) ownership, 'L' indicates ownership through a Lease.
Vendor Code
If this Power Unit is owned by a company who is set up as a vendor in the Customer & Vendor Profiles program, enter the vendor code or click the search button for a search form. This information is displayed in the Owner column in the Dispatch program > Power Unit Tab.
Pay Driver
Click the search button to select a Driver that will be paid when this Power Unit is in use (this field should only be used when an Owner-Operator owned Power Unit is selected).
Permits tab
The Permits tab is used to enter any permit information related to this power unit.
The information entered on this Permits tab can also be viewed in the Dispatch program > Power Unit tab by selecting the Permit option from the right-mouse shortcut menu in the Power Unit grid.
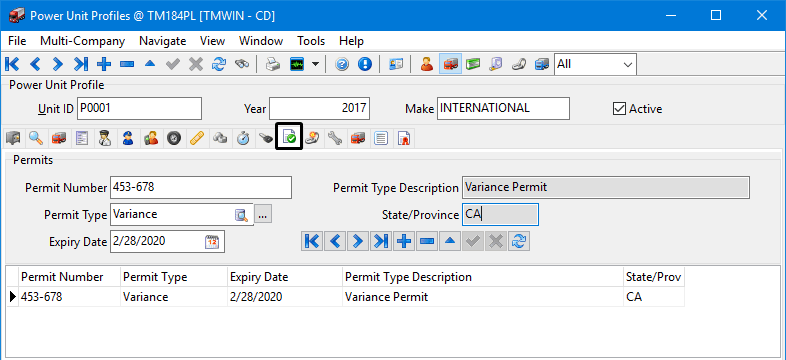
Note: Permit types are entered and configured in the Codes Maintenance > Power Unit Permits tab.
See the Special Events program for information related to flagging this resource in the Dispatch program when a permit is about to expire.
Permit Number
Is a 32 character free-format entry field used to store the permit number.
Permit Type
Is a 10 character free-format entry field used to describe the permit type.
Description
Is a 20 character free-format entry field used to describe the permit.
Province / State
Is a 2 character free-format entry field used to store the province or state code.
Expiry Date
Is used to store the permit’s expiry date. Double-click for a calendar selection form.
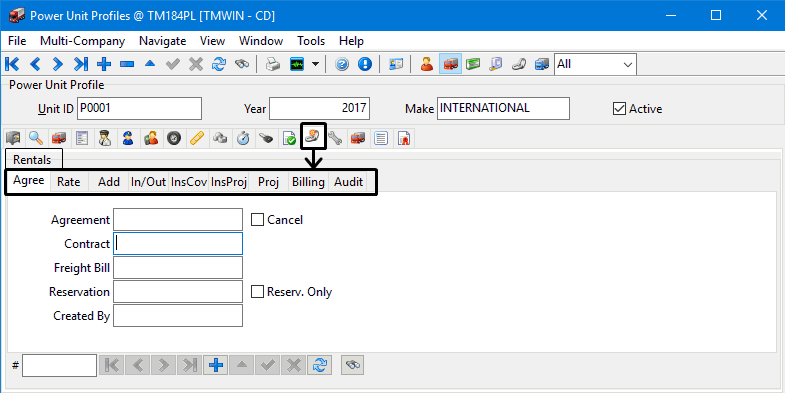
Rentals tab
The Rentals tab of the Power Unit Profiles program exactly mirrors the Rentals tab found within the Miscellaneous Equipment Profiles program. It can be used to enter rental information for a rented power unit.
Repairs and Maintenance tab
The Repairs and Maintenance tab allows you to display and in some cases enter or edit maintenance related information for the currently selected power unit.
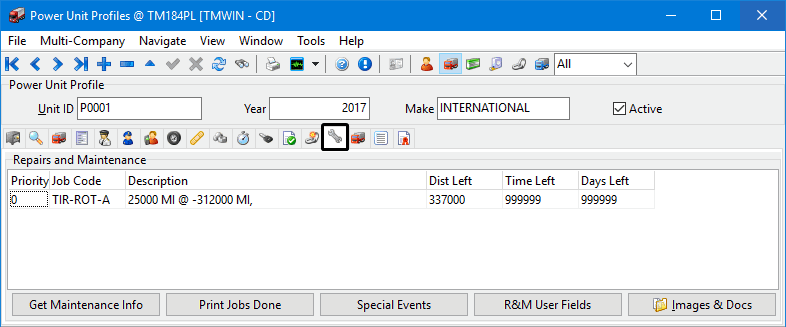
Get Maintenance Information
Click the Get Maintenance Information button to retrieve outstanding maintenance jobs for this power unit and display them in the grid. Maintenance jobs are configured in the R&M Configuration program, and are assigned to Power Units on the Maintenance Jobs tab of the Power Unit Profiles program or in the R&M Maintenance program.
Print Jobs Done
Click the Print Jobs Done button to view (and / or print) a report of completed maintenance jobs for this Power Unit.
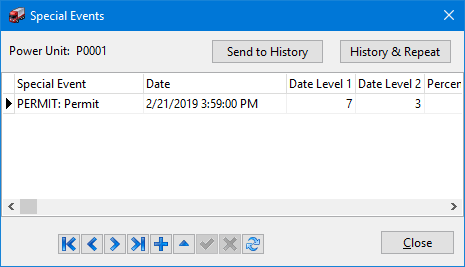
Special Events
The Special Events button displays the Special Events window where any existing events assigned to this Power Unit are displayed in the grid. You can use this window to add a new special event to this Power Unit record. Special events are configured in the Special Events program.
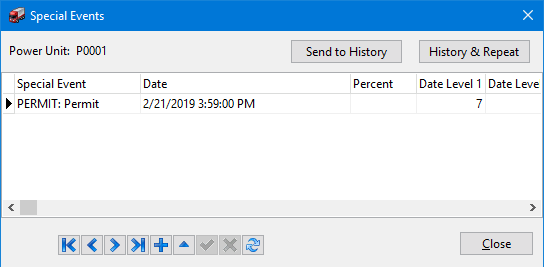
Send to History
You can archive the special event that is currently selected in the grid by clicking the Send to History button. If the Req Results field for the special event code in the Special Events program is set to 'True', the special event cannot be sent to history until you have entered something in the Results field in the grid.
History and Repeat
Will archive the Special Event that is currently selected in the grid, and create a new Special Event of the same type. You will be required to enter a date for the new event.
Special Events Grid
Special Event Code
Select a Special Event Code description from the drop down list.
Date
Specify the date that the Special Event comes due. Double click for a calendar selection form.
Level 1 / Level 2
The Level 1 and Level 2 values configured in the special event code setup will default here. You can change them if you like.
Remarks
Enter Remarks that will display in the Special Events column in the Dispatch program > Power Unit Tab. If you set the Copy Descr field to 'True' in the Special Events program, the description will appear in the Remarks field.
Results
You can enter text in the Results field before you send the item to history. If you set the 'Req Results' field to 'True' in the Special Events program, you must enter Results before you archive the event.
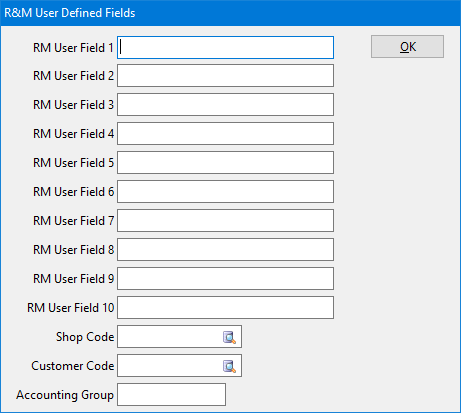
R&M User Fields
Clicking the 'User Fields' button will display a new window, asking you to input new labels for the fields labelled 'User 1' to 'User 10' in the main Power Unit program grid. You may enter new labels simply by typing them in the text fields. You may also specify a 'Shop Code' by using the search button, and may enter an 'Accounting Group' name in the appropriate field. Click 'OK' to save your changes. You can change the text names of these fields from within the Application Configurator program.
Images & Docs
Selecting this button will open the Attach / Open Related Files window used to attach photos or documents.

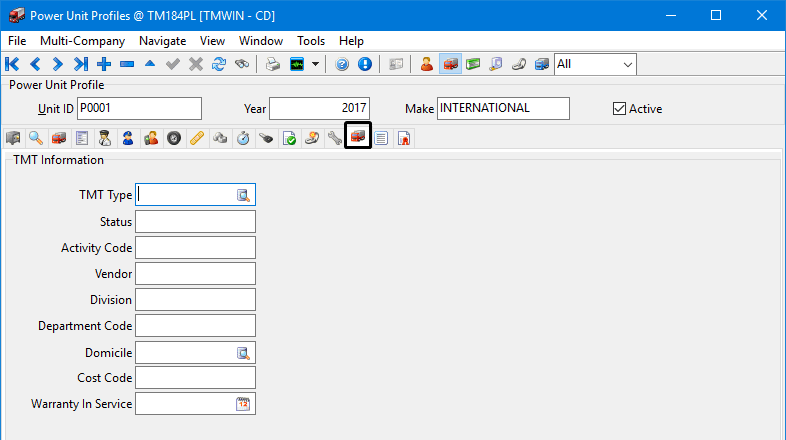
TMT Information tab
The TMT Information tab is used to display some basic driver information as it relates to the TMT Fleet Maintenance program.
The TMT Fleet Maintenance management program is a separate software application that helps your vehicle repair and maintenance shop operations minimize downtime, control repair costs and provide the service needed to keep your fleets productive.
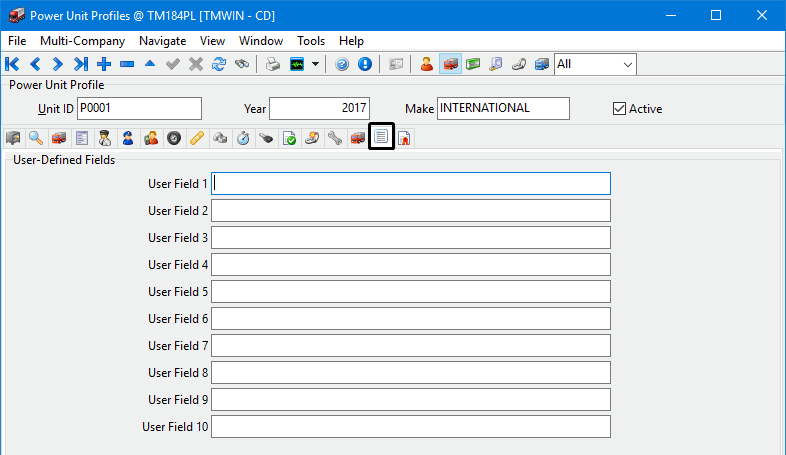
User-Defined Fields tab
The User-Defined Fields tab allows you to enter data into any one of the 10 User-Defined fields available to the Power Unit Profiles program. The labels of these fields can be changed using the 'User Field 1 - User Field 10' options from the Application Configurator program > PUNIT.EXE section.
Warranty Info tab
The Warranty tab is used to record warranty information that covers the entire power unit (such as the original manufacturer’s warranty). This information is for reference purposes only.
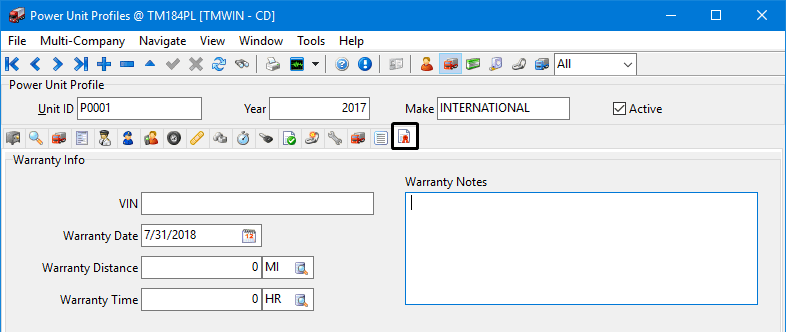
Warranty information for specific components, such as starter motors or batteries, is recorded on the R&M Maintenance program > Warranty tab.
VIN
Enter the unit’s Vehicle Identification Number in this field. This field is for informational and reporting purposes only.
Warranty Date
Is used to store the date that the warranty began. Double click for a calendar selection form.
Warranty Distance / Unit
If the warranty is valid for a specific distance, enter the distance in the field on the left. Double click in the field on the right to select the distance unit (as configured in the Codes Maintenance program).
Warranty Time / Unit
If the warranty is valid for a specific time period, enter the amount of time in the field on the left. Double click in the field on the right to select the time unit (as configured in the Codes Maintenance program).
Warranty Notes
Is a free-format field where general notes about the warranty can be entered.
Viewing or editing Special Events
The Power Unit Profile program > Repairs and Maintenance tab > Special Events button menu provides a window for viewing or editing special events related to a power unit like license renewals, permit expiration dates, CARB certification renewal dates, etc.
-
Go to Profiles > Power Unit Profiles.
-
Go to the power unit’s profile.
-
Go to the Repairs and Maintenance tab and click the Special Events button.
The Special Events window appears and lists any events related to this power unit.
Note: Any additions or revisions made here will also update the information displayed by the separate Special Events program that summarizes all events for all resources including power units.
The Date Level 1 and 2 fields are used to define the number of days to display warning colors before the event is due. Level 1 is the lowest (blue), level 2 is next (green) and level 3 is the highest (red).
For example, the code PERMIT will cause the power unit’s code in Dispatch to turn blue seven days before it is due; green three days before it is due and on the day the permit renewal is due, the power unit’s code will turn red and it will remain red until the Special Event is archived.
-
To archive entries, click the Send to History button. They will be removed from the power unit’s Special Events window but will still appear on the History tab in the Special Events program.
To archive an entry AND create another duplicate to repeat the renewal date event entry for the coming year, click the History & Repeat button.
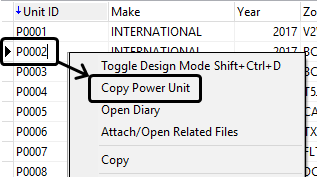
Copying an existing power unit
If you are entering a fleet of similar power unit vehicles, you can enter and populate the data for the first one and make a copy of it to speed up data entry for adding the rest.
-
Go to Profiles > Power Unit Profiles.
-
Go to the power unit profile you want to copy from.
-
The power unit will appear in the grid at the bottom of the window with a small black arrow.
-
Right-click and select Copy Power Unit from the shortcut menu.
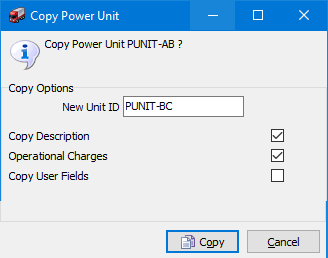
The Copy Power Unit window is displayed.
-
Enter the New Unit ID and use the checkboxes to indicate which information should be copied over into the new power unit as a starting point for populating the data.
-
Click
 Copy.
Copy.The new power unit will be displayed in the main window and the bottom grid.
-
Verify the data copied over is correct and revise the information to reflect the values associated with this power unit.
Creating Diary entries using Power Unit Profiles > Open > Diary
The Diary feature is as an advanced note-taking tool accessible from within the Power Unit Profile program.
Unlike the normal TruckMate Notes window, the Diary allows you to make multiple entries and it has its own security settings. For each entry, you assign a 'Date', 'Communication Type', a 'Note Subject', and either long notes (in a free format field) or a picture. There are columns for each resource type (driver, power unit, trailer, etc.) so the Diary entry can be cross-referenced and accessed in the application that calls it.
-
Go to Profiles > Power Unit Profiles.
-
Go to the power unit profile.
-
The power unit will appear in the grid at the bottom of the window with a small black arrow.
-
Right-click and select Open Diary from the shortcut menu.
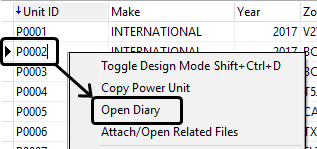
The Diary for Power Unit window is displayed.
See Diary for more information about how to use this feature.
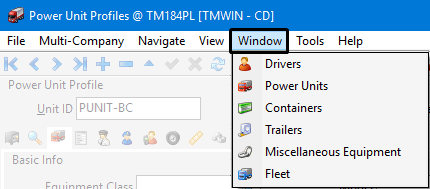
Accessing other TruckMate programs using the Windows menu
The Power Units Profiles program provides a Window menu with options to provide access to related TruckMate programs and make it easier to move back and forth between programs.
Viewing Fuel Card information using Power Unit Profiles > Tools > Cards
The Power Unit Profile program provides access to the fuel card information assigned to a power unit.
If you have a License for the Fuel Card Management program (key 30000), selecting this option will allow you access (view/edit/add) your Fuel/Credit cards using the Card Management program > Cards tab.
Note: Before you can access this function, at least one Vendor must be configured in the Fuel Card Management program > Setup tab.
-
Go to Profiles > Power Unit Profiles.
-
Go to the power unit profile
-
Go to the Tools menu and select
 Cards.
 -
The Cards for Power Unit window will appear.
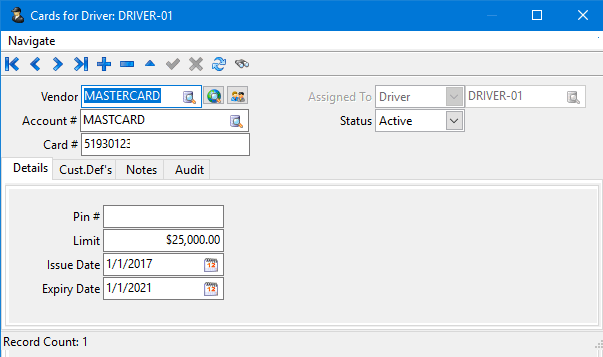
This is the same information that is displayed and managed within the Fuel Card Management program.
See:
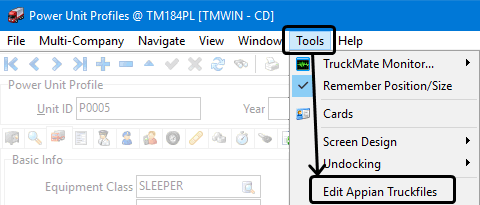
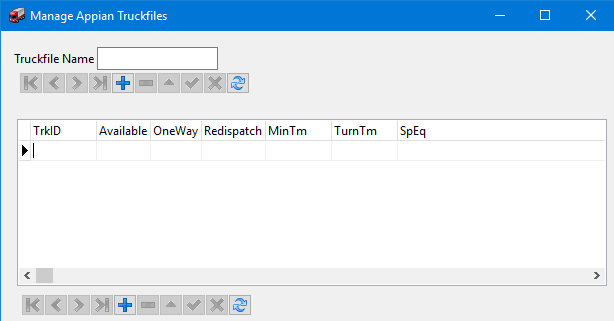
Editing Appian Truckfiles
The Power Unit Profiles program allows you to access the Appian Truckfiles associated with each of the power units.
Appian DirectRoute refers to a separate Trimble Transportation routing and scheduling software application used for improving the delivery planning, execution and evaluation analysis processes.
To view and edit the Appian Truckfiles:
-
Go to the Tools menu and select Edit Appian Truckfiles.
-
The Manage Appian Truckfiles window will be displayed.
-
Refer to the Appian/Final Mile tab on the Learning Center web site for more information.