Statement Printing

The Statement Printing program will allow you to print out customer billing statements. Using this program to print statements will result in the following appearing on the Customer Service program > Status Tab: 'STMT_PRINTED'. This program can be used to print statements and invoices together (i.e., 'Customer A’s' statement followed by 'Customer A’s' invoices, then 'Customer B’s' statement followed by 'Customer B’s' invoices).
To access the full functionality of the Statement Printing program, you must have created a Statement Batch in the AR Inquiry program > Assign Statements window. This window allows you to group all of a Customer’s Freight Bill information into a Statement, which can then be given a Report in this application.
To access Statement Printing:
| From this location | Go to |
|---|---|
TruckMate Menu and TruckMate Task List |
Billing > Statement Printing |
Windows Start Menu |
TruckMate 20xx > Statement Printing |
Windows Explorer |
C:\Program Files (x86) > TruckMate 20xx > BillLTL.exe |
How Do I?
How do I Setup Automatic Statement Printing?
This process occurs outside of the actual Statement Printing program, in the Customer & Vendor Profiles application.
-
Open the Customer & Vendor Profiles program (PROFILES.EXE).
-
Select the 'Customer' button (
 ) on the toolbar.
 -
Select the Client you wish to edit using the TruckMate Naviation Bar at the top of the program, then select the Billing Tab.
-
On the Billing Tab, fill in all the applicable details for the Statements that you wish to print. Ensure that the 'Statement Frequency' is set correctly, and ensure that the 'Auto-Assign Statements' flag is checked.
-
Save the Customer record.
How do I determine if I should use the Statement Printing or Billing Consolidation (or neither, or both - consolidations for some Clients, statements for others)?
| There are many subtle differences and 'pros and cons' between Statement Printing and Billing Consolidation. The below article should help you determine which is best (or which method is best for which of your clients). |
A Statement will usually show only one line per Freight Bill (usually containing basic info like 'bill of lading number', 'shipper', 'consignee' etc.. that your client can quickly and easily match up to shipping documents, so they can verify what they are being billed for).
One purpose of this is to reduce the amount of paperwork for your high-volume clients with many repetitious Freight Bill’s. Secondly, it allows your Client to refer to a single number and dollar amount when writing a check. A Statement simply sums up the charges from the individual Freight Bill’s, unlike Billing Consolidation which can re-rate the total (based on 'pooled weight' or however you do rating).
If you are proficient at Crystal, or commission a custom report from our Crystal Development Department, you could theoretically show anything you want on a Statement as you could select the Freight Bill’s for the given 'statement number'. However, if you want to see multiple TLDTL lines per Freight Bill on the statement, although possible, it kind of defeats the first purpose of a statement- you should then either use consolidation or nothing at all (ie: send the Freight Bill 'as is').
The Statement Printing program allows you to either print just the Statements, or the Statements and corresponding Freight Bill’s in correct collation order (S1, FB1, S2, FB2, etc..). This second option again defeats the first purpose of a statement (reducing paperwork), as you are actually sending the client more pages, not less (but at least they can pay by Statement Number, making their check printing and your cash receipt entry easier).
As of TruckMate 7.0, Statements can be setup to get assigned automatically (see above), whereas with the Billing Consolidation program, someone must constantly go in and manually select Freight Bill’s to group together (and this can be a slow and tedious process, especially if you re-rate the group). With Statements, you would have to approve and run the individual Freight Bill’s through the Billing Register program (for approving, there is a right-click option from the filter view in Customer Service to quickly do a batch). With Billing Consolidation, you only have to 'approve' and 'post' (run through Billing Register) the generated Master Freight Bills (theoretically a much lower number of Freight Bill’s).
With Statements, your Accounting and Dispatch staff see the exact same set of Freight Bill numbers; with Consolidation, Dispatch sees the original 'part-lot' bills, but not the Master Bill, wihle Accounting sees the Master but not the original Freight Bills. Because of this, with Statements, you would see many more rows in A/R Inquiry than you would with Consolidation (and the same is true in the Cash Receipts program- but again, there is an option to apply a payment to all Freight Bill’s on a statement at once).
Menu Bar / Toolbar
File Menu
Print Reports
![]() Selecting the Print Reports button will begin the Statement/Invoice Printing process as defined by the options selected on the main form of the Statement Printing program.
Selecting the Print Reports button will begin the Statement/Invoice Printing process as defined by the options selected on the main form of the Statement Printing program.
For more information on Report functionality in TruckMate, see the Crystal Reports Reference.
Exit
![]() Selecting this option will close the Statement Printing program.
Selecting this option will close the Statement Printing program.
Multi-Company
For more information on the Multi-Company options available from the Menu Bar, see the Multi-Company documentation.
Tools Menu
TruckMate Monitor
![]() Click the down arrow next to this button to access the various functions of the new TruckMate Monitor.
Click the down arrow next to this button to access the various functions of the new TruckMate Monitor.
Remember Position / Size
Selecting this option will maintain the program window position and size upon close. When the program is re-opened, it will appear the same.
Test Filter
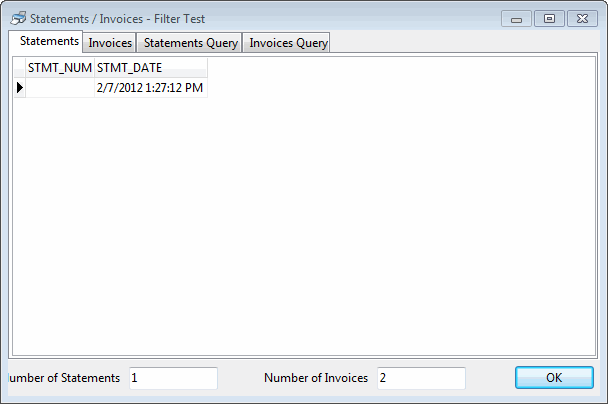
![]() Selecting this option will invoke the Filter Test window. The filter test window is used to test the selected filter and show the SQL query to be used in generating the report. This feature is useful in giving the user an idea on the expected output based on the entered filter values before the actual printing takes place. If the output is not what is needed, the user has a chance to change the filter values and try again.
Selecting this option will invoke the Filter Test window. The filter test window is used to test the selected filter and show the SQL query to be used in generating the report. This feature is useful in giving the user an idea on the expected output based on the entered filter values before the actual printing takes place. If the output is not what is needed, the user has a chance to change the filter values and try again.
-
Statements
This tab displays the numbers and dates of 'Statements' that are selected based on the entered filter values. -
Invoices
This tab displays the numbers and dates of 'Invoices' that are selected based on the entered filter values. -
Statement Query
This tab displays the SQL query that is generated based on the entered filter values for 'Statements'. -
Invoice Query
This tab displays the SQL query that is generated based on the entered filter values for 'Invoices'. -
Number of Statements/Number of Invoices
Those fields are counter fields that display the number of fetched records for either type of documents (Statements/Invoices) based on the entered filter values.
Window Menu
Invoice Print
![]() Selecting this option will open an instance of the Invoice Print program.
Selecting this option will open an instance of the Invoice Print program.
Billing Register
![]() Selecting this option will open an instance of the Billing Register program.
Selecting this option will open an instance of the Billing Register program.
Help Menu
TruckMate Help
![]() Selecting this button will open the Statement Printing topic in the TruckMate Online Help file (the page you are currently viewing).
Selecting this button will open the Statement Printing topic in the TruckMate Online Help file (the page you are currently viewing).
Service Portal
![]() Selecting this button will open an instance of your default Internet browsing software, with the https://www.tmwcare.com login page displayed.
Selecting this button will open an instance of your default Internet browsing software, with the https://www.tmwcare.com login page displayed.
About
![]() Selecting this button will open the standard TruckMate About window, which contains important information about the application you are currently using, including its version number (important for support calls).
Selecting this button will open the standard TruckMate About window, which contains important information about the application you are currently using, including its version number (important for support calls).
Main Window
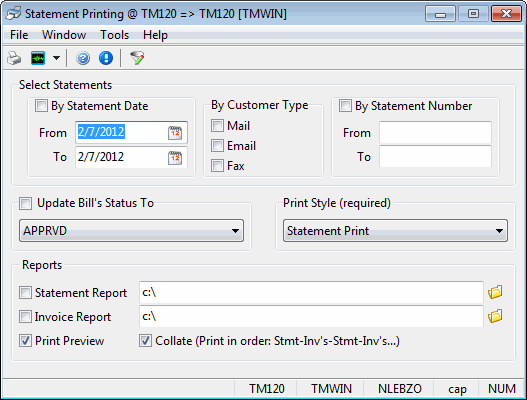
Select Statements By Date and Customer Type
Select a Date Range
Use the pull-down arrow to scroll through the calendar shown and select your desired starting and ending date.
Customer Type
Select 'Mail', 'Email' and/or 'Fax' depending on how the Customer would like to receive the Statement. If boxes are selected, the program will only select those Client records that match. If no boxes are selected, the program will select all client statements.
Statement Number
Select the 'Statement Number' flag if you would like to setup a Statement Range, then enter Statement number values in the 'From' and 'To' fields to make the Range.
Update Bill Status
Update Bill’s Status to
Place a checkmark in the box provided if you wish the bill’s status to be updated to your desired selection. The status change will appear on the Status Tab of the Customer Service program. Use the pull-down arrow to make your selection from the following: 'APPRVD', 'BILLD', 'COMPLETE', 'PRINTED', 'UNAPPVD'.
Print Style (Required)
Use the pull-down arrow to select either 'STATEMENT PRINT' or 'REPRINT'. After you print a statement once, the system will remember it ('AR_SUM.STMT_PRINTED' is changed to 'True'), so you will not be able to print duplicates by accident. Therefore, if you need to print a Statement again for some reason, you will need to use the 'REPRINT' option.
Reports
You can create statements in the AR Inquiry program, and then use the Statement Printing program to print both statements and invoices. For more information on report functions in TruckMate, see the Crystal Reports Reference.
Statement Report
If you wish to print Statements, place a checkmark in the box provided and use the search button to go to the report file located on your computer. The recommended Crystal Report for Statements is named 'BILLSTMT.RPT'.
Invoice Report
If you wish to print Invoices, place a checkmark in the box provided and use the search button to go to the report file located on your computer. The recommended Crystal Report for Invoices is named 'INVOICE1.RPT'.
Print Preview
Place a checkmark in the box provided if you wish to preview the generated reports prior to printing.
Collate
The Collate flag controls how printing is done in the event that both the 'Statement Report' and 'Invoice Report' flags above are checked. If checked, program behavior is the same as in prior releases (reports printed in the order: 1st statement, invoices for 1st statement, 2nd statement, invoices for 2nd statement, 3rd statement, etc.) . If unchecked, then all the Statements are printed before any Invoices are printed.
| The 'Pause Between Statements and Invoices' option, available in the Application Configurator program > BILLLTL.EXE section, can be used to further modify the printing behaviour of the Statement Printing program. |