Terminal Maintenance

The Terminal Maintenance program allows the user to quickly view and configure information related to the various Terminals they manage. You can view Terminal Information and configure the Lane Tree (used by the CrossDock program) or Route Tree (used by the City Dispatch program).
To access Terminal Maintenance:
| From this location | Go to |
|---|---|
TruckMate Menu and TruckMate Task List |
|
Windows Start Menu |
TruckMate 20xx > Terminal Maintenance |
Windows Explorer |
C:\Program Files (x86) > TruckMate 20xx > Terminal.exe |
Menu and toolbar options
This topic describes menu and toolbar options and functionality that are specific to the Terminal Maintenance window.
For information about common menu and toolbar options (i.e. File menu, Refresh, Multi-Company, etc.), see General menu and toolbar options in TruckMate basics.
Tools Menu
New Terminal
![]() Selecting this option will open the New Terminal Wizard, which guides the user through the process of creating a new Terminal ID.
Selecting this option will open the New Terminal Wizard, which guides the user through the process of creating a new Terminal ID.
Export to SMC
Selecting this option will allow the user to export the Terminal data to SMC Carrier Connect. The 'Export to SMC' function creates a flat file that could be sent to SMC. After selecting this option, simply provide a directory location for the flat file to be created in. The user will be notified once all files have been created.
Export to TCG
Selecting this option will open the Export to TCG window, which allows the user to export revenue / costing data to TCG.
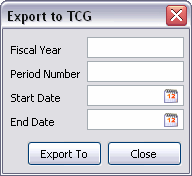
Entering a 'Fiscal Year' and 'Period Number' will automatically populate the 'Start Date' and 'End Date' fields with dates from the GL_PERIODS Table. You can manually change the 'Start Date' and 'End Date' if required.
Select the 'Export To' button and then choose a destination folder for the export file to be created in. The user will be notified when all the export files have been created.
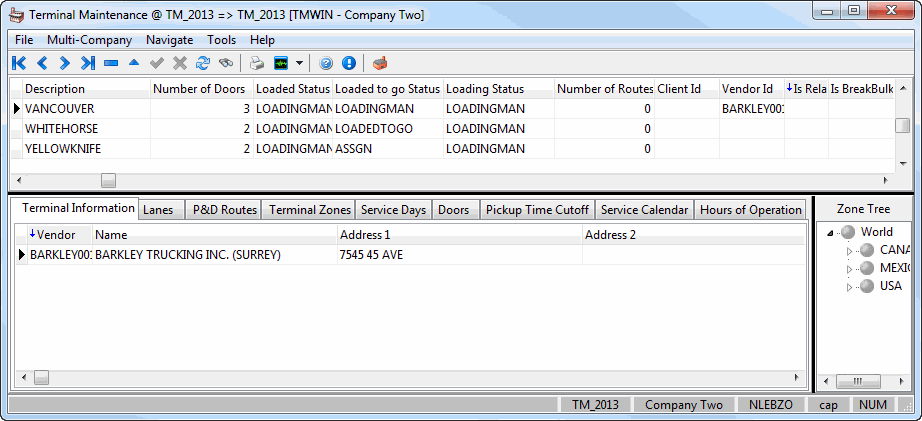
Terminal Grid
The topmost Grid in the Terminal Maintenance program displays all of the currently configured Terminals in your TruckMate Database, ordered by their 'Terminal ID'. The data in this Grid is gathered from the TERMINAL Table. All of the below Tabs reveal more information regarding the currently selected Terminal ID in this Grid:
Status Code Fields
You must enter a valid Status Code (as configured on the Codes Maintenance program > Status Codes Tab) into each of the various 'Status' fields for your Terminal. These Status values will become the default Status Codes for the task they are named after (i.e. the Status Code in the 'New Trip Status' field will become the default Status for new trips when working with this Terminal).
Note: The user cannot manually enter Status Codes into these fields, as an incorrect Status Code value could potentially break Dispatch functionality. The user must double-click each field to select a Status Code from a pick list.
Important columns will have some information listed below:
Dock Status Two
This docked status will be used on multi-leg trips where an 'Arrive at Dock' and some unloading occurs in the middle of the trip (i.e. not at the end).
TBU Status
This column gives the "To Be Unloaded" status, and is set in the Multi Mode Dispatch program when a trip is created directly at the door to be unloaded.
Mode
This field is used to link a TruckMate Terminal to one of the available Terminal Modes: 'Road', 'Rail', 'Ocean', or 'Air'. The choice of Mode will limit the usage of certain Travel Mode codes (as setup on the Codes Maintenance program > Travel Modes Tab) for the selected Terminal.
Rating Point
This field, when set to 'True', allows users to specify that the selected Terminal should be used as a 'Rating Point' when included on a Trip’s LTL Terminal Plan. For more information on the use of this flag (and how it affects a Trip’s rating), see the Multi-Point Rating documentation.
Leave Empty Status
This status is used for freights that can leave the terminal 'Empty' without loading or unloading. Set the default status value for such freights.
Terminal Information Tab
The Terminal Information Tab outlines the Vendor information for those vendors that have the selected Terminal as their 'Terminal Zone'. The vendor records displayed here are those that exist in the TERMINAL Table. The Tab Grid shows pertinent info like the vendors’s 'Name', 'Address', 'Contact', 'Phone Number', etc.
CrossDock Tab
The CrossDock Tab shows the TruckMate 'Lane Tree' component starting at the system’s 'Base Lane'. Using this Tab, the user can build the 'Traffic Lanes' necessary for the use of the CrossDock program. The user can build Lanes by dragging nodes from the left-side 'Zone Tree' menu to the right-side 'Lane Tree'.
Note: For more information on creating CrossDock lanes, see the CrossDock Traffic Lanes program.
City Dispatch Tab
The City Dispatch Tab shows the TruckMate 'Route Tree' component starting at the system’s 'Base Route'. Using this Tab, the user can build the 'Routes' necessary for the use of the City Dispatch program. The user can build Routes by dragging nodes from the left-side 'Zone Tree' menu to the right-side 'Route Tree'.
Note: For more information on creating City Dispatch routes, see the CrossDock Traffic Lanes program.
Terminal Zones Tab
The Terminal Zones Tab allows the user to specify which Zone Codes in the TruckMate system will be 'Terminal' Zones. The user can assign a Terminal Zone to the TruckMate system by dragging Zone nodes from left-side 'Zone Tree' section into the right-side ' Terminal Tree'.
Note: If a parent node contains child zones, the child zone will become a 'Terminal Zone' as well.
Service Days Tab
The Service Days Tab is used to configure the service days needed for pickups/drops at a selected terminal. The calculations entered here will be used on the Customer Service program > LTL/Routing Tab’s 'Avaliable', 'Departure' and 'Arrive' date fields. Information entered on this tab will be saved into the TERMINAL_SERVICE_DAYS database table. Choose one of the available terminal records from the Terminal Grid and you’ll see it appear as an icon on this tab. All configured service days calculations will appear under the terminal zone, categorized by their 'Travel Mode'. The user must use the right-click Context Menu options to setup the service days.
Note: Service Days calculations are only done on 'P' (pick) and 'D' (drop) trip portions (i.e. not for 'I' (linehaul) legs).
Context Menu
New
To begin entering service days for a terminal, the user must select the 'New' option, which will open the Service Days window.
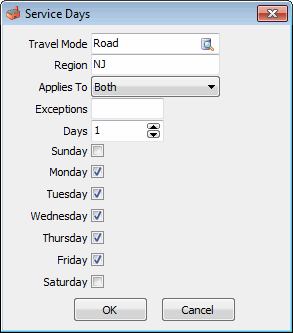
| Field | Definition |
|---|---|
Travel Mode |
Select one of the four available Travel Modes (Air, Ocean, Rail, Road) for the service days calculation for the chosen terminal. Terminals can have multiple service days calculations based on the Travel Mode. |
Region |
Enter a jurisdictional region for grouping your data. This field is only used for organizational purposes; the actual calculation of the service days uses the 'Travel Mode' and the Terminal Zone’s position in the Zone Tree (as defined in the Codes Maintenance program > Zone Tab). |
Applies To |
Select whether the service days calculation will apply to either 'Pick' (pickups at the terminal), 'Drop' (unloads at the terminal) or 'Both'. |
Exceptions |
When text is entered into this free-format field, the service days record for a region will be selected for an LTL movement before a service days record in that region that doesn’t have an Exception value. For example: If your company works out of a terminal in downtown Vancouver, British Columbia, making deliveries throughout the Greater Vancouver Regional District all week, but makes a special trip to the summit of Cypress Mountain once a week, you would setup two service days records, as follows:
When the 'Exception' case takes longer than the normal case, you can adjust the 'Days' value, as well. Note: The Exception logic will see any text entered into the field, but it sorts it in descending order. With this in mind, a user could enter multiple exceptions for a single region (i.e. an exception for each day of the week) by using the characters 'Z', 'Y', 'X', and so on (i.e. 'Z' comes first). |
Days |
Enter the number of service days required for the pick/drop at the terminal when using the specified travel mode. |
Day of the Week |
Select the days of the week that the specified service days calculation will be valid on. This information is used to calculate the 'Deliver' date on the Customer Service program > LTL/Routing Tab. |
Update Region / Update Service Days
The 'Update Region' option will re-open the Service Days window, allowing the user to update the entered 'Region' value. The 'Update Service Days' option will prompt the user for a new integer value, and will then alter the configured service days calculation accordingly.
Create Exception
Selecting this option will re-open the Service Days window and allow the user to enter values into the 'Exceptions' field.
Delete Region / Delete Zone
These options will remove the configured service days calculations and/or zones from the tree attached to the selected terminal.
Expand Tree
Use this option to expand the service days calculations tree for the terminal.
Refresh Tree
Use this option to refresh the service days calculations tree for the terminal after any changes are made.
Doors Tab
The Doors Tab is used to view and configure the Terminal Doors available to the Multi Mode Dispatch program > Active Trips section > Doors Tab.
Door Code
This field designates the alpha-numeric code that will display in the Multi Mode Dispatch program > Doors Tab.
Desciption
Enter a brief description of the Door, if required. This will also populate in Multi Mode Dispatch.
Description 2
Enter a second description of the Doof, if there is a need for that.
Active
Designates if the Door is able for use in the Multi Mode Dispatch program. This column can be toggled via double-click, or via the 'Active' right-mouse click option.
Context Menu
Active
See 'Active', above.
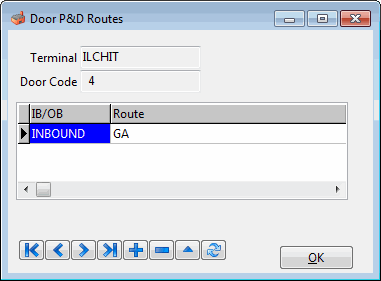
PD Routes
Pickup and Delivery routes can be associated with a given Door (inbound or outbound) by default. Select this option to open the Door P&D Routes window, where the routes can be added and configured.
View Loading Defaults
Select this option to view Door Load/Unload Defaults window, which details the linehaul door option setup in load plan options, such as the inbound or outbound doors associated with another zone.
Pickup Time Cutoff Tab
This tab can be used to specify the latest time a freight must be picked up, this is to allocate processing time to allow the freight to be processed by the terminal. A different 'Pickup Cutoff Time' can be specified for each day of the week.
Day of week
Specify the day of week you want the pickup cutoff time to be applied to.
Latest Pickup Cutoff time.
Specify the latest time a freight must be picked if it is to be processed by the selected terminal on the chosen day of the week.
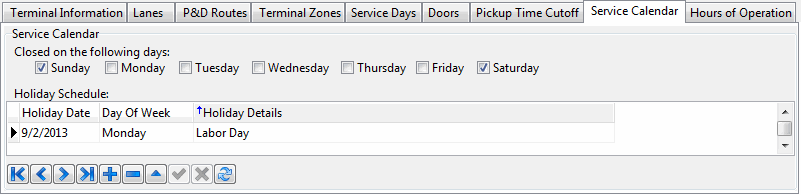
Service Calendar Tab
The Service Calendar Tab allows you to define the working days of the week as well as all the holidays through out the year for the selected terminal. Information entered in this tab will be used in the calculation of the Expected Date. If the expected date falls in a day that is defined as a holiday or a non-working day for the destination terminal, the result will be adjusted to the next working day.
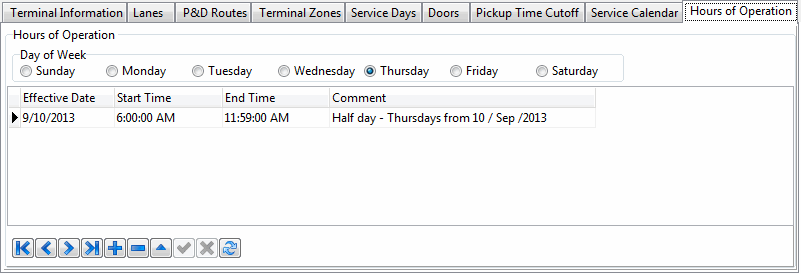
Hours of Operation Tab
The Hours of Operation Tab allows you to define multiple hours of operation for each day of the week throughout the year. In other words, if the hours of operation for a terminal change on different times of the year and / or on different days of the week, you can define a different hours of operation for each day of the week for different periods throughout the year. The Effective Date field allows you to define the start of a different time period. Information entered in this tab will be used in the calculation of the Expected Date. If the expected date falls in a day / time that is defined as outside the hours of operation for the destination terminal, the result will be adjusted to the next available hours of operation.
New Terminal Wizard
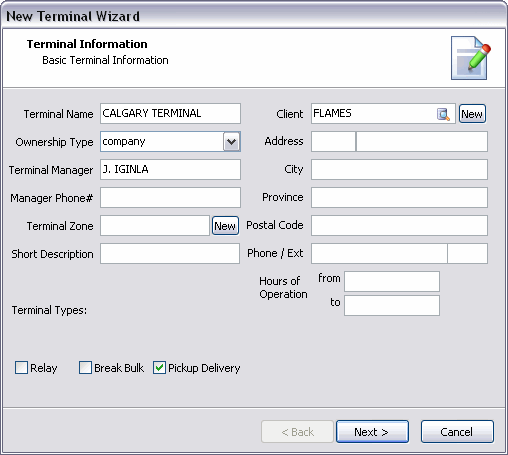
The New Terminal Wizard will guide the user through the process of creating a new Terminal ID for use in the CrossDock and City Dispatch programs, as well as other LTL operations throughout TruckMate.
Step 1 - Basic Terminal Information
On the first page of the New Terminal Wizard, simply enter the Basic Information that will define your Terminal. Selecting the 'New' button next to the 'Terminal Zone' and 'Client' fields will display some additional records, which you can use to configure a new Terminal Zone Code and Client record, respectively, without having to resort to the Codes Maintenance program or Customer & Vendor Profiles program.
The three 'Terminal Type' flags are for informational purposes only- the flags currently do not drive any additional functionality.
Select 'Next' once you have configured the Basic information for the Terminal.
Step 2 - CrossDock Information
The second page of the New Terminal Wizard allows the user to define several options required for the CrossDock program.
Number of Doors
Enter the number of Door spaces you wish to be available for the new Terminal when it is used in the CrossDock program. The number entered here directly corresponds to the number of available Doors in the CrossDock program > Trips / Doors List.
Status Options
Use the database search buttons to select the default Status Codes for the Status Changes that will be applied to Trips in the CrossDock program while working in this Terminal. The Status Codes available for selection on this page are configured in the Codes Maintenance program > Status Codes Tab.
Base Lane
Select the Base Lane Tree for use with this Terminal in the CrossDock program. The Lane Trees available from this drop-down menu are configured on the CrossDock Tab, above.
Select 'Next' once you have configured the CrossDock information for the Terminal.
Step 3 - City Dispatch Information
The third page of the New Terminal Wizard allows the user to define several options required for the City Dispatch program.
Number of Routes
Enter the number of Door spaces you wish to be available for the new Terminal when it is used in the City Dispatch program. The number entered here directly corresponds to the number of available Routes in the City Dispatch program > Active Trips List.
Base Route
Select the Base Route Tree for use with this Terminal in the City Dispatch program. The Route Trees available from this drop-down menu are configured on the City Dispatch Tab, above.
Select 'Next' once you have configured the City Dispatch information for the Terminal.