THE DAWG

THE DAWG® is geared toward the everyday users of TruckMate who actively execute key tasks that drive your business: Customer Service representatives, Dispatchers, Billing and Payroll personnel. Their decisions and attention to detail determine the quality, accuracy, and timeliness of the data that is ultimately used to judge the effectiveness and profitability of your organization. By sending 'in-your-face' notifications of potential problem situations, THE DAWG helps these key employees stay on top of the details that, collectively, lead to the success of your business.
THE DAWG functionality occurs across two programs: THE DAWG - which allows users to configure notification events- and the TMW Windows Service Host program > Scheduler Services, which performs the queries and e-mail the results. THE DAWG consists of SQL-driven metrics that are used to measure key areas of your business. Depending on its configuration, alert information can be updated hourly, daily, every 'x' minutes, or at will, based on data recorded in TruckMate.
Each alert consists of one of the following:
-
SQL Statement: this is an SQL statement that will return a set of rows of data. If the number of rows returned by the query > 0, then an e-mail will be sent.
-
Stored Procedure: if the data to be returned requires more complex business rules then permitted in a single SQL query, a stored procedure can be created. The stored procedure can return a result set, a set of 'out' parameters, or can execute a stored procedure "silently" without returning any type of data. Input parameters to the stored procedure can also configured within THE DAWG .
-
E-mail addresses of the employees who are to be notified of potential problem situations: when an alert detects a situation that is beyond the alert threshold, it provides those employees with an e-mail alert to make them aware of the issue immediately. This allows them to pro-actively investigate and head off problems before they start.
| The "From" name of the e-mail alert sent by THE DAWG is determined by the Codes Maintenance program > E-Mail Setup > Profiles Tab > 'Sender Name' field. You can assign different e-mail "From" values (via different e-mail profiles) for different DAWGs. |
To access THE DAWG:
| From this location | Go to |
|---|---|
TruckMate Menu and TruckMate Task List |
|
Windows Start Menu |
TruckMate 20xx > The Dawg |
Windows Explorer |
C:\Program Files (x86) > TruckMate 20xx > WatchDawg.exe |
How Do I?
How Do I Use the Dawg program?
When first installed, there will be 4 default Dawg SQL Statement alerts added. Follow these steps to begin using these alerts:
-
Open the Dawg program (WATCHDAWG.EXE).
-
You will need to edit each default alert, and put a valid Email address in the 'Email To' field of the Header section for each alert you wish to use.
-
Open the TMW Windows Service Host program > Scheduler DAWG Service. Click: Start > Programs > TruckMate > Utilities > TMW Service Host
-
Confirm the dog is running by opening The Dawg Activity Monitor and checking the logs. If the Status displays as 'Not Running', right-click the service and select the 'Play' button.
-
Open the Scheduler Email Properties and make sure the 'Schedule' value is set appropriately and that the 'Mail Server' value is correct.
-
You should begin receiving Emails from the Dawg application.
How Do I Setup Email Confirmation?
THE DAWG allows the option to send a confirming E-mail once Pickup or Delivery of the product has occurred.
-
From the Tools Menu, select the 'E-Mail Confirmation' option.
-
The E-Mail Confirmation Profile window displays.
-
Select the '+' button to begin configuring the Confirmation Profile. You must enter a name for the Profile in the 'Confirmation Profile' field, and select the 'Default' flag if this Profile will be the system default. The 'Description' field is optional.
-
Begin entering the filtering conditions for the Confirmation Profile by selecting the 'Client List' and/or 'Status Codes' buttons:
-
Client List: this button allows the user to specify which Clients- and the specific Freight Bill party they must be on a Freight Bill- in order to "signal" the E-Mail Confirmation Profile to generate the message. If you enter 'CLIENT1' and set 'Bill-To' to 'True', for example, the selected Profile will only generate messages when 'CLIENT1' is the 'Bill-To' on a Freight Bill.
-
Status Codes: similar to the Client List button, this allows you to determine the Freight Bill Status Code(s) that will determine when the E-Mail Confirmation Profiles sends the e-mail message.
-
-
If you would like the e-mails generated by the displayed Profile to be sent to a Notification List (as configured in the Customer & Vendor Profiles program > Customer > Contacts Tab), double-click in the second field to the right of the 'Notification List' text. You will be able to select from those available in your system.
When a Notification List is selected, it will not disallow you from entering additional e-mail recipients in the 'To', 'CC', 'BCC', (or any of the Freight Bill Party fields below) for the E-Mail Confirmation Profile.
-
Select the 'Delivery Confirmation', 'Pickup Confirmation' and/or 'Loaded Bill' flags to determine the type of Freight Bill that will generate this specific Profile, and enter the relevant information in the fields provided:
-
Mail Server: Enter your mail server information here (usually in the form of: "mail.mycompany.com").
-
Mail From: Enter the name/company that this e-mail is coming from.
-
-
Enter the e-mail addresses you wish to send the generated e-mail to, using the 'To' / 'CC' (carbon copy) / 'BCC' (blind carbon copy) fields. In addition, you can enter a list of valid e-mail addresses separated by commas, or select any or all of parties attached to the Freight Bill by selecting:
-
C - Caller
-
O - Origin (Shipper)
-
D - Destination (Consignee)
-
3 - 3rd party
-
B - Bill to Customer
When you select any/all of 'C', 'O', 'D', '3' or 'B', a valid e-mail address needs to be already entered into the 'Email' field of the Customer & Vendor Profiles program > Customer > Address Tab.
-
-
Enter a descriptive subject for the e-mails generated by the Profile in the 'Subject' field. You can use dynamic scripts in the Subject field just as you can in the larger Script text field below. See the below topic for more advanced functionality available in the 'Subject' field.
-
Type any static text required for the e-mail message body in the 'Script' field. See the below topic for more advanced functionality available in this text field.
Note: For companies that have their database set to run as multi-company, the scheduler will only handle confirmations of freight bills created by the company the scheduler is running in, freight bills created in other companies must be handled by e-mail confirmations created within those companies.
How Do I Code the Confirmation Script?
Dynamic data elements come from TLORDER (the query that generates the data source is "SELECT * FROM TLORDER WHERE DETAIL_LINE_ID = :DLD"), and you can include them by using a "@" meta-tag. The general format is:
<@{FIELDNAME}[,FORMAT[,JUSTIFICATION]]>
where FIELDNAME is any field name from TLORDER, FORMAT (optional) is a format specifier, and JUSTIFICATION is a justification specifier. Note that FORMAT must be present if you are specifying a justification specifier.
| You can use these same scripts in the e-mail’s Subject line- the functionality is the same. |
Valid values for FORMAT
-
"S" - general format string (default)
-
"$" - format as currency (using the windows currency format)
-
"Ln" - take the leftmost 'n' characters
-
"Rn" - take the rightmost 'n' characters
-
"Mp:n" - starting at position 'p" take count 'n' characters
-
"Ft" - format (must be a number) using template 't'
Valid values for the 'template'
-
0 - Digit place holder: if the value being formatted has a digit in the position where the '0' appears in the format string, then that digit is copied to the output string. Otherwise, a '0' is stored in that position in the output string.
-
- Digit place holder: if the value being formatted has a digit in the position where the '' appears in the format string, then that digit is copied to the output string. Otherwise, nothing is stored in that position in the output string.
-
. - Decimal point: the first '.' character in the format string determines the location of the decimal separator in the formatted value. Any additional '.' characters are ignored. The actual character used as a the decimal separator in the output string is determined by the 'Number Format' of the 'International' section in the Windows Control Panel.
-
"xx" - Characters enclosed in quotes are output as-is, and do not affect formatting.
Valid values for JUSTIFICATION
-
Ln - Left justify to a count of 'n' characters. If the source is longer it will be truncated. If the source is shorter it will be padded out with spaces to the specified size
-
Rn - Right justify to a count of 'n' characters. Truncated and padded in a similar fashion.
-
Cn - Center justify to a count of 'n' characters. Output is left and right padded equally (if possible).
Examples
<@PICK_UP_BY> (date field)
The output will be something like: 10/10/2000 10:10:10 AM
<@PICK_UP_BY,L10>
This will truncate after 10 chars, so the output would be: 10/10/2000
<@PICK_UP_BY,L10,R15>
Right justify and display 15 wide: 10/10/2000
<@TOTAL_CHARGES,$>
The output will be (assuming currency format is $0.00): $123.45
<@TOTAL_CHARGES,F$0.0000>
The output will be: $123.4500
Full Sample of Delivery Confirmation by E-mail
Subject: Your delivery confirmation...

Text:
Your freight is now delivered.

Bill Number:   <@BILL_NUMBER>
Trace Number:  <@TRACE_NO>

---------- CALLER -----------
Caller:        <@CALLNAME>
Address:       <@CALLADDR1>
               <@CALLADDR2>
               <@CALLCITY> <@CALLPROV> <@CALLPC>
Phone:         <@CALLPHONE>

---------- SHIPPER ----------
Pickup At:     <@ORIGNAME>
Address:       <@ORIGADDR1>
               <@ORIGADDR2>
               <@ORIGCITY> <@ORIGPROV> <@ORIGPC>
Phone:         <@ORIGPHONE>
Pick Up By:    Between <@PICK_UP_BY> and <@PICK_UP_BY_END>
Actual:        <@ACTUAL_PICKUP>

--------- CONSIGNEE ---------
Deliver To:    <@DESTNAME>
Address:       <@DESTADDR1>
               <@DESTADDR2>
               <@DESTCITY> <@DESTPROV> <@DESTPC>
Phone:         <@DESTPHONE>
Deliver By:    Between <@DELIVER_BY> and <@DELIVER_BY_END>
Actual:        <@ACTUAL_DELIVERY>

---------- DETAILS ----------
Pallets:       <@PALLETS>
Pieces:        <@PIECES>
Length:        <@LENGTH_1>
Cube:          <@CUBE>
Weight:        <@WEIGHT>
Area:          <@AREA>
Volume:        <@VOLUME>
Dangerous:     <@DANGEROUS_GOODS>
Temp. Ctrl.:   <@TEMP_CONTROLLED>

--------- FINANCIAL ---------
Declared Val:  <@DECLARED_VALUE,$,R12>
Charges:       <@CHARGES,$,R12>
Extra Charges: <@XCHARGES,$,R12>
Tax 1:         <@TAX_1,$,R12>
Tax 2:         <@TAX_2,$,R12>
Total Charges: <@TOTAL_CHARGES,$,R12> <@CURRENCY_CODE>
Bill To:       <@BILL_TO_NAME>

Subject: Your delivery confirmation...

Text:
Your freight is now delivered.

Bill Number: <@BILL_NUMBER>
Trace Number: <@TRACE_NO>

---------- CALLER -----------
Caller:         <@CALLNAME>
Address:        <@CALLADDR1>
                <@CALLADDR2>
                <@CALLCITY> <@CALLPROV> <@CALLPC>
Phone:          <@CALLPHONE>

---------- SHIPPER ----------
Pickup At:      <@ORIGNAME>
Address:        <@ORIGADDR1>
                <@ORIGADDR2>
                <@ORIGCITY> <@ORIGPROV> <@ORIGPC>
Phone:          <@ORIGPHONE>
Pick Up By:     Between <@PICK_UP_BY> and <@PICK_UP_BY_END>
Actual:         <@ACTUAL_PICKUP>

--------- CONSIGNEE ---------
Deliver To:     <@DESTNAME>
Address:        <@DESTADDR1>
                <@DESTADDR2>
                <@DESTCITY> <@DESTPROV> <@DESTPC>
Phone:          <@DESTPHONE>
Deliver By:     Between <@DELIVER_BY> and <@DELIVER_BY_END>
Actual:         <@ACTUAL_DELIVERY>

---------- DETAILS ----------
Pallets:        <@PALLETS>
Pieces:         <@PIECES>
Length:         <@LENGTH_1>
Cube:           <@CUBE>
Weight:         <@WEIGHT>
Area:           <@AREA>
Volume:         <@VOLUME>
Dangerous:      <@DANGEROUS_GOODS>
Temp. Ctrl.:    <@TEMP_CONTROLLED>

--------- FINANCIAL ---------
Declared Val:   <@DECLARED_VALUE,$,R12>
Charges:        <@CHARGES,$,R12>
Extra Charges:  <@XCHARGES,$,R12>
Tax 1:          <@TAX_1,$,R12>
Tax 2:          <@TAX_2,$,R12>
Total Charges:  <@TOTAL_CHARGES,$,R12> <@CURRENCY_CODE>
Bill To:        <@BILL_TO_NAME>
Menu Bar / Toolbar
File Menu
Print Reports
![]() Selecting the Print Reports button will bring up the report selection window, common to many TruckMate applications. Here, you will select a report file from those available in your system and a Crystal Report will be generated.
Selecting the Print Reports button will bring up the report selection window, common to many TruckMate applications. Here, you will select a report file from those available in your system and a Crystal Report will be generated.
For more information on Report functionality in TruckMate, see the Crystal Reports Reference.
Exit
![]() Selecting this option will close the Dawg program.
Selecting this option will close the Dawg program.
Multi-Company Menu
For more information on the Multi-Company options available from the Menu Bar, see the Multi-Company documentation.
Navigate Menu
The Navigate Menu contains the standard TruckMate Navigation Bar, as well as the following options:
Find
![]() Click this button to search for a specific the Dawg notification records, searchable by 'ID#' or 'Description'.
Click this button to search for a specific the Dawg notification records, searchable by 'ID#' or 'Description'.
Tools Menu
TruckMate Monitor
![]() Click the down arrow next to this button to access the various functions of the new TruckMate Monitor.
Click the down arrow next to this button to access the various functions of the new TruckMate Monitor.
Remember Position / Size
Selecting this option will maintain the program window position and size upon close. When the program is re-opened, it will appear the same.
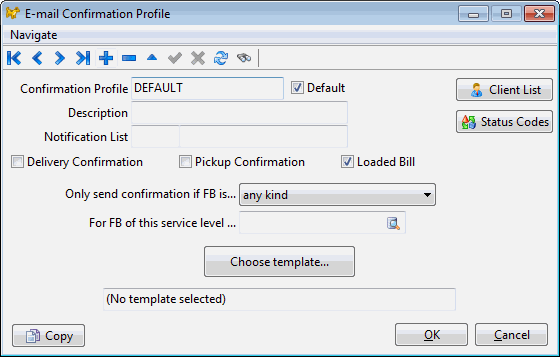
Delivery Confirmation…
Selecting this option will open the E-mail Confirmation Profile window, which allows you to setup automatic e-mail events based on the alerts that come out of The Dawg.
Test SQL Statement
![]() Select this option to test the syntax of the SQL Statement you have entered on the SQL Statement Tab. A warning window will display the outcome of the syntax test when completed.
Select this option to test the syntax of the SQL Statement you have entered on the SQL Statement Tab. A warning window will display the outcome of the syntax test when completed.
Help Menu
TruckMate Help
![]() Selecting this button will open the Dawg topic in the TruckMate Online Help file (the page you are currently viewing).
Selecting this button will open the Dawg topic in the TruckMate Online Help file (the page you are currently viewing).
Service Portal
![]() Selecting this button will open an instance of your default Internet browsing software, with the https://www.tmwcare.com login page displayed.
Selecting this button will open an instance of your default Internet browsing software, with the https://www.tmwcare.com login page displayed.
About
![]() Selecting this button will open the standard TruckMate About window, which contains important information about the application you are currently using, including its version number (important for support calls).
Selecting this button will open the standard TruckMate About window, which contains important information about the application you are currently using, including its version number (important for support calls).
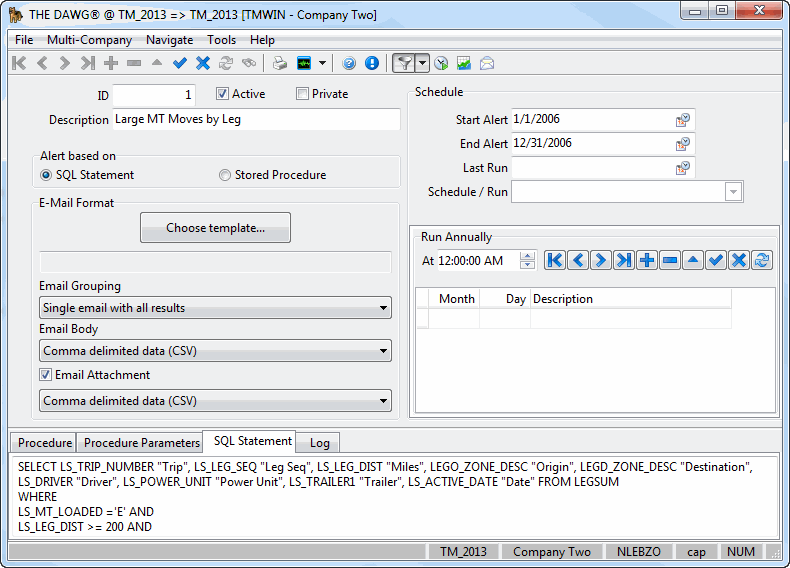
Header Details
The Header section of THE DAWG application is used to define the general parameters of the notification you are creating. Click the '+' button to begin creating a new record. You can enter notification records manually, or use the 'Import Query from Command Center' option in the Tools Menu.
ID
This field is automatically generated when a new record is created. It cannot be modified and will always increment sequentially when new records are created.
Description
The Description field is used to provide a general description of the notification alert you are creating.
Alert Based On
Choose whether the displayed alert will run a 'Stored Procedure' or 'SQL Statement' when it occurs. Depending on your choice in this section, you must setup either the Procedure Tab or the SQL Statement Tab accordingly.
Delivery Confirmation
Selecting this option will open the E-mail Confirmation Profile window, which allows you to setup automatic e-mail events based on the alerts that come out of THE DAWG .
Private
Selecting the 'Private' flag will only allow the User who creates the notification alert to view its configuration.
Active
The 'Active' field will turn the alert on/off.
| The Toolbar Filter option 'Exclude Inactive Alerts' will remove those alerts that do not have the 'Active' flag checked from the record set when scrolling, searching etc. |
E-Mail Format
This section allows you to configure the e-mail messages that will be sent out by THE DAWG when an alert occurs. THE DAWG has been enhanced to provide the e-mail template (chosen below) with the actual data sets that generated the table, meaning that THE DAWG can pull information from the TLORDER table, for example, and pass that directly into the e-mail that is generated by the template.
| The e-mail functionality accessed from here is used only for alerts being sent out by THE DAWG. |
Choose Template
Click the Choose Template button to select a Template. You can select a Crystal Report to attach to a template, and when THE DAWG generates an alert, it will include this Crystal Report as a .PDF attachment on the email that is generated.
|
The "From" name of the e-mail alert sent by THE DAWG is determined by the Codes Maintenance program > E-Mail Setup > Profiles Tab > 'Sender Name' field. You can assign different e-mail "From" values (via different e-mail profiles) for different DAWGs. For companies that have their database set to run as multi-company; the e-mail templates created are company specific, which means that a template can only be retrieved from within the company it was created by. |
E-mail Grouping
This setting configures how THE DAWG results will be collected for e-mailing:
-
Single email with all results: when THE DAWG returns data, all records will be sent out as one e-mail.
-
One email per result row: when THE DAWG returns data, each record (row) will be sent as a separate e-mail. Keep in mind that this could severely crowd the inbox of the recipient, depending on how often THE DAWG runs and how much data is returned.
| If you have configured your email template to include a Crystal Report (which will be sent as a .PDF file), you can use one of the columns in the row as the recipient address, you could now generate multiple emails to multiple recipients from one DAWG. |
E-mail Body
This option allows you to select a format for the e-mail body. Use the dropdown list to select the suitable format for your e-mail body. Below are the available values for this option.
-
Fixed-width formatted data
-
HTML-formatted data
-
Comma delimited data (CSV)
E-mail Attachment
If you want to send the results as an attachment to the e-mail, select this checkbox and then select the format of the attachment from the dropdown list. Below are the available values for this option.
-
Fixed-width formatted data
-
HTML-formatted data
-
Comma delimited data (CSV)
Schedule Section
The Schedule area allows the user to dictate the frequency at which the displayed alert will occur.
Start Alert / End Alert
Double click these fields to select a date from the calendar menu. These dates determine when the alert is active (in addition to the 'Active' flag in the program header).
Last Run
This field displays the date of the last time the alert was processed. The 'Last Run' value is used in conjunction with the 'Run Every' schedule below. The 'Run Every' value is added to the 'Last Run' and compared to the current date/time. You can edit the 'Last Run' value if you would like to change when the alert is to run next.
Schedule / Run
The 'Schedule/Run' drop-down allows you to configure how often the displayed alert will run. By default, all your existing dawgs and any newly added dawgs have this value set to 'Periodically (At fixed intervals)', which allows the user to enter the 'Days', 'Hours' and 'Minutes' between dawg executions (as in prior versions of TruckMate). The drop-down includes the following options:
-
Daily: the user specifies a time of day, and (if the TMW Windows Service Host program > Scheduler DAWG Service is running), the displayed dawg will get executed every day at that time.
-
Weekly: this is similar to daily in that the dawg is executed at a fixed time each day, but it allows you to skip days. The user specifies which day (or days, up to 7) of the week you want the displayed dawg to execute (i.e. Monday through Friday at 5:00 AM). Note that if you check all 7 days, this is the same as the 'Daily' option.
-
Monthly: this is similar to 'Daily' and 'Weekly' in that you specify a specific time of day, but you can specify which days of the month. Note that if you check the 31st, then the displayed dawg will not fire on months shorter than 31 days (i.e. will execute in January, but not February). You could check the 28th, and it would execute every month; but the user might not like this (want it to execute on Jan 31st, not Jan 28th). So, as an alternative, you may check the 'Last day of the month' flag.
-
Annually: this is similar to 'Weekly' and 'Monthly' (fixed time of day), but you specify the days of the year. Having 365 check-boxes would be too cumbersome, so, instead, the user can enter the required days into a grid. For each row, you need to enter the 'Month' (number) and the 'Day' of the month. A drop-down is available for each. A read-only 'Description' column is displayed to confirm your selection.
-
Always: choose this option to not set any filter / criteria on the TMW Windows Service Host program > Scheduler DAWG Service. Every time the scheduler runs dawgs, it will execute this one. So, if you have the scheduler set to run THE DAWG every 5 minutes, this particular dawg (select statement or procedure) will get executed every 5 minutes.
| For the 'Daily', 'Weekly', 'Monthly', and 'Annual' scheduling options, it is not a good idea to schedule at 11:59 PM (or any times in the X minutes before midnight where X = the frequency of the TMW Windows Service Host program > Scheduler DAWG Service). The reason for this is that in these 4 scheduling options, the logic is that a). today is a matching day (per criteria for all but daily) and b). the dawg has not been run yet today and c). the current time is equal or past the time specified for the dawg. So, for example, if your scheduler runs at 11:45 PM and 12:15 AM, without any runs in between, any daily/weekly/monthly/annual dawgs scheduled between 11:46 PM and 11:59 PM will never execute. |
Procedure Tab
The Procedure Tab allows the User to assign a Stored Procedure to a DAWG event. Whenever the displayed alert occurs, the Stored Procedure chosen in the 'Procedure' field will run against the Schema selected in the 'Schema' field.
Schema
This is the database schema the stored procedure resides in.
Procedure
Procedure is the name of the stored procedure.
Procedure Parameters Tab
If a Stored Procedure is used, the system will populate this Grid the first time the alert entry is saved. You can then modify the parameter values that will be passed into the procedure when the alert is run. The user will require some understanding of the selected Stored Procedure in order to set the appropriate values for the parameters.
SQL Statement Tab
The SQL Statement Tab allows the User to define a custom SQL procedure that will be run whenever the displayed Dawg alert occurs. The User must enter a valid SQL Query into the large text box on this Tab. THE DAWG comes with four pre-set SQL Statements, as follows:
-
Large MT Moves by Leg: this query will select any Legs that have MT miles > 200 miles that are have happened within the past hour.
-
Large MT Moves by Trip: this query will select any Legs that have Total Trip MT miles > 200 miles that are have happened within the past hour.
-
Percentage of MT Miles: this query will select any Legs that have Total Trip MT miles > 200 miles that are have happened within the past hour and also have an MT mile % > 40%.
-
Revenue Per Mile: this query will select any loaded legs that have revenue per mile < $ 1/mile. The query will include the sum of all miles on the move (both 'loaded' and 'MT').
| Dawg SQL statements may contain two special parameters: '@LastStart' and '@CurrStart' (without quotes). On execution of a SQL statement (via the 'Test SQL' option in THE DAWG or the TMW Windows Service Host program > Scheduler DAWG Service, '@LastStart' is replaced by the Dawg’s 'Last Run' Date/Time and '@CurrStart' is replaced by the last scheduled start Date/Time (which is calculated by taking the 'Last Run' Date/Time and adding as many multiples of 'Run Every' days, hours and minutes without going into the future). |
Log Tab
The Log Tab maintains a record of the times a specific alert has run, including the 'Log Date', 'Run Duration', 'Message' and 'Transaction Count' information, as well as some details regarding the Parameters that were run, if applicable.
E-mail Confirmation Configuration
You can enter multiple E-mail Confirmation messages, and set them up for a variety of different scenarios: by the 'Client ID' attached to the Freight Bill (see the 'Client List' button description below), or by Freight Bill 'Status' (see the 'Status Codes' button description). Select the '+' button on the TruckMate Navigation Bar to begin creating a new E-mail Confirmation Profile. Freight bill e-mail confirmation messages create entries in 'EMAIL_MSG_TLORDER' table. Those entries can be used for cross referencing and reporting purposes. For specific setup steps, click here.
| For companies that have their database set to run as multi-company, the scheduler will only handle confirmations of freight bills created by the company the scheduler is running in, freight bills created in other companies must be handled by e-mail confirmations created within those companies. |
The "From" name of the e-mail alert sent by THE DAWG is determined by the Codes Maintenance program > E-Mail Setup > Profiles Tab > 'Sender Name' field. You can assign different e-mail "from" names (via different e-mail profiles) for different DAWGs.
Confirmation Profile / Description
When creating a new Confirmation Profile, this field will be blank. Enter the value you wish to use when assigning this Profile to Clients in the Customer & Vendor Profiles program > Misc Tab. The Confirmation Profile code should be somewhat descriptive (i.e. 'BILLED_NOTICE' for an e-mail that will be used to notify the Client that they are being billed).
Use the description field to give a brief outline of what this Confirmation Profile will be used for.
Default
Select this flag if you wish to set the currently displayed Confirmation Profile as the default profile for your system. The default Profile will be used whenever a Client ID cannot be matched to a specific Confirmation Profile.
Notification List
An E-mail Confirmation can be tied to a Client’s specific Notification List, as configured on the Customer & Vendor Profiles program > Contacts Tab. If using a Notification List, you do not need to enter details in the 'To', 'CC' or 'BCC' fields on this window, as the e-mail information will be supplied by the Notification List data.
-
Client List
The Client List button allows the user to specify which Clients will generate an e-mail message (based on this profile) when attached to a Freight Bill in the Customer Service program. The Confirmation Client List window will appear, allowing you to add the Clients, and to configure some details.
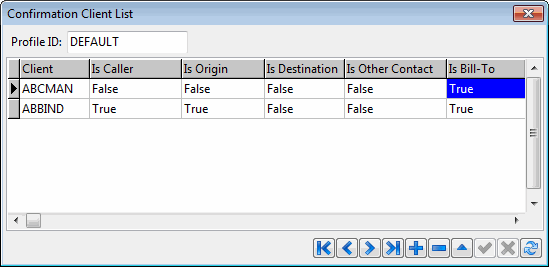
Select the '+' button on the TruckMate Navigation Bar to add a Client to the selected Email Confirmation Profile.
You can then use the 'Is Caller', 'Is Origin', 'Is Destination', 'Is Other Contact' or 'Is Bill-To' fields to specify when the Email Confirmation message should be sent to the specific Client.
In the above example, the 'DEFAULT' E-Mail Confirmation message will be sent out when either the 'ABCMAN' client is the Bill-To party, or when the 'ABBIND' client is all of the following: Caller, Origin and Bill-To.
Profile ID
This field displays the Confirmation Profile ID, as setup on the previous window.
-
Status Codes
The Status Codes button allows the user to specify which Status Codes will notify THE DAWG to send out e-mail messages based on the displayed Profile. The Confirmation Status Code window will appear, allowing you to add specific Status Codes.
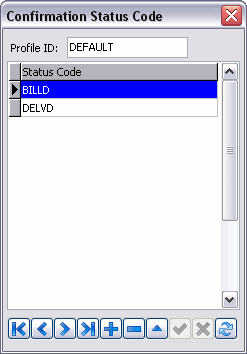
Select the '+' button on the TruckMate Navigation Bar to add a new Status Code to this E-mail Confirmation message. When a Freight Bill is set to one of the included Status Codes on a specific E-mail Confirmation Profile, the e-mail message attached to the profile will be sent.
Delivery Confirmation / Pickup Confirmation / Loaded Bill
Select the flag that corresponds to the general nature of the e-mail: either 'Delivery Confirmation', 'Pickup Confirmation' and/or 'Loaded Bill'. If any of these flags represent the reason for the communication, de-select them.
Only Send Confirmation if FB is…
This menu allows Intermodal clients some additional filtering criteria for the e-mails generated by the displayed Confirmation Profile. The user can select from 'Any kind' (no Intermodal filtering), 'Import' (Import movements only), 'Export' (Export movements only) or 'Either Import or Export' (Import and Export movements, excluding any other Freight Bills).
For FB of this service level
The user can select a service level from the drop down list and this e-mail confirmation will only apply to freight bills having that service level assigned to them.
Choose Template
Allows the user to select a Template. See the TruckMate E-Mail System for more information.
| For companies that have their database set to run as multi-company; the e-mail templates crated are company specific, which means that a template can only be retrieved from within the company it was created by. |