Advanced program details
| As of TruckMate 2022.4, CrossDock is no longer available. Trimble still provides support for older versions. |

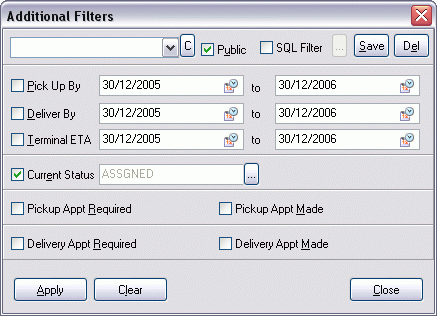
Additional Filters
The options in the Additional Filters window allow advanced Filtering options for the Freight Bills that will be displayed in the Freight Bills Grid of the CrossDock program.
| Filter access can be modified in SECSETUP.EXE > Business Events > Filters tab. |
Public
If on a multi-user system, checking the 'Public' tag will make the Filter useable by all Users. Leaving this option unchecked will only allow the current User access to the Custom Filter.
SQL Filter
Check this checkbox option if you wish to use an SQL Statement as your Filter. Once checked, the search button next to this option will become enabled. Click this search button to open a window where you can enter (or modify) your SQL Filter.
Save / Del
Click the 'Save' button when you are finished setting up your Filter and it will be applied to the Freight Bill Grid. Click the 'Del' (Delete) button to remove your options and disable the Filter.
Pick Up By
Check the Pick Up By checkbox to enable Filtering by a Pickup Date Range. Double click the two fields to the right to select your Date Range from Calendar menus.
Deliver By
Check the Deliver By checkbox to enable Filtering by a Delivery Date Range. Double click the two fields to the right to select your Date Range from Calendar menus.
Terminal ETA
Check the Terminal ETA checkbox to enable Filtering by a Terminal ETA. Double click the two fields to the right to select your Date Range from Calendar menus.
Current Status
Check the Current Status checkbox to enable Filtering by Status(es). Click the search button to open the 'Multiple Status Selection' window where you may choose a variety of Statuses that you wish to be used as Filters.
Delivery Appt Required
Check this option to display only those Freight Bills that require a Delivery Appointment.
Delivery Apt Made
Check this option to display only those Freight Bills that have completed their Delivery Appointment.
Terminal Setup
The Terminal Setup window is accessed from the 'Terminal Setup' button on the Terminal Select window (accessed via the 'View' Menu).
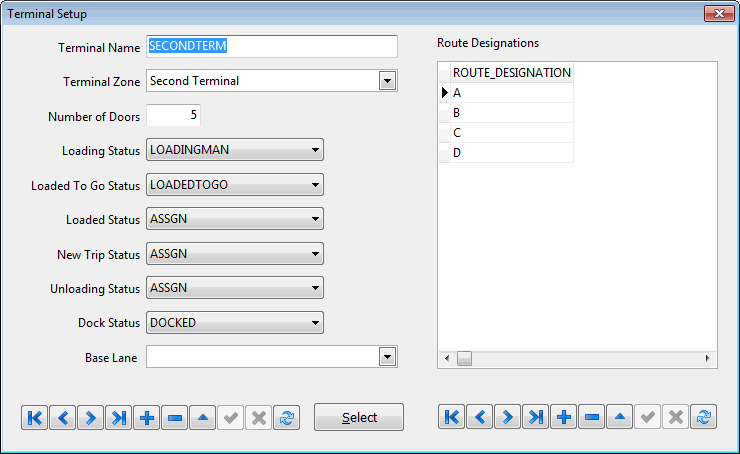
All Status Codes entered onto this form will be saved to the Terminal record in the TERMINAL Table, which can also be altered via the Terminal Maintenance program. When you use this window to edit a Terminal in the future, all Status Codes are defaulted from those entered in Terminal Maintenance.
Terminal Name
Enter a name for this Terminal.
Terminal Zone
Select the Zone Code that corresponds with this terminal from the drop down list box. Only Zone Codes that have been flagged as Terminal zones in the Codes Maintenance program are available for selection.
Number of Doors
Enter the number of doors that this terminal has. This number will determine the number of doors that display on the right side of the Freight Bill Grid. You can now have up to '400' doors entered in this field.
| If you enter a value greater than 400 in this field, a Warning Message will display, prompting you to reduce the number you have entered. |
Loading Status
As soon as a trailer is dragged to a door, a trip is created. While the trip is visible in the Dispatch program, is cannot be activated until it is released in the CrossDock program using the Loaded to Go menu option. Until that time, the status code selected here will be displayed as the trip’s current status in the Dispatch program. Only status codes of the Assignment code behavior (as configured in the Codes Maintenance program) will be available for selection here.
Loaded to Go Status
When the Loaded to Go status is assigned to the trip (using the Loaded to Go menu option in the Door Options menu), the status code selected here will be assigned to the trip. Only status codes of the Assignment code behavior (as configured in the Codes Maintenance program) will be available for selection here.
New Trip Status
When the User right-clicks the Door/Trips List section in the CrossDock program and selects the 'New Trip at This Door' option, this is the Status Code that will be given to the new Trip. Only status codes of the Assignment code behavior (as configured in the Codes Maintenance program) will be available for selection here.
Unloading Status
When the user right-clicks a Trip on the Door/Trips List section and chooses the 'Start Unloading' option, this is the Status Code that will be applied to the Trip. Only status codes of the Assignment code behavior (as configured in the Codes Maintenance program) will be available for selection here.
Dock Status
When a user enters the Door/Trip List drill-down screen and uses the 'Unload' optiosn to remove Freight from a Trailer, the Freight Bills will be given the Status Code that is entered in the 'Dock Status' field.
Base Lane / Base Route (City Dispatch)
Use this field to select a specific Lane that should apply, by default, to this terminal. See Traffic Lanes above for more information.
When accessing the Terminal Setup window from the City Dispatch program, this field will be labelled 'Base Route,' and will allow you to set a default Route for the selected Terminal. These Route codes are configured in the CrossDock Traffic Lanes program. After selecting a 'Base Lane / Route', all other entries below the Base in the Lane / Route tree will be added to the CrossDock (or City Dispatch) program’s Lane/Route Tree.
| If this field is 'NULL' (no value) the entire Lane / Route Tree will be displayed. |
Route Designations
This section allows the user to create Route Designations for the selected terminal. A rout designation is used as a planning tool to group freight bills. Assigning the same route designation to number of freight bills puts those freight bills in one group. The user can define multiple route designations for each terminal. When the user is working on a terminal that has multiple route designations defined, the user will be able to select which route designation to assign to the freight bill via a drop down list available in 'Route Designation' field, in the freight bill grid. This section includes only one column, 'Route Designation'. You can use the navigation bar at the bottom of the section to manipulate data in the section (add, edit, delete and navigate through available records).
Door Summary
The Door Summary window shows a list of all Freight Bills assigned to the trip at this door, as well as all assigned trailers. The Freight Bill Grid in the Door Summary form shows the same information as the Freight Bill Grid on the main CrossDock screen, and has the same Grid sort capability.
Toolbar
Unmatch Trailer
![]() Select a trailer in the Trailer ID Grid on the left, then click this button to remove it from the trip. This option performs an 'unmatch', or de-assign, operation. The Unmatch option is usually used if the User has pre-planned the shipment on a Trip, and then changes his/her mind.
Select a trailer in the Trailer ID Grid on the left, then click this button to remove it from the trip. This option performs an 'unmatch', or de-assign, operation. The Unmatch option is usually used if the User has pre-planned the shipment on a Trip, and then changes his/her mind.
Clear Selection
![]() You can select multiple Freight Bills in the Freight Bill Grid. To manually select Freight Bills, hold down the '<Ctrl>' key, and click the desired Freight Bills with your mouse. Use this menu option to clear the selection, and return the Freight Bill display to its normal state.
You can select multiple Freight Bills in the Freight Bill Grid. To manually select Freight Bills, hold down the '<Ctrl>' key, and click the desired Freight Bills with your mouse. Use this menu option to clear the selection, and return the Freight Bill display to its normal state.
Select All
![]() To select all Freight Bills currently displayed in the Freight Bill Grid, use this option. This is the same as manually selecting a group of Freight Bills. Use the Clear Selection menu function to undo the selection and return the Freight Bill display to its normal state.
To select all Freight Bills currently displayed in the Freight Bill Grid, use this option. This is the same as manually selecting a group of Freight Bills. Use the Clear Selection menu function to undo the selection and return the Freight Bill display to its normal state.
Select by Route Designation of Selected Bill
![]() To select all Freight Bills with the same Route Designation as the Freight Bill that is currently selected, use this menu option. This is the same as manually selecting a group of Freight Bills. Use the Clear Selection menu function to undo the selection and return the Freight Bill display to its normal state.
To select all Freight Bills with the same Route Designation as the Freight Bill that is currently selected, use this menu option. This is the same as manually selecting a group of Freight Bills. Use the Clear Selection menu function to undo the selection and return the Freight Bill display to its normal state.
Unmatch Freight Bills
![]() Select a Freight Bill in the Door Details Grid below, then click this button to remove it from the Trip. This option performs an 'unmatch', or de-assign, operation. The Unmatch option is usually used if the User has pre-planned the shipment on a Trip, and then changes his/her mind.
Select a Freight Bill in the Door Details Grid below, then click this button to remove it from the Trip. This option performs an 'unmatch', or de-assign, operation. The Unmatch option is usually used if the User has pre-planned the shipment on a Trip, and then changes his/her mind.
Unload One
![]() Highlight a single bill on the Grid, then click this button to remove it from the trip, and send it back to the available Freight Bills Grid on the main screen. The 'Unload' option performs a 'dock' status change. This option is used if the User is physically docking a shipment from the trailer to the dock.
Highlight a single bill on the Grid, then click this button to remove it from the trip, and send it back to the available Freight Bills Grid on the main screen. The 'Unload' option performs a 'dock' status change. This option is used if the User is physically docking a shipment from the trailer to the dock.
Unload All
![]() Highlight more than one Freight Bill in the Grid using '<Ctrl>+click', then click this button to return them all to the available Freight Bills Grid on the main screen. The 'Unload' option performs a 'dock' status change. This option is used if the User is physically docking a shipment from the trailer to the dock.
Highlight more than one Freight Bill in the Grid using '<Ctrl>+click', then click this button to return them all to the available Freight Bills Grid on the main screen. The 'Unload' option performs a 'dock' status change. This option is used if the User is physically docking a shipment from the trailer to the dock.
Print Load Card
![]() Selecting this button will open the Report Selection form, which will display the default report template 'LOADCARD.RPT'.
Selecting this button will open the Report Selection form, which will display the default report template 'LOADCARD.RPT'.
For more information on Crystal Report Functionality, see the Crystal Reports Reference.
Print Manifest
![]() Selecting this button will open the Report Selection form, which will display the default report template 'MANIFEST.RPT'. For more information on Crystal Report Functionality, see the Crystal Reports Reference.
Selecting this button will open the Report Selection form, which will display the default report template 'MANIFEST.RPT'. For more information on Crystal Report Functionality, see the Crystal Reports Reference.
For more information on Crystal Report Functionality, see the Crystal Reports Reference.
Print Invoice
![]() Selecting this button will open the Report Selection form, which will display the default reports: 'DLVRECPT.RPT' (delivery receipt format with no charges printed on invoice), 'INVOICE.RPT' (landscape style) and 'INVOICE1.RPT' (portrait style).
Selecting this button will open the Report Selection form, which will display the default reports: 'DLVRECPT.RPT' (delivery receipt format with no charges printed on invoice), 'INVOICE.RPT' (landscape style) and 'INVOICE1.RPT' (portrait style).
For more information on Crystal Report Functionality, see the Crystal Reports Reference.
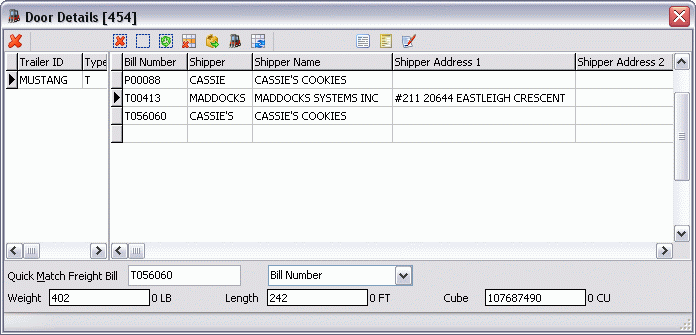
Door Details Grid
The Door Details Grid lists all the Freight Bills that are currently attached to this Door.
![]()
Quick Match Freight Bill
You can assign a Freight Bill to the current trip by entering the Freight Bill number in this field. You can also change the identifier used to match on by selecting a trace number type from the drop-down field just to the right.
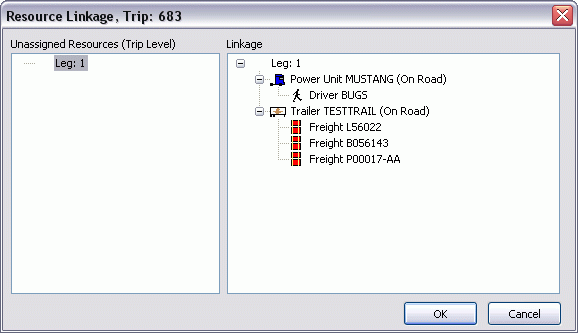
Resource Linkage
The Resource Linkage window is used to easily view all the different Resources attached to the current Trip. The 'Linkage' menu tree on the right side allows you to browse the Resources attached to a Trip on a Leg by Leg basis. Click the 'OK' button when you are finished viewing these details.