TruckMate Service Host
| TMW Service Host was renamed to TruckMate Service Host as part of TruckMate 2019.1. |

This application hosts and controls Trimble Transportation built Windows Services that control various aspects of the TruckMate software. The feature-set of this application is constantly expanding as TruckMate changes more of the core TruckMate applications into Windows Services that run "behind the scenes".
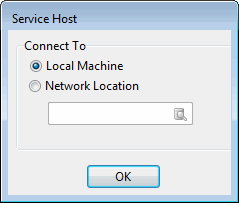
An extended feature of this application is to allow to connect to services on remote machines, not only the local machine, via a network connection. On launching the application, the Service Host popup will appear, prompting you to select whether to connect to the 'Local Machine' or a 'Network Location'. If you select the network location radio button, you will have to provide the network location using the available 'Find' button.
|
To access TruckMate Service Host:
| From this location | Go to |
|---|---|
TruckMate Menu and TruckMate Task List |
|
Windows Start Menu |
TruckMate 20xx > TruckMate Service Host |
Windows Explorer |
C:\Program Files (x86) > TruckMate 20xx > MadServiceHost.exe |
How Do I?
How to set up a Service to run as a Windows User
This process is used when the service is not working as it’s suppose to do. So instead of starting the service as a normal windows service this process will set up the service to run as a windows user which can add some flexibility on which files can be accessed and how the service can run in the background.
-
Start the process as another user (presumably the same user that you logged into the workstation with).
-
Check permissions, the selected user may not have permissions to start as a service.
-
To check the permissions use the start button on the Configure Service Window; it will give a popup error if it can’t login. (If it runs as a background process, you won’t see an error, but it will be in the event viewer).
-
To enable permissions :
-
Open Control Panel > Administrative Tools > Local Security Policy
-
Drill down to Security Settings > Local Policies > Security Options, and find 'Log on as a service'
-
Double -click the entry, and add the user that would be running as a service.
-
-
-
This user running as a service can NOT use mapped drives..these are established on interactive login, instead, you have to use UNC format (\\server\sharepoint\directory\etc….) and also ensure the user has permissions on the file share.
-
If you change the log file settings, you should stop the process, and close the log file window first.
Menu and toolbar options
This topic describes menu and toolbar options and functionality that are specific to the TruckMate Service Host window.
For information about common menu and toolbar options (i.e. File menu, Refresh, Multi-Company, etc.), see General menu and toolbar options.
View Menu
Module Tree
![]() Selecting this option will toggle the display of the Module Tree (the various Services displayed in the left menu) on / off.
Selecting this option will toggle the display of the Module Tree (the various Services displayed in the left menu) on / off.
Add Service Menu
Selecting any of the following options will toggle the availability of that service in the Module Tree.
-
ALK Content Tools
-
BreakThoughFuel Module
-
Carrier API Load Offer
-
Comdata
-
Container IQ
-
Driver Retention
-
EDI Order Update
-
Export
-
Export Wiz
-
FB Import
-
FleetOne
-
Match Advice Over The Road
-
MJ Ervin Fuel Cost Import Module
-
Omnitracs Hours of Service
-
QuikQ
-
Omnitracs Portal
-
Out of Band Process
-
PplNet Module
-
RMIS Module
-
Scale Import
-
Scheduler Dawg
-
Scheduler Detention
-
Scheduler Email
-
Scheduler Run DLL
-
Scheduler Stored Proc
-
Status Changer
-
TCH
-
T-Chek
-
TMT Module
-
TMW Cloud Imaging
-
Trimble Cloud Export
-
Trip Template Auto Generation
-
TruckMate Notifications
-
TruETA Notifications
-
Twilio SMS
Windows Service Setup
Selecting any service option from the Add Service list opens the Windows Service Setup window, which allows you to configure the behaviour of the MADWINSERVICEHOST.EXE application, which runs the Windows Service required to run in the background so that the TruckMate Windows Service Host can operate.

This window is where the Windows Service behavior is set up. Regardless of what TruckMate service you want to set up as a windows service, this service setup window must be used to set up the generic features of the Windows Service. The specific features as related to each separate service can be set up in the respective designated section in the application for each individual service.
Database
Alias
Use the drop-down menu to select the TruckMate Database Alias that will be used. If the database alias you are looking for is not in the drop down list click the refresh button beside the field.
User Name / Password
Enter the appropriate credentials for the selected TruckMate Database.
Company
Select the company you are working on. If the company you want to work on is not in the list click the refresh button beside the field.
Test DB
Select this button to test Database connectivity based on the credentials you have provided in this section.
Service Control Manager
Startup
Choosing 'Automatic' will have your system start the Windows Service automatically on system startup. Choosing 'Manual' will require the User to start the program manually.
Security
Choose which kind of security you would like to use for Windows Service. If you select 'Local System Account' the security credentials of the User for the machine’s operating system will be used (a SYSTEM account). If you select 'Use Specific Account' you will have to supply a specific User Name and Password in the provided fields.
Normally, Clients use the 'Local System Account' option so that when the PC reboots, the service will be able to start automatically without having to login a user.
Service Path
Enter the path for the background TruckMate Windows Services Host application on the local machine. The file name of this application is 'MADWINSERVICEHOST.EXE'.
User Defined Name
The user can select a name for the service that is different from the default one given by the system.
Service Name
This is the default service name given by the system. This is a display-only field that displays the service name that is currently being set or viewed.
Status
This is also a display-only field that shows the current status of the service.
Start / Pause / Stop
Use these buttons to Start, Pause and/or Stop the Windows Service. These buttons are only available after you have verified the application path with the buttons to the right.
Verify Path / Cancel Path
Click on the 'Verify Path' button to load the Windows Service program from the path you specified in the 'Service Path' field above. If the path is correct, you will have access to the 'Start', 'Pause' and 'Stop' buttons for the Service Host. The 'Cancel Path' button will allow you to re-enter the path if you so desire.
Note: If the service log files are located on a network drive instead of the local machine the log files will not be populated because local system accounts don’t have access to network shares, they have access only to local drives. This is a limitation of Windows. To resolve this issue you can Setup the Service to Start as a Windows User. (Refer to Procedure.)
Window Menu
Cascade
Selecting this option will arrange all displayed Service windows in a 'Cascading' fashion (windows one on top of the other).
Tile
Selecting this option will arrange all displayed Service windows in a 'Tiled' fashion (the right side of the screen will be divided equally between Service windows).
Arrange All
Selecting this option will automatically arrange all the open activity windows.
Module Tree
The Module Tree (left side menu) displays all the Services available to be controlled by the TruckMate Windows Service Host application. Double-clicking the 'Activity Log' icon under each Service will populate the Service’s log details into the Service Windows area of the program. Some services may have configuration options accessed via the 'Properties' context menu option (see below).
Note: The TruckMate Service Host process can run as its own, separate process (one for each module). This keeps the modules separated, the advantage being that if a particular module accidently stops or hangs, the other modules will still continue to function.
The available services are broken into several categories:
Multi-Company
The TruckMate Windows Service Host program supports multi-company integrations. Users have the ability to setup service host modules on a company-specific basis, or configure multiple instances of the same service module for a number of companies, such as the Scheduler Email service. Simple use the 'Multi-Company' menu to switch your active company, then create and configure the service modules as you see fit.
The Start/Stop/Pause commands in the tree view now control the service that hosts the module.
See the Service Configuration section heading for the module you are configuring for any multi-company specific notes.
TruckMate Scheduler
Beginning in TruckMate 2011, the TruckMate Scheduler program has been merged into the TruckMate Windows Service Host application. All previous jobs handled by the TruckMate Scheduler program (SCHEDULER.EXE) are now handled as separate Windows services. The stand-alone TruckMate Scheduler program is no longer included in the TruckMate release.
The previous tasks handled by SCHEDULER.EXE are now available as separate service modules:
-
Scheduler Dawg
-
Scheduler Detention
-
Scheduler Email
-
Scheduler Run DLL
Mobile Communications
Comdata: allows communication between TruckMate and the Comdata API. The comdata service will open a port to 'listen' for incoming point of sale transactions. The port number is determined by the following query:
SELECT REMOTE_PORT_POS FROM FC_VENDOR WHERE ID='COMDATA'.
When a transaction is received, an entry is created into the FC_POS Table.
PeopleNet: support for PeopleNet’s Queue View and EDriver logs (data available from the Driver ELogs forms in the Dispatch program and Driver Call-In program). This Service Module replaces the PeopleNet Communicator program used in previous versions of TruckMate. This new service module will use packet data services for improved data reliability.
Some configuration options are available via right-click access to the PplNet Properties window.
Omnitracs Hours of Service: allows communication between TruckMate and the Omnitracs HOS servers. Some configuration options are available via right-click access to the Omnitracs Hours of Service Properties Window.
Omnitracs Portal: allows communication between TruckMate and the Omnitracs web portal. Some configuration options are available via right-click access to the Omnitracs Portal Properties Window.
ReeferTracs: allows access to functions of Qtracs Portal, and allows the various ReeferTracs updates to and from the Message Center program.
T-Chek: allows communication between TruckMate and the T-Chek API. The service opens 3 sockets to connect to the tchek server. The server and port numbers are determined by the following query:
`SELECT REMOTE_SERVER, REMOTE_PORT_POS, REMOTE_PORT_CARD_UPDATES, REMOTE_PORT_EXPRESS FROM FC_VENDOR WHERE ID='TCHEK'
`In addition MIN_INACTIVE and TIME_OUT are also selected. Every MIN_INACTIVE minutes, the service will check on port REMOTE_PORT_POS to see if there are any point of sale transactions. Every TIME_OUT minutes, the service will 'ping' each port (REMOTE_PORT_POS, REMOTE_PORT_CARD_UPDATES, REMOTE_PORT_EXPRESS) to signal that the services are still active.
TMT Fleet Maintenance: This module communicates with the AMS system via SOAP calls. The TMT Fleet Maintenance module updates the same tables that the TruckMate Repair & Maintenance software would, so that reporting systems are the same. When started, you will see a list of upcoming tasks and some log information. When the service is stopped, you can access the TMT Fleet Maintenance Properties Window.
Miscellaneous
Arch Coal Import
BreakThroughFuel Module: allows communication between TruckMate and BreakThroughFuel. Some configuration options are available via right-click access to the BreakThroughFuel Properties Window.
Sample Module: the sample module is used to test the functionality of the TruckMate Windows Service Host application.
Export Wizard: allows the transfer of export Fuel Tax records for the IDSC integration. Some configuration options are available via right-click access to the Export Wizard Properties window.
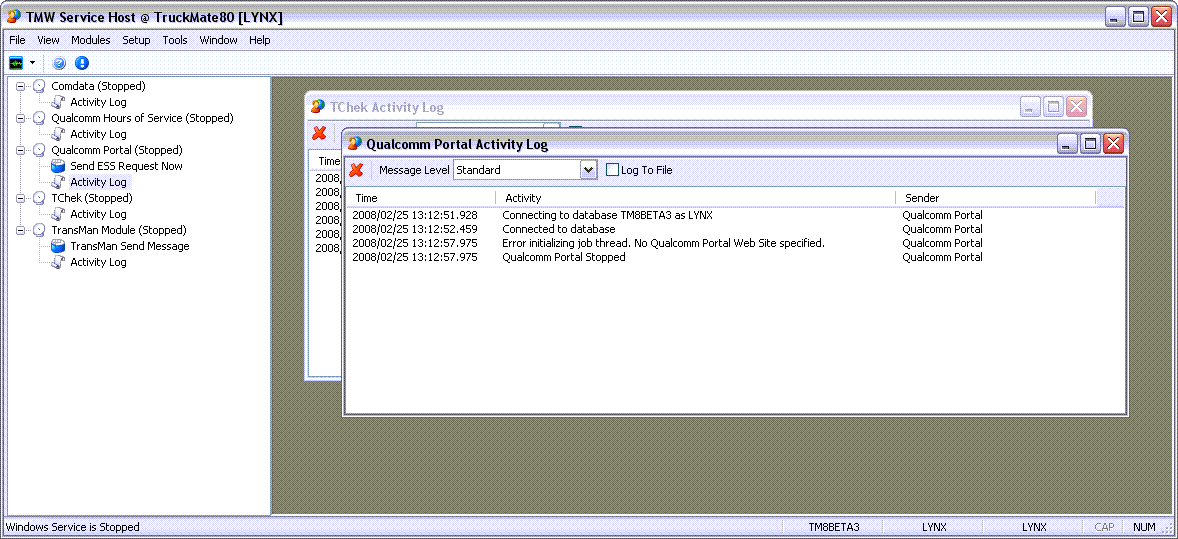
Service Windows
The Service windows display the log information for their respective Service.
Toolbar
There are several options available for formatting the displayed logs on an of the Service Windows:
Clear Log
![]() Select this option to clear the displayed Log information for the currently selected Service window.
Select this option to clear the displayed Log information for the currently selected Service window.
Message Level
The 'Message Level' controls which kind of information is displayed on the Service Windows, as follows:
-
None:* no log information will be displayed on the Service Window.
-
Error:* only 'Error' log information will be displayed on the Service Window.
-
Warning:* only 'Warning' log information will be displayed on the Service Window.
-
Standard:* 'Error', 'Warning' and 'Standard' log messages will be displayed on the Service Window.
-
Debug:* the 'Debug' level includes all specified in the 'Standard' Message Level, but also includes Debug information regarding the Database Objects being used by the Service.
Log To File
Select this flag if you would like the displayed logs to be saved to a text file as well.
Service Configuration
BreakThroughFuel Properties
The BreakThroughFuel properties window allows the user to configure settings regarding the BreakThroughFuel module, and can be accessed by selecting 'Properties' from the right-click menu.
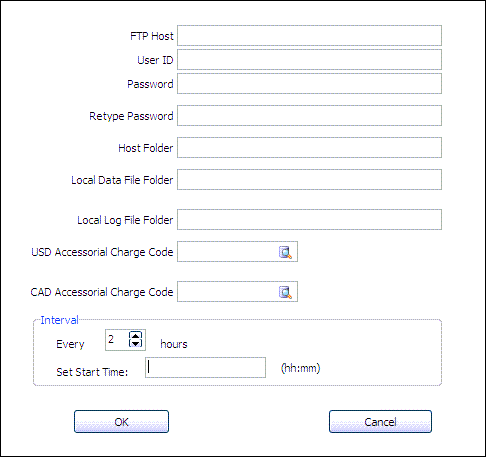
FTP Host
This is the path to the BreakThroughFuel FTP server.
User ID, Password, Retype Password
User ID information required to access the files.
Host Folder
Folder for the FTP Host.
Local Data File Folder and Local Log File Folder
The local folders where the Breakthrough files and log files will be located. If these fields are left blank, the current program folder will be used.
Note Data [.dat and .csv] and trigger files will be removed from FTP server after the download.
USD Accessorial Charge Code and CAD Accessorial Charge Code
These fields should contain the codes associated with the appropriate (BreakThroughFuel) accessorial charges.
Interval
Set the start time and frequency of file retrievals.
Export Wizard Properties
The Export Wiz Properties window allows you to configure which fuel data is exported, specify the transfer rates, and configure the IDSC transfer protocols.
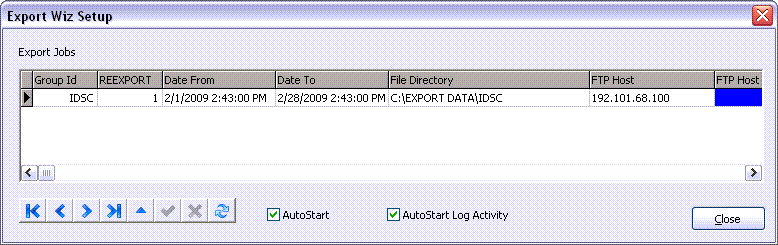
Export Jobs Grid
Each detail line on the Export Wizard Setup window will contain the IDSC Fuel Export data from TruckMate, as well as the required transfer information for the IDSC server. Whenever an Export is completed, the 'Date From' and 'Date To' values will be updated so that historic entries are not sent more than once. The user can manually update these (if necessary).
The 'File Directory' field value is where the Export file will be stored, but if it is not provided, the program will automatically enter the directory that the TruckMate Windows Service Host program resides into this field.
AutoStart
When this option is flagged, when the user starts the 'Export Wiz' service from the main TruckMate Windows Service Host program screen, the export of IDSC Fuel data will begin automatically.
AutoStart Log Activity
When this option is flagged, when the user starts the 'Export Wiz' service from the main TruckMate Windows Service Host program screen, logs will begin generating automatically for the exports.
Export Properties
The Export Properties window is for configuring the options for different export types. (Currently only Great Plains is supported).
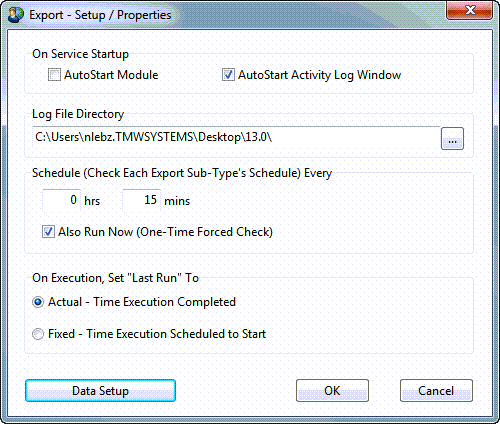
Auto Start Module
This checkbox allows you to select to auto start or manually start the module. Put a check mark in the box for auto start.
Auto Start Activity Log Window
This checkbox allows to select to auto start the activity log window or start it manually. Put a check mark in the box for auto start.
Log File Directory
Select a directory where you want your log files to be stored.
Schedule (Check Each Export Sub-Type’s Schedule) Every
This group allows you to define the schedule interval to check if any of the sub-type services needs to be run. The concept of sub-type service is based on the idea that some export types could have sub-types that are not necessarily run at the same time interval. In such a case, this group allows you to define the generic time interval used to check the sub-types for a service run. The service run interval for each sub-type will be set at the individual sub-type level. It will be a good idea to set this field to the lowest interval defined at the sub-type level. This way you would know that the sub-type level service will be run at the defined interval.
Also Run Now (One-Time Forced Check)
This checkbox allows you to run the service when you fist set it up. Place a check mark in the box if you want your newly defined service to be run once at setup time.
On Execution, Set "Last Run" To
For each service, a date and time of the latest execution is recorded. This option allows you to use either the actual time the execution was finished, or use the time the service is scheduled to be executed as a fixed time for that purpose. Select the radio button that best fits your business needs.
Data Setup
This button opens the Export Setup window which allows you to define export groups and their sub-types and the options related to the data to be exported.
Export Setup window
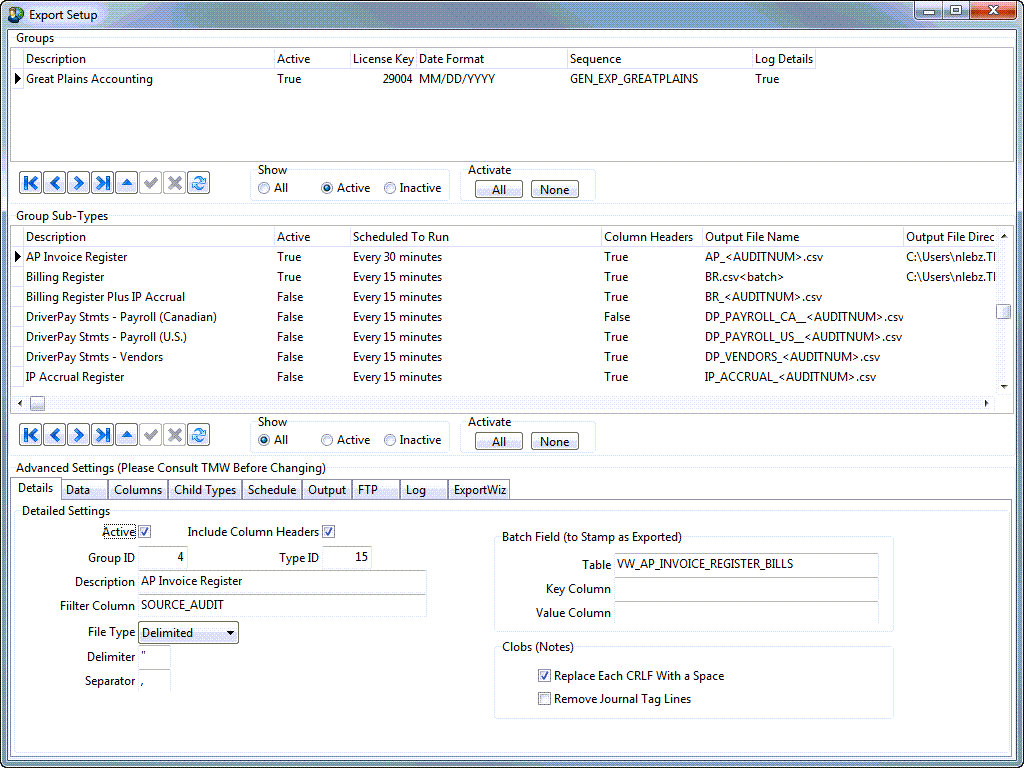
Groups
This grid is where you define the main export groups, currently only Great Plains Accounting is supported.
Description
Enter a description of the group you are defining.
Active
This a flag whether the group is currently active or not. If not active the export can’t run.
License Key
For each type of export TruckMate requires a license. The license key required for this export is displayed in this field.
Date Format
You can setup the date format for exported data items of type Date.
Sequence
This is the sequence of the group among all other defined groups.
Log Details
This flag indicates whether to log the details of the export process or not for the selected group.
Group Sub-Types
This section is where you define the sub-types of the selected main group. Each subtype can be run separately, at a different scheduled time interval.
Description
Enter a description of the sub-type you want to define.
Active
This a flag as whether the selected sub-type is active or not. Only active sub-types can be scheduled to run.
Scheduled to Run
Enter an interval for executing this sub-type.
Column Headers
This is a True / False flag to indicate whether the column headers will be exported along with the data or not.
Output File Name
Enter the name of the file you want the data of this sub-type to be exported to.
Output File Directory
Select the folder where you want the export file to be stored.
Secondary Output File Directory
Provide an additional folder where you want the export file to be stored.
FTP / FTP Host
The first field indicates whether the export file is going to be directed to an FTP site or not. If true, the second field is the address of the FTP host that will receive the export file. If the FTP option is selected, further defining is required in Advance Setting (the following section) > FTP tab.
Show
This radio button group allows you to filter the sub-types appearing on the grid to show only 'Active' ones, 'Inactive' ones or all. Selecting a different radio button (other than the one selected) will refresh the grid and apply the selected filter option on the displayed sub-types.
Activate
This group includes two buttons 'All' and 'None', which means that you can select the 'All' button to activate all available sub-types, or you can select the 'None' button to deactivate all sub-types.
Advanced Settings
The advanced settings section allows you to configure the specifics of the data to be exported, for that, its highly advised that you consult Trimble Transportation Support before you change.
FB Import Properties
The FB Import service has become available in TruckMate 2011.1 and later versions. The concept is to provide an easy to setup and handle FB importer which can be scheduled to run at any desired time. The TruckMate FB importer can save a lot of time and effort that were unavoidable along with an additional dimension of cost in older versions of TruckMate. The standard TruckMate FB Import service can import freight bills from a CSV-Format file.
A separate license is required for the FB Import. It is a unit-based license i.e. one unit per service instance. A service instance represents a single CSV file format. Typically, this is one service instance per one of your customers. If you can use the same CSV-File format for all your customers, all what you would need is one unit. Every additional format is an additional license unit. The TruckMate license required for the FB Import service is '47100 FB Import license'. For more information about the required licenses, see the License Key Registration program.
The FB Import Properties window, allows the user to configure the options required for importing freight bills from a CSV-Format file.
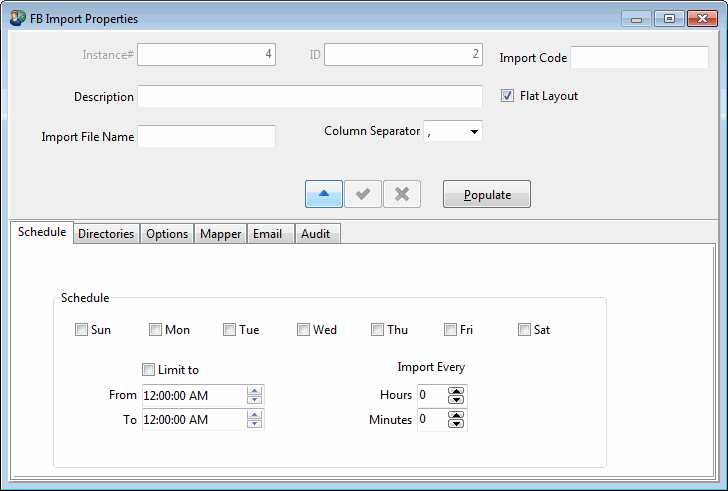
Instance #/ID
These two fields are system-generated read-only fields. The instance number refers to the number of instances are open of the service, while the ID is the number of services already setup for FB import.
Import Code
This 10 character field identifies the import service based on user-chosen code. The user can use any code for the service that is being setup.
Description
This is an optional field, a description can be entered to give additional details about the service.
Flat Layout
The FB Import in TruckMate can handle two types of CSV-file structures. A structure, where a freight bill record is represented by one row in the CSV-File, called flat, and another structure in which the freight bill can be represented in multiple lines in the CSV-File.
Import File Name
This is the CSV file name that contains the freight bills to be imported. If the exact name is not remembered, a wild card can be used (the '?' for a single character substitution and the '*' for multiple characters substitution) with parts of the file name to brows for the desired file.
Column Separator
TruckMate supports two types of column separators, ',' (Comma Delimited) and '|'. Select the separator that is used in the CSV file.
Populate
This button can be used to populate the rest of the needed information based on a template. Selecting this button will invoke the 'FB Import Template' search window, with filtering options. You can search for previously setup FB import services. Find the proper template, select it and then select the 'OK' button, this will populate the remaining fields with values from the selected template.
Schedule Tab
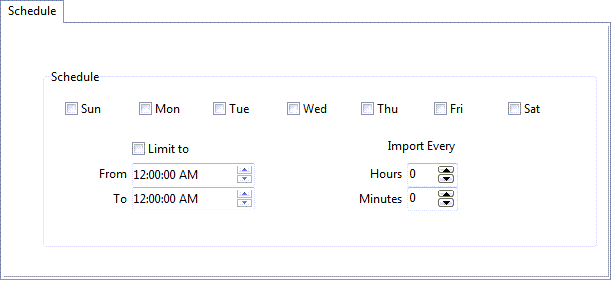
The schedule tab, just as the name implies, is to setup a schedule for the service to run.
Days of the week (Sun through Sat)
The service will run on the selected day/days of the week.
Limit to/From/to
Select the 'Limit to' checkbox if you want to set a time period limit on running the service. The 'From' and 'To' define the time period to limit the run of the service.
Import Every/Hours/ Minutes
The user can set a time interval for running the service. Select the number of hours and the number of minutes to set your desired interval for running the service.
Directories Tab
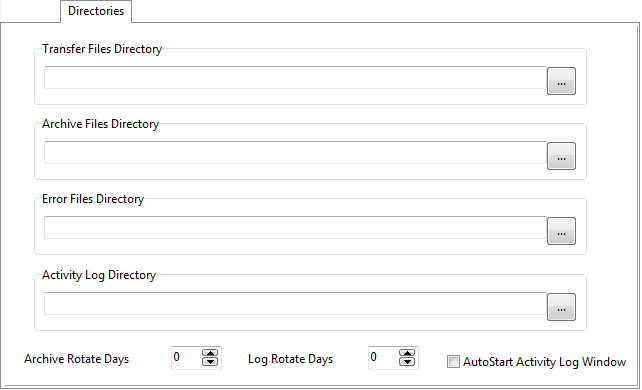
The 'Directories' tab is where the different directories for where the different files will be positioned are selected.
Transfer Files Directory
This directory tells the system where to look for new import files. Click the edit pock button to invoke the Windows Explorer popup for your transfer folder selection.
Archive Files Directory
All import files are date/time stamped and archived, regardless if successfully imported or not. This directory is where the system will store these archive files. Click the button to invoke the Windows Explorer popup for your archive folder selection.
Error Files Directory
Failed import files are files that the import could not recognize as 'belonging' to this import code. Click the button to invoke the Windows Explorer popup for your error folder selection.
Activity Log Directory
Click the button to invoke the Windows Explorer popup to select the folder where you want your activity log files to be stored.
Archive Rotate Days
How many days worth of archived files do you wish to keep. Enter the number of days or enter 0 if you want to keep the files indefinitely.
Log Rotate Days
How many days worth of activity log files do you wish to keep. Enter the number of days or enter 0 if you want to keep the files indefinitely.
AutoStart Activity Log Window
The Activity Log window is the right pane of the MadServiceHost screen. Check this box if you want the 'Activity Log window' to display automatically when you start up the service.
Options Tab
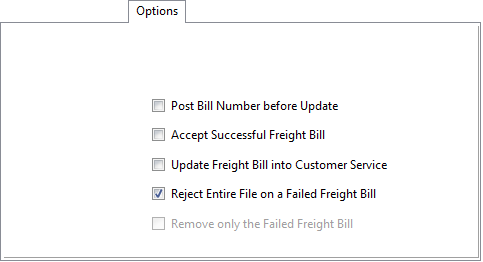
Post Bill Number before Update
Select whether or not to automatically assign the Freight Bill Number in Order Preprocessor. If checked, for orders that successfully passed all of the Freight Bill Import’s Exception Checks, the Freight Bill Number is assigned at time of order creation into Order Preprocessor. If unchecked, then the Freight Bill will remain as a 'NA' bill and the user will need to perform the 'Post' step manually in either Order Preprocessor or Customer Service.
Note: Regardless of this setting, if the Site ID has not been provided in the Mapper tab’s File Definition, then the Freight Bill will remain as a 'NA' bill. Further more, if both the Site ID and the Bill Number have been provided, the order will automatically post using that Bill Number, Regardless of this setting.
Accept Successful Freight Bill
Regardless of the 'Post Bill Number before Update' setting, select whether or not to automatically accept orders that successfully passed all of the Freight Bill Import’s Exception Checks. If checked, this will automatically update the (successful) orders in the Order Preprocessor > Pending tab to 'Accepted'. If unchecked, then the user will need to perform both the 'Accept' and the 'Update' steps manually in Order Preprocessor.
Update Freight Bill into Customer Service
If 'Accept Successful Freight Bill' is checked, select whether or not you want the 'Accepted' orders to automatically update into Customer Service. If checked, this will automatically update the 'Accepted' orders in the Order Preprocessor > Pending tab to 'Updated' and update the order into Customer Service. If unchecked, then the user will need to perform the 'Update' step manually in Order Preprocessor.
Reject Entire File on a Failed Freight Bill
Select whether or not you want none of the orders to import if any one of the orders in the file failed a Level 2 or 3 Exception Check. A Level 0 (i.e. DB2 error) or Level 1 Exception will always reject the entire file.
Remove only the Failed Freight Bill
If 'Reject Entire File on a Failed Freight Bill' is unchecked, select whether or not you want a failed order to still be imported into Order Preprocessor. This refers only to orders that failed the Level 2 or 3 Exception Check, since Level 0 and Level 1 exceptions never reach the Order Preprocessor stage. If checked, you will not be able to view the failed order’s content in Order Preprocessor but rather you will use the Exception e-mail to address the error at the source. If unchecked, the failed orders will remain in Order Preprocessor > Pending tab for you to take action. Besides the Exception e-mail, the exception information will display in the Notes tab.
Mapper Tab
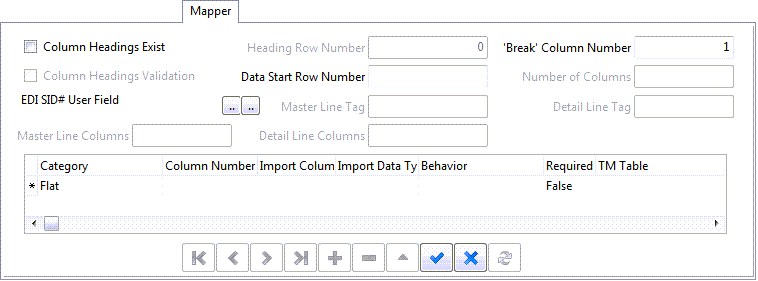
Header - File Validation
Column Headings Exist
Select whether or not there are column headings in the import file.
Column Headings Validation
If 'Column Headings Exist' is checked, select whether or not you would like the Level 1 Exception Check to include a validation against the column headings in the 'Column Headings Row Number' versus the 'Import Column Names' you have defined in the mapper detail below, rejecting any file that is not an exact match (including an exact match on upper/lower case).
Column Heading Row Number
If 'Column Headings Exist' is checked, enter the row number containing the row that contains the column headings. The default is 0.
Data Start Row Number
Enter the row number to start reading the order data. This allows the processing to skip past column heading or other extraneous information at start of the file. The default is the 'Column Headings Row Number' + 1.
Master Line Tag/Detail Line Tag
These two fields are both relevant only when a NON-Flat file is selected. If a NON flat file is selected (the 'Flat' checkbox is un-checked), then the user must enter a tag for the master line and another tag for the detail line.
'Break' Column Number
Enter the column number that will tell the import processor that, when this value differs from the previous row’s value, it needs to break to a new Freight Bill. This would typically be the column that contains the order number. This feature thus allows for instances where the file is a 'multiple rows per Freight Bill' format. A value must be entered for this field.
Number of Columns
For display purposes only. Whenever you do an edit/save to the mapping definition below, the number of columns is recalculated and displayed here. The Level 1 Exception Check will ensure that the number of columns for all rows in the CSV file does match to the number of columns here, rejecting any file that is not a match.
EDI SID# User Field
Displays from EDI Communications Manager Setup, if applicable. If you are not using EDI, click the first button 'Change EDI SID# User Field' to invoke the edit-pick, then choose which Customer Service User field shall hold the SID Shipment ID#. Though not recommended, the second button 'Empty EDI SID# User Field' will clear the selection (and this also clears the field in EDI).The SID# is helpful when navigating through failed orders in the Order Preprocessor > Pending tab as well as for any of your needed order filtering in TruckMate. Once this value is set, it will automatically apply to all your FB Imports (as well as all your EDI 204 Inbound maps) and it should not be changed.
Detail - File Mapper Definitions
Category
The available values for this field are 'Master' and 'Detail'. If a NON-Flat file format is selected (the 'Flat' checkbox is NOT checked), then this field must indicate whether the column being defined is on the master line or on the detail line. If the file is 'Flat' (the 'Flat' checkbox is selected), the value of this field becomes irrelevant.
Column Number
Enter the position of this column in the CSV file. Set this to '0', if you are using the hard-code default for the Order Preprocessor staging table column. Duplicates are allowed when you need to map an import field to more than one column in the Order Preprocessor staging table e.g. Column 11 'Date' typically would map to 'Deliver By', 'Deliver By End', 'Pick Up By' and 'Pick Up By End' dates in TruckMate.
Import Column Name
If the 'Column Headings Validation' is checked, then the column name entered here must match exactly to how it exists in the CSV file. Otherwise, enter a short description of what this column contains. If you enclose the value in quotes, this does not represent a column heading but rather a hard-code default to force the Order Preprocessor staging table column to this value (should you not be setting it from the import data itself).
Import Data Type:
Enter the data type for this CSV column from the pull-down list. The import will validate to ensure the value in the file is of this data type. Leave it empty, if you do not want the field to be validated e.g. you are not mapping this field so there is no need to validate it. Valid entries are:
-
<blank>= No entry indicates that this field does not need to be validated (use only if not mapped)
-
ALPHA * = Alphanumeric
-
NUMERIC* = Must be numeric
-
MM/DD/YY or DD/MM/YY * = Date format without century
-
MM/DD/YYYY or DD/MM/YYYY* = Date format with century
-
Behavior
Enter the mapping behavior from the pull-down list. Valid entries are:
-
<blank>= No entry indicates this field is not to be mapped so ignore it
-
DEFAULT * = Actions the hard-coded default defined in quotes under the 'Import Column Name'
-
APPENDb **= Append this field to another with a single space as the separator
-
-
PREPENDb * = Prepend this field to another with a single space as the separator
-
MAPPER * = Standard mapping rule to map the import column to TruckMate column
-
CUSTOM* = For informational purposes only, to indicate there is custom code in use to set this field
-
CDF (Custom Defined Field)* = This value indicates that the mapping will be to a Custom Defined field. If this value is selected, the pick list for the 'TM Column Name' described later will include all available CDF fields available for the column selected (if any).
-
Required
Select 'True' if this field cannot be null/empty/blank. Level 2 Exception Check will ensure this CSV column contains a value, rejecting this order if a required field is missing. Select 'False' if no check is required. The value here is not relevant if you did not enter an 'Import Data Type' for this column.
TM Table
Select which Order Preprocessor staging table you wish to map this field to. Choices are PTLORDER for header fields, PTLDTL for detail line fields and PTRACE for trace numbers. Leave this field empty, if you are not mapping this field. If 'Behavior' = 'CUSTOM', the value here is for informational purposes only. There would be corresponding import specific code added by TruckMate to handle this field.
TM Column Name
If a 'TM Table' has been entered, select which column in the Order Preprocessor staging table to map this field to. If you need to assign the PTLORDER.BILL_NUMBER from data in the import file, you must also address the mapping of SITE_ID since both these fields are required for the post of a manual bill number in TruckMate. Also, ensure Required = 'True'. These orders will automatically be posted, regardless of your value in 'Post Bill Number before Update'.
Note: The import does not check for duplicate BILL_NUMBER. Order Preprocessor and the update of the Freight Bill into Customer Service both allow for duplicate bill numbers. However, if the Customer Service Application Configurator 'Duplicate FB Number' = 'False', you will be prevented from doing an edit-save on duplicates in Customer Service.
TM Type
For display purposes only. If a 'TM Column Name' has been entered, the data type is extracted from the schema and displayed.
Email Tab
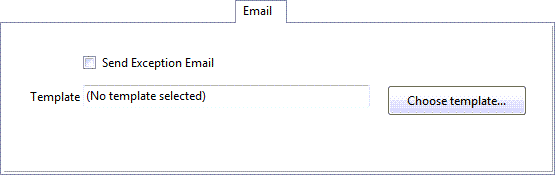
Send Exception Email
Select whether or not to send e-mails whenever an exception is encountered. It is recommended that you check this box.
Template/Choose Template
This field displays the selected e-mail template if one is selected using the 'Choose Template' button. This button will display a list of e-mail templates if any is already defined. If no templates are yet defined, the 'Edit Template' window will open where you can define and edit e-mail templates to be used for the current service and for services that might be defined in the future.
MJ Ervin Fuel Cost Import Properties
The MJ Ervin Fuel Cost Import Properties window allows the user to configure settings regarding the MJ Ervin Fuel Cost Import module, and can be accessed by selecting 'Properties' from the right-click menu.
Schedule Tab
The schedule tab, just as the name implies, is to setup a schedule for the service to run.
Days of the week (Sun through Sat)
The service will run on the selected day/days of the week.
Limit to/From/to
Select the 'Limit to' checkbox if you want to set a time period limit on running the service. The 'From' and 'To' define the time period to limit the run of the service.
Import Every/Hours/ Minutes
The user can set a time interval for running the service. Select the number of hours and the number of minutes to set your desired interval for running the service.
Directories Tab
The 'Directories' tab is where the different directories for where the different files will be positioned are selected.
Transfer Files Directory
This directory tells the system where to look for new import files. Click the edit pock button to invoke the Windows Explorer popup for your transfer folder selection.
Archive Files Directory
All import files are date/time stamped and archived, regardless if successfully imported or not. This directory is where the system will store these archive files. Click the button to invoke the Windows Explorer popup for your archive folder selection.
Error Files Directory
Failed import files are files that the import could not recognize as 'belonging' to this import code. Click the button to invoke the Windows Explorer popup for your error folder selection.
Activity Log Directory
Click the button to invoke the Windows Explorer popup to select the folder where you want your activity log files to be stored.
Archive Rotate Days
How many days worth of archived files do you wish to keep. Enter the number of days or enter 0 if you want to keep the files indefinitely.
Log Rotate Days
How many days worth of activity log files do you wish to keep. Enter the number of days or enter 0 if you want to keep the files indefinitely.
Files

The files tab allows the user to define a filename mask to be used for locating the .CSV file that will be imported. Enter the Filename mask then select the OK button.
Email Tab
Send Exception Email
Select whether or not to send e-mails whenever an exception is encountered. It is recommended that you check this box.
Template/Choose Template
This field displays the selected e-mail template if one is selected using the 'Choose Template' button. This button will display a list of e-mail templates if any is already defined. If no templates are yet defined, the 'Edit Template' window will open where you can define and edit e-mail templates to be used for the current service and for services that might be defined in the future.
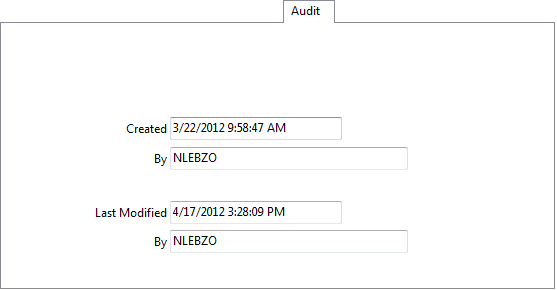
Audit Tab
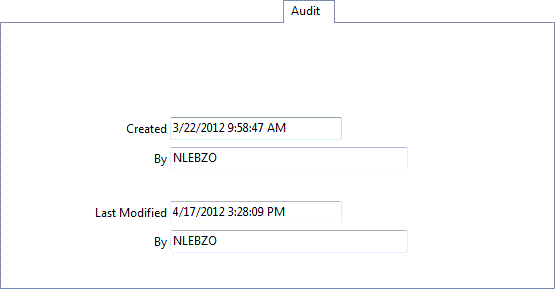
This tab displays the 'Auditing Columns'. These columns are automatically generated by the system to record when was the record created and by whom (which user), and when was the record last modified and also by whom. All of the fields on this tab are Read-only fields.
PeopleNet Properties
The PeopleNet Properties window allows you to configure the PplNet connection information for the EDriver Logs data, as well as the time interval for several of the service events.

Connection Info Tab
The various URL fields on this Tab must be configured based on your PeopleNet setup/ configuration. This information will be provided by PeopleNet.
Company Name / Password
Enter the credentials your company uses when connecting to PeopleNet’s EDriver Logs.
Autostart
Select this flag to have the PeopleNet EDriver Logs service automatically run when the TruckMate Service Host program opens.
Events Tab
This Tab allows you to set the minute intervals for a variety of retrieval tasks. Enter integer values for each of the fields.
Omnitracs Portal Properties
The Omnitracs Portal Properties window allows you to set the configuration options for communication between TruckMate and the Omnitracs Portal website. The functionality of this window is divided into several Tabs:
Web Service Tab
The Web Service Tab allows you to configure how your system will interact with the Omnitracs Portal’s website.
Web Service
The Web Service section is where the connection settings for interacting with the Omnitracs Portal web site are entered.
URL
Enter the URL of the Omnitracs Portal web site. This field will normally automatically populate, but you modify the information if requried.
Cust Name
Enter your Company’s Customer Name associated with the Omnitracs Portal web site.
UserName / Password
Enter the User details associated with your Company’s account on the Omnitracs Portal web site.
ESS Subscriber No.
If applicable, enter your Company’s ESS Subscriber number in the field provided.
Log File Settings
This section controls how (and where) log files for the Omnitracs Portal are generated and stored.
Log File Path
Enter a hard drive location to store the log files. This field will default to the directory from which the TruckMate Windows Service Host program is run.
Rotate
This value determines the amount of days that the log files will be maintained on the hard drive. Using the default ('30' days) means that the hard drive will contain- at any point in time- the previous 30 days worth of log files. All logs older than 30 days (from the current date) will be automatically deleted.
Proxy Server Settings
If your system connects to the internet through a Proxy Server, you must check the 'Connect Through Proxy Server' option and provide the Proxy details in the available fields in order for the TruckMate Windows Service Host program to interface with the Omnitracs Portal website.
Server
Enter the Proxy Server’s address and port number (eg 111.111.111.111:8080).
UserName / Password
Enter the User details associated with your system’s account on the Proxy Server in these two fields.
AutoStart
When this option is enabled, the Omnitracs Portal service will automatically be started when the TruckMate Service Host program is opened.
Mark Failed Requests as Completed
When this option is enabled, any requests sent by the TruckMate Windows Service Host program that are not received by the Omnitracs Portal web site (those requests marked as 'Failed') will be set to 'Complete' and ignored when the program attempts to reconnect to the Portal web site.
General Tab
The General Tab allows you to configure the Status Codes that will be tied to commuincations between TruckMate and the Omnitracs Portal, as well as set some miscellaneous options.
Miscellaneous
Echo Interpretation Errors to Drivers
Sends a copy of the log to the Driver assigned.
Enable Auto-Dispatch
Allows a Driver to accept a load offer while on an existing trip. When enabled, multiple load acceptances will be accepted by the system. Additionally, new fields have been added to the Dispatch trip Grids entitled: 'Load Offer Status' and Load Offer Sequence'. Load offer status options will be offered, read, accepted, declined, active, or completed. The load offer sequence will be system generated when the load offer is generated. For more information, refer to the Dispatch program.
Notify Driver of Status
Place a checkmark in the box provided if you wish to notify the Driver of any status changes.
Status Codes
The Status Codes section allows you to assign TruckMate Status Codes to a variety of communication events across several Tabs organized for different business models. Truck Load Carriers, for example, will want to setup the various options on the TL Tab, while Less Than Load Carriers will use the LTL Tab.
The Tabs themselves consist of various drop-down menu fields tied to specific communication messages. The User may setup TruckMate Status Codes for all events, or for only those events that they expect to use when communicating with the Omnitracs Portal web site during normal operations.
TruckMate Status Codes are defined and maintained in the Codes Maintenance program > Status Codes Tab.
Distribution Group Tab
The Distribution Group Tab is used to identify the users (as configured in the Security Setup program) who should receive incoming messages. The users selected here will be notified of incoming messages.
Unaddressed Messages
Choose which Users you would like to give access to the Unaddressed Messages that your system receives. Simply select the User you would like to add to the 'Distribution List' section and click the 'Right' arrow to add them.
Auto-Read Messages
Place a checkmark in the box provided if you wish to mark interpreted incoming messages as 'Read'.
Addressed Messages Setup
Selecting the 'Setup' button will allow users to create group distribution lists. After selecting the 'Setup' button from the previous screen, you can view the Distribution Group Setup window. Create a new group name, and add users to the group distribution list.
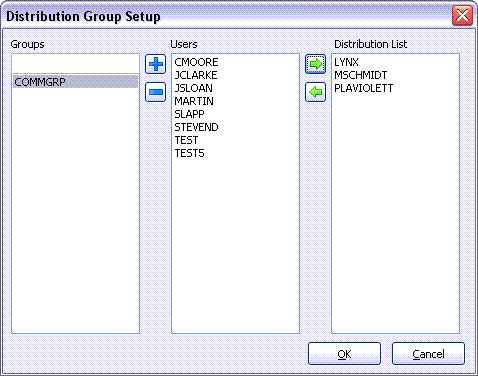
Use the '+' sign to add a new group name, and then highlight a member’s name and use the right facing red arrow (![]() ) to move a user into the distribution list.
) to move a user into the distribution list.
Advanced Tab
The Advanced Tab allows you to setup automatic Return Macros for a variety of events that may occur while Freight is in transport.
Fuel Search
In the Communications Macro Setup program, you can configure a Return macro that the Driver can use to query the TruckMate database for information about the nearest fueling facility. The pertinent return macro field type is 'Free Form Text', and the return action is 'Request Fuel Search'. When a Driver sends a macro that contains this field, the records from the Contacts and Phone program are searched based on the criteria specified here. Then, a Forward macro is sent to the Driver that contains the information that was requested, based on the criteria below.
Phone Category
In the Contacts and Phone program, you can assign Categories to individual records. For example, you could create records for all your card lock fuel locations, and assign to them the category 'CARDLOCK'. Then, in this field, select the category 'CARDLOCK' to filter the records in the Contacts and Phone program that will be automatically sent to the Driver in response to his return macro.
Maximum Matches
Enter the maximum number of records that you wish to send to the Driver in response to his return macro.
Search Area
In the Contacts and Phone program, you can assign a Latitude and Longitude positions to records. These must be in the format of hours, minutes, seconds, and position, such as '0510215N'. (Note that you can use third-party mileage software, such as PC*Miler, to determine longitude and latitude values.) When a Driver sends a return macro with a request for a fuel search, his current position is compared against the latitude and longitude positions assigned to the records in the Contacts and Phone program. The closest geographical matches will be included in the reply to the Driver.
Breakdown Search
in the Communications Macro Setup program, you can configure a Return macro that the Driver can use to query the TruckMate database for information about the nearest repair facility. The pertinent return macro field type is 'Free Form Text', and the return action is 'Request Breakdown Search'. When a Driver sends a macro that contains this field, the records from the Contacts and Phone program are searched based on the criteria specified here. Then, a Forward macro is sent to the Driver that contains the information that was requested, based on the criteria below.
Phone Category
In the Contacts and Phone program, you can assign Categories to individual records. For example, you could create records for all your repair locations, and assign to them the category 'REPAIR'. Then, in this field, select the category 'REPAIR' to filter the records in the Contacts and Phone program that will be automatically sent to the Driver in response to his return macro.
Maximum Matches
Enter the maximum number of records that you wish to send to the Driver in response to his return macro.
Search Area
In the Contacts and Phone program, you can assign a Latitude and Longitude positions to records. These must be in the format of hours, minutes, seconds, and position, such as '0510215N'. (Note that you can use third-party mileage software, such as PC*Miler, to determine longitude and latitude values.) When a Driver sends a return macro with a request for a breakdown search, his current position is compared against the latitude and longitude positions assigned to the records in the Contacts and Phone program. The closest geographical matches will be included in the reply to the Driver.
Automatic Late Calculation
Enabled
If this box is checked, the Communication Manger program will analyze position updates received from remote units and attempt to determine if the trip to which the Power Unit is assigned (in the Dispatch program) is late. The system will look at the Active Leg to which the Power Unit is currently assigned. Using the Latitude and Longitude value that is configured for the 'Leg To' zone (in the Codes Maintenance program, or using the Latitude and Longitude Update program), the system will calculate the distance between the unit’s current position and the Leg To zone. Then, using the value entered in the Avg. Speed field, the system will calculate the expected time that will be required to reach the Leg To zone. If that time exceeds the leg’s Deliver By time, the trip’s status will be changed to the Default for Category for the 'Late' Code Behavior (as configured in the Codes Maintenance program).
Avg Speed
Enter the average speed that the Power Unit travels. This value is used in the late calculation described above.
Late Threshold
Enter a numerical 'buffer' value in this field. For example, if the value in this field was 30, and the trip was calculated to be 15 minutes late, the trip’s status would not change.
Notify Dispatch when Driver is Running Late
If this box is checked a new message will be created for the users on the Distribution List informing them that the Driver is running late. If this box is not checked, the trip status will be changed by no message will be generated.
You can use the 'Wait Time' field to allow a grace period (in minutes).
Use Mileage Server for Distance Estimate
If this box is not checked, latitude and longitude values are used to calculate distances. If this box is checked, the Mileage Server program will be used to interface with your third party mileage software, and thus determine distances based on available routes rather than simply by latitude and longitude.
Special Events Tab
The Special Events Tab lets you add Special Event notices to your Messages.
Special Event Integration
Check this box if you would like to integrate Special Events notices into your Messages.
Time of Day
Click the '+' button on the Navigation bar to add a value to this field.
Auto Reply Tab
The Auto Reply Tab allows you to setup and configure the 'Auto Reply' options used in the Communications Manager program.
Feature Enabled
In order to use the Auto-Reply functionality of Communication Manger, you must check this option checkbox.
Rule Enabled
This option controls the 'Enabled' field for the Rule ID detail lines in the Grid near the bottom of this Tab.
Description
Enter an Auto-Reply Rule Description.
Network
Use the pull down menu to select the Software Network that you are currently Using.
Trigger
Use the pull down menu to select the event which will Trigger the creation of an Auto-Reply Message.
Value
Enter a value in the space provided.
Send Freeform Message
Selecting this option will create 'Freeform' text messages to be automatically sent whenever the Trigger event occurs. Type the text you wish the Message to consist of in the space provided directly below this option.
Send Macro Message
If you would like your automatic Messages to be based on a specific Macro, use the pull down menu to select the Macro you wish to use. Macros are set up in the Communications Macro Setup program.
Auto Reply Grid
This Grid displays the Auto-Reply Rules that you have setup in your system using this Tab. The 'ID' field is generated automatically and is a sequential integer field. The 'Enabled' and 'Description' field values are populated using the options detailed above.
Pool Settings Tab
The Pool Settings Tab allows Drivers to request a pickup trace number on-demand by sending a 'Generate Pickup Number' macro. The trace number is assigned to the currently active bill on the Driver’s current trip. A trace number is added to the POOLED_ORDERS table when a bill is added to a pool. The two are not linked to each other until the Driver requests a pickup trace number.
Allow Pickup Number Generation
Check this checkbox to use automatic Pickup Number Generation for Pooled Loads.
Trace Number Type for Pickup Number
Use the pull-down menu to select which Trace Number (from the original Freight Bill) will be used when automatically generating the Pickup Number for the Pooled Load.
QTracs Tab
The QTracs Tab allows you to configure and enable the QTracs interface with TruckMate via functionality borrowed from the Communications Manager program. If the QTracs Setup section of the Communications Manager program has previously been configured, the TruckMate Service Host program will copy the configuration settings automatically.
Defaults
Return Receipt
If this box is checked, when a message sent from the Dispatch program or Driver Call In program is read by the Driver, an 'AR' status will be sent from the remote unit. This is translated by the TruckMate Windows Service Host program into an 'A' status, which is used to indicate that the message has been read by the Driver. In the Driver Call In program, you can view the status of any Forward (ie, dispatch office to remote unit) message.
For sites using the Dispatch program’s Drill Down function, this box must be checked in order to use the 'LTL Read by Driver' status change (as configured on the General Tab).
Forward Message Priority
Sets the default QTracs/Cancom priority value for outgoing messages. 'Default' will use the value specified in the QTracs software, which is by default 'Normal'. 'Normal' status attempts to send messages up to 9 times over 35 minutes. 'Important' status has the same send frequency, but sends the message immediately, rather than waiting for the next scheduled communication. 'Sleepy' attempts to send the message 7 times over 18.25 hours. 'Important Sleepy' has the same send frequency as 'Sleepy', but initiates an immediate communications dialog. You can also configure the message priority for specific macros in the Communication Macro Setup program. Also, in the Dispatch program or Driver Call In program, you can select the message priority on an individual basis for each forward message.
Options
Distribute Reply to Sender Only
You can specify that Return messages that are in reply to Forward messages only get distributed to the user who sent the original Forward message. The Login Name (as configured in the Security Setup program) of the user who created the Forward message is used, and the Distribution List configured on the Distribution Group Tab is ignored.
Once you have set these, reboot the host machine and then restart QTracs and the TruckMate Windows Service Host program.
Copy Power Unit History
If this flag is selected, when a Power Unit for a specific Device ID has been renamed to a different Power Unit ID, the Qtracs Portal will copy the original Power Unit position history over to the new Power Unit ID.
Mark Return Message as Seen on Web Portal
When a return message is received on the Qtracs Portal a copy of that return message is also sent through the Qtracs Portal API. Normally, the return message into TruckMate, but the return message on the Qtracs Portal web site is still marked as 'Unread'. When this setting is turned on, after the return message is imported, TruckMate sends a command to mark the message as 'Read' on the Qtracs Portal web site.
Automated Arrival and Departure
Enabled
In order to use the Automated Arrival and Departure features, you must check this checkbox.
Log Events
If you wish to Log Events from the Omnitracs Portal web site, check this checkbox.
Event Status Setup
Clicking this button will open an Event Status Setup window where you may use pull down menus to configure the Status Codes for the 'Arrived' and 'Depart' events for your Shipper and Consignee customers. Check the 'Use non-standard Status' option if you are using non-standard Status Codes in your TruckMate system.
Arrival Time Tolerance
Enter a time value (in minutes) for the Automated Arrival system.
End-of-Trip Threshold
Enter a time value (in minutes) for the End-of-Trip Threshold.
Low Confidence Event Offset
Enter a time value (between 5 and 120 minutes) for the Low Confidence Event Offset.
Check Pending Arrival Events
Enter a time value (between 5 and 120 minutes) that will elapse before checking for pending arrival events.
Resource Management
Send to TruckMate Resources
When this flag is selected and if a device is added/updated/deleted on the Qtracs Portal, a message is sent by Omnitracs to notify TruckMate of this action. For example, if the notification is that a new device has been created on Qtracs Portal, then TruckMate will take that device information and add it into TruckMate automatically.
Send to Web Portal Resources
When this flag is selected and a device is added/updated/deleted in TruckMate, the information regarding the resource is sent to the Qtracs Portal to be updated there. For example, if the device is assigned a Power Unit in TruckMate, TruckMate will send that information to the Qtracs Portal to be updated.
VIN #
Omnitracs has added a new VIN number field to their equipment list. We can now update the tractor and trailer’s VIN number with that information.
-
Add a new setting in the Qtracs Portal Setup to allow or disallow updating the tractor or trailer VIN field.
-
Add logic in that if the VIN for the resource is not blank and the setting is turned on. Then update the resources VIN number.
Note: If you have many QTracs devices, you can import a list of QTracs devices into TruckMate using the 'Import QTracs Portal Devices' option available from the Mobile Device Maintenance program > Menu Bar > File Menu.
Trailer Tracks Tab
The Trailer Tracks Tab allows you to configure and enable the Trailer Tracks interface with TruckMate. These settings will integrate TruckMate with Omnitracs’s own T2 Trailer Tracking Service. It will grab the position updates from Omnitracs’s Omni iWeb Portal and update the TruckMate database with the position of the Trailer.
Default Settings
SCAC
Enter the Trailer’s SCAC code in this field. The default value should be 'SCAC'.
Trailer Type
Enter the Trailer Type in this field. The default value should be 'DFT'.
Management Group
Enter the Management Group in this field. The default value should be 'DFT'.
Copy Trailer History
When moving a Trailer Tracks device from a previous Trailer to a new Trailer, this setting will tell TruckMate to update the Trailer Tracks device history onto the new Trailer.
ReeferTracs Message Notify
When this flag is checked and a Temperature Tolerance Event or Low Fuel Event gets imported by the Trailer Tracks, a return message is generated to let the user know that these events have come in and need immediate attention.
Resource Management
Send to TruckMate Resources
When this flag is selected and if a Trailer or Device is added/updated/deleted on the Omnitracs T2 service, a message is sent by Omnitracs to notify TruckMate of this action. For example, if the notification is that a new device has been created in T2l, then TruckMate will take that device information and add it into TruckMate automatically.
Send to Web Portal Resources
When this flag is selected and a device is added/updated/deleted in TruckMate, the information regarding the resource is sent to the T2 software to be updated there. For example, if the Trailer or Device is assigned a Power Unit in TruckMate, TruckMate will send that information to the Omnitracs T2 softwarel to be updated.
RMIS Properties
Note: Using this service requires TruckMate license '50000', For information on TruckMate licenses please contact a TruckMate Sales Representative.
The RMIS properties window allows the user to configure RMIS integration settings, and can be accessed by selecting 'Properties' from the right-click menu. For more information on RMIS integration, click here.
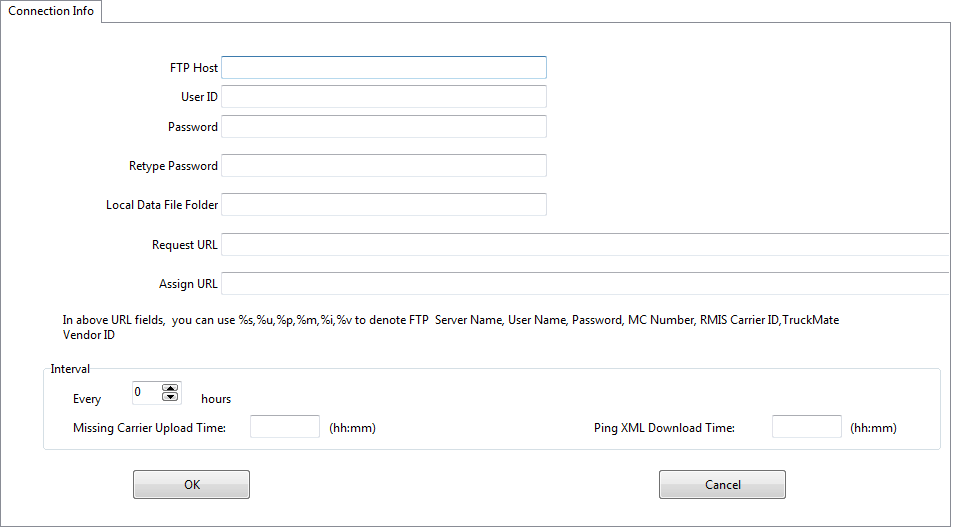
On the RMIS Module Properties > Connection tab, the user will need to input all applicable information, such as FTP Host, User ID, Password, etc.
Interval
This section allows the user to set the time and frequency for pinging the RMIS service for updated data.
Every
In this field, enter the frequency for how often TruckMate should Upload and Download the data. Entering 24 will ping once a day (at the times indicated in the upload and download fields, described below), 48 will ping every other day, 72 will update every third day, etc.
Missing Carrier Upload Time:
In this field, the user can specify what time the upload will occur, in the format hh:mm (24-hour clock).
Ping XML Download Time
In this field, the user can specify what time the download will occur, in the format hh:mm (24-hour clock).
For example, if Every is set to 48, and Download is set to 2300 and Upload is set to 0200, then it will download and upload every other day at 11pm and 2am respectively.
After the fields in this window have been filled out, the user will have to right-click and select 'Start' to start the RMIS Module. (The Activity Log will now be accessible to the user.)
Scale Import Service Properties
The Scale Import Service Window is used to setup the service to allow data files from weigh scales to be imported and associated with Freight Bills, and processed. Data from each import run (which requires a custom stored procedure) is assigned a batch_id, and can be accessed via the Barcode Item Scale Details window (accessed via Right-Mouse-Click on Customer Service > Details grid). Application Configuration options for 'Scale Import' can be set to process data after import, which will update the Barcode Item details (As well, Configuration options for 'CROSSDCK.EXE' can be set to automatically update order detail fields from Barcode Items).
General Tab
AutoStart Module
Check this option to start the process on startup.
AutoStart Activity Log Window
Check this option to automatically display the log window.
Log File Directory
Location for the windows servcies logfiles.
Schedule
Specify the days of the week, time ranges, and frequency to run the process.
Import Files Tab
Import File Directory & File Name
Specify the location and name of the import file.
Archive Files Directory
Specify a directory to archive Imported data records, with the batch_id appended to the file name.
Error Files Directory
Errors from Import and Processing are archived in the specified directory, with the batch_id appended to the file name.
Scheduler Services
Scheduler DAWG Properties
The Scheduler DAWG Setup window includes options for setting up when your DAWGs (as configured in THE DAWG(r) ) will be run.
Schedule
The various options in the Schedule group allow the user to set when the service will check the system for new messages generated from DAWG alerts and send them out. You can configure the check to run based on a per minute basis, an hourly basis, a 12 hour basis, a 24 hour basis, or at a specific time.
On THE DAWG Execution, Set "Last Run" To
These two radio options control the 'Last Run' variable, which tells the system when THE DAWG was last executed. This variable is used to determine when THE DAWG should next be run.
Actual
The 'Actual' setting will set the 'Last Run' variable to the exact date/time that THE DAWG processes completed. Thus, if you have selected a 'When' option such as 'Every 30 minutes', THE DAWG will execute 30 minutes after the 'Last Run' variable, which may be 12:03pm. As each 'Last Run' variable will change depending on the amount of work for THE DAWG to process, using the 'Actual' option may lead to erratic automatic launches.
Fixed
The 'Fixed' setting will alleviate any erratic launching of THE DAWG caused by the 'Actual' setting. When using this option, the 'Last Run' variable will always correspond to the 'When' setting you have chosen. If you have set the 'When' variable to 'Once a Day at a specified time', THE DAWG will always be launched at that exact time, no matter how long it took to run the previous day.
Common Settings
Log Path
Provide a log path for the messages generated by the Scheduler DAWG service. You can use the ellipsis button to browse to a hard drive location on your machine.
Rotate
Enter the amount of days that should elapse before the existing log file is automatically deleted by the TruckMate Windows Service Host program and recreated.
AutoStart Module / AutoStart Activity Log Window
These two flags control if the service will automatically start when Windows is started on the machine and will auto-open the Activity Log within the TruckMate Windows Service Host program when it is opened.
Scheduler Detention Properties
The Scheduler Detention Setup window includes options for setting up your Detention Warning e-mails.
Schedule
The various options in the Schedule group allow the user to set when the service will check the system for new Detention email messages and send them out. You can configure the check to run based on a per minute basis, an hourly basis, a 12 hour basis, a 24 hour basis, or at a specific time.
Detention Settings
E-Mail Default Profile
Select which profile should function as the default for Detention warnings.
Note: E-mail settings are all controlled via the TruckMate E-Mail System.
Setup
Clicking this opens the Codes Maintenance program > Site Setup tab.
Template / Choose Template
This field displays the email Template that will be used for the Detention emails. Use the 'Choose template…' button so select an email Template to use.
Note: If setting up a multi-company Detention email integration, be sure to create similar email templates for each of your companies and assign them to their respective company record.
Common Settings
Log Path
Provide a log path for the messages generated by the Scheduler Detention service. You can use the ellipsis button to browse to a hard drive location on your machine.
Rotate
Enter the amount of days that should elapse before the existing log file is automatically deleted by the TruckMate Windows Service Host program and recreated.
AutoStart Module / AutoStart Activity Log Window
These two flags control if the service will automatically start when Windows is started on the machine and will auto-open the Activity Log within the TruckMate Windows Service Host program when it is opened.
Scheduler Email Properties
The Scheduler Email Setup window allows you to setup automatic e-mail/fax delivery.
Schedule
The various options in the Schedule group allow the user to set when the service will check the system for new email messages and send them out. You can configure the check to run based on a per minute basis, an hourly basis, a 12 hour basis, a 24 hour basis, or at a specific time.
Emails
E-Mail Default Profile
Select which profile should function as the default for Detention warnings.
Note: E-mail settings are all controlled via the TruckMate E-Mail System.
Setup
Clicking this opens the Codes Maintenance program > E-mail Setup tab.
Faxes
Printer to send faxes to
Use the drop-down menu to configure the default printer to be used for faxes.
Common Settings
Log Path
Provide a log path for the messages generated by the Scheduler Email service. You can use the ellipsis button to browse to a hard drive location on your machine.
Rotate
Enter the amount of days that should elapse before the existing log file is automatically deleted by the TruckMate Windows Service Host program and recreated.
AutoStart Module / AutoStart Activity Log Window
These two flags control if the service will automatically start when Windows is started on the machine and will auto-open the Activity Log within the TruckMate Windows Service Host program when it is opened.
Delivery Confirmation Profiles
This button opens the E-Mail Confirmation Profile window, allowing users to create Delivery Confirmation Profiles.
Note: If setting up a multi-company Scheduler e-mail integration, be sure to create similar email templates for each of your companies and assign them to their respective company record.
Scheduler Run DLL Properties
To make the Scheduler service dynamically fit the needs of its users, the Scheduler DLL Run Setup window allows the input of DLL’s that you have created. Once entered into the service, a DLL can be set to occur at any specific interval.
Settings
DLL File
Use the ellipsis button to select one of the available DLLs to be run.
*Warning:* The .dll file being used must be a .dll of 'Function' type, and must return a Boolean value (an INTEGER of '0' or '1'). If you wish to use the .dll functionality of the TruckMate Scheduler program without error, you cannot have the .dll return 'CHAR' or 'STRING' values.
Routine
Enter the routine you wish to run when the DLL is accessed.
Function Parameters
Enter the parameters you wish to run against the .DLL using the fields available.
Schedule
The various options in the Schedule group allow the user to set when the service will access the configured .DLL file. You can configure the check to run based on a per minute basis, an hourly basis, a 12 hour basis, a 24 hour basis, or at a specific time.
Common Settings
Log Path
Provide a log path for the messages generated by the Scheduler Email service. You can use the ellipsis button to browse to a hard drive location on your machine.
Rotate
Enter the amount of days that should elapse before the existing log file is automatically deleted by the TruckMate Windows Service Host program and recreated.
AutoStart Module / AutoStart Activity Log Window
These two flags control if the service will automatically start when Windows is started on the machine and will auto-open the Activity Log within the TruckMate Windows Service Host program when it is opened.
TMT Fleet Maintenance Properties
If you stop the TMT Fleet Maintenance service, you will be able to access the TMT Fleet Maintenance Properties window, which allows you to set various synchronization values for use with the TMT Fleet Maintenance SOAP server. The TMT Fleet Maintenance/TruckMate interface can be set up differently for each customer, as each company will have a unique way of linking TMT Fleet Maintenance with TruckMate Tables and fields.
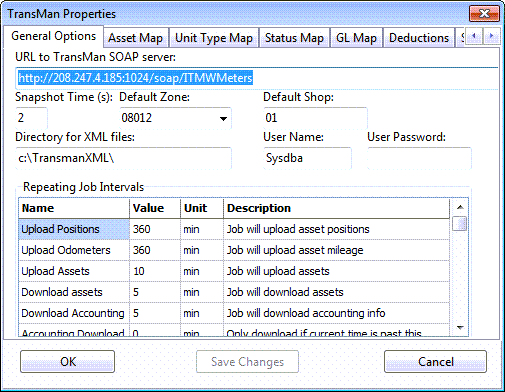
General Options Tab
The General Options Tab shows the basic TMT Fleet Maintenance setup information.
URL to TMT Fleet Maintenance SOAP Server
This field is used to enter the URL address of the server hosting the TranSman SOAP server. The default is http://208.247.4.185:1024/. This is the portal to the SOAP system and if you simply use a web browser to go there, you will see a list of available functions.
Snapshot Time(s)
Denotes the interval between system updates between TruckMate and the TMT Fleet Maintenance server.
Default Zone
Denotes the Zone Code that will be used when importing assets from TMT Fleet Maintenance.
Default Shop
Denotes the Shop ID that will be used when exporting assets to TMT Fleet Maintenance.
Directory for XML Files
Denotes the hard drive location where debugging XML files are stored.
User Name / User Password
These two fields are the user name and the password for accessing the TranSman SOAP server.
Repeating Job Intervals
This section shows the time intervals between repeating jobs. An interval value of '0' (zero) means that the job will not occur at all. The following jobs are available for configuration:
-
The major asset tables between the two systems (PUnits, Trailers, Containers, Misc. Equipment)
-
In and out of service notices
-
PMs due and Work Pending notices
-
Mileages for PUnits
-
Asset locations
Asset Map Tab
The Asset Map Tab shows how TMT Fleet Maintenance and TruckMate asset Tables (units or resources) are mapped to each other. Typically, TMT Fleet Maintenance will have one Table containing all units of all kinds whereas TruckMate will have several resource Tables (PUNIT for trucks, TRAILER for trailers etc.).
See this example for an outline of how fields can be related.
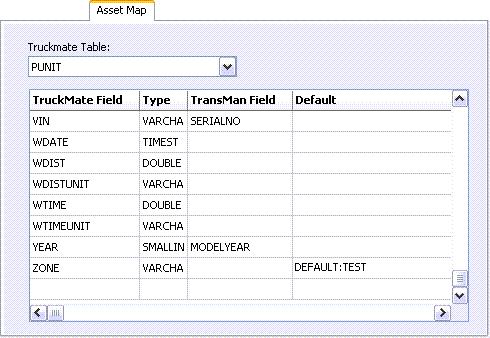
-
In this example, the TransMan 'SERIALNO' field will be stored in the TruckMate 'VIN' field.
-
Similarly, the 'MODELYEAR' field will be stored in 'YEAR'.
-
TransMan does not support the concept of Zones, so no 'ZONE' data transfer is possible. Instead, the 'Default' zone 'TEST' will be used for 'ZONE' (in TruckMate).
Unit Type Map Tab
The Unit Type Map Tab determines how the single TMT Fleet Maintenance UNIT Table is divided between the various TruckMate resource tables. The UNIT table contains a field called 'TYPE' and this is used as a basis for division.
To use this Tab, first use the 'Download Codes from TMT Fleet Maintenance' button. Then, for each 'TYPE', assign an appropriate/matching TruckMate type.
Status Map Tab
The Status Map Tab simply shows which TMT Fleet Maintenance and TruckMate codes are 'In Service' and which are 'Out of Service'. This is mainly used to determine what service notices are required.
GL Map Tab
The GL Map Tab shows the relationship between TMT Fleet Maintenance and TruckMate GL Accounts. If a relation is not setup, the integration program will attempt to use the TMT Fleet Maintenance account number "as is". Therefore, if both TMT Fleet Maintenance and TruckMate have been set up with the same accounting structure, this Tab is not required.
Special Accounts Tab
The Special Accounts Tab is used to specify special case accounts that will not be transferred if they are found.
Initialization
This tab is used for initializing the integration when it’s run for the first time. Clients, Shops and Vendors can be imported from TMT. Furthermore, a currency conversion can be defined and the default Accounts Payable (AP) account and the default Accounts Receivable (AR) account can also be specified.