ADP Payroll Export

The ADP Payroll Export program allows the User to quickly export their payroll information from a text (.TXT) or spreadsheet (.CSV) file to the ADP system for processing. The program functions in the form of a Wizard, taking you through the process step-by-step.
The ADP Payroll Export program works closely with the Payroll Returns Generator program (which creates the .CSV files) and the Company Profiles program (where the ADP system number is configured).
To access ADP Payroll Export:
| From this location | Go to |
|---|---|
TruckMate Menu and TruckMate Task List |
Accounting & Finance > Payroll > ADP Payroll Export |
Windows Start Menu |
TruckMate 20xx > ADP Payroll Export |
Windows Explorer |
C:\Program Files (x86) > TruckMate 20xx > PRExportToADP.exe |
Menu Bar / Toolbar
File Menu
Print Reports
 Selecting the Print Reports button will bring up the report selection window, common to many TruckMate applications. Here, you will select a report file from those available in your system and a Crystal Report will be generated.
For more information on Report functionality in TruckMate, see the Crystal Reports Reference.
Exit
 Selecting this option will close the ADP Payroll Export program.
Multi-Company
For more information on the Multi-Company options available from the Menu Bar, see the Multi-Company documentation.
Tools Menu
TruckMate Monitor
 Click the down arrow next to this button to access the various functions of the TruckMate Monitor.
Remember Position / Size
This option, when checked, will remember the program position and size on exit, and will use the same position and size the next time the application is opened.
Codes Setup
Selecting this option opens the ADP Code Mapping window.
Options
Selecting this option opens the Edit Master File Options window.
-
Launch the ADP Client Application after creation occurs
When checked, the ADP Client application (as specified in the 'ADP Client Application' field below) will be opened following creation of the ADP Export File. -
ADP Client Application
Enter the location of the ADP Client Application on your system, or click the search button to browse to its location. -
Save Master File In
Enter the location you would like to have the Master File save in, or click the search button to browse to a location. -
Save
Click this button to save your changes.
View File
Selecting this option will open the most recently created Master File.
Help Menu
TruckMate Help
 Selecting this button will open the ADP Payroll Export topic in the TruckMate Online Help file (the page you are currently viewing).
Service Portal
 Selecting this button will open an instance of your default Internet browsing software, with the https://www.tmwcare.com login page displayed.
About
 Selecting this button will open the standard TruckMate About window, which contains important information about the application you are currently using, including its version number (important for support calls).
Export Process
Selecting a task
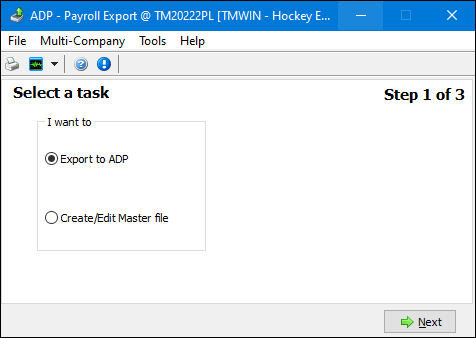
The first screen you will see upon opening the program is the 'Select a task' form. Here you will choose between a simple 'Export to ADP' or the option to 'Create/Edit Master file'. Select one of the available options and click the 'Next' button near the bottom of the window.
Selecting a company
When you click the 'Next' button, the Company Selection window will appear.
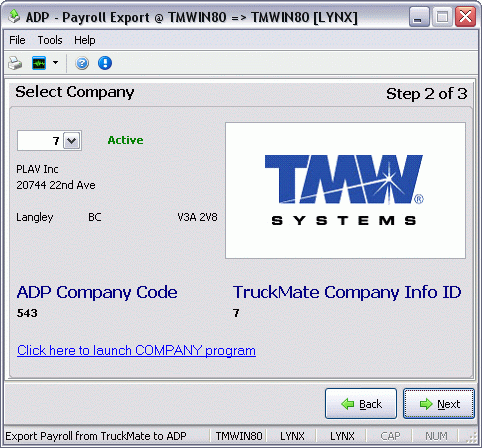
The information on this screen will automatically populate when the User selects a Company Code form the pull-down menu in the upper left corner of the window. This information is all maintained in the Company Profiles program. Click 'OK' if the details displayed are correct.
You can launch the Company Profiles program to modify any data for the selected company by clicking the link in the bottom left corner of this window.
Exporting data
Once you have confirmed the Company information, you will see the Export from TruckMate to ADP form, or the Create/Edit Master File form.
Export from TruckMate to ADP
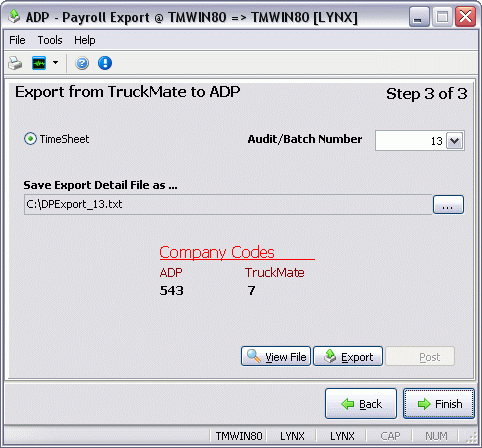
Many of the options on this form will automatically populate. You need only make sure that the correct value is displayed in the 'Audit/Batch Number' field, and use the pull-down menu to select the correct Batch if it is not. When you change the Batch number, the filename for the 'Detail File' will change accordingly.
Company Codes
You can click this text to re-select a Company Code from those available on your system. Company Code information is maintained by the Company Profiles program.
View File
Following creation of the text file, you can click the 'view File' button to view the file that was generated by the program.
Export
When everything appears satisfactory, click the 'Export' Button, and the text file (in the above example 'DPExport_19.txt' will be created in the directory location displayed.
Post
A new button 'Post' need to be added to lock all Driver Pay and Driver Deductions for the exported batch(s). After posting, these records won’t show up in either the Check Printing or Check Register programs.
Tools Menu
These options only appear on the Export from TruckMate to ADP form.
-
Codes Setup
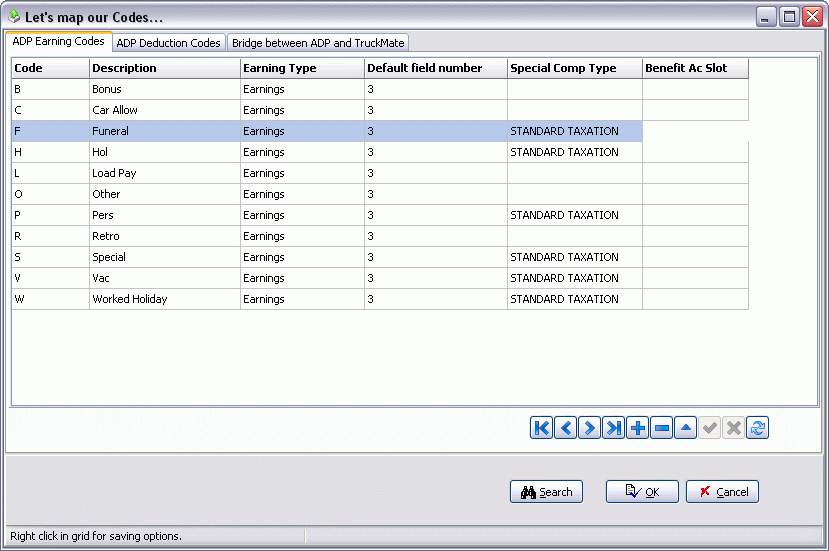
Selecting this option will allow you to tie ADP 'Earnings' and 'Deduction' Codes to TruckMate Pay Codes via the Map Codes window.The Map Codes window has three tabs: 'ADP Earning Codes', 'ADP Deduction Codes' and the 'Bridge between ADP and TruckMate'.
-
ADP Earning Codes Tab
This Tab displays the currently configured ADP Earning Codes. These Codes are not used in TruckMate outside of this program. To add a new code, simply click the '+' button on the TruckMate Navigation Bar to access the Add/Edit ADP Code window. Enter all the required information into this window and click 'OK' to create the Code.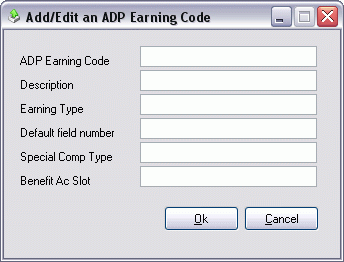
These codes are tied to TruckMate Payroll codes on the 'Bridge between ADP and TruckMate' Tab.
-
ADP Deduction Codes Tab
This Tab displays the currently configured ADP Deduction Codes. These Codes are not used in TruckMate outside of this program. To add a new code, simply click the '+' button on the TruckMate Navigation Bar to access the Add/Edit ADP Code window. Enter all the required information into this window and click 'OK' to create the Code.These codes are tied to TruckMate Payroll codes on the 'Bridge between ADP and TruckMate' Tab.
-
Bridge between ADP and TruckMate Tab
This Tab is where you will setup the connections between the ADP Earnings and Deductions Codes and their TruckMate Payroll Code counterparts. There are two sections on this Tab: 'Earnings' and 'Deductions'. Use the '+' button beneath each section to add records, and double click the fields in the 'TruckMate PayCode' and 'ADP Code' columns to add codes from your system.The ADP Codes are gathered from the two other Tabs in this window, while the TruckMate PayCodes are defined in the Payroll Setup program.
-
-
Options
There are two configuration options on the Options window.-
Default detail file name
This text will be used preceding the Batch number of the Payroll Batch you are Exporting. You can type any filename you wish, but adding '_' following the filename is advisable, in order to clearly distinguish between multiple files on your system. -
Save file as
Choose either '.TXT' (simple text format) or '.CSV' (spreadsheet format) from the drop-down menu.
-
-
Undo previously done batch
Will open a window that will allow you to reverse a previously processed Payroll Batch. Simply select the Payroll Batch number from the drop-down menu and click the 'Undo' button. -
View File
Functions similarly to the 'View File' button on the main form of step 3.
Create/Edit Master File form
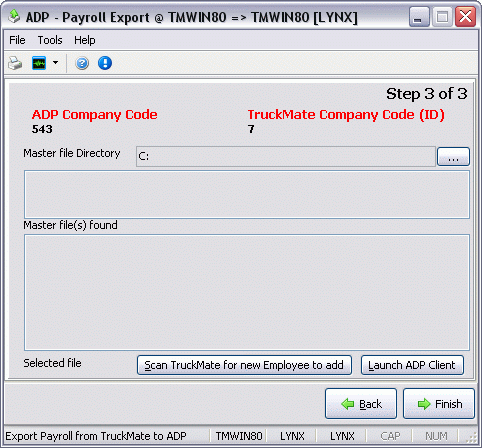
Master file Directory
This value normally defaults to 'C:', but can be changed by clicking the search button to the right. This value specifies where the Payroll Master file can be found. The box below this field will display all the .CSV (spreadsheet) files found in the Master Directory. Check one of the entries to use it in creating the Payroll Master file.
Scan TruckMate for new Employee to add
Clicking this button will launch a small window containing a list of employees that have not had ADP settings entered against their records. The window contains a link to the Employee Profiles program’s ADP page, which needs to be completed for every employee on this list, if they are to be included in the automatic ADP processing.
You can select a flag on the bottom of this window to ignore the new employees, but doing so will exclude them from the ADP export.
Launch ADP Client
Selecting this button will launch your installed ADP Client software, as defined in the Menu Bar > Tools Menu > Options menu item.