AP Inquiry

The AP Inquiry program is used to view vendor account information, produce aging and ISTA reports, pay bills, create check entries and make invoice adjustments. Only invoices that have been posted using the AP Invoice Register program will appear in this program. For those on the more technical side, AP Inquiry is essentially a listing of the VENDOR and AP_SUM tables. As a user you would select a 'Vendor ID' from the Vendor Information Grid and the program will gather all related AP_SUM records with the same 'Vendor ID'. When you look at the transaction history behind each AP_SUM record you are looking at the AP_BILL and CHECK_MSTR_BILL tables. AP_BILL stores the BILL, DEBIT, and CREDIT invoices, and CHECK_MSTR_BILL shows payments from checks against the bill.
To access AP Inquiry:
| From this location | Go to |
|---|---|
TruckMate Menu and TruckMate Task List |
Accounting & Finance > Accounts Payable > AP Inquiry |
Windows Start Menu |
TruckMate 20xx > AP Inquiry |
Windows Explorer |
C:\Program Files (x86) > TruckMate 20xx > ApNi.exe |
How Do I?
How do I Make an Adjustment to/Remove an AP Invoice?
You can use these steps to make any needed adjustments to an Invoice, but you can also follow these steps to "clean up" the Invoice Details Grid of the AP Inquiry program, which should be done if any Invoices have been entered incorrectly (to the wrong Vendor, or if someone has entered negative bills in an attempt to reconcile Invoice errors in the past).
-
Open the AP Inquiry program (APNI.EXE).
-
Locate the Vendor Name you would like to adjust Invoices for. Select the Vendor by clicking it. The relevant Invoices for that Vendor will appear in the bottom Grid.
-
Use the bottom Grid and select 'Open', 'Paid' items, or both. The relevant information will appear in the grid.
-
Use your Context Menu (right-click) to select 'Transaction History'. A Transaction History window will appear. Highlight the Bill requiring adjustment and use your Context Menu to select 'Debit Memo' or 'Credit Memo', as required:
-
Debit Memo*: Debit Memos are used most commonly to Adjust an Invoice that has the wrong charge amount, perhaps adding a monetary amount that was forgotten upon initial creation of the Invoice.
-
Credit Memo*: Credit Memos are used when an Invoice is totally in error, perhaps allocated to the wrong Vendor, and will create a new Invoice that will basically void the original Invoice.
-
-
Confirmation messages will appear to ensure you wish to continue.
-
That’s it! You’ve completed your adjustment. To double-check that your adjustment has occurred properly within the system, open the AP Invoice Entry program and you’ll find the system has created the adjustment for you.
-
The next step is to modify and update/post the Invoice using the AP Invoice Register program.
How do I View Vendor Account information?
-
Open the AP Inquiry program (APNI.EXE).
-
If your Company has only a few Vendor accounts, you may be able to view the Vendor’s information upon opening the program, but if you company has many Vendor accounts, you will need to use the Filter function to sort quickly through a large database of information. If you have a large database, a message will display saying 'too many to list'. Use the Filter function to assist you in locating the Vendor of your choice upon viewing this message.
-
Notice the blue down-pointing arrow in one of the columns. This is a sorting tool. Selecting a column will bring this blue down-pointing arrow the column of your choice. Use the filter text field at the top right-hand corner of the screen and enter, say, the first letter (or first few letters) of the vendor account you’re seeking (this is referred to as 'Partial Logic Searching').
For example: if you’re seeking 'TMW' vendor account information, you could select the vendor column, and place the letter 'M' in the filter field, and if TMW is listed as a vendor in your database then the TMW information would appear in the grid. For an extremely large database, enter two or three characters to assist in your vendor search.
| Only invoices that have been posted using the AP Invoice Register program will appear in the AP Inquiry program. |
How do I Find a specific Bill for a Vendor?
-
Open the AP Inquiry program (APNI.EXE).
-
If your company has only a few vendor accounts, you may be able to view the vendor’s information upon opening the program. But, if you company has many vendor accounts, you will need to use the Filter function to sort quickly through a large database of information. If you have a large database, a message will display saying 'too many to list'. Use the Filter function to assist you in locating the vendor of your choice upon viewing this message.
-
Notice the blue down-pointing arrow in one of the columns. This is a sorting tool. Selecting a column will bring this blue down-pointing arrow the column of your choice. Use the filter text field at the top right-hand corner of the screen and enter, say, the first letter (or first few letters) of the vendor account you’re seeking (this is referred to as 'Partial Logic Searching').
For example: if you’re seeking 'TMW' vendor account information, you could select the vendor column, and place the letter 'T' in the filter field, and if TMW is in your database then the TMW information would appear in the grid. For an extremely large database, enter two or three characters to assist in your vendor search.
-
Go to the 'Find Bill' in the center of your screen, type in the bill number, and press 'Enter'. The triangle, located in the bottom grid, left-hand side, will then move to the location of the bill number you are seeking.
How do I Pay a Bill?
-
Open the AP Inquiry program (APNI.EXE).
-
Use your Context Menu (right-click) in the Upper Grid to select 'Pay Bills'.
-
The Pay Bills window will appear. Find your bank, and select a payment date. Make a selection from the 'Outstanding Bills Section'--which is really a filter area where you can specify which bills you are seeking. When you select the 'Select Bills' button, only those bills relevant to your filter choice will appear in the grid showing. For more information on the Pay Bills window, see the A/P Inquiry program > Menu Bar > Vendor menu.
-
Click the 'Select Bills' button.
-
All of the Bills you wish to pay will be shown in the Grid. Use your Context Menu (right-click) and select one of the options.
| You can select one, some, or all of your bills before using the Context Menu by clicking the records while the <Ctrl> key is depressed on your keyboard. This way, you can pay all your selected Bills at once, if necessary. |
How do I Create Check Entries?
-
Open the AP Inquiry program (APNI.EXE).
-
Use your Context Menu (right-click) in the Upper Grid to select 'Pay Bills'.
-
The Pay Bill window will appear. Find your Bank, and select a payment date. Make a selection from the 'Outstanding Bills Section'- which is really a Filter area where you can specify which bills you are seeking. When you select the 'Select Bills' button, only those bills relevant to your filter choice will appear in the grid showing.
-
Press the 'Select Bills' button.
-
All of the Bills you wish to pay will be shown in the Grid. Select one or all of the bills you wish to pay. Use your Context Menu (right-click) and select 'Create Checks'. Confirming windowes will appear. Select 'OK' if you wish to continue.
| Only invoices that have been posted using the AP Invoice Register program will appear in the AP Inquiry program. |
How do I Void a Printed Check?
-
Open the AP Inquiry program (APNI.EXE).
-
Locate the Printed (Completed) Invoice in the Invoice Details Grid and use your Context Menu (right-click), and select Transaction History.
-
Select the Check you wish to Void (in the Payment Details at the bottom). Use your Context Menu (right-click) and select 'Void Check'.
-
Run the AP Check Register program to update the General Ledger accounts, and the vendor’s account.
Menu Bar / Toolbar
File Menu
Print Reports
 Selecting the Print Reports button will bring up the report selection window, common to many TruckMate applications. Here, you will select a report file from those available in your system and a Crystal Report will be generated.
For more information on Report functionality in TruckMate, see the Crystal Reports Reference.
Exit
 Selecting this option will close the A/P Inquiry program.
Multi-Company Menu
For more information on the Multi-Company options available from the Menu Bar, see the Multi-Company documentation and the Cross-Company Viewing documentation.
Navigate Menu
The Navigate Menu contains the normal TruckMate Navigation Bar, used to browse through your Database records.
Vendor Menu
Notes
 You can view and enter notes for the selected Vendor. These notes correspond to those in the Notes Tab in the Customer & Vendor Profiles program.
You have the option of specifying these Notes as 'Normal' style (simple text entry) or as 'Journal' style (every entry is Date/Time stamped). To toggle these settings, use the 'VENDOR Journal-style 1-3' options in the Application Configurator program > NOTES section. You can also toggle the names of the three available Tabs by using the 'VENDOR Notes 1-3' options.
Reporting
All Reporting options will display the Report Selection form prior to displaying the selection criteria form (as applicable). After selecting the desired report (using the Report Selection form) and specifying the selection criteria (as applicable), the report will preview to the screen. Click the printer icon at the top of the screen to send the report to the printer that is configured as the default printer for your workstation. See the Crystal Reports Reference for more information on report functions.
-
Aging Reports
The Crystal Report template supplied with the TruckMate system is called 'APAGING.RPT'. Aging reports can be produced for a single vendor or for all vendors. You will be prompted to select an Aging Date, a detail level (transaction level, invoice level, vendor level or currency level), and you will be asked if you wish to include paid invoices. -
ISTA (Sales Tax)
The Crystal Report template supplied with the TruckMate system is called 'ISTADTL.RPT'. You will be prompted to select a date range for the ISTA report. The ISTA report summarizes entries made on the ISTA Tab of the A/P Invoice Entry program and the ISTA Tab of the Instant Checks program. Entries are summarized according to the splits entered on the ISTA Group form (see below). -
Other
There is a Crystal Report template supplied with the TruckMate system, called 'VENDORLIST.RPT', which generates a listing of all Vendors configured in the Customer & Vendor Profiles program.
Payment History
![]() Displays the Payment History window, that shows all payments made to the selected vendor. In addition to the summary of the check and vendor information, there is a field that indicates if each check has been cleared through the Bank Reconciliation program (labeled 'Cleared') and a field that indicates if the check has been voided (labeled 'Voided').
Displays the Payment History window, that shows all payments made to the selected vendor. In addition to the summary of the check and vendor information, there is a field that indicates if each check has been cleared through the Bank Reconciliation program (labeled 'Cleared') and a field that indicates if the check has been voided (labeled 'Voided').
You can query by check number from within the Payment History window. Double clicking a detail line within the Payment History window will 'Drill-down' upon a specific check, to see it’s details. The Drill-down screen has fields that display each transaction contained within the checks total value, including a 'Type' field, that indicates what kind of payment is involved, and a 'Reference' field that displays the associated Freight Bill number. Another field is the 'Link ID' which is the ID of the vendor claim that created the AP invoice (if applicable). There are also fields that indicated the 'GL Account', 'Driver ID', and so on.
You can use the 'Amount Range' flag (and the two fields to its right) to specify a Payment Range for filtering the displayed data on this form. Additionally, you can right-click any of the detail lines here to access Context-Menu options:
-
Void Check: selecting this option will void the selected check. The Check Register program must be run before the Void takes effect.
Note: When a voided check is deleted in the Instant Checks program, the voided check will have its TX_VOID/TX_CLEARED values set to 'False', and the CHECK_MSTR.TX_VOID_ID field will be populated to link the two entries.
Although the TX_VOID_ID field is not displayed in the Payments History grid), but it links the two related checks (voiding check and its original) together (i.e. each has the other’s CHECK_MSTR.CHECK_ID). This field can be useful for Crystal Report purposes.
-
View Check in Instant Check: this option allows you to immediately jump to the current (right-clicked from) check in the Instant Check program to view more details (e.g. GL breakdown, etc).
-
View GL Distribution: this option will open a window that lists the Debit and Credit totals by GL Account associated with the selected transaction.
-
Imaging: you also have access to Imaging functionality from this grid, based on the CHECK_MSTR Table. See the Document Imaging Overview for more information on how to setup Imaging functionality.
| The Payment History window grid can be sorted by any of the columns available. Simply click on the column label and the grid records will be sorted by the values in that column (similar to other areas in TruckMate). |
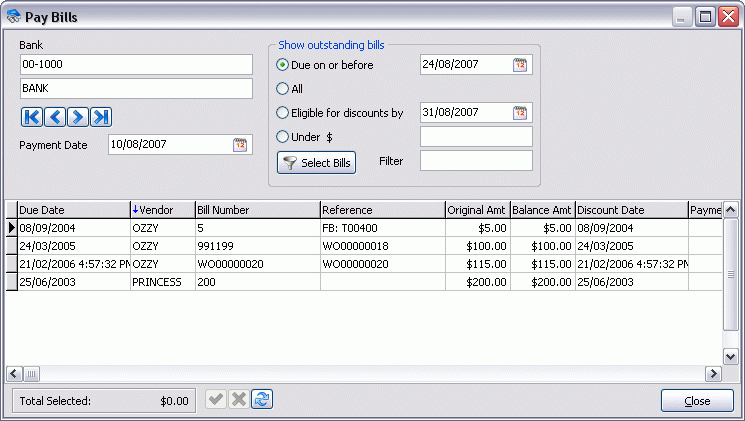
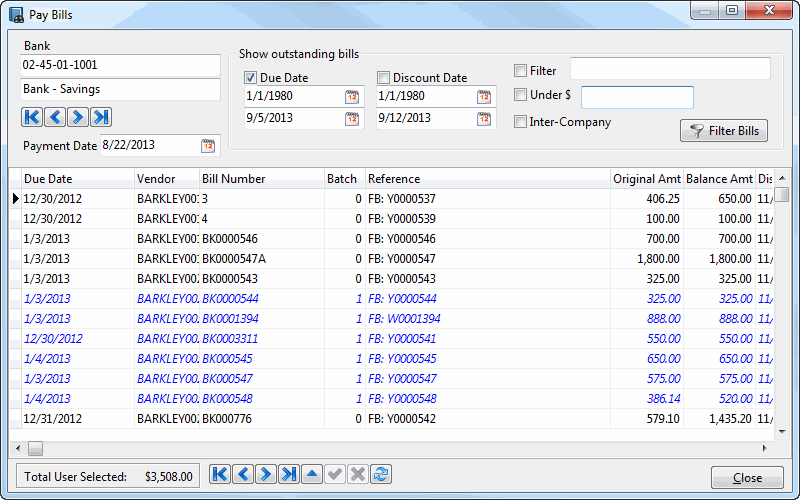
Pay Bills
![]() The Pay Bills window is invoked from the Context Menu in the Vendor grid. It is used to select outstanding invoices for payment, calculate discounts, create checks, and print cash requirements. There are two functions that can be performed directly in the invoice grid: if you click in the 'Discount Amt' field, the Discount form will be displayed. If you wish to make a partial payment on an invoice, click in the Payment Amount field and enter the amount you wish to pay. The invoice balance will be updated after the Check Register program is run. Left click on a column header to sort the grid by the desired column.
The Pay Bills window is invoked from the Context Menu in the Vendor grid. It is used to select outstanding invoices for payment, calculate discounts, create checks, and print cash requirements. There are two functions that can be performed directly in the invoice grid: if you click in the 'Discount Amt' field, the Discount form will be displayed. If you wish to make a partial payment on an invoice, click in the Payment Amount field and enter the amount you wish to pay. The invoice balance will be updated after the Check Register program is run. Left click on a column header to sort the grid by the desired column.
| Field | Definition |
|---|---|
Bank |
Select the bank account from which you will issue the check to pay the invoices. General Ledger accounts of the type 'Bank' are available for selection here. Only invoices that match the currency of the selected bank account will be displayed in the grid. Bank accounts are configured in the GL Chart of Accounts program. For each category (type) of accounts defined; one account can be set to be the default account. If an account is configured to be the default account for the 'Bank' category that account will be displayed in this field on opening this window. However, if no default account was defined then the master account (the account with the lowest number in the category) will be displayed as the default. |
Payment Date |
Click on the down arrow to select a date from the calendar. The date selected here will become the check date. |
Due on or before |
You can display bills according to their due date. Click on the 'Due on or before' radio button to select this option, then enter a date in the field to the right (or click on the down arrow for a calendar selection form). |
All |
To display all invoices, click on the 'All' radio button. |
Eligible for discounts by |
To display invoices according to their discount date, click on this radio button, then enter a date in the field to the right (or click on the down arrow for a calendar selection form). |
Under $ |
To display invoices with a balance under a specific dollar amount, click on this radio button and enter the amount in the field to the right. |
Filter |
The Filter field works in conjunction with the sort column selected in the grid. When you click on a column header in the grid, items will be sorted according to that column. A blue arrow will indicate that this field is the sort column. When you enter a value in the Filter field, only items with matching data in the selected sort column will be displayed. Click the Select Bills button to update the grid display. |
Select Bills |
After you have specified your display criteria, click this button to display the invoices. |
Total Selected / Total User Selected
This field shows the total payment amount of the invoices selected on this window.
| The behavior of this field can be modified using the Application Configurator program > APNI.EXE > Paybill Screen Total for Current User Only option. If 'True' this field will be named 'Total User Selected' and will only include those bills that the currently logged in user has flagged for payment. |
Context Menu
Calculate discount for current bill
Will display a form that summarizes the discount information for the selected bill, and allows you to enter a manual discount amount.
Use the Amount of Discount field to enter the discount amount (if different than the calculated discount), and select a General Ledger posting account in the Discount Account field. The account selected here will be credited with the amount of the discount when the Check Register program processes the check. You can also display the Discount form by clicking in the 'Discount Amt' field in the grid.
| The Application Configurator program > APNI.EXE > 'Default Discount Account' config can be used to default the GL Account selected as the discount account in a variety of ways. |
Set payment on selected bills
After applying your selected filters, you can select single or multiple bills for payment. For multiple selection, use ctrl + left mouse click, and then select this option. For single invoice selection, you can highlight the bill and select this option. Alternatively, you can double click on an invoice to select or de-select it. Invoices that have been selected for payment are highlighted by blue, italicized text.
| If the Application Configurator program > APNI.EXE > Paybill Screen Total for Current User Only option is set to 'True', bills that have been selected for payment by other users will appear as grayed-out detail lines (and will not be included in the 'Total User Selected' value. |
Clear payment on selected bills
This option reverses the function of the previous option. Selecting this option for bills already selected for payment, de-selects them and changes the text color back to black an removes the italic.
Set payment on all bills
Will select all invoices displayed in the grid for payment.
Clear all selected bills
Will de-select all invoices that have been previously selected for payment.
Pay Bills from Vendor Category
In the Customer & Vendor Profiles program, you can assign a category code to a vendor’s profile. You can then specify that category code here in order to display invoices according to a vendor’s category.
Print payment edit list
Will display the Report Selection form. The Crystal Report template supplied with the TruckMate system is called 'NJ.RPT' (which summarizes the included payments). After selecting the desired report (using the Report Selection form) the report will preview to the screen. Click the printer icon at the top of the screen to send the report to the printer that is configured as the default printer for your workstation.
See the Crystal Reports Reference for more information on Report Functions.
Create checks
Will create check entries that can be viewed and printed using the Check Printing and / or Instant Check programs.
| There is an option that can direct the system to accumulate all outstanding payments for a vendor in one check instead of printing one check per each transaction. This option is controlled by an App Config ('Print Check Per Vendor') in Configuration Explorer > AP > APNI.EXE. |
Print cash requirements
Will display the Report Selection form. The Crystal Report template supplied with the TruckMate system is called 'CASHREQ.RPT', which summarizes the check amount by bank account. After selecting the desired report (using the Report Selection form) the report will preview to the screen. Click the printer icon at the top of the screen to send the report to the printer that is configured as the default printer for your workstation.
See the Crystal Reports Reference for more information on Report Functions.
Delete cash req. and start again
Will delete the check entries that were created using the Create checks menu option, and will return the status of all affected invoices to non selected.
ISTA Groups
![]() The ISTA Group Maintenance window is used to configure group codes that are used for ISTA reports. The Inter-Provincial Sales Tax Agreement allows companies who operate in more than one province to pro-rate sales tax paid for parts and labour on equipment. The pro-rate factor is determined according to the number of fleet miles traveled in each jurisdiction during the previous year. Entries of ISTA - claimable parts and labour are made on the A/P Invoice Entry program > ISTA Tab, and on the Instant Checks program > ISTA Tab.
The ISTA Group Maintenance window is used to configure group codes that are used for ISTA reports. The Inter-Provincial Sales Tax Agreement allows companies who operate in more than one province to pro-rate sales tax paid for parts and labour on equipment. The pro-rate factor is determined according to the number of fleet miles traveled in each jurisdiction during the previous year. Entries of ISTA - claimable parts and labour are made on the A/P Invoice Entry program > ISTA Tab, and on the Instant Checks program > ISTA Tab.

| Field | Definition |
|---|---|
Group Code / Name |
Enter an ISTA group code and a code description. When you assign an ISTA distribution code to an invoice in the A/P Invoice Entry program or the Instant Check program, you will select a Group Code. |
Distributable? |
If this group code is used for entries that qualify for the ISTA tax pro-rate, enter a 'Y' in this field. If this group code is used for equipment that does not qualify, such as a fleet that only operates in one province, enter a 'N' in this field. |
Percentage Splits |
Enter the percentage of the purchase that is liable for provincial sales tax in each jurisdiction. For example, if your fleet operates 20% of the time in Ontario and 80% of the time in Manitoba, enter 20 in the ON field and 80 in the MB field. |
View AR Information |
This option will only be available if the selected vendor has a Client ID specified in their profile (in the Customer & Vendor Profiles program). When this option is selected, the AR Inquiry program will be loaded and the customer entered as the Client ID for this vendor will be displayed. |
View A/R Information
![]() Selecting this option will open an instance of the AR Inquiry program, which allows you to view your Vendor’s Accounts Receivable information.
Selecting this option will open an instance of the AR Inquiry program, which allows you to view your Vendor’s Accounts Receivable information.
The <Ctrl><I> hot-key can also be used to access the AR Inquiry program.
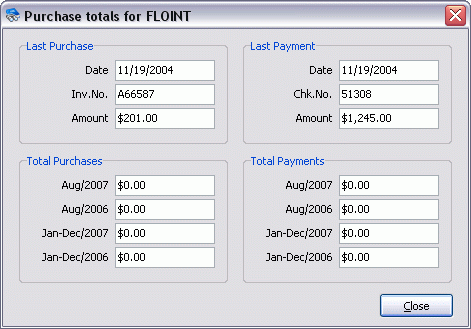
Purchase Totals
![]() Opens the Purchase Totals for <VENDOR> window, where you can view information on the last purchase, last payment, as well as total purchases, and total payment information of a specific vendor.
Opens the Purchase Totals for <VENDOR> window, where you can view information on the last purchase, last payment, as well as total purchases, and total payment information of a specific vendor.
| Field | Definition |
|---|---|
Edit Vendor <Vendor Name> |
Opens the Customer and Vendor Profiles program for the selected vendor. |
View Misc. Cash Receipts |
If the selected vendor has any Miscellaneous Cash Receipts, selecting this option will open the A/R Cash Receipts program. |
Edit Vendor <VendorName>
![]() Selecting this option will open an instance of the Customer & Vendor Profiles program, with the selected Vendor’s Profile information displayed. You can use this option to quickly make changes to a Vendor’s Profile.
Selecting this option will open an instance of the Customer & Vendor Profiles program, with the selected Vendor’s Profile information displayed. You can use this option to quickly make changes to a Vendor’s Profile.
The <Ctrl><E> hot-key can also be used to access Customer & Vendor Profiles program.
View Misc Cash Receipts
![]() If the selected Vendor has any Miscellaneous Cash Receipts in the system, selecting this option will open an instance of the A/R Cash Receipts Entry program.
If the selected Vendor has any Miscellaneous Cash Receipts in the system, selecting this option will open an instance of the A/R Cash Receipts Entry program.
Toggle Hold/Pay on Vendor
![]() Selecting this option will toggle the 'Payment Hold' field to True or False, depending on the current value for the specific Vendor in the Vendor Information Grid. When this setting is set to 'True', you will not be able to create new checks for the selected Vendor.
Selecting this option will toggle the 'Payment Hold' field to True or False, depending on the current value for the specific Vendor in the Vendor Information Grid. When this setting is set to 'True', you will not be able to create new checks for the selected Vendor.
IP Advance Checks
This allows users to view advance checks for vendors, and filter them by date range.
Compare Calculated Balance
This option will have the application calculate the balance based on the detail transactions and then compare it to the saved balance; a popup will report a variance if any exists. Selecting the OK button on the popup will open a grid showing ONLY bills with variances, comparing calculated values with current values for each bill.
Invoice Menu
Transaction History
![]() Displays the Transaction History window. The top grid shows the history of the invoice, including the audit number from the A/P Invoice Register. The context menu can be used to create a Debit or a Credit memo from the selected invoice.
Displays the Transaction History window. The top grid shows the history of the invoice, including the audit number from the A/P Invoice Register. The context menu can be used to create a Debit or a Credit memo from the selected invoice.
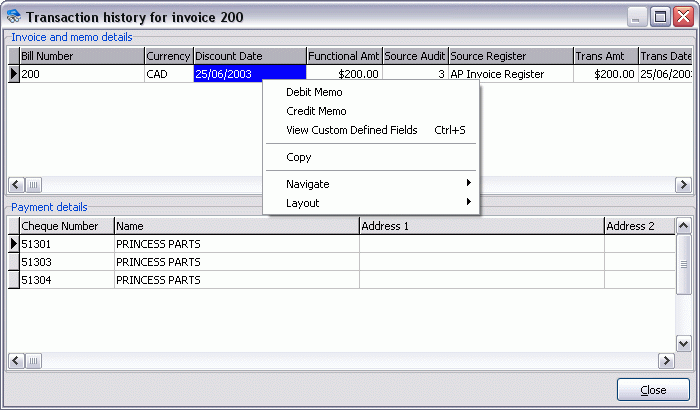
Invoices and Memo Details
This Grid displays the Invoice Details for the Invoice you right-clicked in the main window of AP Inquiry, and shows a variety of details regarding the Invoice. The debit or credit memo will be created in the A/P Invoice Entry program using the details of the original invoice. These must be updated using the A/P Invoice Register program before they will be reflected in the vendor’s account balance.
Context Menu
Debit Memo
Debit Memos are used most commonly to Adjust an Invoice that has the wrong charge amount, perhaps adding a monetary amount that was forgotten upon initial creation of the Invoice.
You will be asked to confirm this decision. If you click 'Yes', the Debit Memo will be created.
Credit Memo
Credit Memos are used when an Invoice is totally in error, perhaps allocated to the wrong Vendor, and will create a new Invoice that will basically void the original Invoice.
You will be asked to confirm this decision. If you click 'Yes', the Credit Memo will be created.
View Custom Defined Fields
Selecting this option will open a window that will display any Custom Defined Fields that the Invoice has been given.
Customize Grid / Save Grid Layout
The first option opens the Grid Customization Tool common to most TruckMate applications. Once you have customized the Grid (using the Customizer or simply resizing the fields in the Grid itself), you can use the second option to save it for future use of the Transaction History window.
View IP Adjustment Notes
Select this option to view the Interline Payables Adjustment Notes (if any exist) for the current detail line record.
View GL Distribution
Selecting this option will display a window that lists the Debit and Credit totals by GL Account associated with this transaction.
This option is only enabled for rows that were created by the AP Check Register program or the Interline Payables Register program, not those created by the Repairs & Maintenance Registers.
Payment Details Grid
The bottom grid displays payment details for the invoice, including the number of the check by which the invoice was paid, and the Check Register Audit number. Additional fields that are hidden by default are available that show the CHECK_ID and the EDI 820 Status for vendor payments.
Context Menu
Void Check
You can void the check by selecting the Void Check right mouse option in this Grid. This will create reversing General Ledger postings that will take affect when the Check Register program is run. Voiding the check will return all invoices paid by the check to an unpaid state.
View Bill in AP Invoice Entry
Selecting this option will open the AP Invoice Entry program (or switches focus to an already open instance) with the Bill details of the Freight Bill selected in the Bills Grid displayed.
Toggle Hold / Pay
![]() If you set the Hold status of an invoice to 'True', the invoice will not be available for selection in the Pay Bills screen. Invoices can also be placed on Hold in the A/P Invoice Entry program. To pay the invoice, use the Toggle Hold / Pay option to set the Hold status to 'False'.
If you set the Hold status of an invoice to 'True', the invoice will not be available for selection in the Pay Bills screen. Invoices can also be placed on Hold in the A/P Invoice Entry program. To pay the invoice, use the Toggle Hold / Pay option to set the Hold status to 'False'.
Change Invoice Due Date
![]() The default for this feature is disabled. To enable this feature, go to the Security Setup program > Business Events Tab, and place a checkmark in the box beside A/P Due Date. This will allow you to make changes to the invoice due date from within the A/P Inquiry program.
The default for this feature is disabled. To enable this feature, go to the Security Setup program > Business Events Tab, and place a checkmark in the box beside A/P Due Date. This will allow you to make changes to the invoice due date from within the A/P Inquiry program.
Change Invoice Discount Date
![]() The default for this feature is disabled. To enable this feature, go to the Security Setup program > Business Events Tab, and place a checkmark in the box beside A/P Discount Date. This will allow you to make changes to the invoice discount date from within the A/P Inquiry program.
The default for this feature is disabled. To enable this feature, go to the Security Setup program > Business Events Tab, and place a checkmark in the box beside A/P Discount Date. This will allow you to make changes to the invoice discount date from within the A/P Inquiry program.
View Bill in AP Invoice Entry
Selecting this option will open the AP Invoice Entry program (or switches focus to an already open instance) with the Bill details of the Freight Bill selected in the Bills Grid displayed.
Clear Zero Charge Invoice
Selected Invoice
If the selected Invoice has a charge of $0, this option will clear the Invoice.
All Invoices For This Vendor
Clears all $0 Invoice charges for the selected vendor.
Tools Menu
TruckMate Monitor
![]() Click the down arrow next to this button to access the various functions of the new TruckMate Monitor.
Click the down arrow next to this button to access the various functions of the new TruckMate Monitor.
Remember Position / Size
Select this option to retain window size and position upon exit. When the program is re-opened, it will maintain its previous appearance.
Check Search
You can use this option to search for posted AP checks, in order to view their details. You have the option of searching by 'Dollar Amount', 'Date' and/or 'Client'.
Window Menu
AP Invoice Entry
![]() Selecting this option will open an instance of the AP Invoice Entry program.
Selecting this option will open an instance of the AP Invoice Entry program.
Instant Checks
![]() Selecting this option will open an instance of the Instant Checks program.
Selecting this option will open an instance of the Instant Checks program.
Help Menu
TruckMate Help
 Selecting this button will open the A/P Inquiry topic in the TruckMate Online Help file (the page you are currently viewing).
Service Portal
 Selecting this button will open an instance of your default Internet browsing software, with the https://www.tmwcare.com login page displayed.
About
 Selecting this button will open the standard TruckMate About window, which contains important information about the application you are currently using, including its version number (important for support calls).
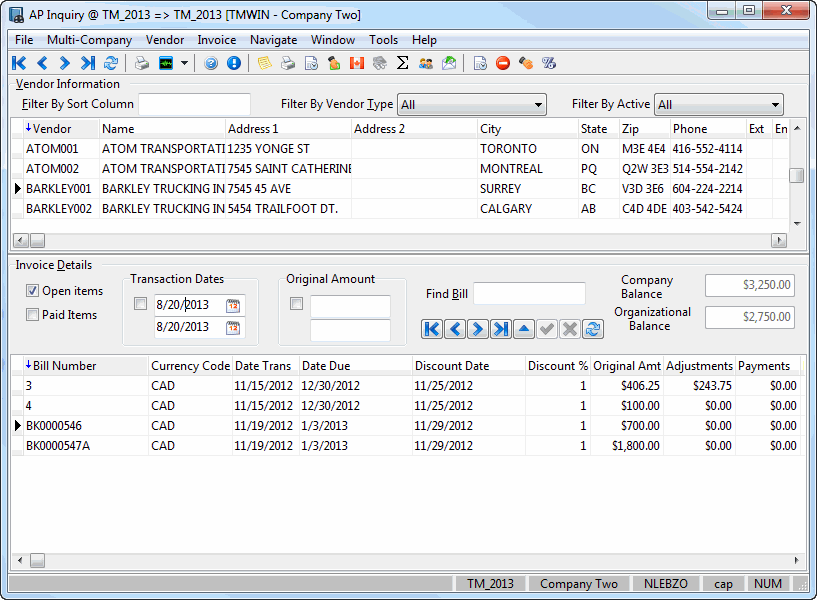
Vendor Information Grid
Vendor information is displayed in the grid at the top of the screen. Vendors are configured in the Customer & Vendor Profiles program > Vendor Tab.
Filter
You can reduce the number of vendor records that are displayed by entering partial match data in the Filter field. The Filter field works in conjunction with the 'sort' column, indicated by a blue arrow. When you enter characters in the Filter field, only records in the `sort' column that match the characters will be displayed.
Filter By Vendor Type
You can use this drop-down menu to filter the available Vendor records by their 'Vendor Type' (as configured on the Customer & Vendor Profiles program > Vendor > Types Tab). You can set which Vendor Types are available in this drop-down via the Security Setup program > Security > Business Events > Filters Tab.
Filter By Active
This allows you to filter vendors in the Vendor Information Grid by Active vendors (True in the Terminated column), Terminated vendors (False in the Terminated column), or All.
Note that if a Vendor is flagged as Terminated, then the Debit, Credit, and Void Check right-click options in the Transaction History form are disabled.
Payment Hold
There is a new True/False field, Payment Hold, in the Vendor Information Grid. If given rights to do so in the Security Setup program > Security Tab > Vendor Types Tab, you may toggle this field in 1 of 3 ways:
-
From the 'Vendor' Menu.
-
By right-clicking the Vendor Grid
-
By double-clicking the cell in the vendor grid
If you change the flag to 'True' and there are some unposted checks for the vendor, you will get a warning. If the flag is set to True, then no invoices for the given vendor will display in the Pay Bills screen. You can also change the flag in the Vendor Profile program and you also cannot create a check in Instant Check for any Vendor on payment hold.
Invoice Details
The Invoice Details Grid displays the invoices for the vendor selected in the vendor grid. There are two functions that can be performed directly in the grid: you can change the Due Date and/or the Discount Date of an invoice by clicking on either of those fields.
Open Items
Check this box to display invoices that have not been paid (including invoices that have been partially paid).
Paid Items
Check this box to display invoices that have been paid in full.
Transaction Dates
If the user selects the flag in this section, then the 'Start Date' and 'End Date' fields will be used as a Date Range Filter on the 'Transaction Date' of the records available in the Invoice Details Grid.
Original Amount
If the user selects the flag in this section, then the 'Starting Amount' and 'Ending Amount' numeric fields will be used against the 'Original Amount' value of the records available in the Invoice Details Grid in order to Filter the records by a certain Original Amount Range.
Find Bill
To find a specific invoice, enter the invoice number in this field. Notice that as you enter characters, the pointer on the left side of the row will move down the display according to the matching characters found.
Balance
This field will display the sum of the balance of all outstanding invoices.
Invoice Details Grid
All of the information in the Invoice Details grid is pre-populated based on the vendor highlighted in the Vendor Information grid above. You can make changes to the Due Date, Discount Percentage, and/or the Discount Date of an invoice by double-clicking on either of those fields.
Bill Number
Pre-populated based on the vendor highlighted in the Vendor Information grid. Double-clicking in this field has the same behaviour as the 'View Bill in AP Invoice Entry' option on the 'Invoices' menu.
Currency Code
Pre-populated based on the vendor highlighted in the Vendor Information grid.
Date Trans
Pre-populated based on the vendor highlighted in the Vendor Information grid.
Date Due
Pre-populated based on the vendor highlighted in the Vendor Information grid.
Discount Date
Pre-populated based on the vendor highlighted in the Vendor Information grid.
Discount %
Pre-populated based on the vendor highlighted in the Vendor Information grid.
Original Amount
Pre-populated based on the vendor highlighted in the Vendor Information grid.
Adjustments
Pre-populated based on the vendor highlighted in the Vendor Information grid.
Payments
Pre-populated based on the vendor highlighted in the Vendor Information grid. A new column has been added entitled 'Discounts' which separates the discount amount from the payment amount. The 'Payment' column now shows only actual check amount (after discount taken).
Balance
Pre-populated based on the vendor highlighted in the Vendor Information grid.
Reference
Pre-populated based on the vendor highlighted in the Vendor Information grid.
Held
Pre-populated based on the vendor highlighted in the Vendor Information grid.
Aged Days
Pre-populated based on the vendor highlighted in the Vendor Information grid.
PO Number
Displays the PO Number if this detail line refers to a Purchase Order. This value will be updated into the AP_SUM table when the User posts the record.
Discounts
Pre-populated based on the vendor highlighted in the Vendor Information grid. A new column has been added entitled 'Discounts' which separates the discount amount from the payment amount.
Aging Date
This field displays the Aging Date of the Invoice (which reflects when the customer originally submitted the Invoice), as entered in the 'Invoice Aging Date' field of the AP Invoice Entry program.
IP Notes
This field will display one of three possible values, depending on if Interline Payables Adjustment Notes exist for the selected invoice, and depending on the state of the Application Configurator program > APNI.EXE > 'Show IP Adjustment Notes' option:
-
True / False: The config option is set to 'True' (access to the field is possible). 'True' designates that there are IP Adjustment notes, while 'False' designates that no notes exist for the Invoice. You have access to the 'View / Edit Notes' context menu option (see below).
-
N/A: The config option is set to 'False' and the IP Notes functionality is disabled (as well as the context menu option below).
Context Menu
All of the options available in this Context Menu have been described in the 'Invoice Menu' above, as part of the Menu / Bar Toolbar.
View Check in Instant Check
Selecting this option allows you to immediately jump to the current (right-clicked from) check in the Instant Check program to view more details (e.g. GL breakdown, etc).
View / Edit Notes
This option will allow you to view (and/or edit) any existing IP Adjustment notes, as entered in the Interline Payables Audit program.