Trips/Doors section, Trailer Pool, Traffic Lanes
| As of TruckMate 2022.4, CrossDock is no longer available. Trimble still provides support for older versions. |

Trips/Doors Section
The number of doors that display for each terminal depends on the Terminal Setup. To create a Trip at a door, drag a Trailer, Container or Chassis record from the Trailer Pool Area (bottom part of the screen) to one of the Doors, or use the right-click 'New Trip at This Door' menu option. This trip will be visible in the Dispatch program, but cannot be advanced there.
Freight Bills are loaded on trailers by clicking and dragging from the Freight Bill Grid to a Door.
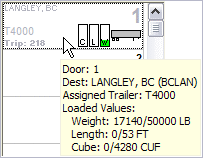
Hovering the mouse over the door briefly displays summary information about the door and trip on the door. When the trip is ready to be dispatched, change the status to 'Loaded to Go'. This will free the trip for activation in the Dispatch program. Double click on the door to display the Door Summary window.
Context Menu
Show Door Summary
Will show a list of all Freight Bills assigned to the trip at this door, as well as all assigned trailers. The Freight Bill Grid in the Door Summary form shows the same information as the Freight Bill Grid on the main CrossDock screen, and has the same Grid sort capability. See the Advanced Program Details section below for more information on the Door Summary window.
New Trip at This Door
This option generates a new trip number (using the same number generator used by all the dispatch programs which can create new trips), which is the starting point of most TruckMate Dispatch operations. The newly created trip will default its starting zone to the zone associated with the current terminal and will have a current status matching the Loading Status for the current terminal. This new trip is also created without an assigned trailer. This allows you to start planning a trip and assigning Freight Bills before the desired trailer has arrived at the yard.
Container Quick New
Selecting this option opens the Quick Container Entry window, which will be familiar to anyone who has used the Customer Service program > Intermodal > Container Tab. This window allows you to quickly enter a new Container ID record that can immediately be assigned to Intermodal functions in the CrossDock program, as well as throughout other TruckMate Intermodal applications.

| Field | Definition |
|---|---|
Cont # |
This field will pre-populate based on the Container ID or code as entered in the previous field. Once you select the 'Container #', the rest of the fields on the Quick Container Entry window should automatically populate. If the Container you have selected is currently set to 'Active' status, there will be a warning message. If any other information has not automatically populated, enter values as required using the following options. |
Check Digit |
Enter a Check Digit for this Container. The Check Digit is displayed next to the Container # whenever it is referenced. |
Number |
Enter a number for this Container, if required. |
ISO # |
Enter the ISO # or select an ISO # from those available in your system by clicking the search button. |
Type |
Enter a Container Type or use the search button to view container types already entered on your system. |
Size |
Enter an appropriate size or use the search button to view Container size information already entered on your system. To enter a new container size, go to the Intermodal Setup program > Size Tab. |
Owner |
Enter a valid owner for this Container or use the search button to view Clients entered on your system. To add an owner to a Client profile, go to the Profile program > Customer Tab > Intermodal Tab and select the desired type or types of transport relevant for this Client. |
Current Zone |
Click the search button to select a Current Zone value for this Container. |
Loaded |
Check this flag if the selected Container is loaded. |
Start Loading / Finished Loading
These two options are used when the Trailer is being loaded.
| These options are only available when the selected Trip is not set to 'Loaded to Go' ('Manifest' must equal 'Y'). |
Start Unloading / Finished Unloading
Start Unloading marks the trip as being unloaded and Finish Unloading marks the trip as being unloaded, empty and ready for further processing. The Finish Unloading does not complete the trip just yet, the trip can be completed from Dispatch, need to know how?. However, if you want to automatically complete the trip once it finishes unloading, you can set an application configuration option in Application Configurator > Dispatch > CROSSDOCK.EXE - 'Complete trip when finished unloading' to 'True'. This option is set to 'False' by default.
| These options are only available when the selected Trip is not set to 'Loaded to Go' ('Manifest' must equal 'Y'). |
Reconcile Items
When this option is selected, a prompt will display, asking for a 'Bay Number'. Once chosen, the system will perform a check that all items are at the bay location.
Optimize Trip
This option is the same function as is offered in the Dispatch program. The Trip Optimization screen offers you the ability to edit the trip legs and assign Freight Bills to be picked or dropped in whatever order required.
Show Linkage
Choosing this option will display the Resource Linkage window. For more information, see the Resource Linkage window details below.
Assign Resource
The Assign Resource option allows you to add a 'Power Unit', 'Trailer', 'Container' or 'Chassis' record from the TruckMate system to a CrossDock Trip, even if that resource is already assigned to another Trip. This option allows you to manifest Freight to a Trailer or Container that may not yet be at your Dock. If the Resource you select is already active on another Trip, the program will warn the User and confirm the assignment. If necessary, a reposition Trip will be automatically built for the movement to the Dock.
Carrier Assignment
Selecting this option will open the Carrier Assignment window which will assign /deassign an Interliner Carrier on the currently selected Trip (route).
Find Near
Choosing the 'Find Near' option will open the Find Near window, which allows you to search for Resources by location.
Cancel Trip
Selecting this option will delete the trip from the screen. This option is disabled if bills have been assigned to the trip, since you cannot cancel a trip with resources assigned to it. You must de-assign all bills and (if the trip was released to Dispatch) any drivers and equipment before you are allowed to cancel a trip.
Set Destination
Before you can activate the trip in the Dispatch program (using the Loaded to Go menu option) you must supply a destination zone for the trip. This zone code will become the Leg To zone on the final leg of the trip. You cannot use the Set Destination option in the CrossDock program if the trip legs have been edited using the Optimize Trip function.
Loaded to Go
When all the desired Freight Bills have been loaded on the trailer, and the destination for the trip has been specified, select the Loaded to Go menu option to release the trip to the Dispatch program. You will not be able to set the trip as Loaded to Go unless all the Freight Bills included have a status that is of the Docked behavior category (as configured in the Codes Maintenance program).
Park in Yard
Using this option indicates you have moved the Trailer, Container and/or Chassis (and all the Freight the equipment contains) from the Door section to the Trailer Pool section of the screen. This allows you to suspend loading, but to keep the configuration of Freight Bills and Trailers/Containers/Chassis that you’ve created.
Set City Dispatch Route
Selecting this option opens a window where you may select a City Dispatch Route / Lane ID for the selected Trip.
| When you click this option, the trip doors display will be refreshed to reflect the changes. |
Set Door/Font Color
Selecting this option will open the Select Color window, which will allow you to define the background ('Door') color and Font color for the currently selected 'Door'.
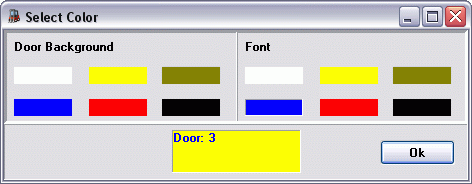
Simply click one of the color bars in either the 'Door Background' or 'Font' section to change the color of the background or text. The sample image at the bottom of the window gives you a preview of how your selected combination will appear in the Trips/Doors Grid.
Reset Door/Font Color
Select this option to reset the displayed Door and Font colors to their default (white background / black text).
Reset All Doors/Font Color
Selecting this option will reset ALL Doors and Fonts to the default values (white background / black text).
Refresh Colors
Select this option to refresh the color values for any recent changes.
Trailer Pool
The Trailer Pool section of the screen displays Trailers, Containers and Chassis with a status of the 'Availability' behavior category (as configured in the Codes Maintenance program) whose current zone matches the Terminal Zone, as specified in the Terminal Setup.
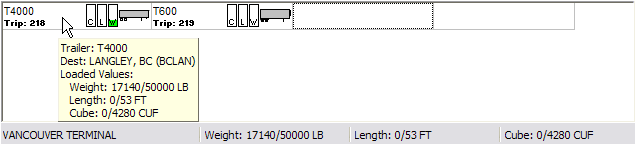
When you use the 'Park in Yard' option in the Door section, the Trailer, Container or Chassis record will be displayed in the Trailer Pool. Small icons are displayed if you have chosen an image file Trailer’s Equipment Class in the Codes Maintenance program. If you position your mouse pointer over an equipment record in the Trailer Pool, that piece of equipment’s capacity will display at the bottom of the screen.
Be sure to use the 'Refresh' button at the top of the CrossDock screen frequently to update the display of the available equipment in the Trailer Pool.
Trailer Pool Filters (Trailers, Straight Truck, Container, Carrier, and No Resource)
These checkboxes, located right above the Trailer Pool section, filter the results in the Trailer Pool. Please note that the following have specific functions:
-
Carrier: When checked, this will show trips that have been parked in the yard with only an Interliner attached to them.
-
No Resource: When checked, this will show trips that have been parked in the yard without any resources attached. This can be useful for brokerage/non-asset based companies.
Traffic Lanes
The Traffic Lanes Section is built around the concept of grouping delivery zones into a lane. In visual terms, imagine parking all your trailers to be loaded with freight bound for a specific region or destination in one lane in your yard. In this way, the lane tree represents all of the zones you service through your terminal.
Beside each lane is displayed the total weight of all bills with delivery zones that match the lane. This provides a visual representation of the amount of traffic (and therefore resources required) moving through a particular lane.
Your terminal can have as many lanes as you wish, but you must start with a base lane which will include all the lanes you will use. The default lane is labelled 'World' and by definition, it includes all of the zones in the system. You will want to go into the CrossDock Traffic Lanes program to create lanes that describe your service areas and specifically those regions serviced by your terminals.
Traffic lanes can be labelled with whatever name makes sense to your dispatchers and each lane can be assigned whatever zones you wish to assign. You can even assign one zone to multiple lanes if it makes sense.
Example:
Your Vancouver terminal services points into northern BC, Alberta, and the Yukon. Some of your northern BC trips run to the Yukon, and some of your northern Alberta trips run to the Yukon as well.
You can set up a northern BC lane that includes Yukon zones and you can set up a northern Alberta lane that includes the same Yukon zones.
In this way, you have a visual aid in deciding how to distribute your traffic to the Yukon between the two lanes.
You can expand a branch of the tree by clicking on the plus symbol beside a lane to view the lanes or zones included below it. You can collapse a branch of the tree as well by clicking on the minus symbol.
You should make note to use the refresh button often to ensure the weight calculations take into account new bills inbound to your terminal which can then be included in the traffic totals for your lanes.
Refresh
![]() The Refresh button will cause the Grid to re-sort after you have added or change Route Designation values. You can filter the Freight Bills that are displayed in the Grid by using the Filter By This Route Designation menu option, accessible by clicking the right mouse button anywhere in the Freight Bill Grid. This value can also be viewed and edited in the Dispatch and Manifest Maintenance programs, and can be viewed in the Local Dispatch program.
The Refresh button will cause the Grid to re-sort after you have added or change Route Designation values. You can filter the Freight Bills that are displayed in the Grid by using the Filter By This Route Designation menu option, accessible by clicking the right mouse button anywhere in the Freight Bill Grid. This value can also be viewed and edited in the Dispatch and Manifest Maintenance programs, and can be viewed in the Local Dispatch program.
Context Menu
Filter By This Lane
Uses the currently highlighted lane to filter the bills in the available Freight Bills Grid to only show those with delivery zones that match the lane.
Clear Lane Filter
Removes the filtering and shows all bills regardless of Delivery Zone / Lane match-ups.
Reload Lane Tree
Reads any edits that may have been made in the lane definitions and then updates the lane weight totals to reflect those changes.