Pre-Paid Accounts


The Pre-Paid Accounts program was designed to support the creation and management of pre-paid accounts for items such as licensing, permits, insurance payments, etc. A pre-paid account is generally any account that represents products or services which are purchased and paid for in advance of their use over a prescribed period. The product or service therefore may hold a residual value which may be tracked, refunded, adjusted, and/or reassigned. The Pre-Paid Accounts program module will allow you to manage those accounts, including allowing users set up accounts to represent a specific pre-paid item, match the pre-paid account to equipment, generate pro-rated payment schedules, generate journal entries for all current accounts from the payment schedules, and finally close the account when the pre-paid item expires.
To access Pre-Paid Accounts:
| From this location | Go to |
|---|---|
TruckMate Menu and TruckMate Task List |
Accounting & Finance > Accounts Payable > Pre-Paid Accounts |
Windows Start Menu |
TruckMate 20xx > Pre-Paid Accounts |
Windows Explorer |
C:\Program Files (x86) > TruckMate 20xx > PPDAccounts.exe |
How Do I?
How do I Import Existing A/P Transactions into a Pre-Paid Account?
The Import Account window is similar to a wizard-styled window, which will guide users through finding and selecting an A/P transaction to process into one or more pre-paid accounts.
| If an A/P record is already referenced in an existing pre-paid account record, it will not be eligible for import. |
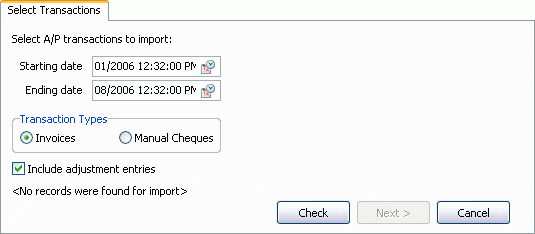
Select Transactions
The User will open the 'File' menu and select 'Import from A/P' (or access the toolbar icon) to open the wizard. The Import Account window will then appear, displaying the Select Transactions Tab.
-
First the user must set a date range to match transactions to, using both the 'Starting Date' and 'Ending Date' fields. A/P invoice transactions (including memo adjustments) must have a 'Bill Date' included in the given range. If searching for A/P checks, the 'Check Date' must be included in the specified range.
-
The user must then select either the 'Invoices' or 'Manual Checks' Transaction Type radio option. Depending on the radio option selected, the wizard will search the given Date Range for A/P invoice transactions or A/P checks, respectively.
-
The 'Include Adjustment Entries' check-box (for including adjustment records) is optional and can be left unchecked if the user knows there are a large number of new transactions to process and/or there are no adjustments to process.
-
The user will then click the 'Check' button to have the wizard check if any transactions match the selection criteria. The results will be displayed as a text message to the user. If no records are found the user can change the selection criteria and check again or they can click on the 'Cancel' button to close the wizard. If records are found, the 'Next' button will be enabled for the user to click to move to the next step of the import process.
Available Records
The next step in the Import process has the user selecting a specific A/P transaction from the Available Records Tab, so that it may be added into a pre-paid account record.
The Available Records Tab grid displays those records which were returned by the selection criteria in step one. The user can search the listing for a specific Vendor, invoice bill or check. They can see the transaction total, the type of transaction it was - whether invoice, check, or adjustment, and the potential number of pre-paid accounts affected. If the user does not find the record they are looking for, they can return to the previous step. Otherwise, the user will select a record by double-clicking on it to advance to the final step.
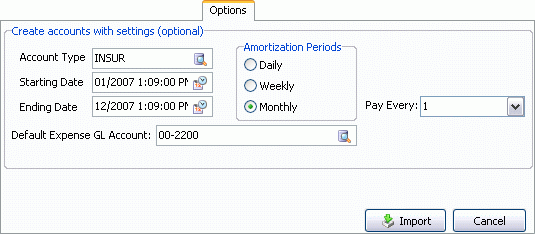
Import Options
The final step in the import process has the user setting up the pre-paid account that the A/P transactions will be entered into, using the Options Tab. The final step will only appear if the user is generating new accounts. If no configurations options are set for the new pre-paid account record, the account will be created anyway and the user will have to update these settings manually for each account before it can be activated, so it is best that the user fills out all the options on this Tab.
-
Select the Database search button in the 'Account Type' field to select a pre-paid account type. These account types are configured using the Account Setup window, accessed from the Tools menu (or the program Toolbar).
-
Use the 'Starting Date' and 'Ending Date' fields to configure the Date Range for the account. These fields indicate when the account becomes active and when it will expire (become inactive) with a 0 balance. These dates will also be used for searching, filtering, reporting, and calculating the amortized payment schedule.
-
Use the Database search button in the 'Default Expense GL Account' to select a GL Account for the transactions that will occur during the active period of the pre-paid account.
-
Select either the 'Daily', 'Weekly' or 'Monthly' radio option in the Amortization Periods section. The option selected will be used to calculate the number of payments, the amount per payment, and then generate records into the payment schedule.
Most users will use 'Monthly', some will use 'Weekly', and a few may use 'Daily'. If the 'Weekly' or 'Monthly' option is selected, the 'Pay Every' field must be set. If 'Weekly', you must indicate the day of the week to make payments on. If 'Monthly', you must indicate a day of the month to make payments on. For example: 'Pay every - Monday' will generate a schedule where weekly payments entries are created for every Monday over the life of the account.
-
The user will then select the 'Import' button to process the data into new accounts or updates and close the wizard.
How do I Reassign a Pre-Paid Account?
Sometimes the Resource a pre-paid account is assigned to may need to be changed.
-
If an account must be reassigned the user will go to the account by using the record navigation buttons, find / search function, or by double-clicking on the account number in the List View Tab to jump to the record in the Account Tab. The user will then change the value in the 'Assign To' field so that the record is now assigned to a new Resource. The user will then save the edit to the record.
-
Changing the account assignment will force a status update to the account to 'Hold', so a window will appear where a user can supply a comment to store in the status change record which will be displayed in the Status Change Tab.
-
The user must then recalculate the payment schedule for the account so that the payment records are updated to show the updated 'Assigned To' Resource. After the payment schedule is recalculated, the account can then be marked 'Active' again. The user will not be allowed to mark the account as 'Active' until the payment schedule is recalculated.
How do I Change Pre-Paid Account Starting and/or Ending Dates?
Sometimes the 'Starting Date' or 'Ending Date' for a pre-paid account was not set up correctly when the account was created.
-
If payments have already been posted to the GL for the account, the field will be locked and the user will not be allowed to edit the account 'Starting Date' value. If payments from the calculated payment schedule have not been posted, the user can change the 'Starting Date' to any value after the date of the original purchase.
-
When the user saves the edit to the record, the status of the account will automatically be forced to 'Hold', so a window will appear where the user can supply a comment to store in the status change record which will be displayed in the Status Change Tab.
-
The user must then recalculate the payment schedule for the account so that it generates a payment schedule based on the new 'Starting Date'. After the payment schedule is recalculated, the account can be marked 'Active' again. The user will not be allowed to mark the account as 'Active' until the payment schedule is recalculated.
-
Changing the account 'Ending Date' does not have exactly the same posting restriction as the 'Starting Date'. The user can change the 'Ending Date' to any value after the given 'Starting Date', or if payments have already been posted to the GL, any value after the last posted payment.
-
Changing the account 'Ending Date' value and then saving the edit will also force the status of the account to 'Hold'. As with other status changes, a window will appear where the user can supply a comment to store in the status change record. The user must then recalculate the payment schedule based on the new date and then mark the account as 'Active'. The user will not be allowed to mark the account as 'Active' until the payment schedule is recalculated.
Menu Bar / Toolbar
File Menu
Import From A/P
 Selecting this option will open the Import Account window, which will allow you to import Accounts Payable transactions from other TruckMate modules into a previously existing pre-paid account, or into a new pre-paid account.
Create Account
 Select this option to create a new pre-paid account. You can also access this option via the standard TruckMate Navigation Bar.
Save
 Select this option to save the changes you have made to a new (or existing) pre-paid account. You can also access this option via the standard TruckMate Navigation Bar.
Cancel
 Select this option to cancel the changes you have made to a new (or existing) pre-paid account, reverting it to its previous state. You can also access this option via the standard TruckMate Navigation Bar.
Delete Account
 Select this option to delete the displayed pre-paid account. You will be asked to confirm before the deletion occurs. You cannot delete a record while it is being edited.
Mark Active
Selecting this option will attempt to set the current pre-paid account record to 'Active' status. A window will appear where the user can supply a comment to appear in the status change record showing when the account was flagged as 'Active'. The user can click on the 'Cancel' button if necessary.
Selecting the 'OK' button will confirm the change and update the account status. See the Account Tab for more information about what accounts can be marked 'Active'.
Mark Inactive
Selecting this option will attempt to set the current pre-paid account record to 'Inactive' status. A window will appear where the user can supply a comment to appear in the status change record showing when the account was flagged as 'Inactive'. The user can click on the 'Cancel' button if necessary.
Selecting the 'OK' button will confirm the change and update the account status. See the Account Tab for more information about what accounts can be marked 'Inactive'.
Hold Account
Selecting this option will set the currently displayed pre-paid account’s status to 'Hold'. When the status of an account is uncertain, that account may need to be set to 'Hold'' so that it will not be included when payments are processed.
See the Account Tab for more information about what accounts can be marked 'Hold'.
Make Adjustment
To create an adjusting entry, the account to be adjusted must be highlighted in the accounts grid. Only one account may be highlighted to create an adjustment for at a time. The user will then click on the 'Make Adjustment' menu item to open a form which captures the adjustment details. When the adjustment is entered, it will appear in the payment history / schedule to be processed just like a normal payment.
Calculate Payment Schedule
The 'Calculate Payment Schedule' function has two modes:
-
The 'Selected' mode will (re)calculate the schedule for only the currently visible account in the Account Tab (if the user is on the Account Tab), or for only those accounts which have been marked as selected on the List View Tab (if the user is in the List View). If the currently visible account is not an 'Active' or 'Hold' account, the function will not be enabled. If the user is on the List View Tab, if any of the selected accounts are not 'Active' or 'Hold', the function will not be enabled.
-
The 'All' mode will recalculate the schedules for all eligible records included by the current filter, whether they are selected or not. If no filter is applied, the function will not be enabled.
When the schedule is calculated, the user will be able go to the Schedule Tab in the lower half of the main screen and see a listing of payments for the Account based on the 'Starting Date', 'Ending Date', 'Amortization Period', and 'Account Balance'. The listing will also include an entry showing how the opening balance was posted into the accrual account. Each payment will be in an 'Unapproved' status.
If the schedule is recalculated after some payments have already been processed, the recalculation function DOES NOT delete or change the already posted payments. It will calculate the schedule based only on the remaining balance and periods.
Process Payments
If processing payments for one account, the user must be in the Account Tab viewing that account before proceeding. If processing payments for multiple accounts, the user must be in the List View Tab before proceeding.
The user will then go to the Process Payments menu item and click on Report. This will open the Posting Reports preview screen. Each report will show information about the account or accounts selected for posting. The first report will be a summary listing of payments to be processed: displaying each account number, account type, the resource each account is assigned to (if applicable), each payment (or adjustment) amount, and each transaction date. The second report will show the GL journal entries which will be generated when the payment (or adjustment) is posted. The user will be allowed to print either report to review before actually posting the payment. If all is well, the user will close the report preview screen and return to the main screen.
The user will then go back to the Process Payments menu item and click on Post. This will open the Posting Reports preview again. This time an audit number will appear in the report. This number will be stamped into the payment transaction and the resulting GL journal entries to link them together. When the user closes the second report window, the payment transaction will be updated to Posted and locked and the GL journal entries will be generated.
| These reports will be system reports using the Quick Reports module (not Crystal) and will therefore be non-editable. |
Print Reports
 Selecting the Print Reports button will bring up the report selection window, common to many TruckMate applications. Here, you will select a report file from those available in your system and a Crystal Report will be generated.
For more information on Report functionality in TruckMate, see the Crystal Reports Reference.
Exit
 Selecting this option will close the Pre-Paid Accounts program.
Multi-Company Menu
For more information on the Multi-Company options available from the Menu Bar, see the Multi-Company documentation.
Navigate Menu
The Navigate Menu contains the normal TruckMate Navigation Bar, used to browse through your Database records.
Find
 Click this button to search for a specific Pre-Paid Account record using a variety of criteria.
Tools Menu
TruckMate Monitor
 Click the down arrow next to this button to access the various functions of the new TruckMate Monitor.
Remember Position / Size
Select this option to retain window size and position upon exit. When the program is re-opened, it will maintain its previous appearance.
Account Type Setup
![]() Selecting this option will open the Account Type Setup window, which allows you to configure the Pre-Paid Account Types that will be used when creating new Pre-Paid Account records.
Selecting this option will open the Account Type Setup window, which allows you to configure the Pre-Paid Account Types that will be used when creating new Pre-Paid Account records.
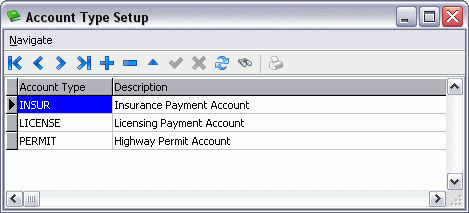
Select the '+' button to begin creating an account. Enter an 'Account Type' and 'Description' value for each Account Type you wish to create, then close this window.
These records are accessed by the 'Acct Type' field on the Account Tab when creating new pre-paid account records.
Help Menu
TruckMate Help
 Selecting this button will open the Pre-Pad Accounts topic in the TruckMate Online Help file (the page you are currently viewing).
Service Portal
 Selecting this button will open an instance of your default Internet browsing software, with the https://www.tmwcare.com login page displayed.
About
 Selecting this button will open the standard TruckMate About window, which contains important information about the application you are currently using, including its version number (important for support calls).
Toolbar
Select Filter
The Select Filter drop-down menu is used to select a previously created pre-paid account Filter (set up using the 'Filter Setup' option below). Once you select a Filter, it will be applied against the pre-paid accounts in your system, which will then be displayed on the List View Tab.
Filter Setup
![]() Selecting this option will open the Filter Setup window, which allows the user to enter SQL statements that will be used to filter the available pre-paid accounts in the system. For more information, see the SQL Filter window documentation.
Selecting this option will open the Filter Setup window, which allows the user to enter SQL statements that will be used to filter the available pre-paid accounts in the system. For more information, see the SQL Filter window documentation.
Clear Filter
Selecting this option will clear any applied Filter, removing all records displayed on the List View Tab as well.
Account Tab
The Account Tab displays existing pre-paid account records which are included in the currently selected filter. The top part of the Account Tab is a form that gives the user access to the currently selected account record. Users can edit the account record itself or go to the bottom half of the Account Tab to access more detailed information about the account in five sub-tabs: Schedule, Status, User, Notes, and Audit.
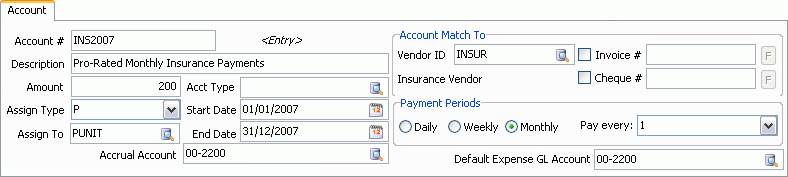
Account #
When creating a pre-paid account (i.e. the account is in 'Entry' status - see below), the user may enter the Account # of the account in this field.
Account Status
The text directly to the right of the 'Account #' field indicates the current status of the selected pre-paid account. Account Status Codes correspond as follows:
-
Entry: when an account is created, it will default to the 'Entry' status. Processing of payments for accounts in Entry status is not allowed. The account will not be included in most activity reports. Accounts cannot be manually set to the Entry status from any other status. Only 'Entry' Accounts can be deleted.
-
Active: processing of payments for the account is allowed. The account will be included in activity reports. During the life of an account, it will usually be in the 'Active' status.
New accounts where the account details have been properly filled in and a schedule calculated can be updated from 'Entry' to 'Active'.
Accounts manually put on 'Hold' (but not adjusted) can be manually moved back to an 'Active' status. Accounts which have been adjusted (see below) must have their payment schedule recalculated before they can be moved back to an Active status. Specifically, every 'Adjusted' status has to have a matching subsequent 'Schedule' status in the status history before the 'Hold' can be moved to 'Active'.
-
Hold: processing of payments for the account is not allowed. Accounts in 'Hold' status may or may not be included in activity reports.
'Active' accounts can be manually moved to 'Hold'. If the user edits values in key fields in the account record, the account will be automatically moved to 'Hold' (see below). Accounts will move from 'Hold' back to 'Active' or 'Inactive'.
-
Adjusted: a change was made to the account which requires the payment shedule to be recalculated. If the user:
-
Edits any one or more of these fields in the account record ('Account Type', 'Assign Type', 'Assign To', 'Starting / Ending Date', 'Payment Periods', or 'Expense GL'), or
-
Creates an adjusting entry which will change the current balance on the account
The program will automatically change the status of the account to 'Hold' and insert an Adjusted event record in the account status history. The result is an account in 'Hold' status with the last status event in the history as 'Adjusted'. The account cannot be moved from 'Hold' to 'Active' until the payment schedule is recalculated (see below).
-
-
Schedule: the payment schedule for the account has been (re)calculated. When the schedule has been (re)calculated for an account a 'Schedule' event record will be captured in the account status history, and the account moved to a 'Hold' status. The result is an account in 'Hold' status with the last status event in the history as 'Schedule'. The account can now be moved from 'Hold' to 'Active'.
Only accounts in the 'Entry' or 'Hold' status can have their schedule (re)calculated.
-
Inactive: the account now has a zero balance and is now closed. No further payments will be processed (there shouldn’t be any) and the account is locked from further editing. When the balance of the account is updated to '0' by posting the final payment or an adjustment, the account will be automatically moved to 'Hold'.
Description
Enter a short text descriptions of the selected pre-paid account record in this field.
Amount
Enter the opening balance of the pre-paid account.
Adjustments made to Pre-Paid accounts in the Invoice Entry program will be automatically added/deducted from the PPD amount. This match is made by 'PPD Account #' and associated 'Vendor'.
Acct Type
Use the search button to assign the selected Account with one of the available pre-paid account types in your system. Account Types are configured in the Account Type Setup window, available from the Tools menu.
Assign Type / Assign To
The 'Assign Type' field is used to select which TruckMate Resource that pre-paid account will be attached to. Once you have selected which type of Resource will be linked to the pre-paid account, use the 'Assign To' search button to choose a specific TruckMate Resource from those available for the selected Assign Type.
Start Date / End Date
These fields indicate when the account becomes active and when it will expire (become inactive) with a 0 balance. These dates will also be used for searching, filtering, reporting, and calculating the amortized payment schedule.
Accrual Account
Use the search button to select the TruckMate GL Account that will become the pre-paid account’s 'Accrual Account'. This GL Account will be used to record all accrual amounts.
Default Expense GL Account
Use the search button to select the TruckMate GL Account that will become the pre-paid account’s 'Default Expense Account'. This GL Account will be used to record all payment transactions.
Account Match To
This section shows the Vendor and the original Invoice or Check used to purchase the item tied to the pre-paid account.
-
Vendor ID
Use the Database search button to select a Vendor ID from your system. The Vendor’s name (as configured in the Customer & Vendor Profiles program) will appear below this field once it has been selected. -
Invoice #
If the pre-paid account was purchased using a specific Invoice, select the check-box and then use the 'F' button to select the Invoice record from your Database. -
Check #
If the pre-paid account was purchased using a specific Check, select the check-box and then use the 'F' button to select the Check record from your Database.
Payment Periods
The user must select one of the three options offered for an amortization period: 'Daily', 'Weekly', or 'Monthly'. The option selected will be used to calculate the number of payments, the amount per payment, and then generate records into the payment schedule.
Most users will use 'Monthly', some will use 'Weekly', and a few may use 'Daily'. If the 'Weekly' or 'Monthly' option is selected, the 'Pay Every' field must be set. If 'Weekly', you must indicate the day of the week to make payments on. If 'Monthly', you must indicate a day of the month to make payments on. For example: 'Pay every - Monday' will generate a schedule where weekly payments entries are created for every Monday over the life of the account.
Adjustments made to Pre-Paid accounts in the Invoice Entry program will be automatically added/deducted from the PPD amount. This match is made by 'PPD Account #' and associated 'Vendor'.
Schedule Tab
The Schedule Tab shows the history and planned activity for the selected pre-paid account, including the initial entry, any adjustments, and the pro-rated payment schedule.
GL Distribution Section
When the 'Show / Hide GL Transactions' button is selected, the GL distribution behind each transaction is displayed in the bottom grid. The distribution for the purchase transaction is created from the A/P invoice transaction and shows the posting to Accounts Payable and the accrual account. Distributions for payments will show the credit posting to the accrual and a debit to the Default Expense GL account indicated. Users can set a flag in the transaction record to indicate a manual override of the GL distribution ('Manual GL' option on Schedule Tab).
Status Tab
The Status Tab lists the status history for the account overall. Accounts will start in an 'Entry' status, move to an 'Active' status, and then are closed. During the life of the account it may be re-assigned, its details may be edited, its balance adjusted, and the schedule recalculated.
User Tab
The User Tab gives the user access to 15 fields where miscellaneous information about the account can be stored. 5 fields store 'text' values, 5 fields store 'numeric' values, and 5 fields store 'date/time' values.
Notes Tab
The Notes Tab is a simple text entry field that allows the User to enter any specific notes regarding the currently displayed pre-paid account.