Message Center

The Message Center program, effectively a replacement for the Driver Call-in program, allows your Dispatch personnel to communicate electronically with your Drivers, as long as the truck is fitted with a functional communication device, like a Cancom, Xata, D2Link, Omnitracs OnRoute or other such device.
The Message Center program now allows PING requests for PeopleNet and Omnitracs OnRoute network devices. To use this functionality you must set the 'AllowPing' option in the Application Configurator program > MESSAGECENTER.EXE section to an appropriate value.
|
To access Message Center:
| From this location | Go to |
|---|---|
TruckMate Menu and TruckMate Task List |
|
Windows Start Menu |
TruckMate 20xx > Message Center |
Windows Explorer |
C:\Program Files (x86) > TruckMate 20xx > Messagecentre.exe |
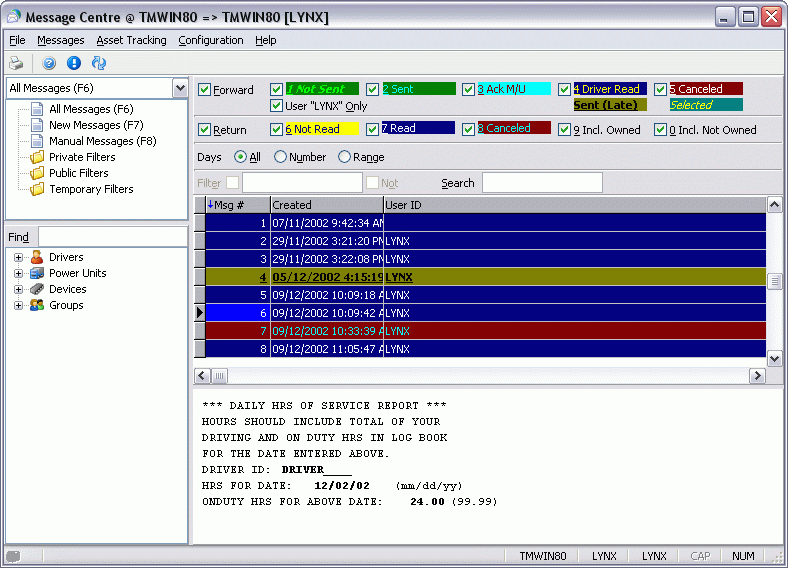
The program screen is built around the Message Grid area where you see both forward (outbound to Drivers) Messages and return (inbound from Drivers) Messages. You can set Message Filters to show only Messages with specific statuses or dates. You can also use the Toolbar to access various program configuration options, like toggling on/off various panes that offer more data, like the Message Preview Pane.
The Message Center program allows you to set preferences for incoming and outgoing Messages for each Trailer. First, ensure your power unit displays properly in the Message Center program. If it is not displaying, open the Mobile Device Maintenance program, select the '+' button, enter your Device ID information, select your Device Type from the list, attach your power unit and save the record.
Back in the Message Center program, select Power Units in the address bar and use your context menu to 'Refresh Address Book'. Your power unit should display in a sub-category of the Power Unit folder. You can refresh the Device folder as well, to view your device information.
Use your context menu again, and select 'New Message for resource'. A Message form will appear where you can enter your Message text. If you have macros set up, use the pull-down menu to select the macro of your choice. Save your Message and return to the Message Center main screen. You’ll notice the 'Refresh' button will blink, notifying the user that a change has been made. Clicking on the 'Refresh' button, in this instance, will cause your Message to display in the grid. Double-click on the Message to display the content. In other instances, when the 'Refresh' button blinks, the user can perform multiple actions, and refresh manually, rather than automatically refreshing after each operation.
Double clicking on any message will display the 'Message' window, where the details of the selected message will appear.
| For return messages, there is a macro field option 'Do Not Process', if this option was selected for a field when the macro was created, and the device transmitting the message is flagged as 'Training Mode', those fields with 'Do Not Process' flag is set to 'True' will appear in green color, to help the user identify those fields quickly when tracking and debugging a message. The purpose of the 'Do Not Process' flag is to skip the automatic processing of the flagged fields when the message is received from a device marked as 'Training Mode'. The 'Training Mode' option is set in Mobile Device Maintenance program > Device Tab. |
Menu Bar / Toolbar
File Menu
Print Preview
![]() Will preview the print out that will be generated when the User selects the 'Print' option from this menu or from the Toolbar.
Will preview the print out that will be generated when the User selects the 'Print' option from this menu or from the Toolbar.
![]() Will send the currently displayed Message to your Printer for printing. (Also available from the Toolbar).
Will send the currently displayed Message to your Printer for printing. (Also available from the Toolbar).
Exit
![]() Selecting this option will close the Message Center program.
Selecting this option will close the Message Center program.
Multi-Company Menu
For more information on the Multi-Company options available from the Menu Bar, see the Multi-Company documentation.
Messages Menu
New Message
![]() Opens a dialog window where you can create a new Message. When creating a new PeopleNet message, you have the option of selecting a specific kind of 'Reply' Form that must be used, as well as specifying the message as 'Urgent' or not.
Opens a dialog window where you can create a new Message. When creating a new PeopleNet message, you have the option of selecting a specific kind of 'Reply' Form that must be used, as well as specifying the message as 'Urgent' or not.
Read Message
![]() Selecting this button will allow the user to read the Message in a new window.
Selecting this button will allow the user to read the Message in a new window.
Resend Message(s)
![]() Selecting this option will Re-send the selected Message(s).
Selecting this option will Re-send the selected Message(s).
Cancel All Late Message(s)
Selecting this option will apply the 'Cancel' status to all Messages with 'Late' status.
View Original
![]() Selecting this button will allow the user to view the original Message.
Selecting this button will allow the user to view the original Message.
Reply to Message
![]() Selecting this button will allow the user to reply to the Message.
Selecting this button will allow the user to reply to the Message.
Message History
![]() Selecting this button will allow the user to view Message history.
Selecting this button will allow the user to view Message history.
Refresh
![]() Refreshes the message screen to receive any recently sent messages.
Refreshes the message screen to receive any recently sent messages.
Asset Tracking Menu
Ping Resource
![]() Opens the 'View Location Details' window. See the Toolbar Details section below for more information.
Opens the 'View Location Details' window. See the Toolbar Details section below for more information.
Tracking…
![]() Selecting this button will bring up the Asset Tracking dialog box. See the Toolbar Details section below for more information.
Selecting this button will bring up the Asset Tracking dialog box. See the Toolbar Details section below for more information.
View Location
Selecting this button will allow the user to view location details for a resource. The View Location window allows the user to search on specific location dates and plot the route on the map.
| You can use the 'Next 10' and 'Last 10' buttons to browse the location entries. |
Configuration Menu
Show/Hide Filter Grid
![]() This is a toggle button allowing the user to select whether to display 'All', 'New', and 'Manual' Messages, plus 'Private', 'Public', and 'Temporary' filters.
This is a toggle button allowing the user to select whether to display 'All', 'New', and 'Manual' Messages, plus 'Private', 'Public', and 'Temporary' filters.
Show Addresses
![]() This is a toggle button allowing the user to select whether to display 'Drivers', 'Power Units', 'Devices', and 'Groups'.
This is a toggle button allowing the user to select whether to display 'Drivers', 'Power Units', 'Devices', and 'Groups'.
Show Preview
![]() This is a toggle button allowing the user to select whether to display the Message preview screen, which is displayed beneath the Message Grid window.
This is a toggle button allowing the user to select whether to display the Message preview screen, which is displayed beneath the Message Grid window.
Preferences
![]() Selecting this button will bring up the Message Centre Preferences dialog box where a user can modify preference settings. For more information see the Toolbar Details section below.
Selecting this button will bring up the Message Centre Preferences dialog box where a user can modify preference settings. For more information see the Toolbar Details section below.
Configure Filters
![]() Selecting this button will bring up the Filter Setup dialog box where the user can configure filters for each power unit and/or device on the system. For more information see the Toolbar Details section below.
Selecting this button will bring up the Filter Setup dialog box where the user can configure filters for each power unit and/or device on the system. For more information see the Toolbar Details section below.
Auto-Read Messages
This is a toggle button allowing the user to select whether to display the auto-read feature. Once the 'Auto-Read' feature is enabled, and you select the 'Auto-Read' button from the toolbar, you’ll be able to view the Timer features, which are your preferred settings for the time length (in seconds) a Message is open and then marked 'Read'. Use the pull down menu to adjust the Timer Features:
Tools Menu
TruckMate Monitor
![]() Click the down arrow next to this button to access the various functions of the new TruckMate Monitor.
Click the down arrow next to this button to access the various functions of the new TruckMate Monitor.
Remember Position / Size
Selecting this option will save the window position and size upon close. When the program is opened again, the window will appear exactly as before.
IDSC Expert Fuel Advice / IDSC Fuel Request / IDSC Netwise
Selecting these options will open their (respective) external application (if available).
Help Menu
TruckMate Help
![]() Selecting this button will open the GL Reconciliation topic in the TruckMate Online Help file (the page you are currently viewing).
Selecting this button will open the GL Reconciliation topic in the TruckMate Online Help file (the page you are currently viewing).
Service Portal
![]() Selecting this button will open an instance of your default Internet browsing software, with the https://www.tmwcare.com login page displayed.
Selecting this button will open an instance of your default Internet browsing software, with the https://www.tmwcare.com login page displayed.
About
![]() Selecting this button will open the standard TruckMate About window, which contains important information about the application you are currently using, including its version number (important for support calls).
Selecting this button will open the standard TruckMate About window, which contains important information about the application you are currently using, including its version number (important for support calls).
Toolbar
Refresh current Message View
![]() Selecting this button will allow the user to refresh the current Message view. A spinning 'Refresh' button notifies the user that a change has been made, and that clicking the 'Refresh' button is required. Refreshing the information allows the user to perform multiple actions, and to refresh manually, rather than automatically refreshing between each operation. Also, clicking on the 'Refresh' button, in some instances, will cause your Message to display in the grid. Double-click on the Message to display the content.
Selecting this button will allow the user to refresh the current Message view. A spinning 'Refresh' button notifies the user that a change has been made, and that clicking the 'Refresh' button is required. Refreshing the information allows the user to perform multiple actions, and to refresh manually, rather than automatically refreshing between each operation. Also, clicking on the 'Refresh' button, in some instances, will cause your Message to display in the grid. Double-click on the Message to display the content.
Message Filters
Automatic Filtering
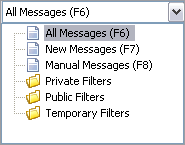
Use the pull down menu (or displayed shortcut key) to select an Automatic Filter option. Available options are: 'All Messages (F6)', 'New Messages (F7)' and 'Manual Messages (F8)'. These options, when chosen, will automatically alter the options found in the Manual Filtering section below.
You can create Custom Filters and place them in one of the three displayed folders here ('Private', 'Public' and 'Temporary' Filters). To do this, see the Configure Filters documentation below.
Manual Filtering
The Message Filters displayed above the Message Window allow you to manually Filter which Messages will appear in the Message Window. This Section also works in conjunction with the pre-set Filters selectable from the Filter Grid section in the above section.

Forward
Not Sent
The Message has not been submitted to network.
Sent
The Message has been submitted to network.
Ack M/U
The Message has been acknowledged by the mobile unit, and the device has received the Message.
Driver Read
The Driver has read the Message.
Cancelled
The Message has been cancelled.
User '<Username>' Only
When this is selected, only Messages created by the current User will display. When not selected, all forward Messages will display.
Return
Not Read
The Message has not been read.
Read
The Message has been read.
Cancelled
The Message has been cancelled.
Include Owned
Messages addressed to the user currently logged in.
Include Not Owned
When a Message comes in that may not be addressed to the current user, but access is still desired, these Messages would be referred to as 'not owned'.
Days
All
Clicking the 'All Days' option will ignore the age of the Messages. No extra options will be displayed to the right side of the radio button field.
Number
Clicking the 'Number of Days' option will Filter the Messages for a certain number of days. A 'Number of Days' field will appear, and you can change the amount by using the small 'Up' and 'Down' arrows.
Range
Clicking the 'Range of Days' option will Filter the Messages by a date range. Two date fields will appear the the right. Click the down arrows to select a date from the Calendar menu.
Filter
Check the Filter checkbox and then use the pull down arrow to select a Custom Filter to apply to the Message Grid.
Search
Enter a text string that you would like to search for within the Message Grid. When you type your 'Enter' key, the record that most closely matches your text string will be highlighted.
Filtering out PING Requests
When a ping request is sent, it returns an 'A' Acknowledge status to message center. The driver does not read ping requests, which keeps ping messages in Acknowledge status all the time. When a dispatcher is trying to track unread messages, ping requests constitute a large chunk of what the dispatcher needs to sift through. To make the process easier for dispatchers, you can filter out ping requests from the rest of the messages. To do so, set the application configuration option in Application Configurator Program > Mobile Communication > MESSAGECENTER.EXE - FilterOutPING to 'True'. The default value is set to 'False'.
Message Grid
Messages to your Drivers and from your Drivers appear in the Message Grid. This offers the advantage allowing you to follow a conversation between a dispatcher or dispatchers and a Driver. The Message Grid will pre-populate based on your Filter preferences.
Msg #
Each Message is automatically given a number. Message numbering ascends starting from number 1.
Created
Displays the date and time the Message was created.
User ID
Displays the user ID who created the Message.
Group
Displays the Group ID, if applicable.
Driver
Displays the Driver name this Message was addressed to, if applicable.
Power Unit
Displays the Power Unit this Message was addressed to, if applicable.
Device ID
Displays the Device ID this Message was addressed to, if applicable.
Status
Displays the sent/received status. NS (not sent), NR (not read).
Network
Displays the network type.
Location Comment
Displays any location comments.
Latitude
Displays the latitude of item, if applicable.
Longitude
Displays the longitude of item, if applicable.
Read By
Displays who the Message has been read by, if applicable.
Macro Name
Displays the macro name, if applicable.
Replied To By
Displays who has replied to the Message, if applicable.
|
You can quickly view the Messages listed in this window by double clicking them. You can access a Debug window (that shows how the Macro is being interpreted) by selecting a message from the Message Grid and using the <Ctrl><Alt><Shift><D> keyboard combination. |
Context Menu
View Message
Opens the selected Message in a new dialog window, including the Message details ('Msg Number', 'date', 'Driver', etc.). You can also View a Message by double clicking it in the Message Grid window.
New Message
Opens a dialog window where you can create a new Message.
Resend Message(s)
Selecting this option will Re-send the selected Message(s).
Cancel Message(s)
Selecting this option will cancel the selected Message(s).
Ping
Opens the 'View Location Details' window. See the Toolbar Details section below for more information.
Resend All Late Message(s)
Selecting this option will Resend all Messages with 'Late' status.
Cancel All Late Message(s)
Selecting this option will Cancel all Messages with 'Late' status.
Select 'Not Read'
This option will select all the Messages with a 'Not Read' status.
Select Late Sent
This option will select all the Messages with a 'Late Sent' status.
Select Unowned
This option will select all the Messages with an 'Unowned' status.
Clear Selection
This option will delete the selected Message(s).
View Original
Selecting this button will allow the user to view the original Message. This function is also accessible from the Toolbar.
Read Message
Selecting this button will allow the user to read the Message in a new dialog Window. If this option is used with a Cancelled message (X) status, the status changes to Cancelled / Read (XR) and the background color remains red.
Reply to Message
Selecting this button will allow the user to reply to the Message.
Thread This Message
Selecting this button will allow the user to view the Reply Thread this Message, which details all the Messages that have been associated with this one via Replies.
View Location
Selecting this button will allow the user to view the Location History for this Message. See the Toolbar Details section for more information.
Message History
Selecting this button will allow the user to view Message history.
Selecting this button will allow the user to print the Message.
Print Preview
Selecting this button will allow the user to preview the Message.
Driver Call-In
This option allows the user to open and access the Driver Call In program. This gives the user an faster and easier way of accessing Driver Call in information when needed rather than going through the traditional way of accessing the 'Driver Call In Program'.
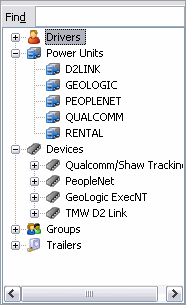
Address Book
The Address Book menu contains all the various Drivers, Power Units, Devices and Groups that can receive Messages from your Mobile Communication system, and provides a quick and simple way of browsing to the Messages related to these items. The Tree records that are displayed here can be configured from within the Preferences menu. See the Toolbar Details section below for more information.
Find
Enter a text string that you would like to search for within the Address Book Tree Menu. When you type your 'Enter' key, the record that most closely matches your text string will be highlighted. Use this feature to quickly highlight a Driver’s name, for example.
To navigate within the Address Book menu, simply click the '+' button next to a Tree Category, and the records within that 'Branch' will expand.
Clicking on a record, for example the Power Unit record of '3100' above, will Filter all Message in the Message Grid window to only those Messages that include the '3100' Power Unit in their details.
Drivers
When working with Drivers, you can hold the <Ctrl> key and left click multiple Drivers. With multiple Drivers selected, you can then use the various Context Menu functions to send Forward Messages to all the Drivers selected. If you attempt to send a Forward Message to a Driver with no attached Mobile Communications device, you will get an error message.
| With the introduction of OnRoute and D2Link into TruckMate, users now have the ability to assign Mobile Units to Drivers only if they are OnRoute/D2Link units. |
Trailers
Trailers that are configured as Trailer Tracks units will be displayed here. To setup a Trailer as a Trailer Tracks Trailer, you must attach a Omnitracs Trailer Tracks device to one of the Trailers in your system in the Mobile Device Maintenance program. Once you have Trailer Tracks Trailers available on the address book, you can right-click them to access a number of functions specific to Trailer Tracks: such as 'Ping Resource' and 'View Reefer Events'.
Context Menu
More Info
Brings up a dialog box offering more detailed information on the selected item.
New Message for Resource
Brings up the Message form.
Ping Resource
Brings up the Message form. This option is used to locate a device. It forces the device to report its current location (via GPS or other similar technology), and will track the request until an answer comes back. This data is then available via the TruckMate API, where third-party software (such as SkyBitz) can access it.
| Not all Device Types are capable of performing a 'ping' operation. |
Create Filter for Resource
Configures a filter for this resource. To make modifications to the filter, press '<Ctrl><F>' or the Configure Filters icon on the toolbar.
Show Manual Messages
Displays any manual Messages associated with this item.
View Location
You can right-click a Mobile Device in the Address Book and select this option to access the View Location of Device window. You may also right click Drivers to access this option: this will do a lookup to MOBILE_DEVICE.ASSIGNED_TO and then get the Position records if there is a match.
When working with a Trailer Tracks Trailer, you can select this option to get the last known location of the Trailer as provided by the Trailer Tracks system.
| Drivers on the PeopleNet/Omnitracs networks will not have this ability, since they are assigned mobile devices by Power Unit. |
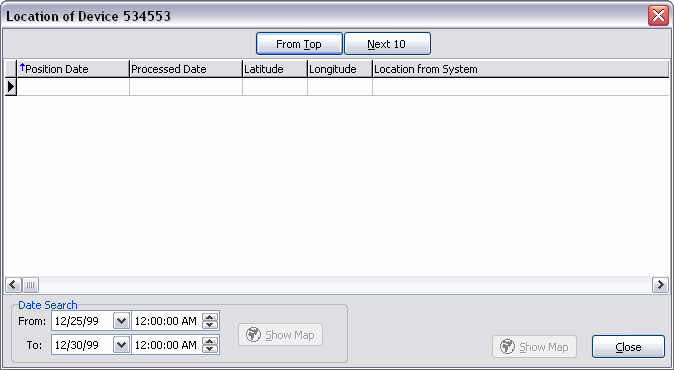
The Location History of Device <Device ID> window will list 10 of the most recent position updates from the selected Mobile Device (or Device attached to a particular Driver). There are several controls that you can use to access older position records:
-
From Top
Select this button to get the 10 most recent position entries from the Device. -
Next 10
Selecting this button will grab the 10 next (older) position entries from the Mobile Device. -
Date Search
Entering a Date Range in the 'From' and 'To' fields will allow the Location History window to display more than 10 records. After defining a Date Range and pulling up any number of records, the user can select the 'Show Map' button in the Date Search section to show all the displayed position records within the Date Range on the Mapping window. This is unlike the normal 'Show Map' button (next to the 'Close' button on the form), which only displays 10 records at a time on the map. -
Show Map
The normal 'Show Map' button (next to the 'Close' button) will open a Mapping window that will display the 10 listed position records from the Location of Device Grid.
Print Reports
This option is available when selecting Drivers, Power Units or Mobile Devices, and will display the default report for that resource. Two new default reports are POSITION_HISTORY.RPT (for Mobile Devices) and MESSAGE_HISTORY.RPT (for Drivers or Power Units). The default parameters for these reports are listed below, and will be automatically passed to the Crystal Report based on the selected resource. Users can customize the default reports to their functional demands.
-
Position History Report
-
Parameters: 'Date Range' / 'Mobile Comm Device ID'.
-
Data gathered from POSHIST table.
-
-
Message History Report
-
Parameters: 'Date Range' / 'Power Unit' or 'Driver'
-
Data gathered from MESSAGE_FORWARD and MESSAGE_RETURN tables.
-
|
The Macro data out of these tables cannot display macro labels (i.e. "Label Freight Bill#:" will show as #FIELD:001). If other listed parameters exist in the report, they are set to '%' (wildcard/all). For example: the Message History report contains a 'Driver' and 'Power Unit' parameter. If you load the report by right-clicking a 'Diver ID', the 'Driver' parameter is set to that 'Driver ID' and the 'Power Unit' parameter is set to '%'. |
For more information on Crystal Report functionality in TruckMate, see the Crystal Report Reference section.
View Reefer Events
Selecting this option will open the Reefer Events window, which will show the Reefer Events for the selected Trailer.
The database grid will only show 10 rows of the events at a time. The data is sorted by the most recent Reefer Events to the oldest. The user can navigate between the records by clicking the 'From Top' and 'Next 10' buttons.
| Field | Definition |
|---|---|
Event Time |
Details the last time reefer controller communicated with T2T. |
Event Type |
Shows the type of Reefer Event that was inserted into TruckMate. Refer to Event Type table for a list of Event Types |
Zone |
Reefer temperature control Zone ID. Possible values include: 'Reefer Zone 1', 'Reefer Zone 2', 'Reefer Zone 3'. |
Operating Status |
Reefer operating status. See below for a list of Operating Status values.
|
Set Temp |
Reefer zone set point temperature in units of Celsius or Fahrenheit based on the publishing company’s preferences. Temperature expressed in signed degrees. |
Ret Temp |
Reefer zone return temperature in units of Celsius or Fahrenheit based on the publishing company’s preference. Temperature expressed in signed degrees. |
Sup Temp |
Reefer zone supply temperature in units of Celsius or Fahrenheit based on the publishing company’s preference. Temperature expressed in signed degrees. |
Targ Temp |
Reefer zone target temperature in units of Celsius or Fahrenheit based on the publishing company’s preference. Temperature expressed in signed degrees. |
Reefer Type |
Shows the Reefer unit manufacturer/type. Possible values include: 'ThermoKing', 'Carrier (Standard)', 'Carrier (Advance)'. |
Reefer Mode |
Displays the Reefer Mode. See below for a list of Reefer Mode values.
|
Engine Hours |
Shows the Reefer units engine hours. |
OEM Alarm Severity |
The most critical (severe) alarm category present across all OEM Reefer alarms. Each type of alarm may be assigned to a specific category, which indicates its severity relative to other alarms and their respective categories. Possible values: 'None', 'Check', 'Cautionary', 'Critical', 'Shutdown'. |
Temp Range Alarm |
Reefer temperature out of range alarm state. Possible values: 'False' (alarm condition cleared or not present) and 'True' (alarm condition present). |
Set Point Alarm |
Reefer set point alarm state. Possible values: 'False' (alarm condition cleared or not present) and 'True' (alarm condition present). |
Low Fuel Alarm |
Reefer low fuel alarm state. Possible values: 'False' (alarm condition cleared or not present) and 'True' (alarm condition present). |
Alarm Code Num |
Alarm Code number. Values range from 0 - 255. |
Alarm Code Desc |
Alarm Code description. |
OEM Alarm Severity Lvl |
The OEM reefer alarm severity level. See below for a list of values.
|
Sensor Event |
The reefer sensor condition that triggered the event. Possible values: 'Return Normal', 'Return Over', 'Return Under', 'Supply Normal', 'Supply Over', 'Supply Under'. |
Latitude / Longitude |
Current Latitude / Longitude of the Trailer. |
Location from System |
TruckMate’s calculated location of the Trailer. |
Location from Network |
Omnitracs’s landmark location of the Trailer. |
Show Map |
The Show Map button will plot all the displayed locations on a third party map. Note: Third party mapping software will have to be installed on the workstation in order to plot the points on a map. |
View Trailer Sensor History
Selecting this option will open the Trailer Sensor History window for the selected Trailer ID. The Trailer Sensory History window lists all available Sensor events for the selected Trailer ID. You can use the 'From Top', 'Next 10' and 'Prev 10' buttons to sort the records if there are many.
The user can also select the 'Show Map' button to plot the locations of the events on a map. Third party mapping software like (such as PC*Miler) is required to plot the locations on the map.
Refresh Address Book
Refreshes the address book data.
Driver Call-In
This option allows the user to open and access the Driver Call In program. This gives the user an faster and easier way of accessing Driver Call in information when needed rather than going through the traditional way of accessing the 'Driver Call In Program'.Toolbar Details
Request Location and/or Pending Data
The New Message window will display when you choose the 'Request Location and / or Pending Data from Device' option from the Toolbar or if you choose the 'Ping' option from the Context Menu. Click the 'Save' button when you are done to Save any changes made.
Before creating the New Message, you will be asked to choose a Destination for the message using the Select a Destination for the Message window:
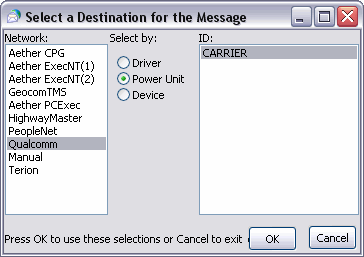
Network
Select the Mobile Communications Network you wish to send a message on from the 'Network' group options.
Select By
Select from either 'Driver', 'Power Unit' or 'Device' to limit the options in the 'ID' field. If you select 'Driver' for example, only those Drivers with Mobile Communications devices matching the 'Network' you have chosen will appear.
ID
Select the Resource ID that you wish to send the new message to, then select the 'OK' button to open the New Message Window.
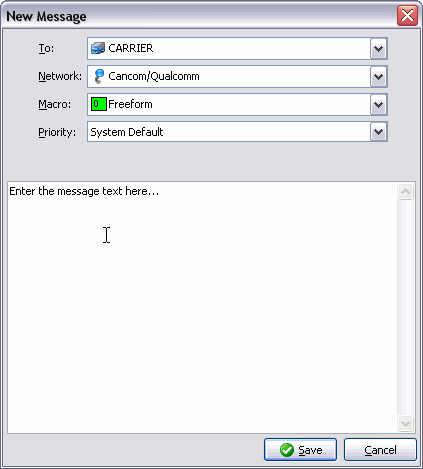
To
(Previously assigned on the 'Select a Destination for this Message window). If you require, you may use the pull down menu bar to choose from the available 'To' options, if there is more than one setup for this Message.
Network
(Previously assigned on the 'Select a Destination for this Message window). If you require, you may use the pull down menu bar to choose from available 'Network' options, if there is more than one setup for this Message.
Macro
Use the pull down menu bar to choose from available 'Macro' options, if there is more than one setup for this Message.
Priority
Use the pull down menu bar to choose from available 'Priority' options. Available values are: 'System Default', 'Normal', 'Important', 'Sleepy', 'Sleepy Important', 'Normal', 'Sleepy' and 'Emergency'.
Asset Tracking
The Asset Tracking window allows you to quickly see a list of all Assets being used by the Message Center program. You can set up Filters for the records in the top section of the window, and the records will be displayed automatically in the Grid below. A message preview window is displayed on the bottom of this window, which will display a Message preview of the selected detail line in the Grid.
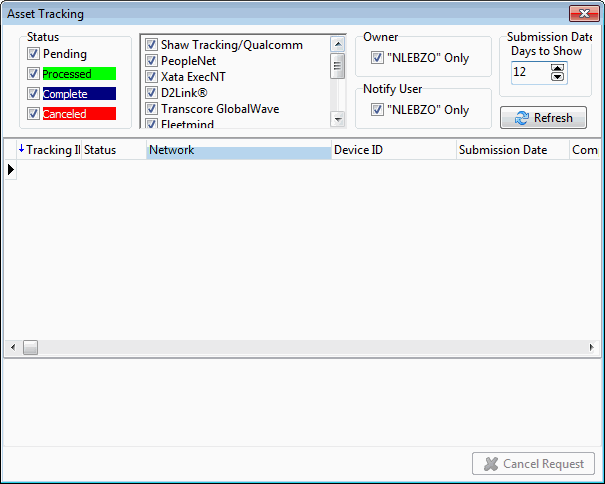
The top section of this dialog window is dedicated to providing Filters for ease of use in displaying the detail lines in the window below.
Status
This section allows Filtering by Message Status. Available values are: 'Pending', 'Processed', 'Complete' and 'Canceled'.
Network
This section allows Filtering of the detail lines by the Network used to process the Message. Available options are: 'AirIQ', 'Omnitracs', 'ExecNT (1)' and 'ExecNT (2)'.
Owner
This section allows Filtering based on the Username of the User currently logged into the Database. Select this option to limit the records to those 'Owned' by the current User (in the above example, the 'LYNX' User).
Notify User
This section allows Filtering based on the Username of the User that the Message was sent to. Select this option to limit the records to those that were to 'Notify' a selected User (in the above example, the 'LYNX' User).
Days to Show
Filters the detail lines by a set amount of days. Use the 'Up' and 'Down' arrows to change the integer value displayed within the field.
Refresh
Click the Refresh button in the top-right section of the window to Refresh the detail lines based on any Filter changes you may have made.
View Status Change History
The Message History window displays a History of any Status Changes associated with the selected Message.
Change Preferences
Selecting this button (or pressing CTRL+J) opens the Message Center Preferences window.
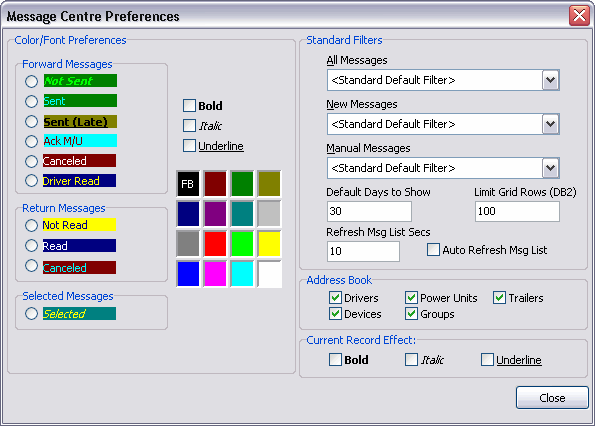
Color / Font Preferences
These settings adjust how Message detail lines are displayed in the Message Grid Window. To change a color value for a selected Message category (as listed in the 'Forward Messages', 'Return Messages' and 'Selected Messages' sections on this screen) simply select the radio option of the Message Type you would like to alter color values for, then choose the values you would like to use.
Bold / Italic / Underline
Check the option(s) that you would like to apply to the selected Message Type.
Color Palette
To select a color value for the 'FG' (Foreground) and 'BG' (Background) of your Message Type, simply click the left mouse button ('FG') and right mouse button ('BG') on the color you would like to use.
Standard Filters
You can change the Default Filter value for three types of Messages here ('All Messages', 'New Messages' and 'Manual Messages') by using the pull down menu option and selecting a Filter value.
Default Days to Show
Enter an integer value in this field. Messages from the last '30' days will be displayed (in the above example). The integer amount you enter will determine how many Messages are displayed.
Limit Grid Rows (DB2)
This value determines how many Messages will be allowed to be displayed to the Message Grid window. The default setting is '100', but you may change this to another integer value by typing a number into this field.
Refresh Msg List Secs
This value is the amount of seconds that the GL Reconciliation will check for new Mobile Communication messages. Default is set at 10 seconds.
Auto Refresh Msg List
If new messages are found and this option is checked, the GL Reconciliation program will automatically refresh the message list with the new message.
Configure Filters
You can open the Filter Setup window by pressing CTRL+F.
Upon opening the Filter Setup window, notice the Legend of 'Checked', 'Unchecked', and 'No Change'. Click the '+' button to add a new filter.
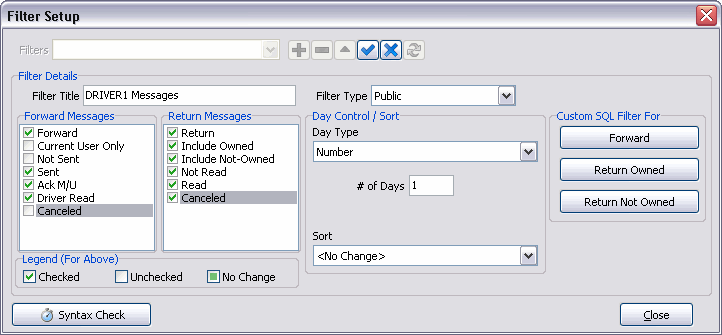
Filters
Use the pull down menu to see a list of available Custom Filters on the system. If there are no Filters in this menu, you must create some by selecting the '+' button.
Filter Details
Filter Title
Enter a descriptive Filter name in the field provided.
Filter Type
Use the pull down arrow to select Public (all users can view this filter), Private (only you can view this filter), or Temporary (viewable on this session only and deleted upon closure of the program).
Forward Messages
Select the Filtering options you would like to apply to 'Forward' Messages when using this Filter. Refer to the Legend if you do not understand what the different check values mean.
Return Messages
Select the Filtering options you would like to apply to 'Return' Messages when using this Filter. Refer to the Legend if you do not understand what the different check values mean.
Day Type
Use the pull-down arrow to make your selection. No change, All (all dates), Number (enter the number of days) Range (brings up a from/to date range selection box), Older NR (not read) Message date, Older NR/NS (not read/not sent) manual Message date. An example of the last day type- Older NR/NS manual Message date might be if not all of your trucks have functioning devices, you could use a manual Message. Then, if this Driver calls in, Dispatch could let him know that there is a Message waiting for him. You could check all of his Messages for him and ensure he’s received them.
Sort
Use the pull-down arrow to select your sort preference.
Syntax Check
Allows users to ensure the database understands the command.