Status Codes

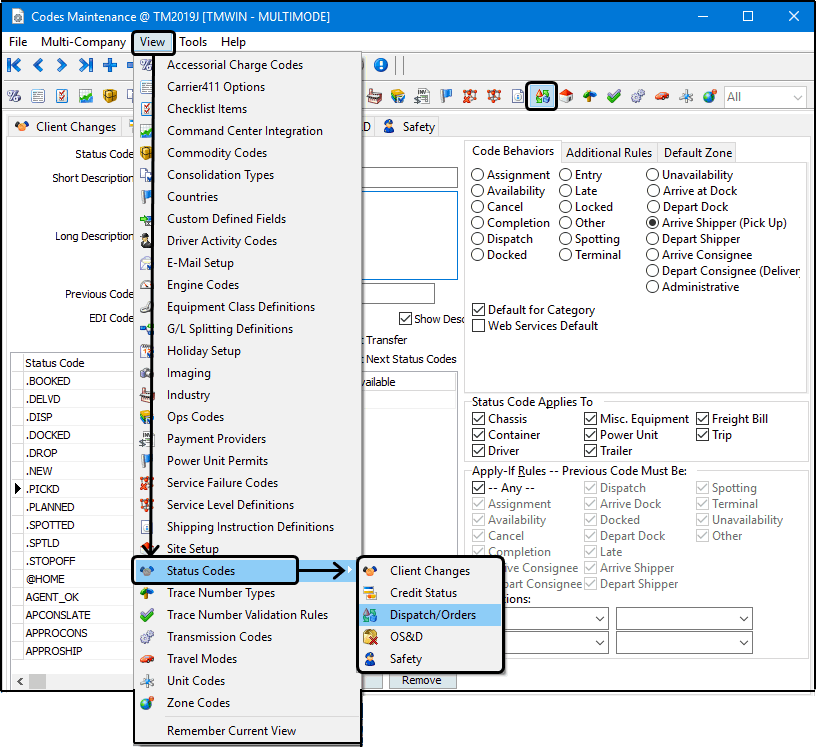
The tabs displayed on the Status Codes window can be accessed directly from the View menu > Status Codes sub-menu.
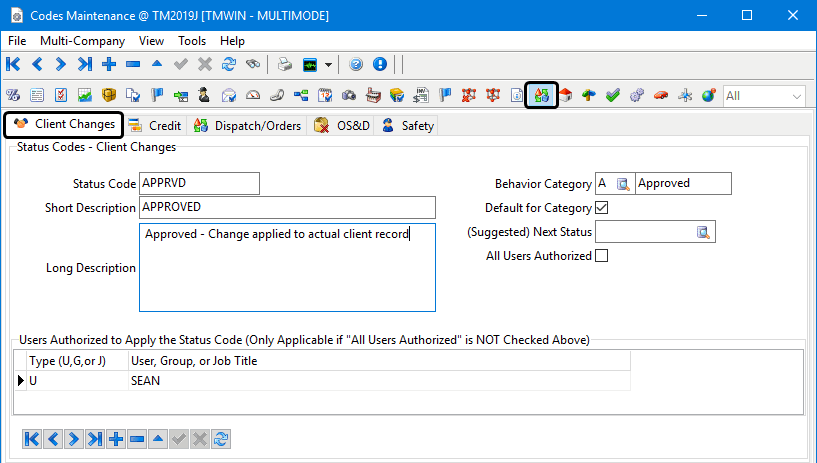
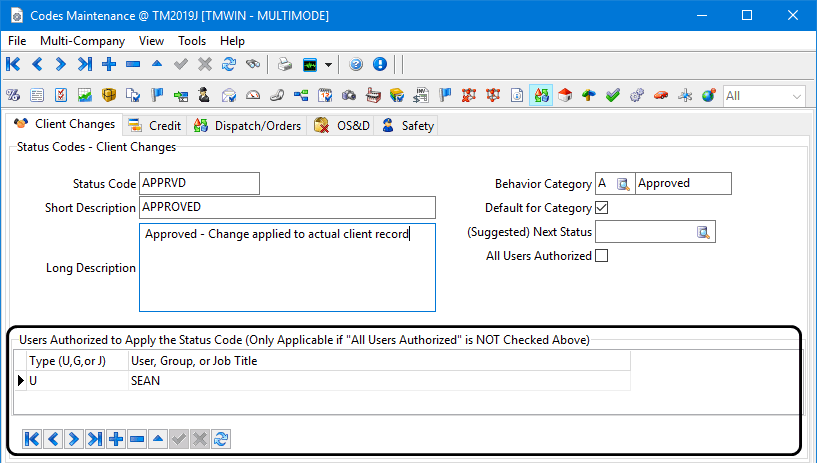
Status Codes - Client Changes
The Status Codes - Client Changes screen is only used when changes to the Client Profiles information must be audited, vetted and approved by someone before the changes are accepted and allowed to update the client profile information.
| The Status Codes - Client Changes tab is only displayed if the Application Configuration option for PROFILES.EXE > Audit/Vet Client Changes is set to B (Both Auditing and Vetting). |
The window consists of two sections, the header part which includes information defining the status code and a bottom grid listing the users who are authorized to apply the status code. TruckMate comes with pre-loaded status codes with a single status code per category but this window allows you to add more. For example, if you would like to add an additional type of rejection where more details of the reason for rejecting the request are required, you can create another status code for the 'Rejected' behavior category.
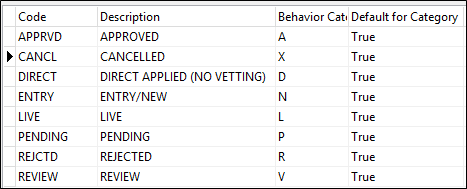
The list of default statuses for client profiles changes includes:
To create a new Client Change status:
-
Go to Profiles > Codes Maintenance > Industry tab
-
Make the appropriate entries in these fields:
Required field: *
Field Definition Status Code *
This is the value most commonly used and displayed by other programs. It can be up to ten characters in length. Because users perform Status changes by selecting Status Codes (rather than Status Code descriptions) it is important to make these Codes as descriptive as possible.
Short Description
The short description field is used to describe the Status Code, and is used for information and reporting purposes. It is an optional field.
Long Description
Further description of the Status Code can be entered in the long description field. This field is for information and reporting purposes only, and is optional.
Behavior Category *
Code behaviors indicate the type of action that should be performed when a Status Code is applied to a change request on a client profile.
Default for Category
This checkbox indicates whether this status code is the default for the category defined in the previous 'Behavior Category' field or not. check the checkbox if you want to set the status as the default for the category defined (this makes more sense when more than one status code is defined per the category selected in the previous field).
(Suggested) Next Status
In this field a suggested next status can be defined, in other words if the status is part of a process or action flow this field suggests the next most logical status that should come next. For example if the current status being defined was 'Pending' then the '(Suggested) Next Status) could be 'Approved' or 'Rejected', whatever is defined to be the 'Next Status' will be the default when a users attempts to change the status from 'Pending' in this example.
All Users Authorized
This checkbox indicates that all users are allowed to assign this status to a client change request.
When this checkbox is selected, any entries in the bottom 'Users Authorized to Apply the Status Code' grid are ignored.
-
If applicable, make entries in the Users Authorized to Apply the Status Code grid.
This grid is used to define any specific users or groups who are allowed to apply this status code to the incoming change requests for client profiles. It is only enabled if the 'All Users Authorized' checkbox is not selected.
Field |
Definition |
Type (U,G or J) |
This is to indicate whether the authorization is for a User (U), Group (G) or a Job Title (J), you can define a specific user to be allowed to apply the status code or decide to allow a group of users to be allowed or maybe allow any one with a specific job title to be allowed to apply the status code. |
User, Group or Job Title |
This is the actual name of the User, Group or Job Title you want to authorize to apply this status code. Note: For speed of entry, it is recommended that you mostly use either groups or job titles and then only use a few user ID’s to indicate exceptions. The user types may overlap. For example, if Jane Doe has job title 'Salesperson' and you list 'Salesperson' as a job title line in the grid, adding 'Jane Doe' as a user line is superfluous; it is allowed and doesn’t do any harm, but it’s a waste of effort and meaningless, because she has already been granted usage via her job title. |
Status Codes - Credit tab
The Status Codes - Credit tab is used to configure which Payment Options will be allowed for each of the standard available credit status options
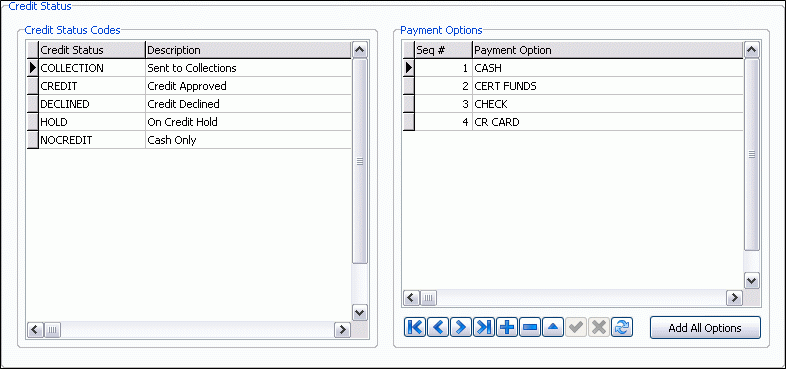
Credit Status Codes
This section of the screen displays the Pre-Loaded Credit Status Codes supplied by TMW Systems Inc. These cannot be altered or removed. You cannot add any other custom Credit Status Codes.
These Credit Status Codes will be available for assigning to your Clients in the Customer and Vendor Profiles program > Customers > Credit Info tab.
Payment Options
This section of the screen is used to define the available Payment Options that can be used toward the selected 'Credit Status' in the Credit Status Codes grid. You may click the '+' button to create a new Payment Options for the selected Credit Status Code, or you can click the 'Add All Options' button to add all valid Payment Options entry into this grid.
This Payment Options will be available for assigning to your Clients depending on their 'Credit Status' in the Customer and Vendor Profiles program > Customers > Credit Info tab.
Status Codes - Dispatch / Orders tab
The Status Codes - Dispatch / Orders screen is divided into four sections: 'Status Code Definition', 'Code Behavior Category', 'Code Applies To', Apply-If Rules and Exceptions, and a grid that shows a summary of existing Codes. If you click on a Code in the grid, the details of the Code will display in the other sections.
For more information on specific Status Codes and their behavior in TruckMate, see Status Code Descriptions - Dispatch / Orders.
Status Code
This is the value that is most commonly used and displayed by other programs. It can be up to ten characters in length. Because users perform Status changes by selecting Status Codes (rather than Status Code descriptions) it is important to make these Codes as descriptive as possible.
Short Description
The short description field is used to describe the Status Code, and is used for information and reporting purposes. It is an optional field.
Long Description
Further description of the Status Code can be entered in the long description field. This field is for information and reporting purposes only, and is optional.
Previous Code
Is used by the Dispatch program and Local Dispatch program to suggest the next Status Code during a trip Status change. For example, if you generally apply a delivered Status Code after applying a picked Status Code, when you create the delivery Code you can specify the picked Code in the previous Code field. Then, when you change the Status of a trip that currently has a picked Status, the delivered Status Code will be suggested.
EDI Code
If you are using the EDI Audit program, enter the EDI Status equivalency Code in this field. Refer to the documentation provided by your EDI service provider (SNS / Assure Corp).
Active
This field reflects the value of the 'Active' checkbox, the status could be active 'Active' = 'True' in which case the status is selectable, accessible and usable by the user any where in the system (where applicable) or it can be inactive 'Active' = 'False' in which case the status is inaccessible and will not be listed in drop down menus for selection.
LTL Sort
LTL Sort specifies the order in which Status Codes are displayed on the Context Menus of LTL-related programs (such as the Drill-Down screen in the Dispatch program or the 'Change Status' Context Menu option on the City Dispatch program > Trip Details > Available Freight Bills grid). Normally, this order will be based on the steps are performed in day-to-day LTL activities.
While any value will be accepted by this field, it is suggested that numerical values be used (for simplicity).
Show Before TL
Determines where the Status Code will appear on the Change Status menu of the Drill-Down screen in the Dispatch program and 'Change Status' Context Menu option on the City Dispatch program > Trip Details > Available Freight Bills grid. If this box is checked, the Codes will appear before the line that separates TL and LTL Status Codes; otherwise they will appear after it.
Active
This checkbox allows the user to determine whether the status is active or not, this option is used when the status is not needed or used but you don’t want to delete it at the same time. If unchecked the status is considered inactive and will not be listed in drop down menus for selection.
Prompt for Pallet Transfer
Placing a checkmark in this box will indicate that when a user changes a Status to this Status in the Dispatch program, the pallet transfer screen will automatically pop up.
Status Code Applies To
The Status Code Applies To section is only used to determine whether or not the Code should be available in the Dispatch program as Status Code.

If the Status Code is used to change Trip Status, check the 'Trip' box. The effect of the Code on 'Driver', 'Power Unit', 'Trailer', 'Chassis', 'Misc Equipment', 'Freight Bill', and 'Container' information is determined by the Code Behavior Category.
Apply-If Rules - Previous Code Must Be:
The Apply-If Rules - Previous Code Must Be section is used to define allowable circumstances for Freight Bill Status changes in the Drill Down screen of the Dispatch programv. Although there is logic built in to the system that determines allowable Status changes (such as the fact that a Freight Bill’s Status must be of the 'Dispatch' Code behavior before a Code with a 'Pick Up' Code behavior can be assigned), the Apply-If Rules allow for an extra level of control and configuration.
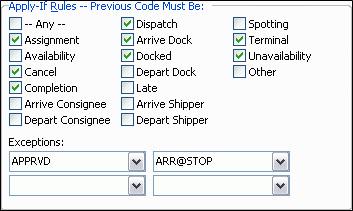
Apply If Rules
To configure rules for the selected Status Code, un-check the 'Any' box. Then select the Code Behavior(s) that must apply in order for the Status Code to be applied to a Freight Bill. For example, say that you are creating a Status Code 'LATEPICK' that will be used to indicate that the Driver is late to pick up a Freight Bill. You could select 'Dispatch' as the previous Code Behavior. Then, the only time that this Status Code could be applied to a Freight Bill is when the Freight Bill’s current Status was of the Code Behavior 'Dispatch'.
Exceptions
Exceptions are used to exclude specific Status Codes from the Apply If rules. For example, in the scenario described above, say that you wanted to restrict the application of the 'LATEPICK' Status to Freight Bills whose current Status has a Code Behavior of 'Dispatch', but that you wanted to disallow the application of the 'LATEPICK' Status Code when the Freight Bill’s current Status is 'DISPHOLD'. Select the Status Code 'DISPHOLD' from the drop down list box. Then, the Status Code 'LATEPICK' could only be applied if the Freight Bill’s current Status was of the 'Dispatch' Code Behavior, but was not the 'DISPHOLD' Status Code.
Code Behaviors sub-tab
Status Code Behavior Category
Code behaviors indicate the type of action that should be performed when a Status Code is applied to a Trip or a Resource (Freight Bill, Driver, Power Unit, Trailer or Miscellaneous Equipment). Select either the Category tab, or the Additional Rules tab. Depending on the Status Code Behavior you choose, certain fields may become available on the Additional Rules tab.
Assignment
Indicates that the resource (Freight Bill, Driver, Power Unit, Trailer and / or Miscellaneous Equipment) has been assigned to a trip, but that the trip is not yet active. For planning purposes, Drivers and equipment that are active on another trip can be assigned to trips that are being planned. Trips always start with an assignment Status. Because the assignment Status indicates that the trip is not yet active, the trip can be cancelled and all resources returned to their previous Status.
Availability
Indicates that the resource (Freight Bill, Driver, Power Unit, Trailer or Miscellaneous Equipment) is available to be assigned to a trip.
Cancel
The Status Code that is applied to a Freight Bill when the bill is cancelled in the Freight Bill grid of the Dispatch program using the right-mouse menu option, 'Cancel Freight Bill'.
Completion
Assigning a Delivery Status to a trip will cause the Freight Bills associated with the trip to get the Status Code that is the Default for the Completion Category.
Dispatch
When this Code behavior is applied to a trip in the Dispatch program, the trip becomes active and can no longer be canceled. Equipment active on a trip cannot be activated on a second trip.
Docked
Completes the trip and makes the Freight Bill available in the Freight Bills grid in the Dispatch program. You must check the Docked box above the Freight Bill grid in the Dispatch program in order to view bills with a Status of this Code behavior.
Late
This code behavior, when applied to a Trip, will designate it as 'Late' (changing the Trip Status to 'Late'). The following restrictions apply when attempting to set a Trip to a 'Late' Status Code:
-
This status must be applied to an Active Trip. If a Late Status behavior is applied to a Trip not in an active status, an error message will appear (dependant on the Resource attached to the Trip Leg).
-
The Late Status will be applied to the Trip Leg. All resources on that Leg will be marked as 'LATE'.
-
Only some status codes can be applied from LATE; otherwise, it will say the resource needs to be in 'DISP' status.
Arrive at Dock
When this Code behavior is applied, the Trailer(s) will be given ARRIVAL Status. The current Trailer will be given the status of 'TBU' (To Be Unloaded), and the next Trailer to be used in the Trip sequence will be given a Status of 'LTG' (Loaded to Go).
Depart Dock
When this Code behavior is applied, the first leg of a Trip is given ACTIVE Status, and no extra Empty legs can be created for the Trip.
Spotting
Can apply to all components, but usually does not apply to the Driver or Power Unit. Spotting allows you to leave components at a zone for pick up by a different Driver and/or Power Unit. For example, if you create a Code with the Spotting behavior and you check the Code Applies To Trailer, Misc. Equipment, Freight Bill, and Trip, the system will use it to de-assign the Driver and Power Unit from the trip, leaving the other components intact and ready for a new Driver and Power Unit to be assigned.
Note: When the 'Spotting' behavior occurs on the last leg of a trip, the system will end the trip, COMPLETE the Freight Bill and mark the trailer with a 'SPTLD' status. To change the status to 'AVAIL', right-click on the Trailer, select the 'Change Status' option and choose 'AVAIL' from the drop down.
Terminal
Terminal can be applied to the Trip. If Default for Category is checked, the Terminal Code behavior completes the current trip leg and activates the next one, leaving the same Power Unit and Driver assigned. If Default for Category is not checked, this Code behavior unmatches the Driver and Power Unit from the trip leg and sets the Status of the next leg to Planned. Note that you can have two Status Codes of the Terminal Code behavior that are both configured as Default for Category.
Unavailability
Indicates that the resource (Driver, Power Unit, Trailer or Miscellaneous Equipment) is unavailable to be assigned to a trip. This status does not apply to Freight Bills.
Arrive at Shipper (Pick Up)
When applied to a trip, a Status Code of this behavior will set the current ACTIVE leg to FINISHED and the next PLANNED leg to ACTIVE. If the ACTIVE leg is an empty leg, the next loaded leg will be activated, and all intervening empty legs will be finished.
Depart Shipper
When this Code is applied to a Trip, the Freight Bill status is changed to DEPSHIP (Departed Shipper), the location of the Resources is updated to the Shipper’s Zone Code, and the Resource Status is updated to DEPSHIP.
Note: If there are no further picks or drops for a specific leg, the Depart Shipper behavior will advance the leg, just as the STOPOFF behavior does.
Arrive Consignee
When this Code is applied to a Trip, the Freight Bill status is changed to ARRCONS (Arrived at Consignee), the Resource location is updated to the Consignee’s Zone Code and given the status ARRCONS. Estimated Time of Arrival calculations are stopped.
Depart Consignee (Delivery)
When this Code is applied to a Trip, the Freight Bill status is updated to DELVD (Delivered) and the Resource locations are changed to the Consignee’s Zone Code. If this is the final Freight Bill on a given Trip, the Trip will be given COMPLETE status and the Resource status will be updated to DELVD (and if the Trip is complete, the Resources become AVAIL [Available] again).
The Delivery Resource Information will then be updated into TLORDER table.
Other
Can be used to create general purpose Codes.
Entry
The 'Entry (N)' Status behavior is to be used with Freight Bills that have yet been processed by the Customer Service program > Freight Bill Check List functionality. The user has the option, on Post of a Freight Bill, to set the Bill to 'Entry' Status, which means that the Freight Bill cannot be added to a Trip in the Dispatch program.
Once the various Check List criteria have been completed, the Dispatcher can set the 'Entry' Freight Bill can be set to 'Available' Status (via the Dispatch program > Freight Bill grid) and then attached to Dispatch Trips.
Default for Category
In the cases where Status Codes are applied automatically by the system, the Default for Category is used. For example, when a trip is completed in the Dispatch program, the Status of the Drivers, Power Unit, Trailers and Miscellaneous Equipment assigned to the trip is changed to the Default for Category for Availability - type Status Codes. In most cases, you should only have one default for each Code behavior category. The exception is the Terminal Code behavior.
Web Services Default
Selecting this option will make the value chosen in the 'Status Code Behaviour' section the default behaviour value when using Web Services with TruckMate.
See the Status Code Descriptions below for more information on specific Status Codes.
Additional Rules sub-tab
The options available on the Additional Rules tab will change depending on which Status Code is selected in the main Status Code grid. Not all of the following options will be available for each Status Code.
Allow Split Leg
This additional rule is only available for status codes with the 'Terminal' status code behaviour. When this flag is checked, and the user attempts a terminal status change at a zone that is not the end zone of the trip leg, the a split leg will be created at this new zone.
Re-Assign Driver After Spot
Allows the option to re-assign a Driver and/or Power Unit after a spot has been done. Locate the applicable spotting Status Code, and select these two checkboxes. This will then tell the Dispatch program to re-match the Driver and power unit after performing a spotting Status.
Re-Assign Power After Spot
Allows the option to re-assign a Driver and/or Power Unit after a spot has been done. Locate the applicable spotting Status Code, and select these two checkboxes. This will then tell the Dispatch program to re-match the Driver and power unit after performing a spotting Status.
Set Pickup Done
If the status code is set as 'Set Pickup Done', when that particular status code is applied to the active leg it will mark all freight bills on that leg as picked.
Reset Pickup Done
Completes the opposite of the 'Set Pickup Done' flag. If by some chance the Freight Bills on a Trip are already marked as picked, when the status code that is flagged as 'Reset Pickup Done' is applied to that leg, it will clear out the picked flag for those Freight Bills. This flag is only necessary when Dispatchers are reassigning the same Freight Bill on another Trip where the Freight Bill has already been picked.
Dispatch All Resources for Driver on Trip
This option is available for Status Codes with the 'Dispatch' behavior category. If this flag is checked, Dispatch Status changes will be applied go to all Freight Bills on the Trip that the current Driver will handle. If it is not flagged, the Dispatch Status changes will apply only to Freight Bills on the 'Active' leg.
| By adding this as an additional rule for Dispatching status codes, customers have the option of configuring multiple Dispatching Status Codes. For example: intermodal customers may want to leave their Truckload Dispatch status code as is (with this option checked,) and create a new Intermodal Dispatch Status Code with this rule turned off. |
Record Attempted / Missed Pick
This option is available for Status Codes with the 'Depart Shipper' behavior category. If this flag is selected for a Status Code that is then applied to a Pickup Freight Bill from within the City Dispatch program via a Status Change, an 'Attempted Pick' record will be inserted into the Terminal Plan record for that Freight Bill. A 'P01' record (or 'P02', 'P03' and so on) will appear on the Customer Service program > LTL tab (and the Terminal Plan window) each time that the Freight Bill is set to the Status associated with this flag. The original expected Pick record ('P') will remain in the Terminal Plan, as it has not yet been completed.
By recording the attempted and/or missed picks on a Freight Bill, you can more accurately calculate Driver Pay in the event that a Driver completes a trip to pick some Freight, and is turned away (or cannot complete the Pick for any other reason).
Record Attempted / Missed Delivery
This option is available for Status Codes with the 'Depart Consignee (Delivery)' behavior category. If this flag is selected for a Status Code that is then applied to a Delivery Freight Bill from within the City Dispatch program via a Status Change, an 'Attempted Delivery' record will be inserted into the Terminal Plan record for that Freight Bill. A 'D01' record (or 'D02', 'D03' and so on) will appear on the Customer Service program > LTL tab (and the Terminal Plan window) each time that the Freight Bill is set to the Status associated with this flag. The original expected Delivery record ('D') will remain in the Terminal Plan, as it has not yet been completed.
By recording the attempted and/or missed picks on a Freight Bill, you can more accurately calculate Driver Pay in the event that a Driver completes a trip to deliver some Freight, and is turned away (or cannot complete the Delivery for any other reason).
Unmatch Freight Bill in City Dispatch
This option is available for Status Codes with the 'Depart Shipper' behavior category. If this flag is selected for a Status Code that is then applied to a Pickup Freight Bill from within the City Dispatch program via a Status Change, the Freight Bill (usually a Pickup Bill) will be automatically unmatched from the City Dispatch Trip.
Cancel Freight Bill After Status Change
This option is available for Status Codes with the 'Depart Shipper' behavior category. If this flag is selected for a Status Code that is then applied to a Pickup Freight Bill from within the City Dispatch program via a Status Change, the Freight Bill (usually a Pickup Bill) will be automatically set to cancelled 'CANCL' Status, disallowing any further changes to the Freight Bill in other programs, such as the Customer Service program.
Complete Trip if Spotting at Dest
-
This will determine what will happen to the trip in question when you apply a spotting status at the last stop on a trip that is not a terminal (i.e., the Leg Destination value).
-
True - The trip will be completed when this spotting status is applied at the Leg Destination.
-
False - The trip will not be completed when this spotting status is applied at the Leg Destination; a new leg will be added, and the trip will remain in spotting status.
-
Ask - The user will be prompted as to whether they wish to complete the trip (True) or not (False).
-
Next Trip(s) Available - This can be set to ensure that the freight bills on the current trip are planned to future trip(s). If they are, the trip will complete. If they are not, the trip will remain open in a spotting status. This is primarily used for the new LCV (light commercial vehicles) workflow introduced into TruckMate, but can also be simply used for planning future trips as well.
-
Complete Trip if Spotting at Dest Terminal
-
This will determine what will happen to the trip in question when you apply a spotting status at the last stop on a trip that is a terminal (i.e., the Leg Destination value).
-
True - The trip will be completed when this spotting status is applied at the Leg Destination.
-
False -The trip will not be completed when this spotting status is applied at the Leg Destination; a new leg will be added, and the trip will remain in spotting status.
-
Ask - The user will be prompted as to whether they wish to complete the trip (True) or not (False).
-
Next Trip(s) Available - This can be set to ensure that the freight bills on the current trip are planned to future trip(s). If they are, the trip will complete. If they are not, the trip will remain open in a spotting status. This is primarily used for the new LCV (light commercial vehicles) workflow introduced into TruckMate, but can also be simply used for planning future trips as well.
-
Complete FB if Spotting at FB Dest
-
This will determine whether the freight bill on a trip will be completed if the spotting status that is applied at the trip occurs at the same zone as the freight bill’s end zone (i.e., End Zone on Freight Bill = Zone of Spotting Status)
-
True - If the spotting status applied to the trip occurs at the zone of a freight bill on the trip (and the FB is set to 'leave' the Trip at that stage), then the freight bill will be completed.
-
False - Regardless of where the spotting status is applied, the freight bill will not automatically be completed as a result of this spotting status.
-
Add FB Unloading Leg
-
If the above option is set to False, this will determine whether an empty Unloading Leg should be added to the Trip in the event that a user does not wish to automatically complete the freight bill if spotting a trip at a freight bill destination.
-
True - If the system determines that there is a bill on the trip that has the same End Zone as the spotting status zone being applied, an empty leg will be added for the purpose of unloading the bill from the trip.
-
False - No modification will be made to the trip.
-
Dock FB if Spotting at Trip Dest
-
This will determine whether a freight bill should end up in a Docked status if the trip is spotted at the trip Destination.
-
True - If the trip is spotted at the Trip Destination, the freight bills should be Docked.
-
False - If this is False, no freight bill will be Docked as a result of the spotted status being applied to the end of the trip.
-
Docked Status
-
If at any point a freight bill would be docked as a result of a spotting status (either with the setting above or per other automated methods), if this picklist is filled in, the system will used the status applied here. If this is empty, the system will always use the first-detected Default for Category Docked status.
Default Status Codes
The following table contains a list of the standard default set of status codes and their default settings as they first appear out-of-the-box after the initial database is created.
| Status Code | Long Description | Previous Code | Code Behaviour Category | Default for Category? | Code Applies To |
|---|---|---|---|---|---|
APCONSLATE |
APPROACHING CONSIGNEE LATE USED FOR MOBILE COMMUNICATIONS |
~ |
Late |
No |
All |
APPROCONS |
APPROACHING CONSIGNEE USED FOR MOBILE COMMUNICATIONS |
~ |
Other |
No |
All |
APPROSHIP |
APPROACHING SHIPPER USED FOR MOBILE COMMUNICATIONS |
~ |
Other |
Yes |
All |
APPRVD |
APPROVED FOR BILLING |
~ |
Completion |
No |
Freight Bill |
APSHIPLATE |
APPROACHING SHIPPER LATE USED FOR MOBILE COMMUNICATIONS |
~ |
Late |
No |
All |
ARRCONS |
ARRIVE CONSIGNEE USED FOR MOBILE COMMUNICATIONS |
~ |
Arrive Consignee |
Yes |
Driver, Power Unit, Freight Bill, Trip |
ARRSHIP |
ARRIVE SHIPPER USED FOR MOBILE COMMUNICATIONS |
~ |
Arrive Shipper |
Yes |
Container, Driver, Misc. Equipment, Power Unit, Trailer, Freight Bill, Trip |
ASSGN |
ASSIGNED |
AVAIL |
Assignment |
Yes |
All |
ATMPTDLVRY |
ATTEMPTED DELIVERY |
ATMPTDLVRY |
Depart Consignee (Delivered Orders) |
No |
All |
AVAIL |
AVAILABLE |
~ |
Availability |
Yes |
All |
BILLD |
BILLED |
~ |
Completion |
No |
Freight Bill |
BRINGBACK |
BRING BACK |
BRINGBACK |
Depart Consignee (Delivered Orders) |
No |
All |
CANCL |
CANCELLED |
~ |
Cancel |
Yes |
All |
COMPLETE |
THE TRIP IS DONE |
~ |
Completion |
Yes |
All except Misc Eq. |
COMPLETED |
COMPLETED |
COMPLETED |
Depart Consignee (Delivered Orders) |
No |
All |
DELVD |
DELIVERED |
PICKD |
Depart Consignee (Delivered Orders) |
Yes |
All |
DEPCONS |
DEPART CONSIGNEE USED FOR MOBILE COMMUNICATIONS |
~ |
Depart Consignee (Delivered Orders) |
No |
All |
DEPSHIP |
DEPART SHIPPER USED FOR MOBILE COMMUNICATIONS |
~ |
Depart Shipper |
Yes |
All |
DISP |
DISPATCHED |
ASSGN |
Dispatch |
Yes |
All |
DOCKED |
DOCKED FOR MANIFESTING |
~ |
Docked |
Yes |
Chassis, Container, Trailer, Freight Bill, Trip |
ENRTE |
EN ROUTE |
~ |
Dispatch |
No |
All |
ENTRY |
FREIGHT BILL ENTERED |
~ |
Entry |
Yes |
Freight Bill |
EXPORTING |
Exporting FB to Direct Route |
~ |
Availability |
No |
Freight Bill |
LATE |
COMPONENT IS LATE |
~ |
Late |
Yes |
Trip |
LOADEDTOGO |
TRAILER NOW LOADED TO GO |
LOADINGMAN |
Assignment |
Yes |
All |
LOADINGMAN |
MANIFESTING THE TRAILER |
AVAIL |
Assignment |
Yes |
All |
LOCKED |
FREIGHT BILL LOCKED |
~ |
Locked |
Yes |
Freight Bill |
LOGON |
DRIVER LOGED ON |
LOGON |
Assignment |
No |
All |
LTLAVAIL |
LTL AVAILABLE |
~ |
Availability |
No |
All |
PICKD |
PICKED UP |
DISP |
Arrive Shipper |
Yes |
Freight Bill, Trip |
PLANASSGN |
PLANNED ASSIGNMENT |
~ |
Assignment |
No |
Trip |
PRINTED |
FREIGHT BILL PRINTED |
~ |
Completion |
No |
Freight Bill |
QUOTE |
QUOTE |
~ |
Other |
No |
Freight Bill |
REFUSED |
REFUSED |
REFUSED |
Depart Consignee (Delivered Orders) |
No |
All |
RESCHED |
DEASSIGN FREIGHT FROM DRIVER |
~ |
Availability |
No |
Freight Bill |
SPOTTED |
SPOTTED |
SPOTTED |
Depart Consignee (Delivered Orders) |
No |
All |
SPTLD |
SPOTTED LOADED |
~ |
Spotting |
Yes |
Chassis, Container, Trailer |
STOPOFF |
STOPOFF |
STOPOFF |
Terminal |
Yes |
All |
TERMINAL |
TERMINAL SWITCH |
~ |
Terminal |
No |
All |
TMTARPOST |
TMT AR Posting |
~ |
Completion |
No |
Freight Bill |
TRAPPED |
USED AS A TRAP |
~ |
Availability |
No |
Container, Power Unit, Trailer |
UNAPPRVD |
UNAPPROVED FOR BILLING |
~ |
Completion |
No |
Freight Bill |
UNAVL |
UNAVAILABLE |
~ |
Unavailability |
Yes |
All |
WASHC |
TRAILER BEING WASHED |
~ |
Availability |
No |
Trailer |
WASHNC |
TRAILER WASH NOT COMPLETED |
~ |
Unavailability |
No |
Trailer |
LTL Status Codes
Understanding the various LTL Status Codes is vital in understanding how your Freight has been processed. Use the following example table as a guide:
Code Can Apply To: |
||||||||||||
Type |
Code Behaviour |
Sample Code |
Usage |
Leg |
Trip |
Freight Bill |
Driver |
Power Unit |
Trailer |
Container |
Chassis |
Misc. Eq. |
A |
Assignment |
ASSGN |
Auto assigned when any resource is 'planned' on a trip |
Ben |
Yes |
Yes |
Yes |
Yes |
Yes |
Yes |
Yes |
|
V |
Availability |
AVAIL |
Set whenever a resource is removed from a trip and is not on any planned trips |
N/A |
Yes |
Yes |
Yes |
Yes |
Yes |
Yes |
||
X |
Cancel |
CANCEL |
Used in Billing to designate a freight bill has been canceled |
N/A |
Yes |
|||||||
C |
Completion |
COMPLETE |
When a freight bill has been 'delivered', this status behavior is applied automatically to the freight bill |
N/A |
Yes |
|||||||
D |
Dispatch |
DISP |
The status behavior applied to a trip to identify it is now committed. Any empty legs required for any of the assigned resources to get to the first pickup are automatically created& Driver locations are NOT considered. Potentially, Power unit location to Trailer location to pickup start zone. If you have the Status Codes 'DEFAULT button' NOT selected, no empty legs will be generated. |
MT Legs created and first leg activated |
Yes |
Yes |
Yes |
Yes |
Yes |
Yes |
Yes |
|
K |
Docked |
DOCK |
Trip will be assumed to be ending at this location (hopefully a dock). Freight will be unloaded and set to this docked status code (similar to available, but available at a dock not at the pickup location). |
Finishes Leg |
Yes |
Set to 'Docked |
Made available (or assigned if pre-planned) |
Made available (or assigned if pre-planned) |
Made available (or assigned if pre-planned) |
Made available (or assigned if pre-planned) |
Made available (or assigned if pre-planned) |
|
L |
Late |
LATE |
If you want to manually mark the trip as Late, all resources will be flagged with this status. Nothing happens to legs. |
Nothing |
||||||||
? |
Sent |
SENT |
All the freight bills in a Trip have a behavior of A (ASSGN). If all the freight bills have the same status code that is set in the Communications Manager under 'Load Offered Sent', it will mark the LTL_STATUS column as SENT. |
|||||||||
1 |
Arrive at Dock |
TBU |
Used in LTL dispatching when a driver returns to the terminal after completing the days work. User will be prompted for which DOOR the trailer (or straight truck) is to be positioned at. Load Planning features of TruckMate will review each freight bill on the trip and populate the load planning option columns. When an 'Arrive at Dock' behavior code is used on a trip, another leg will be automatically created, to park the trip at the terminal/dock, regardless of if the 'Arrive at Dock' is used in the middle of a trip or on the last leg. |
Remains Active Leg |
Status Appl’d |
Status Appl’d |
Removed from Trip |
Removed from Trip (if non straight truck) |
Status Applied |
|||
2 |
Depart Dock |
OFD |
Leaves terminal and is out for delivery. Starts the driver’s day. Similar to a DISP code, but will not create empty legs. This behavior wil remove the trip from the door, whereas a Dispatch behavior will NOT. |
Makes Active |
Yes (and removes Trip from Dock door) |
Status Appl’d |
Status Appl’d |
Status Appl’d |
Status Appl’d |
Status Appl’d |
Status Appl’d |
Status Appl’d |
S |
Spotting |
SPOTtoLOAD |
Take a trailer to a shipper for their loading at a later time. Driver usually leaves to do other work. |
Leg was Active, now set to Planned |
Yes |
Removed from Leg, Status set to AVAIL or ASSGN |
Removed from Leg, Status set to AVAIL or ASSGN |
Left on Leg, Status is set to SPOT Status used |
||||
S |
Spotting |
SPOTtoUNLD |
Finishes a trip but leaves the trailer in spotting status. This is suggesting we have made our commitment to deliver the freight, yet leaving the trailer for the consignee unloading convenience. |
Leg Finished |
Finished |
Removed from Leg, Status set to AVAIL or ASSGN |
Removed from Leg, Status set to AVAIL or ASSGN |
Left on Leg, Status is set to SPOT Status used |
||||
S |
Spotting |
SPOTmidpnt |
Driver is not able to complete the current leg and wants to leave the trailer and freight at this mid-point for someone else to complete. Driver and Power are removed, freight and trailer are set to Spot Status used. |
Leg Split, current Leg is Finished, next Leg is left in Planned Status |
Yes |
Removed from Leg, Status set to AVAIL or ASSGN |
Removed from Leg, Status set to AVAIL or ASSGN |
Left on Leg, Status is set to SPOT Status used |
||||
T |
Terminal |
STOPOFF |
Used to Advance from current leg to next leg. If zone you are terminating at is not the end zone of this leg (and the 'Allow Split Leg' Additional Rule is checked), then the leg is split and next leg automatically made ACTIVE. The first leg will be completed automatically. |
Leg Split, current leg Finished, next leg (from split) made Active |
Yes |
Stays on Legs, Status changed |
Stays on Legs, Status changed |
Stays on Legs, Status changed |
Stays on Legs, Status changed |
Stays on Legs, Status changed |
Stays on Legs, Status changed |
Stays on Legs, Status changed |
T |
Terminal |
TERMINAL |
Used to FINISH current leg and keep next leg PLANNED. If zone you are terminating at is not the end zone of this leg (and the 'Allow Split Leg' Additional Rule is checked, then the leg is split and next leg left as PLANNED. The first leg will be completed automatically. However, if the leg has no deliveries on it then the terminal to terminal leg will not be created. |
Leg Split, current leg Finished, next leg (from split) left Planned |
Yes |
Stays on Legs, Status changed |
Stays on Legs, Status changed |
Stays on Legs, Status changed |
Stays on Legs, Status changed |
Stays on Legs, Status changed |
Stays on Legs, Status changed |
Stays on Legs, Status changed |
U |
Unavailable |
UNAVAIL |
Used to set a driver, power, trailer or other resource to unavailable (broken down, shop, vacation, etc.). |
|||||||||
P |
Arrive at Shipper |
ARRVSHIP |
Identifies the driver as arrived at the shipper’s pickup location. Auto completes all the preceding empty legs. Advances the leg if the current leg has no outstanding picks or drops prior to applying the status code Freight bill and all resources are set to this status and current locations of these resources set to the pickup location. Pickup information (times, trip, driver, power, trailer) updated to the freight bill. Pickup Done status can also optionally be applied |
Empty Legs are auto-Finished, loaded Leg made Active |
Yes |
Status applied and Pickup info updated |
Status applied and current location updated to Shipper location |
Status applied and current location updated to Shipper location |
Status applied and current location updated to Shipper location |
Status applied and current location updated to Shipper location |
Status applied and current location updated to Shipper location |
Status applied and current location updated to Shipper location |
3 |
Depart Shipper |
DEPSHIP |
Used to record activity of departing a shipper. Difference in times between DEPSHIP and ARRVSHIP status codes can determine how long driver was loading or waiting at shipper. |
Remains Active Leg |
Yes |
Status and current location updated |
Status and current location updated |
Status and current location updated |
Status and current location updated |
Status and current location updated |
Status and current location updated |
Status and current location updated |
4 |
Arrive Consignee |
ARCONS |
Used to record activity of arriving at a consignee. Difference in times between ARCONS and DEPCONS status codes can determine how long driver was unloading or waiting at consignee. Cab be applied on legs other than the last leg so that multiple drops can be delivered. |
Remains Active Leg |
Yes |
Status and current location updated |
Status and current location updated |
Status and current location updated |
Status and current location updated |
Status and current location updated |
Status and current location updated |
Status and current location updated |
E |
Depart Consignee |
DEPCONS |
The freight has been delivered and the driver is leaving. This will update all the resources to the consignee’s location, record delivery information back to the freight bill, set the freight bill to this delivered status code, and make all other resources available or assigned as applicable. |
Finished |
Finished |
Delivered |
Available or Assigned |
Available or Assigned |
Available or Assigned |
Available or Assigned |
Available or Assigned |
Available or Assigned |
O |
Other |
SALES |
Not used in Dispatch |
|||||||||
N |
Entry |
Freight Bill that has been posted, but has Check List items against it that must be completed before the Bill can be set to 'Available' for further Dispatch processing |
Nothing |
No |
Yes |
No |
No |
No |
No |
No |
No |
|
L |
Locked |
Locked |
This status applies to Split freight bills. When a freight bill is split, a status of 'Locked' is assigned to the main bill. Users can’t edit the freight details when a freight bill is locked. When the split bills are merged back, the lock status of the main bill is removed and users can update and edit the freight bill details again. |
No |
No |
Yes |
No |
No |
No |
No |
No |
No |
Essential Status Codes
The essential status codes are required for basic TruckMate functions.
Hid the Essential Status Codes and the Suggested Status Codes tables on the advice of a developer who suggested this was very out-of-date and it wasn’t clear what the relationship was between this list and the Suggested Status Codes list is or what information it was meant to impart to the user.
| Status Code | Long Description | Previous Code | Code Behaviour Category | Default? | Code Applies To |
|---|---|---|---|---|---|
ASSGN |
ASSIGNED |
AVAIL |
Assignment |
Yes |
All |
AVAIL |
AVAILABLE |
Availability |
Yes |
All |
|
CANCL |
CANCELLED |
Cancel |
Yes |
All |
|
COMPLETE |
TRIP COMPLETED |
Completion |
Yes |
All |
|
DELVD |
DELIVERED |
PICKD |
Delivery |
Yes |
All |
DISP |
DISPATCHED |
ASSGN |
Dispatch |
Yes |
All |
DOCKED |
DOCKED FOR MANIFESTIGN |
PICKD |
Docked |
Yes |
Freight Bill, Trip |
LATE |
LATE |
DISP |
Late |
Yes |
All |
PICKD |
PICKED UP |
DISP |
Pick Up |
Yes |
Freight Bill, Trip |
SPTLD |
SPOTTED LOAD |
PICKD |
Spotting |
Yes |
Trailer, Misc. Equipment, Freight Bill, Trip |
TERMINAL |
TERMINAL SWITCH |
PICKD |
Terminal |
Trailer, Misc. Equipment, Freight Bill, Trip |
|
UNAVL |
UNAVAILABLE |
AVAIL |
Unavailability |
Yes |
Driver, Power Unit, Trailer, Misc. Equipment |
Suggested Status Codes
| Status Code | Long Description | Previous Code | Code Behaviour Category | Default? | Code Applies To |
|---|---|---|---|---|---|
APPRVD |
APPROVED |
Completion |
No |
Freight Bill |
|
BILLD |
BILLED |
APPRVD |
Completion |
No |
Freight Bill |
CANCELLED |
CANCEL PICKUP AND FREIGHT BILL |
Cancel |
No |
Freight Bill |
|
DELIVERED |
FREIGHT DELIVERED |
Delivery |
No |
Freight Bill |
|
ENRTE |
EN ROUTE |
DISP |
Dispatch |
No |
All |
PICKEDUP |
FREIGHT PICKED UP |
Pick Up |
No |
Freight Bill |
|
PLANASSIGN |
PLANNED ASSIGNMENT |
Assignment |
No |
Trip |
|
PLANAVAIL |
PLANNED AVAILABILITY |
Availability |
No |
Freight Bill |
|
QUOTE |
QUOTE |
Other |
No |
Freight Bill |
|
RESCHED |
DEASSIGN FREIGHT FROM DRIVER |
Availability |
No |
Freight Bill |
|
SPTMT |
SPOTTED EMPTY |
PICKD |
Spotting |
No |
Trailer, Misc. Equipment, Freight Bill, Trip |
STOPOFF |
STOP OFF |
PICKD |
Terminal |
Yes |
All |
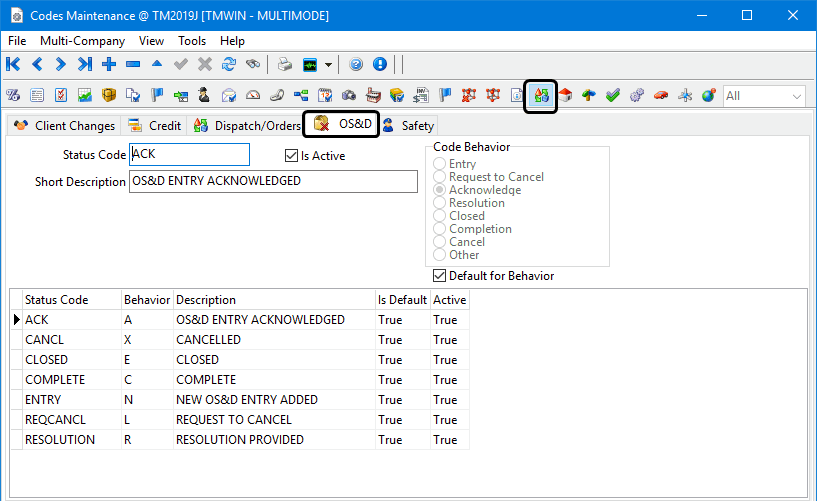
Status Codes - OS&D tab
The Status Codes - OS&D tab is used to set up and configure the status codes used to track the progress of an OS&D (Overage/Shortage/Damage) entry. TruckMate includes a basic set of status codes to use but you have the option of renaming them or creating additional codes to satisfy the unique requirements of your process for dealing with OS&D situations.
To add a new OS&D Status Code :
-
Go to Profiles > Codes Maintenance program > Status Codes tab.
-
Go to the OS&D sub-tab.
-
Click
 Insert.
 -
Make the appropriate entries to these fields:
Required field: *
Field
Definition
Status Code *
Up to ten characters in length. Because users perform Status changes by selecting Status Codes (rather than Status Code descriptions) it is important to make these Codes as descriptive as possible.
Is Active *
Short Description.
Short Description
Describes the Status Code for information and reporting purposes.
Code Behavior *
Indicates the type of action associated with this status or the type of action that should be performed when a Status Code is applied.
Default for Behavior
If more than one status code is defined per category, select this checkbox to indicate which one should be the default code for each category.
-
Click
 Post.
Post.
The grid at the bottom of the window provides a summary list of the status codes. The default codes include:
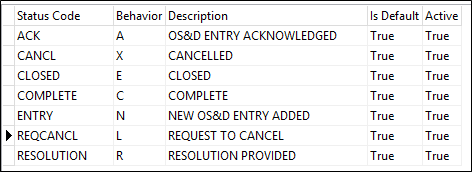
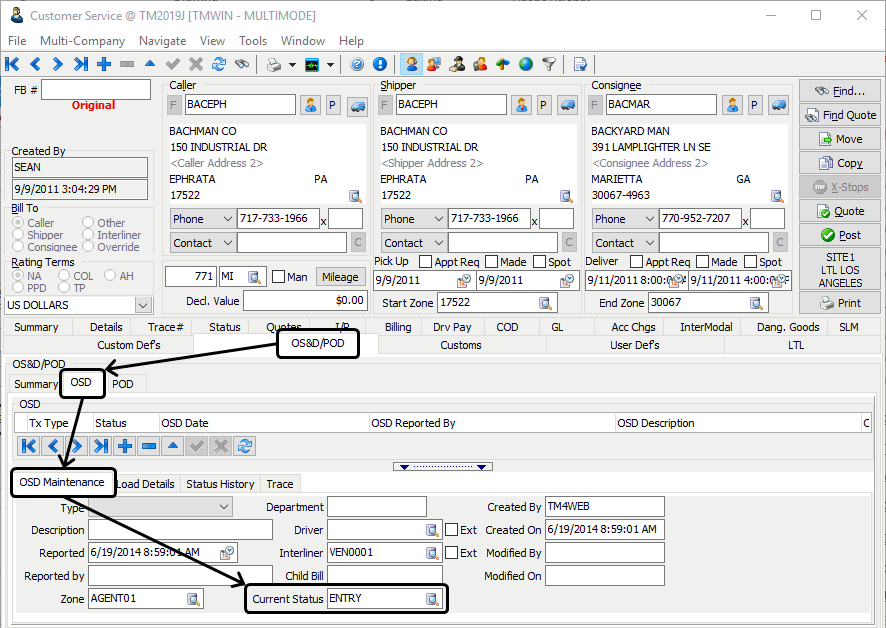
These OS&D status codes are used to indicate the current status of an OSD claim entry as displayed in the Current Status field on the Customer Service program > OS&D/POD tab > OSD > OSD maintenance sub-tab.
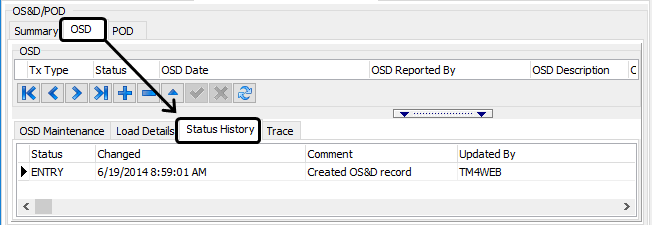
| If the Application Configuration option for CSERV.EXE > Enable status tracking of OSD items is set to True you can view the Status History tab for OSD entries. |
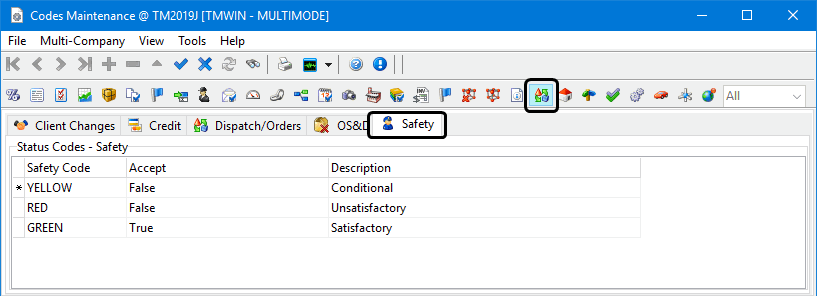
Status Codes - Safety tab
The Status Codes - Safety tab is used to configure a list of Safety Codes which can be associated with the vendor profiles to identify carriers with an acceptable safety rating.
If a Safety Code value has been assigned to a carrier, TruckMate will use the value of this field to determine whether to allow the user to assign this carrier to a trip and ignore the actual safety rating of the carrier. The Safety Code supersedes and overrides the rest of the carrier validation process and can be used to allow or prevent any carrier from being assigned to a trip regardless of their Certification, Safety Rating, SafeStat scores or Operating Status values.
Since the Safety Code supersedes and can override other validation values, you are responsible for setting up and maintaining a current set of safety code assignments. The Safety Codes should be continuously reviewed and updated to ensure the values are current and correct in order to ensure the appropriate and intended use of the override feature.
The Safety Code values are assigned to each vendor manually using the Safety Code drop-down list on the TruckMate > Profiles > Customer and Vendor Profiles > Vendor window > Carrier Insurance tab.
| Safety Code and Safety Rating are not the same. They are separate and distinct fields. Safety Code values are set by you. Safety Rating values are populated via a different process using imported data if your company is using a service like RMIS (Registry Monitoring Insurance Services). |
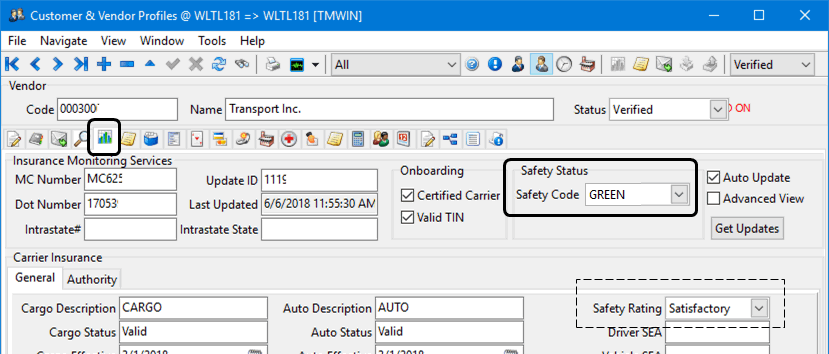
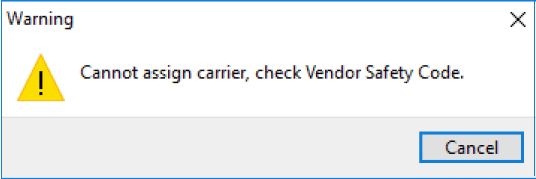
The Safety Code acceptability levels are set in TruckMate > Profiles > Codes Maintenance > Status Codes > Safety tab. Only carriers with a Status of Verified and a Safety Code where Accept = True can be assigned to a trip.
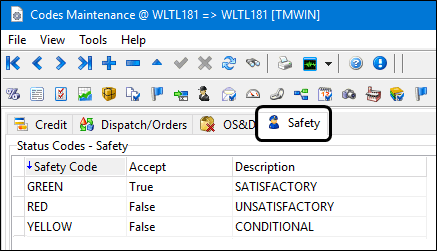
If the Accept value associated with this carrier’s safety code is False, an error message is presented and the carrier cannot be assigned.