Rates Maintenance - Part A

![]()
The Rates Maintenance program is used to configure Automatic Rating. On the Details tab of the Customer Service program and in the Quick Bill Entry program, charges will automatically be calculated based on the shipment details you enter, in combination with the origin and destination zones specified in the bill header. You can set up as many Rate Tables as you need; they can be configured to apply to all your Customers and Interliners, or only to those Customers and Interliners you specify. In this program, you can also generate and print quotes, generate printed rate proposals and confirmations, and view expired Rate Tables assigned to Customers and Interliners.
To access Rates Maintenance:
| From this location | Go to |
|---|---|
TruckMate Menu and TruckMate Task List |
|
Windows Start Menu |
TruckMate 20xx > Rates Maintenance |
Windows Explorer |
C:\Program Files (x86) > TruckMate 20xx > Rates.exe |
Program Details
The Online Help for the Rates Maintenance program is broken down into pages for each of the Tabs within the Rates Maintenance program.
Menu and toolbar options
This topic describes menu and toolbar options and functionality that are specific to the Rates Maintenance window.
For information about common menu and toolbar options (i.e. File menu, Refresh, Multi-Company, etc.), see General menu and toolbar options in TruckMate basics.
Go Menu
Client Info
![]() Click this button to access the Client Info Tab of the Rates Maintenance program.
Click this button to access the Client Info Tab of the Rates Maintenance program.
Vendor Info
![]() Click this button to access the Vendor Info Tab of the Rates Maintenance program.
Click this button to access the Vendor Info Tab of the Rates Maintenance program.
Rate Sheets
![]() Click this button to access the Rate Sheets Tab of the Rates Maintenance program.
Click this button to access the Rate Sheets Tab of the Rates Maintenance program.
Simulation
![]() Click this button to access the Simulation Tab of the Rates Maintenance program.
Click this button to access the Simulation Tab of the Rates Maintenance program.
Detention
![]() Click this button to access the Detention Tab of the Rates Maintenance program.
Click this button to access the Detention Tab of the Rates Maintenance program.
Rate Base
Access the Rate Base Number Maintenance tab of the Rates Maintenance program.
Setup Menu
The Setup Menu contains options that allow users to setup and customize their rating specifications which are required in a Multi-Point Rating implementation.
Rate Mode Setup
Rate Mode Setup allows users to create, edit, and delete Rate Mote codes via the Rate Mode window. You can also assign a brief description to each Rate Mode code. These can then be used in a couple of ways:
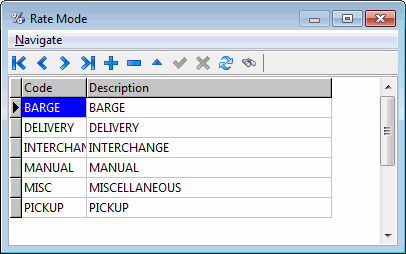
In a non Multi-Point Rating scenario, Rate Mode codes can be assigned to rate sheets and to clients/vendors, so that the rating will apply based on the Rate Mode- similar to adding a Service Level condition to a rate sheet.
In Multi-Point Rating, Rate Modes can be assigned to each leg of a Routing Code, and then have rate sheets apply based on the Rate Mode for each leg of the specified route. See the Routing Config Codes window for more information.
Routing Codes
This option opens the Routing Config Codes window, which allows the user to specify how a Multi-Point Rating code will behave when invoked by the system during rating.
Rate Metrics
This option opens the Base Rate Metrics window, which allows you to setup Base Rate Metrics for the rating system. See the Rates Maintenance program > Client > Rate Metrics Tab for more information.
Rate Mode
You can now tie a Rate Metric calculation to a specific Rate Mode via this field. If you wish to do so, you must set the Rate Mode field for both the Base Rate Metrics and the Client Rate Metrics.
Routing Config Codes Window
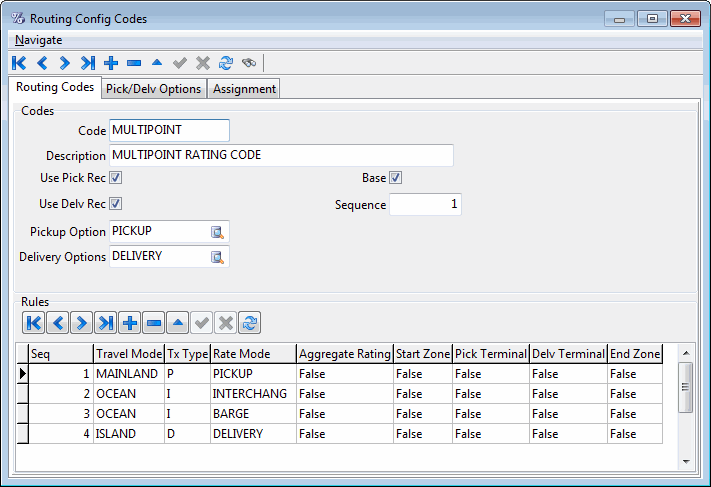
The Routing Config Codes window is used to create Routing Codes that are used in Multi-Point Rating scenarios. A single Routing Code contains any number of 'Rules', which will be used to build out the legs of a Multi-Point Rating movement, and tell the system which rate sheets to apply for those legs (as determined by the 'Rate Mode' attached to the leg sequence and any rate sheet that has the same 'Rate Mode').
The Routing Config Codes window is comprised of three tabs, all of which are involved in setting up a Routing Code:
Routing Codes Tab
The Routing Codes tab allows users to create routing codes and specify their rules. Users can add multiple rules for each code, which will be given a sequence ('Seq') value, which determines how the Multi-Point rating legs will be built out when the Routing Code is attached to a rating client.
Codes Section
Code
In this field, the user designates the Routing Code ID. This code can be attached to clients on the Assignment tab, and will then automatically build out the Multi-Point Rating legs when that client is used as the Bill-To party of a freight bill. These codes are also available for manual assignment to a freight bill from the Customer Service program > LTL/Routing tab.
Description
Enter a brief description for the Routing Code in this field.
Use Pick Rec/Use Delv Rec
These flags control if a Pickup or Delivery term plan record is created.
Base
If checked, this Routing Code will appear in the Customer Service program > LTL Routing tab > Routing Code edit pick list. If this option is unchecked, other Routing Codes will be assigned to the Freight Bill’s Bill To code.
Note: Base Routing codes will not be selected/used if a client-assigned Routing Code can’t be found. Base Routing Codes function differently from Base Rate Sheets.
Sequence
This is the sequence that Base Routing Codes will appear in, in the Customer Service program > LTL/Routing tab > 'Routing Code' edit pick list.
Pickup/Delivery Options
These fields allow the user to select pickup/delivery options, as set up on the Pick/Delv Options tab.
Rules Grid
Routing rules determine how each sequence will be rated by matching the Travel Mode, Rate Mode and any Rate Sheet tied to that Rate Mode. This grid is basically used to setup the rating leg sequence for any client attached to this Routing Code. When a freight bill is created for a client that has had this Routing Code assigned, all of these legs will appear on the Customer Service program > Details tab, with specific rates (as determined by the rate sheet tied to the Rate Mode chosen).
Travel Mode
User can input options like Air, Ocean, Rail, Road and also ISLAND, MAINLAND, etc..
Rate Mode
Enter the Rate Mode you wish to associate to the Travel Mode for each particular leg of the Routing Code.
Tx Type
User can choose between 'P' (Pickup), 'I' (Interchange/Linehaul), 'D' (Delivery) and 'M' (Manual) movement types.
Aggregate Rating
This column is used to control if the multi-point rating record should be set to use aggregate rating.
Pickup/Delivery Options Tab
The Pickup/Delivery Options tab allows users to set up pickup/delivery codes by creating codes and matching descriptions.
Action
Choose one of the following values for your Pickup/Delivery codes: 'NA', 'Terminal' or 'Hub'. These values are used in certain circumstances to control the 'Pickup At' and 'Care of Delivery' clients on a freight bill with multi-point rating.
When the Application Configurator program > CSERV.EXE > 'Routing - Assign Pick At/Care Of' config is set to 'True', the following will occur:
-
When the routing code is assigned if the Pickup Option code has an action of 'Terminal' then the Pickup At client is changed to the client assigned to the terminal.
-
When the routing code is assigned if the Delivery Option code has an action of 'Terminal' then the Care Of client is changed to the client assigned to the terminal.
Assignment Tab
In the Assignment tab, users can view which Clients have been matched with which Routing Codes. As well, the user can pair a Client ID with a Routing Code. Then, when the user creates a Fright Bill and this Client ID is the Bill To code, then the Routing Code will automatically populate on the Fright Bill’s LTL/Routing Tab.
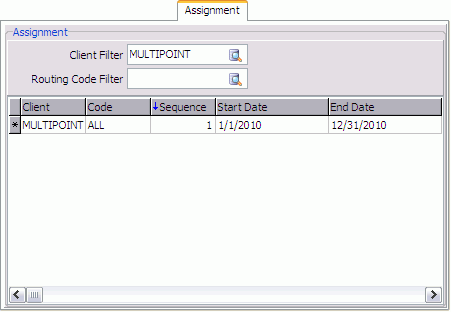
Client Filter
User can filter the grid by Client, and also pick whichever Client they want to assign a Routing Code. Routing Codes can also be assigned on the Rates Maintenance program > Client Tab > Routing Tab.
Routing Code Filter
The user can filter the grid by Routing Code, and also select from various Routing Codes (or create a new one) to assign to a client.
Assignment Grid
Once the new Client/Routing Code is assigned and created, it will be visible in this grid. Users can filter using the fields above.
Note: If there is no record here in the Assignment tab, then it means that the Customer Service Routing Code will not populate.
Users can also pair Clients with Routing Codes in the Rates Maintenance program > Client Info > Routing tab.
Client Information
The Client Info tab displays a grid at the top of the screen that lists all customers configured in the Customer & Vendor Profiles program. Detailed information about the Client’s rates are displayed through a number of tabs in the lower part of the screen.
Filter on Salesman
To display only those customers who are assigned to a specific salesman, as configured in the customer’s profile, check the box and select the salesman’s user name from the drop down list. Customer profiles are configured in the Customer & Vendor Profiles program. User names are configured in the Security Setup program.
Filter
The filter field works in conjunction with the sort column which is indicated by a blue arrow in the column header. If you enter characters in the Filter field, only those records with matching characters in the sort column field will be displayed. You can now enter 'Client' in the filter tab but keep in mind that nothing will display until the filter is cleared or re-applied and the refresh button selected.
Refresh
Click the Refresh button to re-apply any changes to the Filter values you have selected.
Context Menu
Attach / Open Related Files
This option allows you to attach related Documents or Image files to the selected Rates Maintenance Client record. See the Attach / Open Related Files window for more information on how to accomplish this.
Rate Sheets Tab
Confirmations Sub-Tab
The Confirmations Tab displays all approved Rate Sheets for the selected client. Rate Sheets are attached to clients on the Rate Sheet Tab, in the Attachments section. When a Rate Sheet is attached to a client, it becomes a Proposal, and can be viewed on the Proposals Tab. To convert a Proposed Rate Sheet to a Confirmed Rate Sheet, use the context menu option on the Proposals tab. Only Confirmed Rate Sheets will be used by the automatic rating functions in the Customer Service program and the Quick Bill Entry program.
This grid contains information about rate sheets that were already confirmed, below a description of the most important fields on the grid.
Effective Date
You can set the date by which the Rate Sheets are sorted between the Confirmations tab and the History tab. The History tab displays Rate Sheets that have exceeded their expiry date. By changing the Working Date, you can view current and expired Rate Sheets. Click on the down arrow for a calendar selection form.
Discount
This field allows the user to enter a discount that would reflect the discount rate rather than the end result, so a user enters discount in this field for each rate sheet. The discount will apply to Rate.
Terms
This field allows you to set a Rate Precedence for the selected Rate Sheet for this Client. For more information on Rate Precedence, see the Rate Sheet Tab > Misc Tab.
Double click on any grid row to switch to the Rate Sheet Tab and view the Rate Sheet. If you double-click on a Client that has an assigned 'Rate Group' (rather than a specific Rate Sheet), you will be taken to the Rate Sheets Tab with the first Rate Sheet in that Group displayed.
Note: You can sort the records in the Confirmations grid by clicking on any column name / title (excluding the 'Description' column, which is an automatically populated field).
Context Menu
Not Approved
This option sets the currently selected Rate Sheet to un-approved. This will remove the Rate Sheet from the Confirmations tab, and re-display it on the Proposals tab.
Print Confirmation
Selecting this option opens the Report Selection form. The Crystal Report template supplied with the TruckMate system is called 'RATEPRO.RPT'. The report will preview to the screen. Click the printer icon at the top of the screen to send the report to the printer that is configured as the default printer for your workstation.
See the Crystal Reports Reference for more information on report functions.
Copy from another Client
This option allows you to copy an existing rate profile from another customer. Usually this is done to set up a new customer with your standard Rate Sheets.
View Notes
Selecting this option will open a small window that will display any notes that have been entered for this specific Client, in regards to the Rate Sheets that have been approved for use.
Find Confirmation
Selecting this option will open a window that allows the user to search for a confirmed Rate Sheet for the selected Client via a number of criteria (i.e. 'Rate Sheet ID', 'Description', 'Effective Date', 'Expiry Date', etc.).
Proposals Sub-Tab
The Proposals Sub-Tab displays all Rate Sheets for the selected client that have been 'proposed' - that is, attached but not yet approved. Rate Sheets are attached to clients on the Rate Sheet Tab, in the Attachments section. When a Rate Sheet is attached to a client, it becomes a Proposal, and can be viewed on the Proposals Tab in the Client Info section. To convert a Proposed Rate Sheet to a Confirmed Rate Sheet, use the context menu option on the Proposals tab. Only Confirmed Rate Sheets will be used by the automatic rating functions in the Customer Service program and the Quick Bill Entry program. Double click on any grid row to switch to the Rate Sheet Tab and view the Rate Sheet.
Note: You can sort the records in the Proposals grid by clicking on any column name / title (excluding the 'Description' column, which is a calculated field).
This grid is a read-only grid, if you choose to use the 'Plus' button (Add) from the navigation bar you will be forced to pickup a rate sheet via the editpick tool, however, the editpick tool will only allow you to select sheets that are neither duplicate (already assigned to the given client under any of the 3 rate sheet sub tabs) nor outdated (expired prior to your working date).
Context Menu
Approve
This option is used to approve a Rate Sheet that has been assigned to a Client in the Rate Sheet Tab > Attachments section. This will remove the Rate Sheet from the Proposals Tab, and display it on the Confirmations Tab.
Note: Base Rates do not need to be approved on a per-Client basis, as they are approved globally using the 'Approved' flag on the Rate Sheet Tab > Date Tab.
Print Proposal
Will display the Report Selection form. The Crystal Report template supplied with the TruckMate system is called 'RATEPRO.RPT'. The report will preview to the screen. Click the printer icon at the top of the screen to send the report to the printer that is configured as the default printer for your workstation.
See the Crystal Reports Reference for more information on report functions.
History Sub-Tab
The History Sub-Tab displays Rate Sheets where the 'Expiry Date' exceeds the 'Working Date'. The Approved column will tell you whether the entry was a Proposal or a Confirmation. If the value in the Approved column is 'True', then the entry was a confirmation. If the value in the Approved column is 'False', it was an unconfirmed proposal, or was 'un-confirmed' on the Confirmations tab. Double click on any grid row to switch to the Rate Sheet Tab and view the Rate Sheet.
Note: You can sort the records in the History grid by clicking on any column name / title (excluding the 'Description' column, which is a calculated field).
All Sub-Tab
Sequence
Specifies the order that assigned Rate Sheets will be queried. For example, if two Rate Sheets have been assigned to a Customer in the Rates Maintenance program, when you enter Detail lines in the Customer Service program and the Quick Bill Entry program, the Rate Sheet with the lowest sequence value will be tested first to see if a rate can be determined. If no rate is applicable from that sheet, the sheet with the next highest sequence value will be tested. The sequence can also be configured in the Rates Maintenance program.
Description
Displays the description of the Rate Sheet as entered in the Rates Maintenance program. You cannot change the assigned Rate Sheets here. Rate Sheets can only be assigned to Customers in the Rates Maintenance program.
Effective Date / Expiry Date
Displays the starting and ending Dates of the Rate Sheet as entered in the Rates Maintenance program.
Approved
Displays the 'Approved' value of 'True' or 'False' depending on the Customer.
Discount
Displays the Discount value for the specific Customer.
Client Rating Tab
The Client Rating Tab allows you to specify Rate Clients for specific properties of this Client’s Rate Sheets.

The various 'Rate By' fields on this Tab are optional, and are used to change the Client ID that is used to lookup the rating information. When blank the 'Bill To' code of the Freight Bill is used.
These fields are useful in the case when you have many customers that use the same Rating Profile. When the Rating Profile changes (i.e. in the New Year), you’ll need to change the Profile for each customer. If you created a Client ID just for rating and assigned the rate setup to that Client, you could then assign that Client ID to each of the other Client’s 'Rate By' fields. When changes are required, you change the one Client’s rate setup and all Clients are changed. It is also easier to add new Clients: create the new Client ID and then point to the Rate Client.
Aggregate Rating
The Aggregate Rating flag is used to determine if a Freight Bill is rated by aggregate rating or standard rating. This only applies with the 'Aggregate Rating' option in the Application Configurator program > RATES.EXE is set to 'Client'. It is based on the Client who is the 'Bill To' code for the Freight Bill.
Base Rate Metrics
Force Manual Rate
Selecting this box requires the User to enter manual rates for this Customer. This will override the automatic calculation. Usually, used only when cube rating is being applied.
Use 640 Rule
Placing a checkmark in this box will cause the following calculations to occur: if the rate cube (cube value in base units) is greater than 640 then the cube weight will be equal to the (rate cube divided by 64) multiplied by 1000. If the rate cube is less than 640 then the cube weight would be calculated as the rate cube multiplied by the 'cube to weight' number. For example, cube rating compares the weight of a load to the number of cubes times a given amount, and then will rate at the higher of these two numbers. At some point, it is no longer appropriate to rate by cube but to go back to weight. This is where the 640 Rule comes in.
Note: This grid is a read-only grid, if you choose to use the 'Plus' button (Add) from the navigation bar you will be forced to pickup a rate sheet via the editpick tool, however, the editpick tool will only allow you to select sheets that are neither duplicate (already assigned to the given client under any of the 3 rate sheet sub tabs) nor outdated (expired prior to your working date).
Always Utilize My Rate Sheets
If this flag is checked for a client, then any freight bill that the client is associated with (i.e. is the 'Bill-to', 'Shipper', 'Consignee', 'Caller', or 'Other' contact), will have rate-to set to that client (and hence the freight bill will be rated using that client’s rate-sheets).
If more than one client involved on the freight bill has the option checked, then standard precedence logic applies (i.e. if both the shipper and consignee are 'Always Utilize…' clients, then on prepaid bills, the shipper gets priority, and on collect bills, the consignee gets priority).
Cube to Wgt Conv
The factor used by auto-rating to convert cube measurements to weight.
Wgt to Cube Conv
This factor used by auto-rating to convert weight to cube measurements. The default weight-to-cube conversion can be set using the Application Configurator program > PROFILE.EXE > 'Weight To Cube' option.
Cube-To-Weight Break Point
Extra Charges Tab
The Extra Charges Tab is used to configure Accessorial Charges (configured in the Codes Maintenance program) for individual customers. Accessorial Charges are added to Freight Bills in the Customer Service program and the Quick Bill Entry program.
Filter By Status
Select one of the radio options to Filter the displayed Accessorial Charge records. Choose one of the following:
-
All*: shows both Assigned and Unassigned Accessorials.
-
Assigned:* will only show Assigned Accessorials.
-
Unassigned:* will only show Unassigned Accessorials.
Filter On Auto Code
Enter some text in this field and select your <Enter> key to filter the Auto Code records based on the text you have entered (as well as the 'Filter By Status' radio option selected). Select the 'Clear Filter Value' button to the right of this field to remove any applied Auto Code filter.
Code Setup
This button allows you to view the code in Codes Maintenance program.
Substitution Grid
All Accessorial Charges created in the Codes Maintenance program > Accessorial Charges Tab, except those codes that were flagged as 'Custom Code Only', are shown here on this grid. The grid is read-only except for the 'Auto-Assign' and 'Substitution Code' columns that may be changed via either double-click (on the particular cell) or right-mouse-click (anywhere on the row). You may switch to codes maintenance (and go to the current base accessorial code) by either right-mouse-click or by clicking the button above the grid.
Auto Assigned
A value of 'False' indicates that this accessorial was not automatically assigned as opposed to a value of 'True' which means the charge was in fact automatically assigned. This field can be updated from this grid to indicate that the charge was changed (wasn’t auto assigned).
Base Code
This field shows the original code of the accessorial charge when it was originally assigned.
Base Code Description
This field shows the original description of the accessorial charge when it was originally assigned.
Substitution Code
You can setup substitutions for your Auto-Code Accessorial Charges. That is, every time the original code is manually assigned (or assigned automatically if it is an 'Auto Assign by Default' Code Type), the code specified in this field 'Substitution Code' will be used instead. Only 'Custom Code Only' type codes are available for substitution, and they must be of the same Charge Behavior as the original code. The 'Custom Code Only' and 'Auto-Assign by Default' parameters, as well as the 'Charge Behavior', are configured in the Codes Maintenance program > Accessorial Charges Tab.
If you Disallow a code for a specific customer, it will not be automatically assigned (in the case of Auto Assign by Default type codes) and will not be available for selection when manually entering Accessorial Charges in the Customer Service program and the Quick Bill Entry program.
Note: The Substitution column will have red font if set to 'Disallowed' (when substituted to blank).
Substitution Description
This is the description of the charge you want to substitute the original charge with, once you enter a code in the 'Substitution Code' field this field will change accordingly.
Auto-Assign Over Ridden
This field shows whether a substitution has been used for this charge of not ('True' / 'False'), a red font will be used if the value of this field is 'True' to give a better alert to users that the original charge has actually been changed.
Quotes Tab
Quotes created in the Customer Service program and on the Simulation Tab of the Rates Maintenance program will be displayed on the Quotes Tab. Each of the quotes shown is also a 'quote bill' in the Customer Service program, with a bill number prefix of 'Q'.
All of the fields on this Tab are of a read-only nature. All changes to Quote information are accomplished in the Customer Service program.
Filter
You can reduce the number of quotes displayed in the grid by applying a filter on one of: Quote Number, Shipper, Consignee, or Commodity. Click on the column header for one of these four options and then enter a valid value for that field in the Filter box.
Context Menu
View Quote
This option opens the Customer Service program (if not already opened) and display the selected quote.
Print Quote
Will display the Report Selection form. The Crystal Report template supplied with the TruckMate system is called 'QUOTE.RPT'. The report will preview to the screen. Click the printer icon at the top of the screen to send the report to the printer that is configured as the default printer for your workstation.
See the Crystal Reports Reference for more information on report functions.
Discounts / Minimums Tab
In the Customer & Vendor Profiles program, you can set a blanket discount for all rates calculated for the selected customer. This results in a reduction of the rate displayed in the 'Rate' field on the Details tab of the Customer Service program and the Quick Bill Entry program.
However, in some cases (especially with tariff-based rating) you may need to configure discounts according to specific criteria. This can be done on the Discounts / Minimums Tab. When a discount configured on this Tab is applied to an item on the Details Tab in the Customer Service or Quick Bill Entry program, the Rate field will display the original rate (from the Rate Sheet Tab), and the Discount field will display the calculated discount amount configured on this Tab.
Filtering Options
Using the 'Min Pre Disc', 'Intra State', 'Hide Expired' and 'By Date' fields, you can filter the Discounts/Minimums Rate Sheets that appear on this Tab. Simply flag the option you wish to Filter by (and in the case of the Date value, supply a specific date).
Description
Enter a free format description for this discount. This is for reporting and references purposes only, and is not used elsewhere in the system.
Start Date
Enter the date when this discount becomes applicable. The date will default to today’s date.
Expiry Date
Enter the date when this discount expires. The date will default to december 31st of the current year.
Sequence
If multiple discounts can apply to the same customer depending on the circumstances of the order, enter a numerical value that represents the order in which the discount should be tested ('1' first, '2' second, etc.) the first entry (according to the sequence value) that returns a discount will be used.
Rate Sheet ID
If this discount only applies to a specific Rate Sheet, enter the id number of the sheet in this field. Double click for a selection form.
Start Zone
If this discount only applies between specific Zones (as configured in the Codes Maintenance program), enter the start Zone in this field. Double click for a selection form.
End Zone
If this discount only applies between specific Zones (as configured in the Codes Maintenance program), enter the end Zone in this field. Double click for a selection form.
Between Zones
If this discount applies when the start and end Zones are reversed (ie, when the Freight Bill’s start Zone is the same as the discount’s end Zone, and the end Zone the same as the start Zone), enter 'true' in this field. If the discount only applies when the start and end Zones match, enter 'false'.
Note: The way the program looks for the Zones, when they are between Zones, is to ask if the start and end Zones are valid (because they are between Zones - True, there is no real start or end, just one end and the other end).
In an example situation MN to MT, the valid combinations could be MN and MT, MT and MN, MN and MN, MT and MT. The program goes through these in the order of the sequence field. (When you are in the Discounts/Minimums tab, and they are not in sequence order, refresh and they will be). What you should want, is for the program to look at the MN and MT (or MT and MN) combination first, because they will only hold true if both Zones are present. In the MN and MN and MT and MT combinations, as long as each of the Zones is either MN or MT, the program will use that rate. So, if you would move all your same state combinations to the very end of the list, then the only time they would be used is if none of the earlier combinations were met and they were in fact intrastate moves.
Min Weight
If this rate only applies when the weight on the Freight Bill’s detail line is greater than a certain value, enter the value in this field.
Max Weight
If this rate only applies when the weight on the Freight Bill’s detail line is less than a certain value, enter the value in this field.
Commodity
If this rate only applies when a specific Commodity Code (as configured in the Codes Maintenance program) has been entered on the Freight Bill’s detail line, enter the Commodity Code in this field. Double click for a selection form.
Lane ID
If this discount only applies when the Freight Bill’s end Zone is included in a specified lane (as configured in the CrossDock Traffic Lanes program), enter the lane number in this field. Double click for a selection form.
Discount
Enter the amount of the discount in this field. This value is stored in a percentage format; for example, for a 2.5% discount, enter '2.5'. This value will be displayed in the discount rate field on the detail line. This value is multiplied against the amount in the subtotal field to determine the amount of the discount, which is displayed in the discount field on the detail line.
Minimum Charge
If the total charges on a detail line should not be less than a certain value, enter that value in this field. If this minimum charge is calculated, the value in the subtotal field (which would otherwise be the rate multiplied by the number of rating units) will display this minimum charge. The discount rate and discount fields will be zero.
Rate ID Name
If you selected a value in the 'Rate Sheet ID' field, the Rate Sheet’s description (as configured on the Rate Sheets Tab) will display in this field.
Lane ID Name
If you selected a value in the lane id field, the lane id’s description (as configured in the CrossDock Traffic Lanes program) will display in this field.
Maximum Charge
If the total charges on a detail line should not be more than a certain value, enter that value in this field. If this Maximum charge is calculated, the value in the subtotal field (which would otherwise be the rate multiplied by the number of rating units) will display this Maximum charge. The 'Discount Rate' and 'Discount' fields will be zero.
Flat Rate
Enter a Flat Rate charge for this detail line.
Base Rates Only
Default value is set at false. To change to 'true', double-click in the column, and type in 'true'. If the value in this field is 'true', then the discount will only apply to the Rate Sheet if the Rate Sheet is marked as 'Base Rate'.
Shipper
Double click to select the Shipper’s Customer Code.
Consignee
Double click to select a Customer Code for the Consignee.
Requested Equipment
Enter any Equipment you would like to Request in the space provided.
Temp Controlled / Dangerous Goods
Double click to set these fields to 'True' or 'False', depending on the nature of the Discount being applied.
Intra State
If this Discount applies only within a certain State, double click this field to set it’s value to 'True'.
Min Pre Disc
This field is a 'True'/'False' field, and determines when the discount percentage is applied to the calculation of Freight Bill charges when they exceed a Client’s 'Min' or 'Max' charges.
Note: In order to set this field to 'True', the user may have to toggle the Application Configurator program > RATES.EXE > 'Use Pre Disc Min' option to 'True'.
With Minimums…
-
= True
If the item’s 'Total Cost' from the Rate sheet (no discount % applied yet) is greater than Discount’s 'Minimum charge', then the Discount % from the Discount record will be applied to the item’s Total Cost (even if the 'Total cost' * 'Discount %' calculates to LESS than the 'Minimum Charge' requirement).
For example: Discount record’s % equals '10%' and 'Minimum Charge' = '$2300'. Rate a Detail line (2500 LB @ $1.00 LB): $2500 is greater than $2300, so 10% discount is applied. Yet after applying the 10% discount to $2500, the Freight Bill is at $2250 (and not $2300).
If the Item’s 'Total Cost' is less than the 'Minimum Charge' (no discounts applied at this point), the 'Minimum Charge' will be applied to the Freight Bill (i.e. if FB equals $2200 and 'Minimum' is still $2300). In this case a $2300 charge is applied, and the Discount is applied to the $2300 charge (i.e. FB 'Total Cost' is $2300 minus 10%).
-
= False
The item’s 'Total Cost' * 'Discount' will be used in the Customer Service program (and Rates Maintenance > Simulation Tab) if it exceeds the Discount record’s 'Minimum Charge' value. If not, Customer Service detail line will default to the 'Minimum' charge (i.e. if 'Cost' * 'Discount' ⇐ 'Minimum Charge' value).
For example: Discount record’s % equals '10%' and 'Minimum Charge' = '$2300'. Rate a Detail line (2500 LB @ $1.00 LB), then get the Discount % of 10% and apply it: dollar amount is now '$2250'. Compare '$2250' with the 'Minimum Charge' of '$2300'. The Freight Bill’s overall charge (on per line item basis) doesn’t exceed the 'Minimum Charge' of '$2300', so the Freight Bill is now charged at the minimum '$2300' dollars.
With Maximums…
-
= True
If the 'Maximum Charge' is '$2499' and the Freight Bill charges equal '$2500' (with no discount applied), then the Freight Bill defaults to '$2499' and a Discount is applied.
-
= False
If the Freight Bills 'Cost' * 'Discount' < 'Maximum Charge' value, then use the FB’s 'Cost' * 'Discount'. If it is greater than the 'Maximum Charge' value, then only the Maximum value will be applied (no further discounts will be added).
Distance Min / Distance Max
Enter the Minimum and Maximum Distance values for this detail line by typing an integer value into the spaces provided.
Service Level
If you wish to apply Discounts based on a specific Service Level Code, double click this field to select a Service Level Code for the detail line.
Start Zip Min / Start Zip Max
These fields allow you to calculate discounts for your Clients using by Zip Codes. Use the 'Start Zip Min' and 'Start Zip Max' fields to configure a Zip code range. If a Freight Bill for an applicable Client contains a starting Zip code that falls within this range, the program logic will then use the Rate Sheet associated with the Client / Zip range when calculating Discounts and/or Minimum Charges.
End Zip Min / End Zip Min
These fields allow you to calculate discounts for your Clients using by Zip Codes. Use the 'End Zip Min' and 'End Zip Max' fields to configure a Zip code range. If a Freight Bill for an applicable Client terminates at a Zip code that falls within this range, the program logic will then use the Rate Sheet associated with the Client / Zip range when calculating Discounts and/or Minimum Charges.
Zip Allow Between
This option functions similarly to the 'Between Zones' option described above, but supplements Zip codes in the logic, instead of Zone codes.
Rate Type
This field allows determines the rating precedence of the selected Rate Sheet for this Client, used when working with Freight Bills of 'Prepaid' or 'Collect' type. For more information on this new feature, see the Rate Sheet Tab > Misc Tab > Rate Precedence section.
Currency
This field controls which minimum charge currency code will be used. This field will default to be base rate.
Use Minimum Charge Currency
When set to 'True', the value supplied in the 'Currency' field will be used. Default is set at 'False'. When MINCHARGE_CURRENCY_CODE is false, the minimum charge for multiple currency will be calculated as before which assumes that minimums are provided in system’s base currency. If it’s true, if the currency code does not match, then the minimum charge will not be applied at all.
Is Tariff Mincharge Discount Only
When this field is set to 'True', it will be used only as the discount for tariff minimum charge. To make it effective, the sequence no of this discount should be less than general discount. Default is set to 'False'.
Terms
This field allows you to set a Rate Precedence for the selected Rate Sheet for this Client. For more information on Rate Precedence, see the Rate Sheet Tab > Misc Tab.
Start Rate Base / End Rate Base / Rate Base Allow Between
These three columns work just like the 'Start Zone', 'End Zone' and 'Between Zones' columns (see above) except that they get their information from the RATE_BASE Table rather than the TruckMate Zone Tree. These fields effect Client Discounts and Min charges. Use the Rate Base Number Maintenance program to setup the Zones when testing.
Rate Mode
This column displays the selected Rate Mode, and works both with and without multi point rating.
Tariff Value Min / Tariff Value Max
Using these two fields, the user can set the minimum value and the maximum value for the tariff. These two fields define the upper limit and the lower limit of tariff values that allow the current discount / minimum record to be utilized in the system for any given rating scenario.
Note: A commodity in TruckMate is linked to a commodity-class, and a commodity-class in turn is linked to a tariff value.
User Condition
This field can be used to add an additional condition (SQL Memo) to the already established criteria for the discount / minimum record. The condition must be linked to information form the freight bill and/or detail line (TLORDER and/or TLDTL tables). The purpose of this field is to add more flexibility and ease in applying the discount / minimum to a set of customers. For example, the user can a add condition to apply the discount / minimum record to only commodities with commodity codes that start with a specific number (123 for example). For the previous example the user needs to enter the following: TLDTL.COMMODITY LIKE '123%'.
User 1 - User 4
These are 4 user fields that can be used for any current or future business needs.
Tariff Class Tab
The Tariff Class Tab is only applicable to sites using the CzarLite Tariff Rating system. When you import the CzarLite Tariff tables, Commodity Classes are created (in the Codes Maintenance program) to describe each tariff level. These commodity classes must be associated with Commodity Codes. Then, when a user creates a Freight Bill in the Customer Service program OR the Quick Bill Entry program, the Commodity Code associates the detail line with a given rating table. However, on the Tariff Class tab, you can configure table 'equivalencies'. Enter the 'base' tariff class in the Tariff Class field, and the tariff table by which you wish to rate in the Rate Class field.
When a user creates a Freight Bill for a customer, the tariff class that is associated with the detail line’s Commodity Code will be checked against entries on this tab. If an entry is found for the tariff class, the rate will be calculated based on the tariff contained in the Rate Class field.
Tariff Class
Double click to view Commodity Codes available and select the one of your choice.
Rate Class
Double click to view the Rate Class IDs available and select the one of your choice.
Effective / Expiry (Dates)
Those two fields are used to set the start date and end date of the period during which the tariff is considered in effect.
Tariff Class To
This field allows Tariff Ranges to be specified. The range is inclusive, so a 100-200 range includes 100 and 200. To determine if a Tariff is within range, the program will:
Compare the Tariff values
-
If values are 0 or null, try to convert tariff code to numeric and compare.
-
If Tariff code is not numeric, compare code as a string.
Codes are first converted to numeric values in step 2 so that '100' is not considered smaller than '20', as it would be if they were just compared as strings.
Note: The 'All Greater' field (below) takes precedence (i.e., if it is set, the 'Tariff Class To' field has no effect).
From Zone / To Zone
Double click to select a Zone Code for these two fields.
Between Zones
If this Tariff applies when the Start and End Zones are reversed (ie, when the Freight Bill’s start Zone is the same as the Tariff’s End Zone, and the End Zone the same as the Start Zone), enter 'True' in this field. If the Tariff only applies when the Start and End Zones match, enter 'False'.
Rate Mode
Double click to select a rate mode for multi point rating.
Sequence
If multiple Tariffs can apply to the same customer depending on the circumstances of the order, enter a numerical value that represents the order in which the Tariff should be tested ('1' first, '2' second, etc.) the first entry (according to the sequence value) that returns a Tariff will be used.
Intra State
If this Tariff applies only within a certain State, double click this field to set it’s value to 'True'.
All Greater
Double click this field to select a Rate Class. The Rate Class selected here will be used to determine the Range of Rate Classes that will be applied with the same Rate as the one chosen in the 'Rate Class' field of this Grid.
Example: if the 'Rate Class' value is '200' and the User enters '200' in the 'All Greater' field, all Tariff Based Rating for the chosen Commodity is given a manual Rate Class of over '200_'_ will be given the Rate Class value of '200'.
Terms
The 'Terms' field influences which Tariff Classes will be used based on the Freight Bill’s Rating Terms. The sequencing is affected by rating terms in the same way as Freight Bill discount sequencing. For more information on Rate Precedence, see the Rate Sheet Tab > Misc Tab.
Commodity Code
This is an optional field, if a commodity code is entered for this field, this row will only be used based on an exact 'Commodity Code' match.
Note: You can set the values designated on the Tariff Class Tab to apply to any Rate Sheet flagged as a 'Commodity Class Enabled' Rate Sheet by using an Application Configurator option. See the Application Configurator program > RATES.EXE > 'TruckMate Tariff Class' option for more details.
Detention Tab
The Detention Tab allows you to view any Detention Rate Sheets that have been applied to the selected Client. Detention Rate Sheets are created in the main Detention Tab of the Rates Maintenance program.
Detention Sheet ID
Displays the Detention Rate Sheet ID Code.
Calc Order
The Calc Order sets the order in which the Detention Rate is used (specific to the Client). If your Client has multiple Detention rates, you will want to change the 'Calc Order' for each of them (this functionality is also available from the Detention Tab > Client Window).
Note: Detention Rating is determined in the following manner: the Client Information > Detention Tab is checked to see if there are existing Detention Rates attached to the Client. If so, they will be used, depending on their 'Calc Order' value. If not, the logic will check the 'Calculation Seq' field on the Detention Tab in order to determine which Base Rate should be applied.
Approved
Displays 'True' or 'False', depending on the 'Approved' Status of the Detention Rate Sheet.
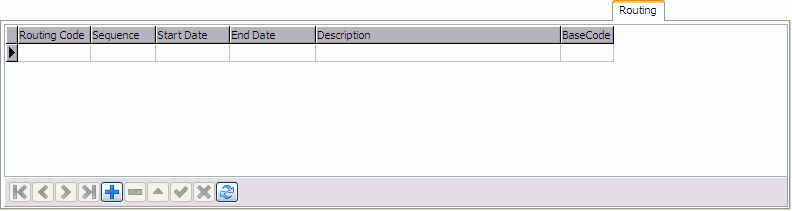
Routing Tab
The Routing Tab allows users to select routing codes in order to pair them with a specific client.
Competitor Info Tab
The Competitor Info tab allows various staff (e.g. sales reps) to gather info that may be helpful to staff setting rates for a given client. In this grid 'Competitor' is a required field and must already exist as a vendor of type ('I', 'O', 'L' or 'M') in Vendor Profiles.
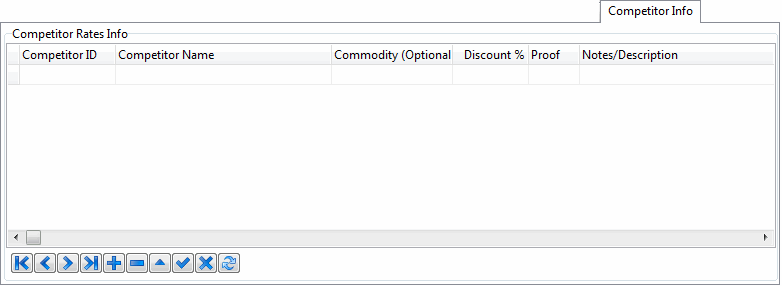
Warning: The competitor Info Tab is a CRM (Customer Relationship Management) tab and thus requires a CRM License from TuckMate (Key 39000). Please contact a TMW Systems representative for details on TMW Systems' products and licenses. If a CRM license is not purchased, an error message will be displayed every time a status changes in the application. To take full advantage of the CRM features you can purchase the license. If you don’t wish to purchase the license then the 'Competitor Info Tab' must be unchecked in Security Setup > Security > Tab Settings to avoid displaying the error message.
Detention Information
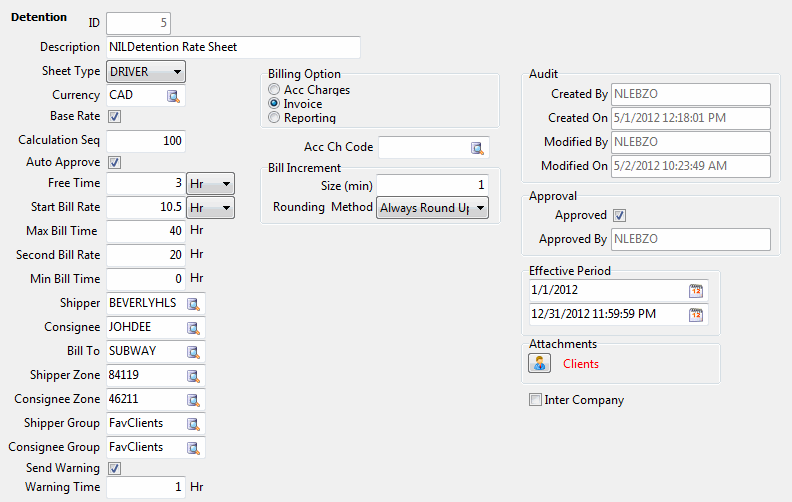
The Detention Rate section is used to create and setup Detention Rate Sheets for use in other TruckMate applications, as well as within the Simulation and Rate Sheet Tabs of the Rates Maintenance program. The Detention section requires a TruckMate License for use (License # 28001). See the License Key Registration program for more information.
Note: Before a Detention Rate sheet is posted (when the User selects the 'checkmark' button on the TruckMate Nav Bar) the program will validate the data entered into the 'Shipper Group' and 'Consignee Group' fields, to ensure that the values match those found in the database.
ID
The value in this field is automatically generated when a new record is created.
Description
Enter a description for this Detention Rate Sheet. This description will be used to identify the Rate Sheet in the event that it is automatically added to a Freight Bill.
Sheet Type
Use the drop down menu here to select which kind of Detention Sheet the selected record will be. Selecting 'Drivers' will make this record a 'Driver Detention Sheet' (ie. all times/values will be judged by the Driver’s Status updates). The 'Driver' styled sheet is the normal style. We have added support for Trailer demurrage styled Detention rating. Selecting 'Trailers' will make this record a 'Trailer Detention Sheet' (ie. all times/values will be judged by the Trailer’s Status updates).
Currency
Click the search button to select a valid 'Currency Code' from those setup on your system.
Base Rate
Check this checkbox to use the Base Rate if no other Rate Sheet applies.
Calculation Seq
The Calculation Sequence value assigned to a Detention record will be used to set precedence in the case that multiple Detention Base Rates exist.
Note: The 'Calculation Seq' value is one of two ways that Detention Rate sequencing is applied. The other is found in the Client Attachments window > 'Calc Order' field, which is used to set the sequence by Client ID (in the case that a Client has multiple Detention Rates). If no Detention Rate is attached to a Client, then the logic will look to the 'Calculation Seq' value to determine which Base Rate should apply.
Auto Approve
This option indicates that detention events which are rated by the sheet will automatically be marked as approved to by-pass the auditing and approval steps and go straight to billing.
Free Time
Enter the Free Time value in the space provided. The 'Free Time' value corresponds to the amount of time (in whichever Unit of Measurement in you select using the adjacent pull down menu) allotted to your Customers that will not be charged.
Start Bill Rate
Enter a Starting Billing Rate for this Detention Rate Sheet, and use the drop down menu to select a Unit of Measurement. The 'Start Bill Rate' value corresponds to the first demarcation of time (ie: regular 'charged' hours).
Max Bill Time
This value corresponds to the amount of time that will be charged the rate set in the 'Start Bill Rate' field. When the value in this field is reached, the application will switch to the charge displayed in the 'Second Bill Rate' field.
Second Bill Rate
Enter a Second Billing Rate for use with this Detention Rate Sheet. This rate is the one used when the time value exceeds the 'Max Bill Time' value (ie: overtime rate).
Min Bill Time
The Minimum Billing Time value corresponds to the amount of additional time that must elapse, beyond the time specified in the 'Free Time' field, before detention charges begin to be calculated for the client.
For example: if 'Free Time' is 2 hours and 'Min Bill Time' is 1 hour, the client will get two free hours after which an additional hour must pass before the client will be charged for detention. If the client is in detention less that 1 hour (e.g. 45 minutes) there will be no detention charges. If the client is in detention 1 hour or greater then the client will be charged for that 1 hour and any additional detention time beyond 1 hour.
Billing Increment
Size (min)
This field determines the way that time increments (and how it is rounded) when the system is determining Detention Billing totals. The default value for this field is '0' (zero), which sets the Detention logic to bill by the minute, once the 'Min Bill Time' value has been surpassed. The User can set this value to what ever number of minutes they want to specify as the increment (i.e. '5'- Detention Billing occurs in blocks of 5 minutes).
An example of the math behind this field (and the resultant Detention Billing calculation):
SET vPICK_TIME = vPICK_TIME / vBILL_BLOCK_SIZE;

SET vPICK_TIME = TRUNC(vPICK_TIME,0);

SET vPICK_TIME = vPICK_TIME * vBILL_BLOCK_SIZE;

where:

'vPICK_TIME' is the pick detention time in minutes,

and 'vBILL_BLOCK_SIZE' is the block size in minutes
Rounding Method
When working with Driver detention rates, you have access to three rounding methods:
-
Truncate: Always truncate the pick/delv time based off of billing block size.
-
Round Half Up: Round up the pick/delv time if half block size more than the closest time units.
-
Always Round Up: Round up the pick/delv time if more than the closest time units.
For example: if the bill block size is 15 minutes and the time difference between arrival and departure is 20 minutes:
-
Truncate: The detention time will be considered as 15 minutes as the actual time is less than 30 minutes (the next interval). Will be considered as 15 minutes if the detention time is between 16 and 29 minutes (30 being the next interval).
-
Round Half Up:The detention time will be considered as 15 minutes (as the actual time difference was 20 minutes - less than 1/2 the distance to next interval). Detention time will be considered as 30 minutes if the actual time is more than 22.5 minutes.
-
Always Round Up: The detention time will be considered as 30 minutes (if the departure time - arrival time is between 16 minutes and 30 minutes)
Shipper
Click the search button to attach a Shipper ID Code to this Detention Rate Sheet.
Note: If this field is left blank, all Shippers will be used.
Consignee
Click the search button to attach a Consignee ID Code to this Detention Rate Sheet.
Note: If this field is left blank, all Consignees will be used.
Bill To
This field allows a Detention Rate to be billed to a specific Client, regardless of the trip details. Use this field to apply the Detention charges to a third-party.
Shipper Zone / Consignee Zone
Rate sheets can be made to be specific to a particular location by specifying a zone. That is, the logic that determines the correct rate sheet to apply to the event will attempt to match the 'Drop Zone' to the specific Zone configured in these fields. If the zone value is provided, the sheet will apply to any drop location. Use the Database search button to browse your system for available Zone Codes.
Shipper Group / Consignee Group
These fields allow the User to create a Detention Rate sheet that will apply to Shipper or Consignee Groups, rather than individual Shipper/Consignee codes. Shipper and Consignee Groups are configured in the Customer & Vendor Profiles program > Groups Tab. If you specify a particular Shipper or Consignee Group code in either of these fields, all Customer/Vendor IDs that are a part of that group will have the displayed Detention Rate Sheet applied against their shipments if they go into Detention.
Send Warning / Warning Time
Check this box if you would like to generate a warning e-mail message that will be sent to customer when Detention charges are coming. This option is used in conjunction with the TMW Service Host program > Schedule Detention Service. The value you enter in the 'Warning Time' field below will tell the system how much you would like to allow after a warning has been sent before the Detention Invoice charges will start applying to your Client.
Exclude Closed Days in Detention
If this field is set to 'False', trailer detention will include closed days and holidays as detention days. If it is set to 'Check Client Profile', trailer detention days will be based on the Client’s hours of operation, as set in the Customer & Vendor Profiles program > Service Calendar Tab.
Detention Billing is calculated as follow:
-
Look at the Rate Sheet first: if the 'Exclude Closed Days in Detention' option is set to 'False', then it will be 'False' for all, regardless of the setting on the Customer Profiles program > Service Calendar Tab. Standard processing will apply and weekends and holidays will be treated like any other day, and will be included in the Detention Billing.
-
If the 'Exclude Closed Days in Detention' option is set to 'Check Client Profile', then go to the Customer Profile:
-
If the Customer Profiles 'Exclude Closed Days in Detention' flag is unchecked, then do not deduct the weekend and holidays from the Detention Billings.
-
If the Customer Profiles 'Exclude Closed Days in Detention' flag is checked, then check both weekend and holiday settings. Do not include these days in the Detention charges.
-
In summary, both Rate Sheet and Customer Profile options must be set to deduct weekends and holidays from the billable Detention time calculation before billings will be adjusted.
Note: Also, when determining the Rate Sheet to use in Detention Billing, the logic will consider the Zone Tree (as it exists in the FASTZONE Table). This means that Detention Rating allows for Rates to be based on Shipper and Consignee Zone Codes from any level within the TruckMate Zone Tree (i.e., if users specify Shipper/Consignee Zone as 'BC', all zones under 'BC' in Zone Tree will be matched with this Rate Sheet.
Exclude Closed Days in Free Time
If this field is set to 'False', trailer detention free time will include closed days and holidays. If it is set to 'Check Client Profile', free time will be based on the Client’s hours of operation, as set in the Customer & Vendor Profiles program > Service Calendar Tab.
Free Time is calculated as follows:
-
Look at the Rate Sheet first: if the 'Exclude Closed Days in Free Time' flag is set to 'False', then it will be 'False' for all, regardless of the setting on the Customer Profiles program > Service Calendar Tab. Standard processing will apply and weekends and holidays will be treated like any other day, and will not extend free time.
-
If the 'Exclude Closed Days in Free Time' is set to 'Check Client Profile', then go to the Customer Profile:
-
If Customer Profiles 'Exclude Closed Days in Free Time' option is unchecked, then do not extend the Free Time by the weekend- standard processing will apply, the rate sheet flag will be ignored.
-
If Customer Profiles 'Exclude Closed Days in Free Time' option is checked, then check both weekend and holiday settings. If Free Time occurs during these times, extend the Free Time by the number of days in the weekend.
-
Also check to see if a holiday falls together with a weekend and extend by that additional time.
In summary, both the Detention Rate Sheet and Customer Profile must be set to include weekends and holidays in Free Time calculation before Free Time will be adjusted.
Inter Company
This checkbox is a flag to indicate whether the selected Rate Sheet is an intercompany sheet or a local (working company) sheet. If checked (selected) and a detention bill is an inter-company bill in working company, the 'Bill-To' code in the Billing Company will be used to determine the rate of the detention accessorial charge. It will be just as if the detention was charged on the billing company’s freight bill. If the freight bill in the working company is not an intercompany bill, the working company can charge detention independently.
Note: If there is a business need to use two separate rate sheets for a client, one that is intercompany and the other is local, sequence the non-intercompany rate sheet first.
Billing Option
Choose either 'Accessorial Charge', 'Invoice' or 'Reporting' by clicking the radio option next to the Billing Option you would like to use for this Detention Rate Sheet.
Acc Ch Code
Click the search button to attach an Accessorial Charge Code to this Detention Rate Sheet. This is the Code that will be used on the Freight Bill if the 'Acc Charges' method is chosen. The codes available for selection in this field are only accessorial charges that have their 'Custom Code Only' field = 'True' (Checked) and their 'Charge Behavior' field = 'Flat Charge' as set in the Codes Maintenance program > Accessorial Charges Tab.
Clock Start Date / Time
Select the radio option you wish to use as the 'Starting' point for the Detention clock. Available choices are: 'Dispatch Delivery', 'Appointment Start', 'Appointment End' and 'Greater of Actual Time or Appointment End'.
Clock Stop Date / Time
Select the radio option you wish to use as the 'Ending' point for the Detention clock. Available choices are: 'Empty Notification' and 'Next Pick Up'.
Trailer
This section is only visible for trailer detention rate sheet, it’s invisible for driver detention rate sheet.
Class
Select the trailer class from the available list of values, only Trailer in the class selected can get detention rate sheet matched.
Audit Information
This is a read-only section that details the Username of the User who Creates and / or Modifies the current Detention Rate Sheet.
Approval
Approved
Check this checkbox to set the 'Approved' Status of this Detention Rate Sheet.
Approved By
Automatically populates based on the User who is using the system.
Effective Period
Click the Calendar buttons to choose two dates from the Calendar menus. The Date Range you setup here will become the Effective Period for the current Detention Rate Sheet. The Date Range defaults to the current Calendar year.
Attachments
Select the 'Clients' button to open the Detention Clients window, where you may attach Clients to the Detention Rate Sheet.
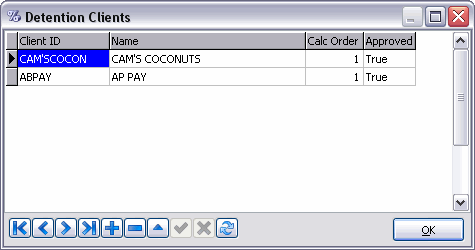
Click the '+' button to add a new Client ID detail line. The 'Name', 'Calc Order' and 'Approved' fields will all populate once the 'Client ID' is chosen (by double clicking the field).
Calc Order
The Calc Order sets the order in which the Detention Rate is used (specific to the Client). So if your Client has multiple Detention rates, you will want to change the 'Calc order' for each of them (this functionality is also available from the Client Information > Detention Tab).