Special Events

The Special Events application is used to configure, create, schedule and archive Special Events like permit expiration, scheduled equipment maintenance, birthdays, etc. Special Events can be assigned to equipment, drivers, customers, vendors and employees. Special Events are also used to highlight or flag resources requiring attention in the Dispatch programs and help prevent assigning a resource that is unavailable due to maintenance or certification expiries.
You can access the Special Events form from several other programs. In the equipment profile programs the Special Events button is located on the R&M tab. In the Driver Profiles program, the Special Events button is located on the Sp Events tab. In the Customer & Vendor Profiles program, the Special Events button is located on the Misc tab on the Customer tab, and in the lower left corner of the Vendor tab. In the Employee Profiles program, the Special Events button is located on the Dates tab. In the Dispatch program, Special Events can be viewed by selecting the context menu option from the driver or equipment grids. Resources are colour coded in the Dispatch program to indicate pending and overdue Special Events.
When you schedule a maintenance job on the R&M Maintenance program > Schedule RM tab, it automatically creates a Special Event record using the Special Event Code 'MAINT'. When creating a Special Event in this manner, you can only edit the Date, Level 1 and 2, Remarks and Results information.
Resources with looming Special Events will be color-coded in the Dispatch program, according to the Special Event code’s level definition. When your mouse pointer passes over one of these records, a small yellow box appears that shows the resource code, the SE Code and the SE Description. There are columns in all the resource screen segments that display the SE Priority and SE Remarks.
The Send to History function is found on all Special Event forms that can be invoked in the programs listed above. It is used to archive the selected Special Event. When a Special Event is archived, resource codes no longer change color in the Dispatch program, and the events do not display in the grid of the Special Events forms. After an event is archived, it can only be viewed through the History tab of the Special Events program. If you set the Req Results field on the code to be 'True', you must enter results before you can send the Special Event to history.
History & Repeat will archive the currently selected Special Event and create a new event with the same parameters. You must enter a new date on the new Special Event.
To access Special Events:
| From this location | Go to |
|---|---|
TruckMate Menu and TruckMate Task List |
Profiles > Special Events |
Windows Start Menu |
TruckMate 20xx > Special Events |
Windows Explorer |
C:\Program Files (x86) > TruckMate 20xx > SpEvents.exe |
How Do I
How do I Enter a new Special Event Code?
-
Open the Special Events program (SPEVENTS.EXE).
-
You must first create a special event. To do this go to the Codes tab and create a special event code if it does not already exist, (e.g., 'PERMIT').
-
Go to the Data Entry tab and enter the Resource Type and Resource Code to identify the resource.
-
User the grid on the Data Entry tab to setup the specific information for this event.
How do I Set Up a Special Event for a Permit expiration?
The Special Events program is used to configure, create, schedule and archive special events like permit expiration, scheduled equipment maintenance, birthdays, etc. Special Events can be assigned to equipment, drivers, customers, vendors and employees. You can access the Special Events form from several other programs. In the equipment profile programs, (Power Unit Profiles, Trailer Profiles, Misc Equipment Profiles), the Special Events button is located on the R&M tab. In the Driver Profiles program, the Special Events button is located on the Sp Events tab. In the Customer & Vendor Profiles program, the Special Events button is located on the Misc tab on the Customer tab, and in the lower left corner of the Vendor tab. In the Employee Data program, the Special Events button is located on the Dates tab. In the Dispatch program, Special Events can be viewed by selecting the context menu option from the driver or equipment grids. Resources are colour coded in the Dispatch program to indicate pending and overdue Special Events.
-
Open the Special Events program (SPEVENTS.EXE).
-
You must first create a special event. To do this go to the 'Codes' tab and create a special event code entitled 'PERMIT'. Refer to the online help for a description of fields and their specific setup requirements.
-
Go to the 'Data Entry' tab and select a 'Resource Type' (from the pull-down menu) that this special event will be applied to. Select one from the choices of: Power Unit, Trailer, Misc. Equipment, Drivers, Vendor, Client, and Employee. In this example, select 'Power Unit'.
-
While still in the 'Data Entry' tab, enter a 'Resource Code' (this will vary depending on your selection of a 'Resource Type'). You can double-click in the Resource Code field to view choices set up for this Resource Code. In this instance, you will select the Power Unit that you wish to attach a PERMIT to.
-
Still in the 'Data Entry' tab, select the '+' button and in the Special Event column, use the pull-down arrow to select 'PERMIT'. Go to the 'Date' column and double-click to bring up a calendar. Scroll to the permit expiration date and select it. Press Save.
Note: You may be asked to enter a remark in the 'Remarks' column depending on your selection in the Codes tab. When on the Codes tab, check to see what appears in the 'Copy Description' column. If 'False' appears there, then you will have to enter remarks when in the 'Data Entry' tab. If 'True' appears in the Copy Description column, then the remarks will be copied from the 'Description' field in the Codes tab.
Does this permit need to be a recurring event? If yes, set up the recurring amount of time on the Recurring tab. In this instance, a permit is set up for November 15, 2002, and I want it to remind me every year on the date of November 15th, until the year 2008. Select the '+' button and in the Month of Year column, enter 11. In the Day of Month column, enter 15. In the Resource Code, select Power Unit. In the Resource Type, select the appropriate Power Unit. For Special Event Code, select 'Permit'. Enter any remarks (e.g., 'Overweight permit') in the remarks field. Press save.
Use the Calendar tab to view upcoming events for say, this week. To verify that you have set up this permit correctly, use the calendar scroll buttons and go to November 15, 2002. Make the same selections as above the Special Events Code, Resource Code, and Resource Type, and you should see your entry in the grid below. Rest your cursor on the grid entry, and a further breakdown of this special event code will appear in a form field at the bottom of your screen.
How do I Use the Calendar in the Special Events program?
-
Using the same example as in the second 'how do I' question for the Special Events program, where we are entering a Permit for overweight vehicles, you can follow along and see how to use the calendar in the Special Events program.
-
Open the Special Events program (SPEVENTS.EXE).
-
You must first create a special event. To do this go to the 'Codes' tab and create a special event code entitled 'PERMIT'. Refer to the online help for a description of fields and their specific setup requirements.
-
Go to the Data Entry tab and select a 'Resource Type' (from the pull-down menu) that this special event will be applied to. Select one from the choices of: Power Unit, Trailer, Misc. Equipment, Drivers, Vendor, Client, and Employee. In this example, select 'Power Unit'.
-
While still in the 'Data Entry tab, enter a 'Resource Code' (this will vary depending on your selection of a 'Resource Type'). You can double-click in the Resource Code field to view choices set up for this Resource Code. In this instance, you will select the Power Unit that you wish to attach a PERMIT to.
-
Still in the Data Entry tab, select the '+' button and in the Special Event column, use the pull-down arrow to select 'PERMIT'. Go to the 'Date' column and double-click to bring up a calendar. Scroll to the permit expiration date and select it. Press Save.
Note: You may be asked to enter a remark in the 'Remarks' column depending on your selection in the Codes tab. When on the Codes tab, check to see what appears in the 'Copy Description' column. If 'False' appears there, then you will have to enter remarks when in the 'Data Entry' tab. If 'True' appears in the Copy Description column, then the remarks will be copied from the 'Description' field in the Codes tab.
Does this permit need to be a recurring event? If yes, set up the recurring amount of time on the Recurring tab. In this instance, a permit for November 15, 2002 is set up, and I want it to remind me every year on the date of November 15th, until the year 2008. Select the '+' button and in the Month of Year column, enter 11. In the Day of Month column, enter 15. In the Resource Code, select Power Unit. In the Resource Type, select the appropriate Power Unit. For Special Event Code, select 'Permit'. Enter any remarks (in this instance I have entered 'Overweight permit' in the remarks field. Press save.
Use the Calendar tab to view upcoming events for say, this week. To verify that you have set up this permit correctly, use the calendar scroll buttons and go to November 15, 2002. Make the same selections as above the Special Events Code, Resource Code, and Resource Type, and you should see your entry in the grid below. Rest your cursor on the grid entry, and a further breakdown of this special event code will appear in a form field at the bottom of your screen.
How do I Enter information on the Data Entry tab?
Using the same example as in the second 'how do I' question for the Special Events program, where we are entering a Permit for overweight vehicles, you can follow along and see how to enter information on the Data Entry tab in the Special Events program.
-
Open the Special Events program (SPEVENTS.EXE).
-
You must first create a special event. To do this go to the Codes tab and create a special event code entitled 'PERMIT'. Refer to the online help for a description of fields and their specific setup requirements.
-
Go to the Data Entry tab and select a 'Resource Type' (from the pull-down menu) that this special event will be applied to. Select one from the choices of: Power Unit, Trailer, Misc. Equipment, Drivers, Vendor, Client, and Employee. In this example, select 'Power Unit'.
-
While still in the Data Entry tab, enter a 'Resource Code' (this will vary depending on your selection of a 'Resource Type'). You can double-click in the Resource Code field to view choices set up for this Resource Code. In this instance, you will select the Power Unit that you wish to attach a PERMIT to.
-
Still in the Data Entry tab, select the '+' button and in the Special Event column, use the pull-down arrow to select 'PERMIT'. Go to the 'Date' column and double-click to bring up a calendar. Scroll to the permit expiration date and select it. Press Save.
How do I Use the History tab?
Use the History tab to view special events that are 'Active' or 'History'.
-
Open the Special Events program (SPEVENTS.EXE).
-
Go to the History tab and select a 'Special Event Code' from the pull-down menu. Select a 'Resource Type' from the pull-down menu. Select a 'Resource Code', from the pull-down menu. Select a 'Status' from the pull-down menu.
-
Select 'Refresh' and all applicable special events relevant to your choices will appear in the grid.
Layout of the Special Events window
Menu and toolbar options
There are no unique menu and toolbar options and functionality specific to the Special Events window.
For information about common menu and toolbar options (i.e. File menu, Refresh, Multi-Company, etc.), see General menu and toolbar options in TruckMate basics.
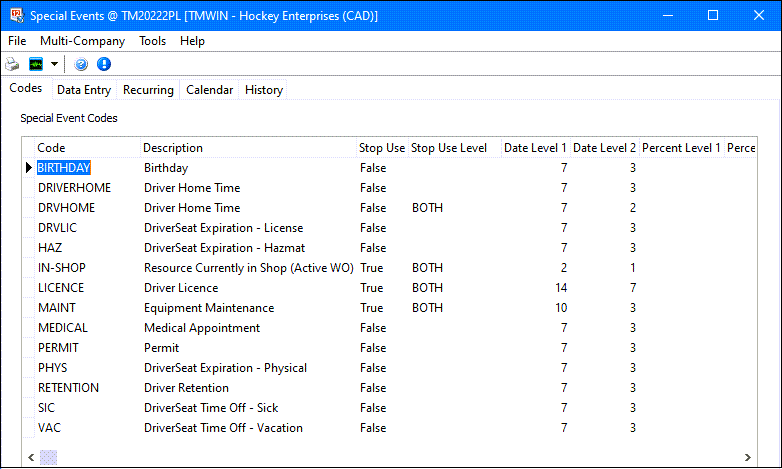
Codes tab
The Codes tab is used to create Special Event codes that describe Special Events and the actions Special Event codes will have. The codes shown below are available on your database; you may modify these codes and/or add additional codes for your own purposes. Do not delete the 'MAINT' code, as it is used by the Repairs & Maintenance module to record maintenance events.
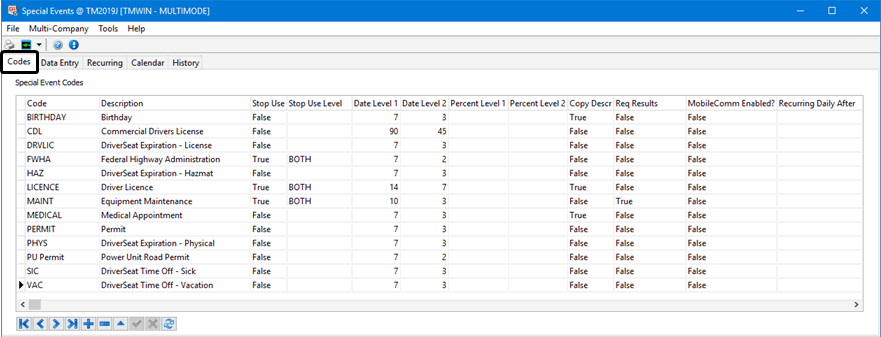
Code
Can be up to ten characters in length. When adding codes, make sure they are descriptive, as pop-up reminders in the Dispatch program display this code.
Description
Enter a description for the Code. It will display in the Special Events activity form in TruckMate programs where this form is available.
Stop Use
If Stop Use is set to 'True', in the Dispatch program, users will not be allowed to activate a trip to which the resource is assigned unless the Group to which the user belongs is configured with the Basic Rights of Supervisor in the Security Setup program. While equipment and drivers can still be assigned to trips, when a user changes the leg status from planned to active (for example, changing the trip status from 'ASSGN' to 'DISP') a warning will be display and, unless the user’s Group is defined as Supervisor, the operation will be aborted.
Stop Use Level
If Stop Use is set to 'True', this Stop Use Level can be used to specify which events, (Match or Dispatch or both), creates a hard stop. In essence, it means the special event stop does not have to be enforced in all instances. For example, if the Stop Use Level is set to Dispatch, you could use this resource for planning but you would not be able to dispatch the trip.
Date Level 1 / 2
In the Dispatch program, driver and equipment codes change color based on upcoming (or overdue) Special Events. There are three levels: Level 1 is the lowest (blue), level 2 is next (green) and level 3 is the highest (red). Levels are defined by the number of days to which they apply. Level 3 warnings are system-coded to turn red on the day the Special Event becomes due; all overdue Special Events will also cause the unit/driver code to turn red. Level 2 and Level 1 codes will change to their respective colors based on the days specified in the Level 1 / Level 2 fields. For example, the code License (shown above) will cause the driver’s code in Dispatch to turn blue fourteen days before it is due; seven days before it is due, the driver’s code will turn green. On the day the driver’s license is due, the driver’s code will turn red and it will remain red until the Special Event is archived.
Percent Level 1 / 2
Percent Level settings are similar to Date Level values in function but are typically used with planned maintenance records to accommodate situations where you are not using date-based records such as odometer or fluid level readings.
Copy Description
If Copy Description is set to 'True', the description of the code will be pasted into the Remarks field on the Data Entry tab of the Special Events program. This is simply to save keystrokes; often, the general code description will be sufficient for the individual application.
Note: You can still edit the Remarks field on the Data Entry tab, regardless of the setting here.
Req Results
If Req Results is set to true, the Special Event cannot be closed and archived unless Results have been entered.
MobileComm Enabled?
Set this field to 'True' if your Special Event code is MobileComm ready. The default is 'False'.
Recurring Daily After
This field is used to designate a time in which to run the Special Event code. Enter a time using the 24-hour method, without including a colon. The Special Events program will format this field automatically.
Data Entry tab
Use the Data Entry tab to assign Special Event codes to drivers, equipment, customers, vendors or employees. Special Events applied here will be accessible in the Special Events program, the Dispatch program, the Driver Profiles program, and the resource maintenance programs. Special Events applied to customers and vendors will only be seen in the Special Events program and in the Customer & Vendor Profiles program. Special Events applied to employees can be viewed in the Special Events program, and in the Employee Profile program. To view or add Special Events, you must first select a Resource Type and a Resource Code.
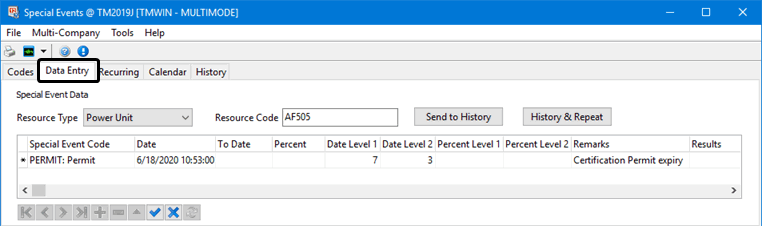
Resource Type
Select a Resource Type from the drop down list.
Resource Code
Double click to view and select a resource code. Only codes of the specified Resource Type will be available for selection.
Send to History
You can archive the Special Event that is currently selected in the grid by clicking the Send to History button. If the Require Results field for the Special Events code is set to true, the Special Event cannot be sent to history until you have entered something in the Results field in the grid.
History and Repeat
Will archive the Special Event that is currently selected in the grid, and create a new Special Event of the same type. You will be required to enter a date for the new event.

Special Event Code
Select a Special Event Code description from the drop down list.
Date
Specify the date that the Special Event comes due. Double click for a calendar selection form.
To Date
The To Date field allows you to specify a date range to indicate a time period where this resource will not be available for use such as a maintenance event. Leave this field empty if you only need to indicate an expiry date.
Percent / Percent Level 1 / 2
Percent Level settings are similar to Date Level values in function but are typically used with planned maintenance records to accommodate situations where you are not using date-based records such as odometer or fluid level readings.
Date Level 1 / Level 2
The Level 1 and Level 2 values configured in the Code setup will default here. You can change them if you like. These values control how the 'Resource Type' is highlighted to denote urgency.
Depending on the values entered in these two fields, the 'Resource Type' will be highlighted a different color. For example, if the date in the 'Date Field' is set at '01/012006' (January 1st, 2006), the value in the 'Level 1' field is '7' and the value in the 'Level 2' field is '3' the following will occur:
-
A date 7 days before January 1st but not 3 days (or less) before will highlight the 'Resource Type' BLUE.
-
A date 3 days before January 1st but not that exact date will highlight the Resource Type GREEN.
-
A date on or later than January 1 will highlight the Resource Type RED.
Remarks
Enter Remarks that will display in the Special Events column. If you specified that Copy Description was 'True' in the Code setup, the description will appear in the Remarks field.
Results
You can enter text in the Results field before you send the item to history. If you set the 'Req Results' field to 'True', you must enter Results before you archive the event.
Recurring Events tab
The Recurring Events tab allows the user to create Special Events that reoccur on a regular basis. The columns are for month, day of month, etc. User then selects the generate button and they will be created based on the selections made in these columns instead of having to enter them over and over.
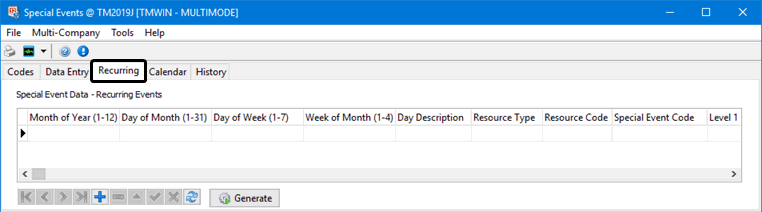
Month of Year (1-12)
Enter the numerical value of the month. For example, January = 1, February = 2, etc.
Day of Month (1-31)
Enter the numerical value of the day of the month. For example, day 5, day 7, etc.,
Day of Week (1-7)
Enter the day of week number. For example, in your Company Day One could equal Sunday, Day Two could equal Monday, etc.,
Week of Month (1-4)
Enter the numbers 1-4 to determine if you are referring to week one, week two, etc., of this month.
Day Description
Enter a brief description explaining this event. For example, medical appointment.
Resource Type
You must select a specific Resource Type. Only Special Events for this resource type will display in the calendar grid.
Resource Code
You must select a specific Resource Code. Double click to view and select a resource code. Only Special Events for the specified resource code will be available for selection. Note that you must select a Resource Type first.
Special Event Code
Double-click to select from the previously entered codes. Go to the Codes tab to enter a new code.
Level 1 / Level 2
In the Dispatch program, driver and equipment codes change color based on upcoming (or overdue) Special Events. There are three levels: Level 1 is the lowest (blue), level 2 is next (green) and level 3 is the highest (red). Levels are defined by the number of days to which they apply. Level 3 warnings are system-coded to turn red on the day the Special Event becomes due; all overdue Special Events will also cause the unit/driver code to turn red. Level 2 and Level 1 codes will change to their respective colors based on the days specified in the Level 1 / Level 2 fields. For example, the code License (shown above) will cause the driver’s code in Dispatch to turn blue fourteen days before it is due; seven days before it is due, the driver’s code will turn green. On the day the driver’s license is due, the driver’s code will turn red and it will remain red until the Special Event is archived.
Remarks
Pre-populated from information entered in the Special Events program, Codes tab.
Note: If you specified that Copy Description was 'True' in the Code tab, the description will appear in the Remarks field.
Generate
Clicking the 'Generate' button will bring up the Generate Recurring Events window.
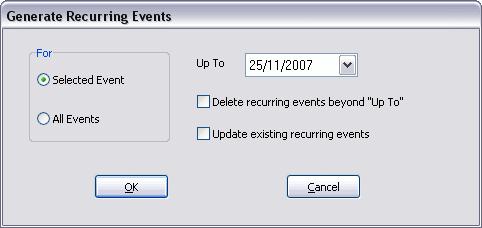
If there are already Recurring Events outlined in your system, you can use this menu to display them based on the criteria in this menu.
For Selected / All Events
If 'Selected Events' is checked, only those events that match the criteria you have specified in the main 'Recurring' tab of the Special Events program will be displayed. Otherwise, all Special Events will be displayed.
Up To
Use the pull down menu to specify a date to limit the amount of recurring events that will be displayed.
Delete recurring events beyond 'Up To'
Checking this option will delete all events past the date you select in the 'Up To' field.
Update existing recurring events
Checking this option will enable all currently existing recurring dates up until the date in the 'Up To' field.
Calendar tab
The Calendar tab shows a calendar grid with Special Events arranged according to their due dates. If you hover the mouse pointer above an event, details of the event will display at the bottom of the screen. If you double click in an empty grid space, you will be asked if you wish to add a new Special Event. If you say yes, you fill in the fields shown at the bottom of the screen in the same manner as you would on the data entry tab. If you double-click on an existing Special Event record, you will be asked if you wish to edit it. If you say no, you will be prompted if you wish to send the event to history.
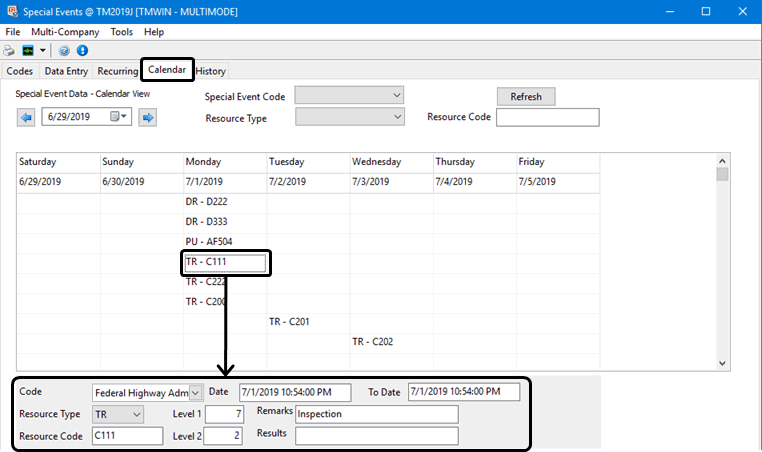
Filtering Options
The following options allow you to filter the Special Event records that will appear in the Calendar tab by a number of criteria:
Date
The calendar grid displays according to the date selected here. This date will be the first of a seven-day period displayed in the grid. Use the red arrows to scroll forward or backward. Special Events are displayed according to their due date.
SE Code
You may optionally select a specific Special Event code to filter the Calendar tab results. Only Special Events of this code will display in the calendar grid.
Resource Type
You may optionally select a specific Resource Type to filter the Calendar tab results. Only Special Events for this resource type will display in the calendar grid. In TruckMate 2010, Resources that are set to 'Inactive' in their respective Profiles Module application will not have their Special Events data displayed on the Calendar tab.
Resource Code
You may optionally select a specific Resource Code to filter the Calendar tab results. Double click to view and select a resource code. Only Special Events for the specified resource code will be available for selection. Note that you must select a 'Resource Type' first.
Refresh
When you change the selection criteria, click on the Refresh button to refresh the grid display.
Special Event Entry
When you double-click on a specific Date field in the Special Event Calendar grid, the footer options become available:
Code
Use the drop-down menu to select a Special Event code.
Res Type
Use the drop-down menu to select a Resource Type to apply the special event code to.
Res Code
Enter the Resource ID code that requires the special event. This can be a Driver ID, Power Unit ID, Trailer ID, etc.
Date
This field will automatically populate based on the Date field that was selected in the Calendar grid.
Level 1 / Level 2
These fields will automatically populate with data based on the values entered in the 'Level 1' and 'Level 2' fields of the Codes tab.
Remarks
This will automatically populate based on the 'Code' value chosen.
Results
This field allows the entry of brief free-format Notes regarding the outcome of the special event.
Post
Select the 'Post' button to add this special event to the Calendar grid.
History tab
You may view both active and archived Special Events on the History tab. For deleted special events, you can view the user who deleted the event 'Deleted By' and the date of deletion 'Deleted Date' in the grid. The header section of the tab is used as a filter. Use the drop down lists and the find buttons to define you filter criteria, and then select the 'Refresh' button, the grid will be populated with history data of special events that match your selected filter criteria. If you change the filters, be sure to click on Refresh to re-display the grid.
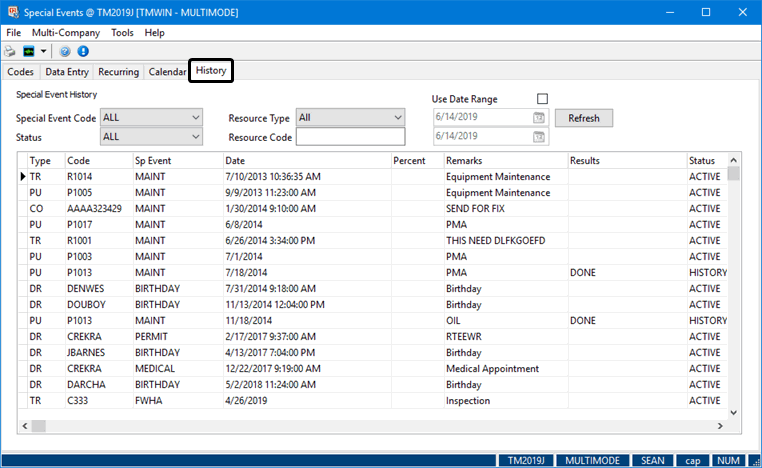
Special Event Code
To view Special Events of a specific code, check the box and select the code from the drop down list.
Status
To view Special Events that are archived (HISTORY) or active (ACTIVE), check the box and select the status from the drop down list.
Resource Type
To view Special Events for a specific type of resource, check the box and select the resource type from the drop down list.
Resource Code
To view Special Events for a specific resource, check the box and double click to select the resource code. Note that you must select a Resource Type first.
Date Range
Use this checkbox to only display records within a specific date range.
Date
To view Special Events according to a range of due dates, select the Date Range checkbox and enter the start and end dates.
Refresh
Select the refresh button to reload the information in the grid, based on the new filter criteria.