Detail tabs: Dangerous Goods, Details

This topic discusses the following tabs:
-
Dangerous Goods
-
Details
Dangerous Goods
The Dangerous Goods tab allows for additional information to be viewed about the Dangerous Goods or hazardous materials referenced in the Load Details.
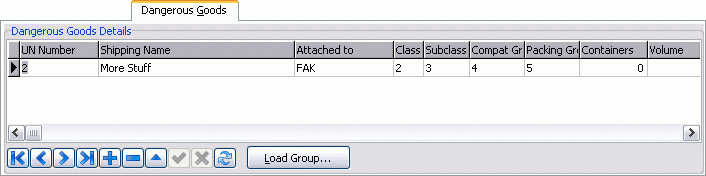
Load Group button
Clicking this button will bring up a new window where you must select a Dangerous Goods Group, which will be displayed within the Details Grid following selection. Dangerous Goods Groups are configured within the Bulk Codes Maintenance program.
Grid Fields
The majority of these fields will pre-populate with information from the Bulk Codes Maintenance program.
| Field | Definition |
|---|---|
UN Number |
Displays the specific dangerous item’s 'United Nations' number. These numbers are the accepted global codes to describe Dangerous Goods. |
Shipping Name |
Displays the full name of the Dangerous item being shipped, usually with a description of what it is used for. |
Attached to |
If the current Dangerous Good is attached to a different Dangerous Good, a second 'Shipping Name' will be displayed here. |
Class |
Displays the Dangerous Goods Class for the selected item. |
Sub-class |
Displays the Dangerous Goods Sub-class (or subsidiary class) for the selected item. |
Compat Group |
Displays the ID of the current item’s 'Compatibility Group', which is defined in the Bulk Codes Maintenance program. |
Packing |
Displays the ID code of the current item’s 'Packing Group'. Available values are 'I', 'II', and 'III'. These codes are set up in the Bulk Codes Maintenance program. |
Containers |
If a specific Container is required to house the Dangerous Good, it’s ID will be displayed here. |
Volume |
Displays the current item’s Volume. |
Vol Units |
Displays the current item’s unit of Volume measurement. |
Mass |
Displays the current item’s Mass |
Mass Units |
Displays the current item’s unit of Mass measurement. |
Explosives |
If the current Dangerous Good contains explosives, enter the amount of explosives in this field. |
Expl Units |
Enter the unit of measurement of the explosive material within the selected Dangerous Good. |
Control Temp |
Will display a Control Temperature value if the current Dangerous Good requires a controlled temperature. |
Emergency Temp |
If the current Dangerous Good has a temperature limit in which it becomes unstable, that temperature will be displayed here. |
Marine Pollutant |
This field will contain one of two values if indeed the current Dangerous Good is a Marine Pollutant. The available values are P (Marine Pollutant) and PP (severe Marine Pollutant). |
Limited Quantity |
This True/False field indicates whether there is a limited quantity of dangerous goods. |
Inhalation Hazard Zone |
This True/False field indicates whether there is an Inhalation Hazard Zone. |
Inhalation Hazard Zone Type |
This field indicates the type of Inhalation Hazard Zone. |
Details
The Details tab is where specific information about the Freight Bill is entered: Commodity, Load dimensions, Rating information and more. The Details Tab is also where the Service Level for the Freight Bill is assigned. Multiple detail lines can be entered for a single Freight Bill.
| A Service Level is a code assigned to each Freight Bill in TruckMate that links the bill to a number of factors that can affect how the bill is to be rated, how Delivery times are calculated, and how the bill is to be processed by your operations. Service Level codes are defined in the Codes Maintenance program. |
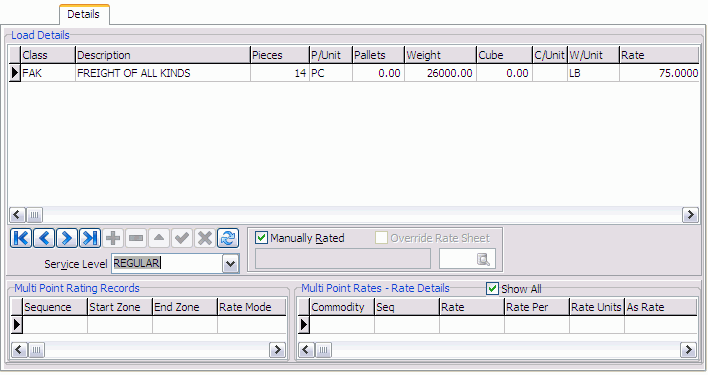
Service Level
Defaults according to the configuration of the site (set up in the Codes Maintenance program > Site Setup). You can manually select a different Service Level (as configured in the Codes Maintenance program) by clicking on the down arrow and selecting from the drop down list box.
Manually Rated
In order to enter a manual charge or rate value on a detail line, this box must be checked. To check this box automatically every time a detail line is entered, set the Manual Rate Checked option in the Application Configurator program to 'True'. When manually rating a Detail line, you can enter rating information in the Rate, Discount Rate, Rate Unit and Rate Per fields, which will cause the Subtotal, Discount Amount and Charges field to calculate automatically. At a Minimum, you can simply enter a charge in the Subtotal field.
A new hook has been added into the system where users can have custom procedures written to manipulate the Freight Bill before it Rates. For example, if you want the mileage calculation to re-rate each time you edit and post the Freight Bill, this is where a trigger could be inserted to meet that need. Contact the Sales Department for more information.
Override Rate Sheet
When using automatic rating, the system now allows the user to override the rate-sheet selected and use an alternative one for this Freight Bill only. This is set up in the Codes Maintenance program > Site Tab.
Skid Dimensions Window
Pressing the '<Ctrl><K>' hot key combination will open up the Skid Dimensions Entry Window, which allows you to enter Skid measurements for the current Freight Bill.
| For the Skid Dimensions Windows to appear when you use the hot key, you must have the 'Skid Dimensions' Application Configurator option set to 'True' for CSERV.EXE. |
Details grid
Enter details about the commodity, weight, dimensions and rate of the Freight Bill in the Details Grid. Post each detail line using the navigator bar on the Details Tab. When all detail lines are entered, post the changes to the Freight Bill using the main navigator bar. All fields in the grid are optional; you only need to enter data in those fields that are pertinent to you for informational or rating purposes.
If an alternate commodity is defined for the selected customer in Customer and Vendor profiles program, and you want to use that commodity for this order, there is an application configuration option in Application Configurator program > CSERV.EXE - Default Commodity Values which allows you to select the fields in the Details tab that you want to be defaulted.
There are two Hot Keys that can be used in this Grid to format the position of the individual detail lines:
-
Use <CTRL><B> to switch current line with previous line in detail grid (move 'up' in Grid).
-
Use <CTRL><F> to switch current line with next line in detail grid (move 'down' in Grid).
| If a Freight Bill is entered without a weight, e.g., '0 LB', it Rates out at the Minimum charge. You can configure the system to automatically calculate weight, cube and pallets based on the 'Conversion from Pieces' factors entered in the Codes Maintenance program. After configuring these values, you will only need to enter the Commodity Code and the number of pieces; piece unit, weight, weight unit, cube, cube unit and number of pallets will be automatically filled in. If the Freight Bill is a 'Parent' bill (that is, if the bill has Extra Stops), detail lines from attached Child Bill will display in grey text. To switch to the Details Tab of the Child Bill, right click on a Child Bill Detail line and select the Go to Child Bill menu option. |
| Column | Definition |
|---|---|
Warnings |
This field contains several icons that will be enabled/disabled depending on several characteristics:
|
Commodity / Description |
If the Bill To customer has a Primary Commodity specified in their profile (in the Customer & Vendor Profiles program), that Commodity Code and description will default when you begin to add the detail line. If not, double-click in the Commodity field to select a Commodity Code. The Short Description of the commodity (as entered in the Codes Maintenance program) will default. TruckMate will check the effectiveness of the selected commodity. This is done by comparing the Pick up Date with the date range specified by the commodity’s Effective Date and the Expiry Date fields in Customer & Vendor Profiles program. If the Pick up Date falls outside that range, TruckMate will issue an error. This field may automatically populate, depending on the 'Client Commodities' option in the Application Configurator program. |
Pieces / Pcs Unit |
Enter the number of pieces in the Pieces field. If there is a Default Unit of Measurement that is of the type 'Pieces' (as configured in the Codes Maintenance program) specified in the Bill To customer’s profile, that value will default in the Pcs Units field. Otherwise, double-click to display and select a pieces unit. |
Weight / Wgt Units |
Enter the numerical weight value in the Weight field. If there is a Default Unit of Measurement that is of the type 'Weight' (as configured in the Codes Maintenance program) specified in the Bill To customer’s profile, that value will default in the Wgt Units field. Otherwise, double-click to display and select a weight unit. |
Length / Length Units |
Enter the numerical length value in the Length field. If there is a Default Unit of Measurement that is of the type 'Length' (as configured in the Codes Maintenance program) specified in the Bill To customer’s profile, that value will default in the Lngth Units field. Otherwise, double-click to display and select a length unit. |
Cube / Cube Units |
Enter the numerical cubic value in the Cube field. If there is a Default Unit of Measurement that is of the type 'Cube' (as configured in the Codes Maintenance program) specified in the Bill To customer’s profile, that value will default in the Cube Units field. Otherwise, double-click to display and select a cube unit. The 'Cube' value is rounded to the nearest decimal value, and can be set to have as many as four decimal points of precision (as configured by the Application Configurator program > CSERV.EXE > 'Round Cube' option. |
Volume / Vol Units |
Enter the numerical liquid value in the Liquid field. If there is a Default Unit of Measurement that is of the type 'Volume' (as configured in the Codes Maintenance program) specified in the Bill To customer’s profile, that value will default in the Vol Units field. Otherwise, double-click to display and select a volume unit. |
Area / Area Units |
Enter the numerical area value in the Area field. If there is a Default Unit of Measurement that is of the type 'Area' (as configured in the Codes Maintenance program) specified in the Bill To customer’s profile, that value will default in the Area Units field. Otherwise, double-click to display and select an area unit. |
Time / Time Units |
Enter the numerical time value in the Time field. If there is a Default Unit of Measurement that is of the type 'Time' (as configured in the Codes Maintenance program) specified in the Bill To customer’s profile, that value will default in the Time Units field. Otherwise, double-click to display and select a time unit. |
Distance / Dst Units |
Enter the numerical distance value in the Distance field. If there is a Default Unit of Measurement that is of the type 'Distance' (as configured in the Codes Maintenance program) specified in the Bill To customer’s profile, that value will default in the 'Dst Units' field. Otherwise, double-click to display and select a distance unit. Note that this field is not used for the purpose of calculating automatic rating; the Mileage field in the Freight Bill header is used for that purpose. |
Height / Height Unit |
Enter the numerical height value in the Height field. Double-click in the Height Unit column to see If there is a Default Unit of Measurement that is of the type 'Length' (as configured in the Codes Maintenance program) specified in the Bill To customer’s profile, that value will default in the Height Units field. |
Width / Width Unit |
Enter the numerical width value in the Width field. Double-click in the Width Unit column to see If there is a Default Unit of Measurement that is of the type 'Length' (as configured in the Codes Maintenance program) specified in the Bill To customer’s profile, that value will default in the Width Units field. |
Dim Weight / Dim Weight Units |
Calculates the dimensional weight, based on the cube to weight conversion factor. |
Position |
Used in conjunction with the Contract Billing program. When a new 'summarized' bill is created, the position that is used to group/consolidate the bills will be entered here by the program. |
Pallets |
For information and reporting purposes, you can enter the number of pallets associated with the detail line. This information is not used elsewhere in the system. |
Items |
The Items column determines the number of bar codes that will be generated for this Freight Bill. If the Freight Bill is billed/interfaced, double-clicking the items field will open the 'Barcode Item Details' window as read-only. |
Pieces Est / Pallets Est |
These columns represent the estimated pieces and pallets for the freight bill, and are used to compare with the actual Pieces/Pallets on the Multi Mode Dispatch program > Barcode Items Detail window. |
Field 21 - Field 25 |
The five fields are all defined as 'Date' fields, the user can use them to store any Date and Time information necessary for the business flow. However, there are 5 app configs that control whether the time part can be used or not for each field, Application Configurator program > CSERV.EXE 'Details User Field (21-25) Type'. If a field is needed for time stamp kind of information, the user can set the app config corresponding to that field as Date and Time. If only the date is needed, the app config can be set to use only the date part. Double clicking on any of them while the grid is in the data entry mode will bring up the calendar window for date selection. |
Sort Order |
This field indicates the order of a detail line. You can use the context menu option, Insert Before Current Line, on any line on the grid to insert a line and update the order of all the lines below and including the selected line. You can also select the context menu option, Update Sort Order, or double click in this field to change the sort order of the selected line. Removing a line from the Details grid will decrement the Sort Order value for all lines with higher Sort Order than the deleted line. If a new line is added (not inserted between the lines), it will be appended at the bottom of the grid and will have a sort order of the maximum at that time + 1. You can sort the grid based on any column on the grid by selecting the heading of the sort column. The sort order values for all the lines will change according to the new sort. |
Commodity Group |
Specify which commodities are available to a Shipper, and define commodity groups, which a Shipper may use. These are defined in the Customer & Vendor Profiles program. When adding bills in the Customer Service or Quick Bill Entry program only allowable commodities and commodity groups will be available to add to a Freight Bill. When a commodity group is added, all commodities that are part of that group are added as well. The user may specify a default commodity or commodity group, which will be added to every Freight Bill as soon as a commodity is added. This works to replace the currently existing Primary Commodity, which is set up using the Codes Maintenance program. Activate this functionality by using the Application Configurator > PROFILE.EXE, 'Client Commodities' option. Upon activation, you’ll notice a 'Commodity' button on the PROFILES.EXE Header, where you can bring up a window and create commodity groups. |
Rate |
If the Manually Rate checkbox is not checked, the system will attempt to automatically rate the Freight Bill based on the configuration in the Rates Maintenance program. If successful, the rate per unit will be displayed in the Rate field, and the rate per unit multiplied by the number of rating units will be displayed in the Charges field. If a discount has been configured for the Bill To customer (in the Customer & Vendor Profiles program) the amount in this field will be reduced by the discount percentage. Do not confuse this with discounts configured in the Rates Maintenance program, which are displayed in the Discount and Discount Rate fields. In the Application Configurator program, you can configure whether Rates should round to two decimal places, or whether all four available decimal places should be displayed and used for the calculation. If a Freight Bill is entered without a weight, e.g., 0 LB, it rates at the Minimum charge. |
Rated As / As Rate |
If 'As Rating' has been allowed on the rate sheet (as configured in the Rates Maintenance program), the system will compare the rate yielded by the next break level on the rate sheet multiplied by the lowest unit amount for the next break level. If it results in a lesser charge than that yielded by the true unit amount multiplied by the rate, the Rated As field will show the lowest unit amount for the next break level, and the As Rate will show the rate for the next break level. |
Charges |
The Charges field will display the value in the Subtotal field Minus the value in the Discount field. This field is read-only, and cannot be modified. If the currency of the Bill To customer varies from the currency of the rate sheet, the Rate amount will be converted based on the currency conversion values configured in the GL Chart of Accounts program. However, this conversion will not be performed until the record is posted on the main navigator bar (not the navigator bar on the Details Tab). Also, discounts are not computed until the record is posted on the main navigator bar. |
Dang. Goods / Temp Controlled |
Will display the value 'True' if the detail line’s commodity is flagged (in the Codes Maintenance program) as a dangerous good or a commodity requiring temperature control. Otherwise, the value 'False' will be displayed. A warning will display in the Customer Service and Quick Bill Entry programs to indicate this status, and an icon will be displayed in the Warnings column of the Freight Bill grid in the CrossDock program. |
Field One - Field Ten |
Are general purpose fields that can be used to store miscellaneous information about the detail line. |
Field Eleven - Field Twenty |
Ten User fields (of 'Double') type, which allow the entry of long decimal numbers. |
Requested Equipment |
Can be used to store an Equipment Class (as created in the Codes Maintenance program). Double-click to view and select an Equipment Class. If your automatic rating is configured to use the Requested Equipment field, it refers to the Requested Equipment value on the Summary Tab, not this field. |
Equipment ID |
This field becomes editable if the application configuration option in Application Configurator > Billing > CSERV.EXE - Use Equipment From Equipment Class is set to True. Furthermore, you can use the edit pick to select an equipment from a list of available equipment. The displayed list will be filtered based on the equipment class entered in the Requested Equipment field described before. |
Temperature |
If a temperature has been assigned to this Commodity Code (in the Codes Maintenance program), that value will default in this field. You can manually change the value if required. A warning will display in the Customer Service and Quick Bill Entry programs to indicate this status, and an icon will be displayed in the Warnings column of the Freight Bill grid in the CrossDock program. |
Discount |
If a discount has been configured for this customer in the Rates Maintenance program, the amount of the discount will be displayed in this field. The Discount Rate is multiplied by the value in the Subtotal field to determine the Discount amount. This field will not be computed until the record is posted on the main navigator bar (not the navigator bar on the Details Tab). |
Discount Rate |
If a discount has been configured for this customer in the Rates Maintenance program, the percentage value of the discount will be displayed in this field. The Discount Rate is multiplied by the value in the Subtotal field to determine the Discount amount. This field will not be computed until the record is posted on the main navigator bar (not the navigator bar on the Details Tab). |
Sub Total |
Displays the Rate multiplied by the number of rating units (ie, number of pounds, number of pieces, etc). If As Rating was used on this detail line, the Sub Total field will display the As Rate multiplied by the number of rating units. If you are manually rating a detail line, enter the charge in this field. |
Rate Unit |
If this Detail line is automatically rated, the unit used to calculate the rate will automatically display in this field. This is configured in the Rates Maintenance program. If the line is manually rated, enter the unit type that should be used to calculate the rate. The amount of the unit type will be multiplied by the value in the Rate field to determine the Subtotal. |
Rate Per |
If this Detail line is automatically rated, the amount of units used to calculate the rate will automatically display in this field. (For example, if the rate is per 100 pounds, '100' will display in this field.) This is configured in the Rates Maintenance program. If the line is manually rated, enter the amount of units that should be used to calculate the rate. The amount of the unit type will be divided by the value in this field, and then multiplied by the value in the Rate field to determine the Subtotal. |
Original FB |
This is a read-only field (you cannot type into it) and will be blank in most cases. However, on a consolidated master bill, if the row was created by copying form an original part-lot bill (as opposed to someone having manually added the row to the master after-the-fact in Customer Service), then the bill number of the original part-lot bill will be displayed. Furthermore, if displayed, and you are not editing the detail line, you may double-click (or press enter) from the new column to go directly to that original part-lot bill. |
Division |
The Division field allows you to enter a specific Company Division name (or number) that will be validated against the Divisions setup for the Caller/Shipper/Consignee of a Freight Bill. If the value in the 'Division' field cannot be found in the Client record, the Freight Bill will not save/post. The Freight Bill party that is validated depends up on the Application Configurator program > CSERV.EXE > 'Division Validated Against' option. If this is set to 'S', for example, the Shipper's Divisions will be used for validation. Setup of the various Divisions for a Client record is done on the Customer Profiles program > Divisions Tab. |


Multi Point Rating Grids
When Multi Point Rating has been setup and enabled, two new grids will be added below the standard Details Grid: 'Multi Point Rating Records' and 'Multi Point Rates - Rate Details'.
The Multi Point Rating Records grid shows the multi point rating leg sequence, as determined by the routing code attached to the freight bill’s rate client (usually the bill-to client).
The Multi Point Rate Details grid shows the rate sheet details attached to each leg in the left grid, as determined by the rate sheets tied to the routing code. You can select the 'Show All' flag to see all the rate sheets for all of the legs, or un-select it to see only the rate sheet details for the selected routing code leg in the left grid.
|
You can also access the Freight Bill Item form (item-level tracking) by double-clicking any of the detail grid records. See the Rates Maintenance program > Routing Config Codes window for more information about routing codes and/or the How do I setup multi point rating? topic. |
Context Menu
Reweigh / Reclass
Selecting this option will open the Reweigh Line Items window, which lists the Detail line items for a given Freight Bill and allows the user to input new values for a re-weigh and/or re-class. The original Detail line’s 'Weight', 'Rate', and 'Class' values will be stored for reporting purposes.
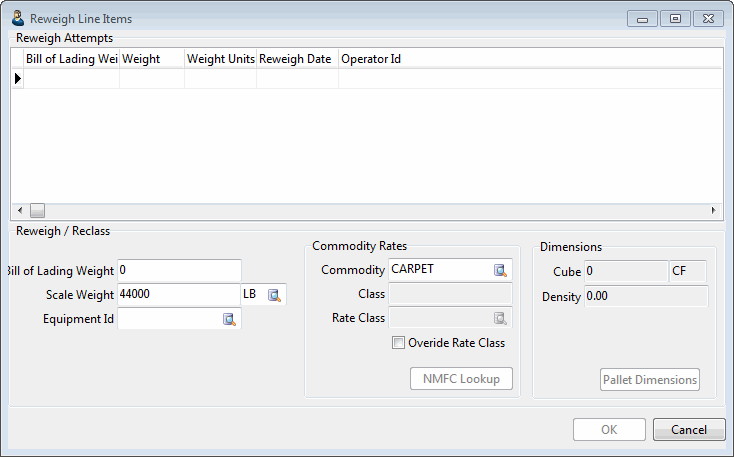
The Reweigh Attempts Grid contains the original TLDTL Table data for the Detail record that was selected for the Reweigh/Reclass from the Details Tab. This information will be stored for reporting purposes, even if a Reweigh is completed.
To complete a Reweigh or Reclass of this TLDTL record, use the fields below.
Once the changes are concluded and the 'OK' button is selected a record will be saved in the 'Reweigh Attempts Grid', If the changes are made to the 'Commodity', 'Class' or 'Rate Class' the record will be saved with a 'Reclass' status, if only the 'Weight' or the 'Density' has changed then the record will be saved with a 'Inspect' status. 'Density' is calculated based on Weight/Cube. There are two weight fields, 'Weight' and 'Actual Weight'. 'Actual Weight' is based on actual reweighing readings. The system will use the 'Actual Weight' in calculating density, if not available then 'Weight' will be used. Whenever 'Actual Weight' (if availably) or Weight is updated the system recalculates 'Density' accordingly.
| Field | Definition |
|---|---|
Bill of Lading Weight |
If you would like to change the BOL Weight of the TLDTL record, simply enter a new weight value in this field. |
Scale Weight |
If you would like to change the Scale Weight of the TLDTL record, simply enter a new weight value in this field. |
Weight Units |
If you wish to change the Weight Unit that the TLDTL record was originally set to, select the Database search button to bring up a window that contains all the Weight Units available in your system (as configured in the Codes Maintenance program > Unit Codes Tab). |
Equipment ID |
This field allows you to alter the Miscellaneous Equipment originally associated with the TLDTL record. Select the Database search button to choose a different Misc. Equip ID from those available in your system. |
Commodity |
This field allows you to alter the Commodity originally associated with the TLDTL record. Select the Database search button to choose a different Commodity from those available in your system. |
Class |
This read only field is the default class associated with the Client & Commodity. When selecting a new commodity class or using NMFC lookup, class is re-assigned (uses new lookup logic based on client and commodity code). |
Rate Class |
This is a read only field by default but can be updated if the 'Override Rate Class' checkbox is selected (checked), If it’s not overridden it clears out if any of the 'Weight', 'Cube' or 'Commodity' fields is changes (it needs a recalculation by rating). |
NMFC Lockup |
This button will set the 'National Motor Freight Carrier' (NMFC) number. It will reset the class and the rate class as well. |
Cube / Units |
These are read only fields that represent the volume of the commodity in hand and the units used. |
Density |
This is a read only calculated field (Cube / Weight). |
Pallet Dimensions |
This button updates the Cube / Units fields based on newly entered or modified data. |
View Rate Clients
This opens the Rate Clients window and shows rate by client IDs. The user can view client profile, a button is there by each client record that will go to the selected Customer Profile record.
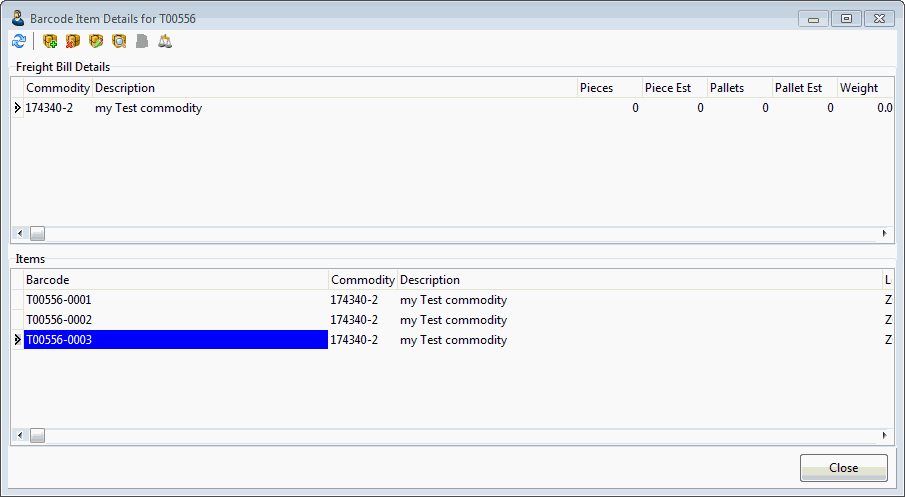
Barcode Item Details
This will display the Barcode Item Details window, corresponding to the number of weighed items in the 'Items' field.
Toolbar options, from left to right:

| Option | Description |
|---|---|
Refresh |
This option reloads window data from the database. |
Add New Item |
This option allows the user to add a new item, the new item window will pop up for data entry. |
Delete Item |
This option deletes a barcode item, a user confirmation will be required. |
Item Details |
This option invokes the 'Item Details' window. Detailed information about the item will be displayed in a grid style window. |
Item History |
This option will show the item related activities in a chronological list. |
Show Scale Data |
This option will display the Barcode Item Scale Detail window (described below). |
The Freight Bill Details grid contains detailed information about available freight bills. The Items grid includes detailed information about the available items in the selected freight bill.
Barcode Item Scale Detail
This window displays all scale data (for this Freight Bill) that has been imported via the 'Scale Import Windows Services Process'. You can rebuild all the Barcode Items for the Fright Bill by selecting multiple weight scale rows, and choosing the 'PROCESS' button. (Use Control-Click, or Shift-Click to select multiple records).
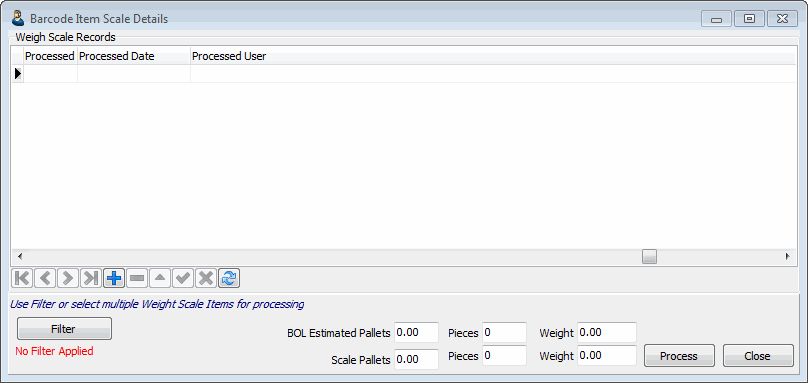
This window displays all scale data (for the selected Freight Bill) that has been imported via the Scale Import Windows Services Process. You can rebuild all the Barcode Items for the Fright Bill by selecting multiple weight scale rows, and choosing the 'PROCESS' button. (Use Control-Click, or Shift-Click to select multiple records).
The information in this window can be grouped into a number of groups. The imported weigh data: Pieces, Weight, Net Weight, Employee ID, Fork Lift ID, Terminal ID. The Processing Data:
| Field/Column | Definition |
|---|---|
Batch Id |
This is the batch number assigned during the file import process. |
Import Date |
This is the date the scale data wad imported. |
Processed Date |
This is the date the data was used for updating the barcode item data. This process can be done either by the 'Scale Import Process' or by selecting the 'Process Button' at the bottom of this window. Outside of the main grid, this window includes the following fields and controls: Filter, BOL Estimated Pallets/Pieces/Weight, Scale Pallets/Pieces/Weight, Process. |
BOL Estimated Pallets/Pieces/Weight |
Display sums of 'Pallets', 'Pieces' and Weight from the Freight Bill Detail lines. |
Scale Pallets/Pieces/Weight |
Displays sums of 'Pallets', 'Pieces' and 'Weight' from the selected rows. |
Filter
The filter button allows the user to apply a filter to the selected data to be displayed.
Process
If selected, this button will delete and rebuild the Barcode Item Detail lines for the Freight Bill, based on the records you have selected. If no records are selected, all records will be processed. An optional check for validating the pallet counts can be enabled via Application Configuration options for 'ScaleImport.EXE'. Additional configuration options for rolling up details to Freight Bill Details can be configured via Application Configuration options for 'CROSSDCK.EXE'.
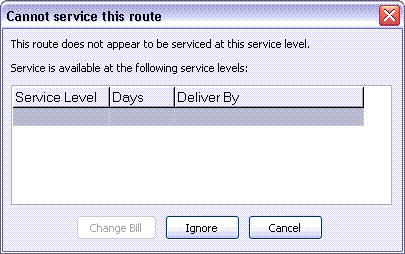
Service Level warning notice
Under certain conditions when using zone-based service levels (or the Service Level Matrix), the Service Level Warning Notice window will appear, stating that the freight bill’s route (defined by the selected Start / End Zone combination) is not serviced at the selected 'service level' (seen at the bottom of the Details Tab). If there are alternate service levels when the selected Route is serviced, they will appear for selection in the grid on this window. Selecting an alternative service level will alter the selected service level for the freight bill. If there are no service levels available, you can configure one in the LTL Service Level Maintenance program.
| Button | Definition |
|---|---|
Change Bill |
If a freight bill’s chosen route (Start Zone to End Zone) appears in the Zone Tree of one of the service levels in the TruckMate database, that service level will appear in the grid of this window. The user can then select the service level and click the 'Change Bill' button to change the service level on the freight bill, which will automatically be saved. |
Ignore |
Selecting this button will ignore the service level warning and save the freight bill with its chosen service level. |
Cancel |
Selecting this button will cancel out of this window and leave the freight bill in edit mode. |
| To disable this appearance of this window, set the Application Configurator program > CSERV.EXE > 'Get Delv Time on Save' option to 'False'. |
Skid Dimensions Entry
Use the Hot Key combination '<CTRL><K>' from the Details Tab to open the Skid Dimensions window to access the Skid Dimension Entry form.This form will allow you to enter a Shipment’s Density by telling the program the measurements of the Skids involved in transport.A shipment’s density is one of the factors that determines the freight rate.Shippers need to know how to calculate a shipment’s density so they can properly describe their goods on the Freight Bill.The total weight of the shipment is divided by the total cubic feet to determine the density.
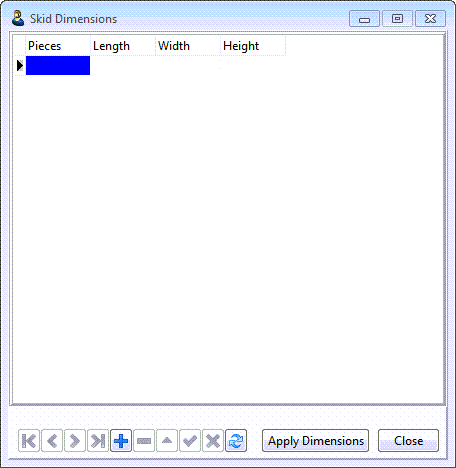
Unlike the Skid Dimensions window in older versions of TruckMate, which were limited to 30 entries, the new form is table based, which means there is no limit to the number of entries to be made.
| The old Skid Dimensions form can still be used if there is a need for it (for data compatibility reasons).To use the old form set the 'Use Old Skid Dimension Calculator' apps config option under 'CSERC>EXE' to 'True'.Utilities > Application Cofigurator > Bill > CSERV.EXE. |
Enter values in the grid in inches (for Length, Width, and Height). When you click Apply Dimensions, the system will calculate 'Dim Weight' of the Skid according to a formula.