AP Invoice Entry
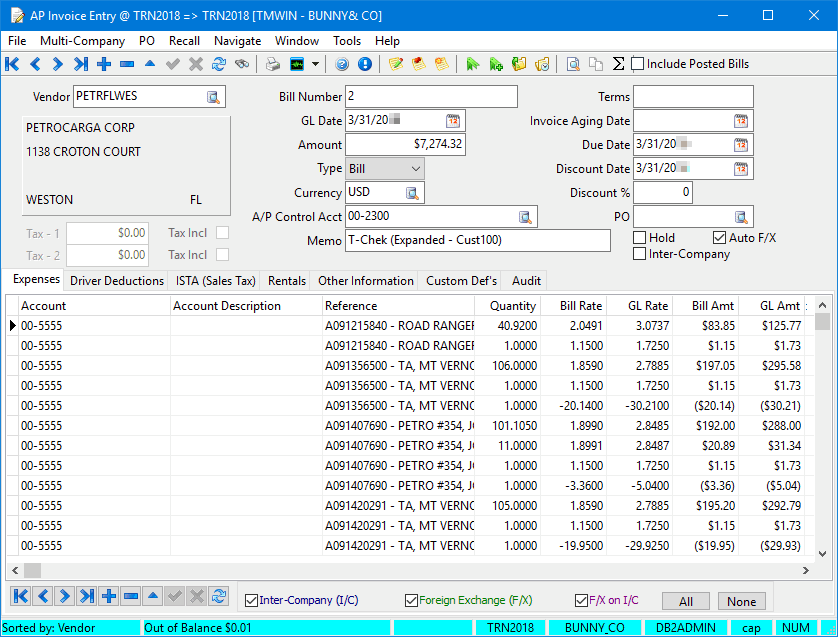
You use AP Invoice Entry to enter invoices from vendors. Vendor profiles (configured in the Customer & Vendor Profiles program) can be set up to automate much of the data entry, particularly the GL distribution of invoices. Invoices are updated to the vendor account and postings are made to the general ledger in AP Invoice Register.
To access AP Invoice Entry:
| From this location | Go to |
|---|---|
TruckMate Menu and TruckMate Task List |
Accounting & Finance > Accounts Payable > AP Invoice Entry |
Windows Start Menu |
TruckMate 20xx > AP Invoice Entry |
Windows Explorer |
C:\Program Files (x86) > TruckMate 20xx > ApNe.exe |
Setting up Application Configurator options for AP Invoice Entry
The following Application Configurator options for AP Invoice Entry are listed under Configuration Options > APNE.EXE.
Allow Blank GL Account in Expense Details |
When set to True, blank and/or null General Ledger (GL) accounts can appear in expense details. In addition, if this option is set to True and an expense record with a blank account already exists, an additional expense entry (with or without an account number added) is prohibited if the values of the existing entries are balanced. |
Allow Date Default |
When set to False, the user must enter dates manually when creating a new invoice record. This also applies to recalling a single memorized transaction. It does not apply to a batch recall. |
Allow Duplicate Bill Numbers |
Determines system behavior when there are multiple bills with the same bill number for a single vendor. Options are:
|
Auto F/X Dflt |
When set to False, the Auto F/X checkbox is deselected when the user opens AP Invoice Entry. When deselected, the system does not create foreign exchange details automatically. |
Auto F/X Ref |
Text to appear in the Reference field in the Expenses tab for automatically-generated foreign exchange details |
Automatic Tax Calculations for AP |
When set to True, the system calculates Tax 1 and/or Tax 2 taxes automatically on vendor invoices in AP Invoice Entry. Tax information appears in the header and the Expenses tab. |
Dollar Amount Cap |
Maximum order of magnitude (before the decimal point) allowed for absolute dollar amounts. Options correspond to the number of zeroes of magnitude. They range from 2 (dollar amounts must be less than $100) to 12 (dollar amounts must be less than $1,000,000,000,000). |
Exp Qty Field Prec |
Number of decimal places displayed in the Quantity field in the Expenses tab. Options range from 0 to 6. |
Exp Rate Field Prec |
Number of decimal places displayed in the rate fields in the Expenses tab. Options range from 0 to 6. |
PayCon Exch Rate |
Determines where the system gets its exchange rates for currency conversions for driver deductions. Options are:
Note: If the Auto F/X checkbox is selected, differences between the two rates are added as a read-only foreign exchange expense detail to the foreign exchange expense account (to make the GL balance). |
PayCon Exch Rate GL Account |
If PayCon Exch Rate is set to True, the system uses the account specified in this option when recording differences between exchange rates for driver deductions. If this option is left at the default (blank), the system uses the minimum GL account of type "PE0101/Foreign Exchange" for the specified company. |
Same IC Accts For Negatives |
Determines which account pair the system uses when the user enters a negative amount on an AP invoice in an intercompany transaction. Options are:
|
Select Active Resource Only |
When set to False, all resources are visible regardless of whether they are active in the system. |
Update Mem Trans |
When set to True, the system updates memorized transactions such that the newest transaction is the most recently recalled record. Each time the entry is updated, the memorized transaction remains current. |
Validate PO Number |
When set to False, the system does not check if the purchase order (PO) number is a valid TruckMate PO number. |
Creating an invoice in AP Invoice Entry
-
In AP Invoice Entry, click
 Insert.
 -
Enter information in all header fields. If you want, you can choose one of the following options:
-
Get information from a purchase order
-
Enter a purchase order number in the PO field.
-
Click
 Get PO.
The system populates the fields with data from the purchase order.
-
-
Create the invoice from a purchase order
-
Click
 Create Invoice from PO.
The window that opens displays valid purchase orders. -
Select a purchase order.
-
Click OK.
The system populates the fields with data from the purchase order.
-
Note: To view the purchase order in AP Purchase Order Entry, click
 View PO.
 -
-
If needed, make entries in the Expenses, Driver Deductions, ISTA (Sales Tax), Rentals, and/or Custom Def’s tabs.
-
Be sure the status bar at the bottom of the window reads Balanced. The invoice will not post otherwise.
-
Click
 Post.
Post. -
In AP Invoice Register, view and, if needed, edit the range of invoices that require updating.
Navigating invoices by vendor or bill number
By default, navigating using the navigation bar displays records in order of the vendor name. To change this functionality in AP Invoice Entry so that records display in order of the bill number, go to Tools > Sort by Bill Number. To resume the default functionality, go to Tools > Sort by Vendor.
Viewing information associated with an invoice
To view freight bills or quotes associated with an invoice in AP Invoice Entry, click ![]() Related/Linked Bills.
Related/Linked Bills.
| This feature is enabled only when Include Posted Bills is selected and other freight bills exist that have the same bill number and vendor as those in the invoice you are viewing. |
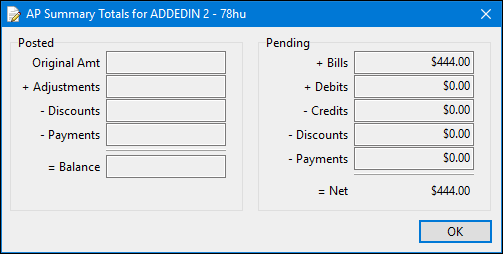
To view summary totals for an invoice, click ![]() Summary Totals. The Summary Totals window displays.
Summary Totals. The Summary Totals window displays.
To view information about the vendor in AP Inquiry, go to Tools > AP Inquiry.
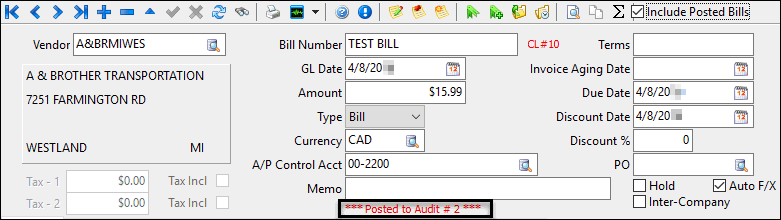
Viewing posted invoices
By default, navigating using the AP Invoice Entry navigation bar displays invoices that have not been posted. To include posted invoices, select Include Posted Bills in the toolbar. A posted invoice displays a message below the Memo field in the header.
Setting default values in the header
In AP Invoice Entry, you can use the menu options in the following table to set default values in the header according to the currently-displayed record. Each time you start AP Invoice Entry, a record corresponding to the default value displays. To clear the default, select the menu option again.
| To set as default/clear the default | Go to Tools > Set Default > |
|---|---|
Vendor name |
Vendor to Last Record’s Vendor |
GL Date |
GL Date to Last Record’s GL Date Note: This option is unavailable if the Application Configuration option Allow Date Default is set to False. |
Type |
Type to Last Record’s Type |
Using document imaging in AP Invoice Entry
You can use a third-party document imaging solution with AP Invoice Entry if it has been set up correctly in the Imaging tab in Codes Maintenance. Once document imaging access has been enabled on a particular field, you can right-click to access the imaging options defined in Codes Maintenance.
If your system is set up for it, you can select Auto-Indexing Document Images to activate indexing mode. This allows you to view and process multiple images in a workflow.
Saving and recalling memorized transactions
If you have recurring purchases with an individual vendor, you can save the currently-displayed invoice as a memorized transaction. Later, you can "recall" the transaction information into a new invoice. You can also add reminder data for each transaction, which will appear when you open AP Invoice Entry at or around the date you specify.
Creating a new memorized transaction
-
Click
 Memorize Transaction.
The Memorize Bill window opens.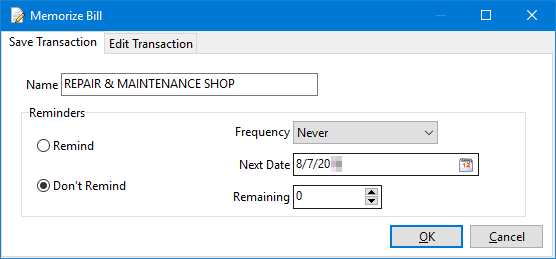
-
On the Save Transaction tab, make entries in the following fields.
Required field: *
Field Definition Name *
Unique name used to identify the transaction
Remind/Don’t Remind *
If you want the system to remind you when to use the transaction again, select Remind. By default, Don’t Remind is selected.
Frequency
If you select Remind, select the frequency with which you want the system to send a reminder. Options are:
-
Daily
-
Weekly
-
Monthly
-
Yearly
Next Date
Date on which the system will send the next reminder based on the value in the Frequency field. When you are first creating this reminder, enter the next reminder date. The system will adjust this date afterwards.
Remaining
Number of times remaining for the transaction to be recalled. When this number is 0, the transaction can no longer be recalled.
-
-
Click OK.
Editing memorized transactions
-
Click image:AP-InvoiceEntry/image11.pngMemorize Transaction.
The Memorize Bill window opens. -
Select the Edit Transaction tab.
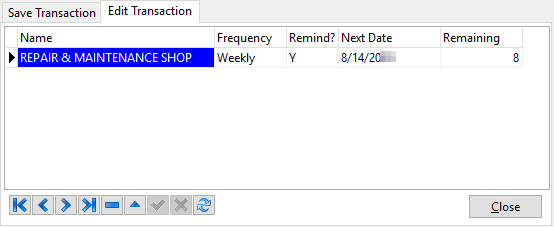
-
To edit a transaction:
-
Select the transaction in the grid.
-
Click
 Edit Record.
 -
Edit data directly in the columns.
-
Click
Post to accept the changes or  Cancel Edit to cancel them.
-
-
To delete a transaction, select the transaction in the grid and click
 Delete Record.
A confirmation message appears. Click Yes to delete the transaction.
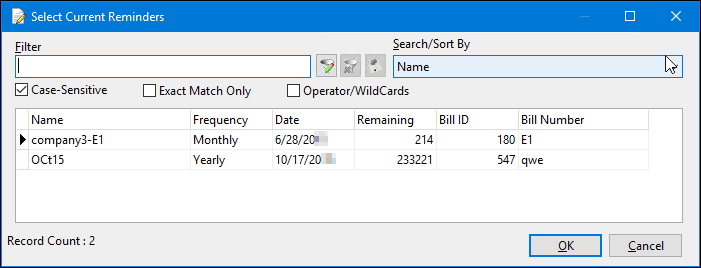
Recalling a memorized transaction
-
Click
 Recall Transaction.
The Select Memorized Transaction window opens. -
Select the memorized transaction.
-
Click OK.
The system populates the AP Invoice Entry window with the information in the memorized transaction.
Recalling multiple memorized transactions
If you have saved all your monthly bills as memorized transactions, you can recall them all at once instead of recalling them individually.
-
Click
 Recall Memorized Batch.
The Batch Recall window opens.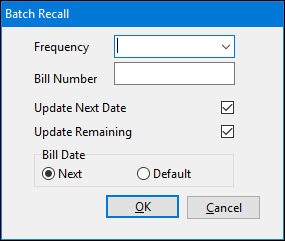
-
Make entries in the following fields.
Required field: *
Field Definition Frequency *
Bill frequency. For example, if you want to process all of your monthly bills, select Monthly.
Bill Number *
Bill number that the system will assign to all bills created by this process. You can change these numbers after they have been recalled. If you want, you can set this value to NA or another value that will make them easier to identify if you already have invoices in process.
Update Next Date
When selected, the system updates the Next (Used) date in each memorized transaction.
Update Remaining
When selected, the system decrements the Remaining counter.
Bill Date
Transaction date assigned to each bill. Options are:
-
Next
Next date associated with the bill -
Default
Current date
-
-
Click OK.
A message displays indicating the number of bills to be created.
General Ledger functions in AP Invoice Entry
Creating payroll invoices
To create AP invoices for payroll based on payroll deductions:
-
In AP Invoice Entry, go to Tools > Create Payroll Invoices.
The Create Payroll Invoices window opens.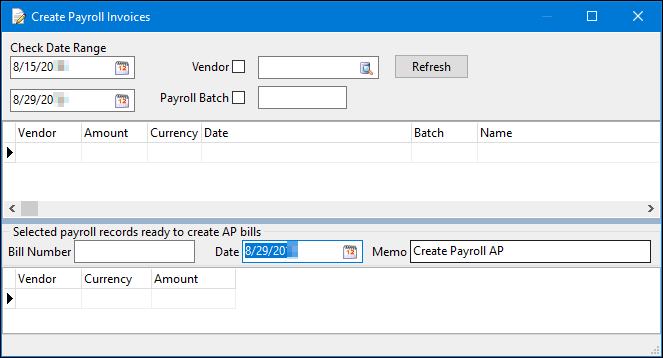
-
In the Check Date Range fields, select a date range.
-
Use the Vendor and Payroll Batch options to filter the results by a specific vendor or payroll batch.
-
Click Refresh.
The middle grid displays a list of applicable invoices along with their associated vendors. -
To complete the process, double-click on an entry in the middle grid.
The Selected payroll records ready to create AP bills grid displays the entry you selected. Entries in this grid can be processed into AP bills. Once processed, they can then be entered into the accounting system using AP Invoice Register.