Interline Payable Accrual Register

The Interline Payable records go through multiple stages before they can become records in the Accounts payable, and thus, become a GL entry and be ready for payment. Two very similar TruckMate applications exist to handle Interline Payable records at different stages of Interline Payable record’s life cycle, the Interline Payable Accrual Register and the Interline Payable Audit Register.
The Interline Payable Accrual Register program handles Interline Records that are approved but have NOT yet gone through the Interline Payable Audit program (The Interface Status Changes from 'S' to 'U'). Once run trough the Interline Payable Accrual Register, the Interline Payable records then become ready to go through the Interline Payable Audit program (Interface Status changes from 'U' to 'A'). After which, they can then be run through the Interline Payable Audit Register (Interface Status changes from 'A' to 'I').
To access Interline Payable Accrual Register:
| From this location | Go to |
|---|---|
TruckMate Menu and TruckMate Task List |
|
Windows Start Menu |
TruckMate 20xx > Interline Payable Accrual Register |
Windows Explorer |
C:\Program Files (x86) > TruckMate 20xx > IPAccrualReg.exe |
Menu Bar / Toolbar
File Menu
Print Reports
 Selecting the Print Reports button will bring up the report selection window, common to many TruckMate applications. Here, you will select a report file from those available in your system and a Crystal Report will be generated.
For more information on Report functionality in TruckMate, see the Crystal Reports Reference.
Exit
 Selecting this option will close the Interline Payables Register program.
Multi-Company
For more information on the Multi-Company options available from the Menu Bar, see the Multi-Company documentation.
Tools Menu
TruckMate Monitor
 Click the down arrow next to this button to access the various functions of the new TruckMate Monitor.
Remember Position / Size
Selecting this option will maintain the program window position and size upon close. When the program is re-opened, it will appear the same.
Post
 Selecting this option will generate a report identical to the one created using the Report function.
In addition, the status of all included interline transactions will be updated to 'Interfaced', and interline invoices for the transactions will be created in the A/P Inquiry program. General ledger postings will be created for the included interline transactions. These can be viewed using the GL Journal Entries program. Until the entries are updated using the GL Journal Entries Register program, they will not be included in the GL Chart of Accounts program balances.
When posting Accounts Payable entries, the Interline Payables Register will link the ORDER_INTERLINER record to an Accounts Payable Bill and use the Vendor’s 'Parent ID' for posting.
Window Menu
Customer Service
![]() Clicking this button will open an instance of the Customer Service program.
Clicking this button will open an instance of the Customer Service program.
Billing Register
 Selecting this option will open an instance of the Billing Register Program.
Help Menu
TruckMate Help
 Selecting this button will open the Interline Payable Register topic in the TruckMate Online Help file (the page you are currently viewing).
Service Portal
 Selecting this button will open an instance of your default Internet browsing software, with the https://www.tmwcare.com login page displayed.
About
 Selecting this button will open the standard TruckMate About window, which contains important information about the application you are currently using, including its version number (important for support calls).
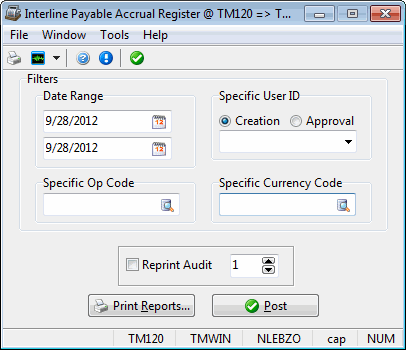
Filters
Date Range
You can post transactions based on a range of the freight bill’s Billing Date (as entered in the Customer Service program and Quick Bill Entry program). Click on the button to the right of the date fields for a calendar selection form. Clearing the Date Range check-box will disable the date-range filter.
Specific User ID
You can select transactions for posting based on the user who created the freight bill in the Customer Service program or Quick Bill Entry program. Select a user name from the drop down list box. User names are configured in the Security Setup program.
Creation / Approval
Select one of the radio buttons for 'Creation' or 'Approval'. Selecting 'Creation' would mean that only those freight bills created by this particular user would be updated. Alternatively, selecting 'Approval' would mean that only those freight bills approved by this particular user would be updated.
| This field can be left blank and the program will still function. |
Specific Op Code
This field is used to filter against certain Operation Codes in your system, and will check against the TLORDER table of this ORDER_INTERLINER record.
Specific Currency Code
This option allows you to filter the checks that will be processed by their Currency Code (usually wither 'CAD' or 'USD'). This value chosen here is also used by the Application Configurator program > COMPANY.EXE > 'Match Quick Report Currency' option to determine which Company logo should be added to the Quick Reports generated by this application.
Report Options
Reprint Audit
To re-print a Interline Payable Register that had been previously updated, check the Reprint Audit box and enter the audit number in the field to the right. Audit numbers print on the register in the top right corner. You can also find the audit number associated with a interline transaction by displaying the transaction history for the invoice. In the A/P Inquiry program, find the invoice (it will be displayed under interliner’s account). Then select Transaction History from the context menu in the invoice grid.
Report and Post
Print Reports…
Will create a report that shows the included Interliner transactions and the general ledger distribution, grouped by 'Trip ID'. You can use this report to confirm that your selection criteria are correct. The Report function does not update the status of the transaction or create postings in the general ledger module; nor does it generate an audit number. It is used only for reporting purposes. The report will be previewed to the screen. To send it to a printer, click the printer icon at the top.
See the Crystal Reports Reference for details about the other report functions.
Post
Will generate a report identical to the one created using the Report function.
In addition, the status of all included interline transactions interface status will be updated from 'S' to 'U', and interline invoices for the transactions will be created in the A/P Inquiry program. General ledger postings will be created for the included interline transactions. These can be viewed using the GL Journal Entries program. Until the entries are updated using the GL Journal Entries Register program, they will not be included in the GL Chart of Accounts program balances.
When posting Accounts Payable entries, the Interline Payables Register will link the ORDER_INTERLINER record to an Accounts Payable Bill and use the Vendor’s 'Parent ID' for posting.