Detail tabs: LTL - Service Level Matrix

This topic discusses the following tabs:
-
LTL
-
OS&D/POD
-
Service Level Matrix
For information on the Quotes tab, see Working with quotes.
LTL
The LTL Tab is used to view (and alter) Terminal Plans, perform Intermodal Marketing Company (IMC) functions and for LTL Freight Forwarding. A Terminal Plan, stored in the TLORDER_TERM_PLAN Table, provides visibility on the planned Terminal sequence for a Freight Bill before it arrives at a dock facility. A Terminal Plan allows users in the Crossdock program to plan for Freight Bills before they are in route to that CrossDock facility.
| If you are encountering an error regarding Pickup terminals when attempting to post a Freight Bill, ensure that if you have the Application Configurator program > CITYDISP.EXE > 'Use Multi Terminals' option set to 'True', your Terminal Zones are defined as 'Multi-Terminals'. Otherwise, make sure that the 'Use Multi Terminals' option is set to 'False' and you will not encounter any problems. |
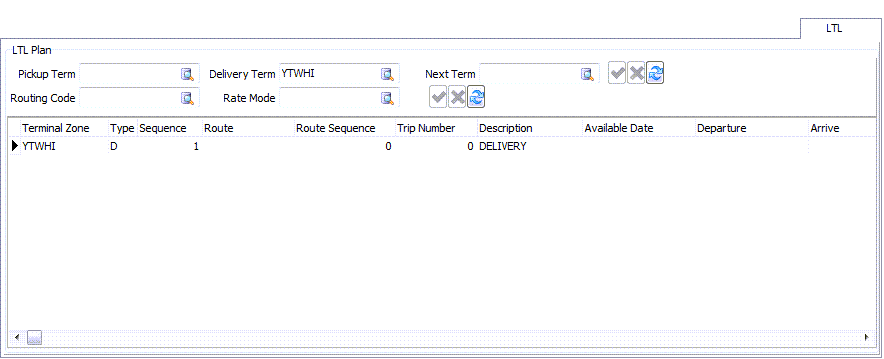
LTL Plan
| Field | Definition |
|---|---|
Pickup Term / Delivery Term / Next Term |
A Terminal Plan is created automatically when a Freight Bill is posted. The default Terminal Plan will be based on the 'Pickup Terminal' and 'Delivery Terminal' specified here. 'Pickup Terminal' and 'Delivery Terminal', in turn, are populated automatically whenever the 'Start Zone' and 'End Zone' of the Freight Bill are changed in the Customer Service program > Header. They will be set to the 'Terminal Zone' attached to the 'Start' and 'End' zones in the Codes Maintenance program > Zone Codes Tab. |
Routing Code |
The Routing Code field is used to set the Routing Code that will be used as a basis for multi-point rating. If there is no value in this field, multi-point rating will not work. For more information, see the Rates Maintenance program > Routing Config Codes window, or the How do I setup multi point rating? topic. Note: While Routing Codes should be attached to client codes (in Rates Maintenance) and thus auto-apply when the terminal plan is built, you can manually select a routing code via the edit-pick, if needed. |
Rate Mode |
The Rate Mode field should be used on orders where a Routing Code is not specified (i.e. when not doing multi-point rating). In such cases, if the Rate Sheet’s Rate Mode value equals the Rate Mode in the Term Plan header then it is a valid rate sheet. Doesn’t affect the auto multi-point rating (based off the Routing Code e.g. ALL). |
LTL Grid
Most of the fields in the LTL Grid are self explanatory.
| Field | Definition |
|---|---|
Type / Description |
The 'Type' and 'Description' fields display helpful text regarding the kind of LTL movement the detail line represents. The various Description values are based on the 'Type' code for the LTL Leg, as follows:
|
Available Date / Departure / Arrive |
When the term plan is calculated, these three fields are automatically calculated and shown in the route grid:
|
Available Date |
The date freight is available |
Departure |
The planned date for the freight go out. The 'Day of Week' value on the Terminal Setup program > Service Days Tab > Service Days window is used to calculate this (i.e. if the day of the week that the service days calculation selects is not selected for the terminal, the departure date will get bumped). |
Arrive |
Calculated from the service days configured for the terminal in the Terminal Setup program > Service Days Tab. Note: The dates for 'P' and 'D' type legs are based on terminal setup and service days (see link above). 'I' type legs are based on the configuration of the Service Level Maintenance > Load Plan Tab. |
Context Menu
| Option | Definition |
|---|---|
Terminal Plan |
Selecting this option will open the selected Freight Bill’s LTL Terminal Plan. The Freight Bill Terminal window will appear, listing the same information as displayed on the LTL Tab, but you will have access to several additional Context Menu functions, which allow you to edit aspects of the Terminal Plan. |
Recalc Terminal Plan |
Use this option to recalculate the Terminal Plan based on changes that have been made. This procedure is triggered automatically when pickup/delivery terminals are set on the freight bill. |
Split IMC Leg |
This option will split the selected IMC movement leg. When this option is chosen, the 'Next Zone' value of the current IMC movement will become the zone code of the client selected for the split leg. The new IMC split leg will go from the client zone to the original 'Next Zone' of the first IMC movement leg. |
Change Terminal Zone |
Use this option to change the Terminal Zone of the specified movement leg. |
Delete IMC Leg |
This option will delete the selected IMC movement leg. |
Create IMC Bill |
This option will create an IMC freight bill (<BILL_NUMBER>-1, -2, etc.) for the selected movement leg. |
Create All IMC Bills |
This option will create IMC freight bills for the entire IMC movement. |
Carrier Find Near |
Selecting this option will open the Find Near window, with the Freight Bill and Carriers Tabs automatically selected, which makes choosing the correct Carrier for the movement much easier. |
Quick Carrier Assign |
Selecting this option will open the Quick Carrier Assign window, which allows the user to setup a new Carrier and immediately assign it to the selected trip portion. |
Operations Code |
The 'Operations Code' option is used to assign unique operation codes (as defined in the Codes Maintenance program > Operation Codes Tab) to each leg of the terminal plan. Because each movement’s operations code can be different, this allows the user to assign each portion of the trip to a specific dispatch board. For example, an operations code for in-house trucking would assign the leg to the in-house trucking division; for LTL freight, the linehaul portion of the trip could be assigned to a consolidator group (using their respective operation code). |
Change FB Status |
Selecting this option will open a Freight Bill Status Change window, which allows you to change the current status of the selected IMB freight bill. |
Create IMC Trip |
Selecting this option will create a new Dispatch trip for all of the IMC freight bills attached to the current IMC movement. |
Print Load Offer |
Selecting this option will open the Crystal Report Selection window, allowing you to print a load offer based on a Crystal Report. For more information on Report functionality in TruckMate, see the Crystal Reports Reference. Note: The Print Load Offer option can only open reports with a data set that has a 'Detail_LIne_ID' field. |
Multi Point Leg Grid
This grid shows and allows users to control the legs of the multi point rating movement. See the Rates Maintenance program > Routing Config Codes window and the How do I setup multi point rating? topic for more information about multi point rating.
Context Menu
| Option | Definition |
|---|---|
Insert New Rating Record |
Once the multi point rating leg sequence has been calculated, you can use the option to insert a manual rating leg. A new record will be inserted following the leg you right-clicked, with an appropriate 'Sequence' value and a 'Tx Type' of 'M' (Manual). If you foresee using this option, ensure that you have configured a rate mode and rate sheet to be used for the manual leg. |
Recalc Rating Records |
Selecting this option will call the multi point rating logic manually, so that any recent changes to the multi point rating setup or conditions will be reflected. |
Mileage Lookup |
If the Mileage Server is operational, selecting this option will populate the 'Distance' column in the Multi Point Leg Grid based on the 'Start Zone'/'End Zone' combination for each of the displayed legs. Note: Security for this Tab is maintained in the Security Setup program > Security > Tab Settings > CSERV. If you cannot see this Tab, you may have to modify your User settings. |
Attempted Pickups and Deliveries
You can configure additional Status Codes that will handle attempted pickups and deliveries of Freight.Using the Codes Maintenance program > Status Codes Tab, create (at least) two new Status Codes to handle these situations:
The 'Attempted Pick' code must be of the 'Depart Shipper' Status Code Behavior Category, and must have the 'Record Attempted/Missed Pick' flag selected on the Additional Rules Tab.If you would like other functionality for the Attempted Pick status code, you can choose other options (such as 'Unmatch Freight Bill in City Dispatch') form this same Tab.
The 'Attempted Delivery' code muse be of the 'Depart Consignee' Status Code Behavior Category, and must have the 'Record Attempted/Missed Delivery' flag selected on the Additional Rules Tab.
When these Status Codes are invoked on a Freight Bill in the City Dispatch program, the selected Freight Bill will be moved from the Trip it is attached to back into the Available Freight Bills Grid.In the Customer Service program > LTL Tab, an 'Attempted Pick' or 'Attempted Delivery' line will be inserted into the Terminal Plan Grid, with a 'Type' of P01, P02, etc.(Pickups) or D01, D02, etc.(Deliveries).
OS&D/POD
The OS&D/POD Tab allows you to enter details regarding shipments that arrived incomplete, delayed or damaged.If entered on a freight bill, all POD fields will be copied to onto Credit/Rebills.
| This tab can be set to read-only for certain users in certain scenarios by changing the three available Security Setup program > Security > Allow Changes Tab options related to the OS&D/POD Tab. |
OSD sub-tab
The OSD Tab is where the user can create new over, short or damaged claims against a freight bill.
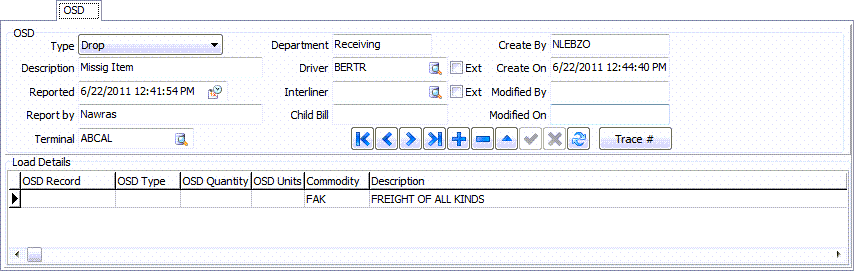
Users can enter multiple OSD records for a single freight bill. Use the '+' button on the navigation bar to enter a new OSD record, and provide details using the available header and grid fields.
| Field | Definition |
|---|---|
Type |
The 'Type' field has three possible values ('Pick', 'Linehaul' and/or 'Drop') and basically corresponds to when the OS&D issue was noticed. If there is a shortage or damages when the goods are being loaded, the user would enter 'Pick' in this field. If the driver notices damages during shipment, the user would enter 'Linehaul', and if anything is noticed at the delivery dock, the user would enter 'Drop'. |
Description |
Enter a relevant description of the occurrence in this field. |
Reported |
Enter the date the OSD was recorded. You can select the calendar icon to choose the date from a calendar menu. |
Reported by |
Enter the name of the person who reported this OSD item. |
Terminal |
Enter the terminal abbreviation here. Double-click to view terminal zones available in the system. |
Department |
Enter the Department name here. |
Driver / Ext |
Enter the Driver’s name here. Double-click to view Driver names already in the system. |
Interliner / Ext |
Enter the Interline name here or select the search button for more choices or to search for the correct name. To view a full profile of the selected Interliner, Right-Mouse click and select 'View in Interliner Profile'. |
Child Bill |
This is the number of a child bill if the original bill is split. Enter the child bill number in this field if this OS & D record is on a split bill. |
Created by / Created On / Modified By / Modified On |
These fields will automatically populated with audit information when a new OSD record is entered or when an existing record is modified. |
Trace #
Clicking this button will open a pop up window OSD Trace Number where trace numbers can be associated with OSD records. A trace number could be any reference to any entity.
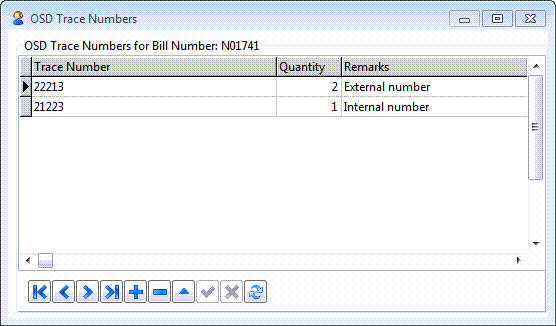
| Column | Definition |
|---|---|
Trace Number |
Enter the desired trace number in this field. |
Quantity |
Enter the quantity related to this trace number. |
Remark |
A free text field to enter remarks about each trace number if wanted. Note: If the user defines 'User-Defined' fields in Codes Maintenance program using the OSD table, and selects the 'CSERV.EXE' application to access them, a scroll box will appear besides the header fields displaying the user defined fields. |
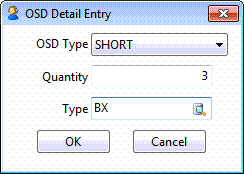
Load Details Grid
Double-click the OSD Type field to open the OSD Detail Entry window, which allows you to choose the 'OSD Type' (Over, Short or Damage), the Quantity and Type (unit). Once this window has been accessed and these three fields have been provided, all other fields on the Load Details Grid will be pre-populated with the freight bill information from the Customer Service program > Details Tab.
| If you have configured Claim Types with Claim Type Rules, entering an OS&D record may automatically update the freight bill detail lines on the Details Tab. See the Claims program > Setup Menu > Claim Types window for more information. |
POD Tab
The POD Tab is where the user can create new proof of delivery records for a freight bill.
| Option | Definition |
|---|---|
Type |
The 'Type' field has three possible values ('Pick', 'Linehaul' and/or 'Drop') and basically corresponds to when the POD issue was noticed. If there is a shortage or damages when the goods are being loaded, the user would enter 'Pick' in this field. If the driver notices damages during shipment, the user would enter 'Linehaul', and if anything is noticed at the delivery dock, the user would enter 'Drop'. |
Description |
Enter a description of the POD issue. |
Signed by |
Enter the name of the person signing off for 'Signed Clean' above. |
Signed On |
Enter the date the shipment was signed off. Double-click to view calendar. |
Trace No. |
If there is a trace number associated with the POD issue, enter it in this field. |
Driver Counted |
Select this checkbox if the driver has made a notation on the bill of lading or delivery receipt that he counted the freight as the shipment was unloaded from the trailer. |
Receiver Signed |
Select this checkbox if consignee’s/receiver’s signature accompanies notation that shipping particulars and count agree with the bill of lading. |
Signed Clean |
Select this checkbox if this shipment was signed 'SLC' or if there is a notation that shipment was unloaded according to bill of lading with no noted shortages, overages or damages. |
Copy Received |
Select this checkbox if a copy of the bill of lading for this shipment was received. |
Driver / Ext |
Enter the Driver’s name here. Double-click to view Driver names already in the system. |
Interliner / Ext |
Enter the Interline name here or select the search button for more choices or to search for the correct name. To view a full profile of the selected Interliner, Right-Mouse click and select 'View in Interliner Profile'. |
Child Bill |
This is the number of a child bill if the original bill is split. Enter the child bill number in this field if this POD record is on a split bill. |
Created by / Created On / Modified By / Modified On |
These fields will automatically populated with audit information when a new POD record is entered or when an existing record is modified. |
Service Level Matrix
Tracking and managing all the factors required to calculate a solid service commitment to your customer is what the Service Level Matrix is about. The Service Level Matrix Tab allows you to specify Advance or Beyond Carrier junction zones. In simple terms, the Service Level Matrix is the set of factors used to calculate the time commitment required for you to move a customer’s load from point A to point B.
In practice, moving a load from point A to point B may require considering:
-
Use of an Advance, Beyond, or Intermediate Carrier with their own Service Level standards to points / terminals / junctions common with your company.
-
Holidays, weekends, or even weekdays when no service may be available.
-
Internal commitments for service between points / terminals / junctions.
-
Defining service regions around a point / terminal / junction.
The concept of a Service Level Matrix applies mainly to users who offer service commitments to their customers when quoting freight services between points in their service area. The allows further information to be entered that may impact the Service Level calculation of the Delivery Date in the Consignee area of the Freight Bill header.
| This Tab cannot be accessed unless the 'Zone-based svclevels' function is enabled for Application Configurator program > SVCLEVEL.EXE. |
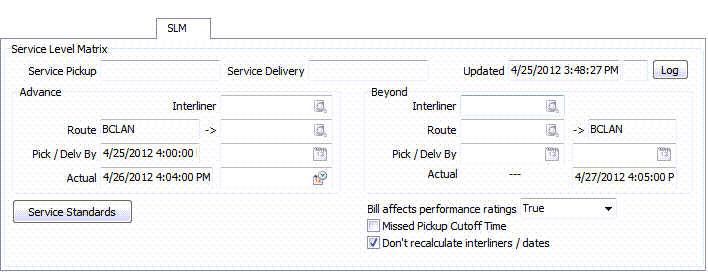
Advance
| Field | Definition |
|---|---|
Interliner |
Click the search button to select your 'Advance' Interliner Carrier. |
Route |
The first value in the 'Route' field pre-populates based on the 'Start Zone' from the 'Shipper' header information. Click the search button to select the next Zone code on the planned Route for the 'Advance' Carrier. |
Pick / Delv By |
The 'Pick' date will pre-populate based on the 'Pickup Date' from the 'Shipper' header information and is read-only within the Service Level Maintenance Tab. Click the calendar button to select a 'Delv By' Date for the 'Advance' Carrier. |
Actual |
This 'Actual' field allows you to manually set the Actual 'Deliver By' Date. Double click the text field to bring up a calendar selection menu. |
Beyond
| Field | Definition |
|---|---|
Interliner |
Click the search button to select your 'Beyond' Interliner Carrier. |
Route |
The second value in the 'Route' field pre-populates based on the 'End Zone' from the 'Consignee' header information. Click the search button to select the previous Zone code on the planned Route for the 'Beyond' Carrier. |
Pick / Delv By |
Click the calendar buttons to select a 'Pick' Date and 'Delv By' Date for the 'Beyond' Carrier. |
Actual |
This 'Actual' field relates to the Actual date the Freight is delivered, and is populated from the Dispatch program. It is a read-only field. |
Other Options
| Option | Definition |
|---|---|
Service Standards |
This button if selected, displays the 'Service Level Options window' with Service Days grid for the selected service level. If the order selected in the header section is already picked up, an error message will popup. Only serviceable and valid pickup days are shown on the grid. The pickup and delivery dates can be changed on the grid. The default value for Transit Days is the difference between pickup date and delivery date. |
Bill affects performance ratings |
Use the pull down menu to select either 'True', 'False', or 'Non-SLM'. |
Don’t recalculate interliners / dates |
If the current trip is already in motion and is somehow delayed, check this option to tell the system not to recalculate the current Interliner Carrier and Dates. |
Missed Pickup Cutoff Time |
There is a configuration option ('Check for Late Pickup Cutoff') in 'SVCLEVEL.EXE' which if set to 'True' will have the system validate the pickup time against the defined cutoff time for the selected pickup terminal. If the cutoff time is missed the system adds one day to the calculations of the delivery time. The 'Missed Pickup Cutoff Time' checkbox allows the user to manually flag the selected order as having missed the pickup cutoff time. If checked (selected by the user) the system will add one day to the delivery calculations. In other words the configuration option tells the system to check if the cutoff time is missed, but this checkbox allows the user to tell the system that the cutoff time has actually been missed. In either case if the system adds a day to the delivery calculations due to a missed cutoff time (either through a system check or by a user choice) an entry will be made to the 'SLM Detail Log'. |