Check Printing
You use Check Printing to print batches of checks. Use Instant Checks to print checks individually.
Check entries are created in AP Inquiry using the Pay Bills feature. You can also create check entries in Driver Statements, COD Payable Register, and Payroll Register.
To access Check Printing:
| From this location | Go to |
|---|---|
TruckMate Menu and TruckMate Task List |
|
Windows Start Menu |
TruckMate 20xx > Check Printing |
Windows Explorer |
C:\Program Files (x86) > TruckMate 20xx > ApNcp.exe |
Setting up Application Configurator for use with Check Printing
The following Application Configurator options for Check Printing are listed under Configuration Options > APNCP.EXE.
Duplicate Check # Warning |
When set to True, the system checks for duplicate check numbers and generates an error if any are found. |
Setting up Security Configuration for use with Check Printing
The following Security Configuration options for Check Printingg are listed under Security > Security > Payroll.
Check printing program - Ability to run a payroll batch |
When selected, users belonging to the selected pay group cannot process a payroll batch. |
Printing checks in Check Printing
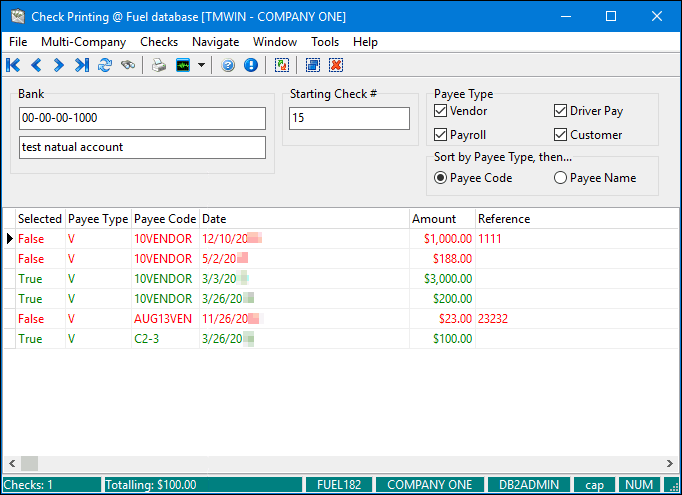
When you open Check Printing, it displays checks corresponding to the first bank account in your database. To search for and select a different account, click  Find or use the navigation buttons in the toolbar.
Checks that are selected for printing appear in green. Checks that will not print appear in red. You have the following selection options:
| To | Do this |
|---|---|
Select/deselect an individual check for printing |
Select the check in the grid Go to Checks > Select/Deselect Check for Printing |
Select all checks in the grid for printing |
Go to Checks > Select All Checks for Printing |
Deselect all checks in the grid |
Go to Checks > De-Select All Checks for Printing |
Use the fields in the Payee Type and Sort by Payee Type sections to filter and sort the checks.
By default, the next sequential check number appears in the Starting Check # field. If you want, you can change this number.
When you are ready to print checks:
-
Go to File > Print Reports.
The Report Selection window opens. -
Select your check report.
-
Click Print Preview to view the checks prior to printing. You can then print them from the window that opens.
-
After the checks have printed, a confirmation window opens. It asks if all of the checks printed correctly. Do either of the following:
-
Click Yes.
You can then view and, if necessary, edit the checks in Check Register. -
Click No. Another confirmation window opens, asking if you want to void and reprint some or all of the checks. Do either of the following:
-
If you want to void and reprint all checks, click Yes.
-
If you want to void and reprint one or more checks, click No. The Void Checks window opens. prompting you for the number of the check.
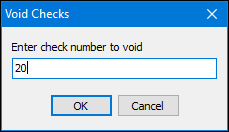
Enter the number and click OK. Repeat this step for each check you want to void and reprint. When you are done, click Cancel.
-
-
Viewing and changing cash requirements
If you want, you can view the cash requirements report, which displays the amount of money you have to cover the checks.
-
Go to Checks > Print Cash Requirements.
The Report Selection window opens. -
Select the Cash Requirements report (CASHREQ.RPT). If that report does not appear, contact your system administrator.
-
Click Print Preview.
The report opens in a separate window.
You can also change cash requirements by deleting some or all of the check records originally created in AP Inquiry and/or Driver Statements. Checks created in COD Payable Register are not affected.
| To | Do this |
|---|---|
Delete all check records generated in AP Inquiry and/or Driver Statements |
Go to Checks > Change Cash Requirements > Delete All & Start Again |
Delete only the records corresponding to selected checks (green) |
Go to Checks > Change Cash Requirements > Delete Selected |
Delete only the records corresponding to deselected checks (red) |
Go to Checks > Change Cash Requirements > Delete Non Selected |
When you do this, the system:
-
Changes the status of each invoice associated with a check to "non-selected" in AP Inquiry
-
Makes driver pay and deduction entries available for inclusion on a new statement