Contacts and Phone

The Contacts and Phone program is used to maintain contact information, such as names and addresses, phone lists, contact notes and call dates.
When you add records to the Customer & Vendor Profiles program and the Driver Profiles program, corresponding records are entered in the Contacts and Phone program. Changes made to customer, vendor and driver records will also update the records as displayed in the Customer & Vendor Profiles and the Driver Profiles programs.
To access Contacts and Phone:
| From this location | Go to |
|---|---|
TruckMate Menu and TruckMate Task List |
Profiles > Contacts & Phone Info |
Windows Start Menu |
TruckMate 20xx > Contacts & Phone Info |
Windows Explorer |
C:\Program Files (x86) > TruckMate 20xx > Phone.exe |
How Do I?
How do I Print a detailed Phone List of all of my customers and vendors?
-
Open the Contacts and Phone program (PHONE.EXE).
-
Select the "Reports" tab at the bottom of the screen.
-
Press the "Print" button and select one from the list of reports available. The 'PHDETAIL.RPT' report will give you a detailed listing of all of your clients, their contact information, phone and fax numbers. The 'PHLIST.RPT' report will give you a more concise listing of only your client names, and their phone and fax numbers.
-
After you select a report, you can preview it on your screen and if you like, press the "Print" icon button at the top to print out a copy for your records.
How do I Add a new Contact using the Contacts and Phone program?
The Contacts and Phone program is used to maintain contact information, such as names and addresses, phone lists, contact notes and call dates. When you add records to the Customer & Vendor Profiles program and the Driver Profiles program, corresponding records are entered in the Contacts and Phone program. Changes made to customer, vendor and driver records will also update the records as displayed in the Customer & Vendor Profiles and the Driver Profiles programs.
-
Open the Contacts and Phone program (PHONE.EXE).
-
Select the Company Name in the top grid. Use the bottom grid to enter the information. Find the "+" sign for the bottom grid and enter the contact information. Select the "" to save your contact information.
-
To verify that your information appears in the Customer and Vendor Profile program, first open the Customer & Vendor Profiles program (PROFILES.EXE), by clicking: Start > Programs > TruckMate > Profiles > Customer & Vendor Profiles.
-
Select the Contacts Tab on the far right of the program, select the refresh button and you should see your newly entered contact information here in this grid.
How do I Enter the Hours of Operation using the Contacts and Phone program?
-
Open the Contacts and Phone program (PHONE.EXE).
-
Locate the Company Name in the top grid. Select the "Hours of Operation" tab in the lower left-hand side of the screen.
-
Place checkmarks beside the days when the Company is closed, and enter in the hours of operation (in 24 hour clock time) for when the Company is open for business.
How do I Add another Category called "Second Sales Call" for example?
-
Open the Contacts and Phone program (PHONE.EXE).
-
Select the "Categories" tab at the bottom of the screen. Select the "+" sign from the navigation bar and enter in the Type (enter P), Code (up to 10 characters), and Description (enter SECOND SALES CALL for example) for your phone list or phone note item. Select "" to save the information entered.
-
Go back to the top grid and double-click on the category column beside the Company Name you wish to make a modification for. A drop-down arrow should appear. Use the drop-down arrow to modify your category choice for this Company. Press "" to save your category changes.
How do I Create a Query in the Contacts and Phone program?
-
Open the Contacts and Phone program (PHONE.EXE).
-
Select the Queries Tab at the bottom of the screen. Select "Create, Edit, and Delete Queries".
-
Enter a query name. For this example: Q_BC drivers living in Vancouver.
-
Select your query items. For example, let’s say you wanted to know the names of all drivers living in the Vancouver area. You’d enter the following query: WHERE CATEGORY = "DRIVER" AND CITY = "VANCOUVER". Select the "Test Query" button to ensure what you’ve entered is a valid query. A dialog box will appear saying "Valid Query". Press "Close" to continue.
-
Highlight the query you wish to use in the query titles. Following this example, you’d highlight: Q_BC drivers living in Vancouver, and then select the button "Use Selected Query". Your query answers will appear in the top grid.
Menu and toolbar options
This topic describes menu and toolbar options and functionality that are specific to the Contacts and Phone window.
For information about common menu and toolbar options (i.e. File menu, Refresh, Multi-Company, etc.), see General menu and toolbar options.
Window Menu
Customer and Vendor Profiles
Opens the Customer and Vendor Profiles program.
Drivers
Opens the Driver Profiles program.
Tools Menu
Switch
Selecting the 'Switch' button when a company record is highlighted in the main Contacts and Phone program Grid will open the Customer & Vendor Profiles program with that company’s information displayed.
Diary
![]() Selecting the 'Diary' button will open the Diary entry window. For more information on Diary functionality, click here.
Selecting the 'Diary' button will open the Diary entry window. For more information on Diary functionality, click here.
Screen Design
For more information regarding the Screen Design mode, click here.
Toolbar
Filter
The filter field works in conjunction with the sort column. The sort column is indicated by a blue arrow in the column header. If you enter characters in the Filter field, only those records with matching characters in the sort column field will be displayed. Note that you can use the Quick Filter function, then change the sort column without reversing the filter.
Locate
This field is used to find a specific record. It works in conjunction with the sort column, indicated by a blue arrow in the column header. Enter characters that match the record you wish to find. You will notice that the black arrow along the left grid margin moves as you enter more characters. To clear the Locate Record field, click the button labeled 'X'.
Go
![]() Select the 'Go' button to apply the filter entered in the 'Locate' field.
Select the 'Go' button to apply the filter entered in the 'Locate' field.
Clear
![]() Select the 'Clear' button to clear any text entered into the 'Locate' field.
Select the 'Clear' button to clear any text entered into the 'Locate' field.
Header Information
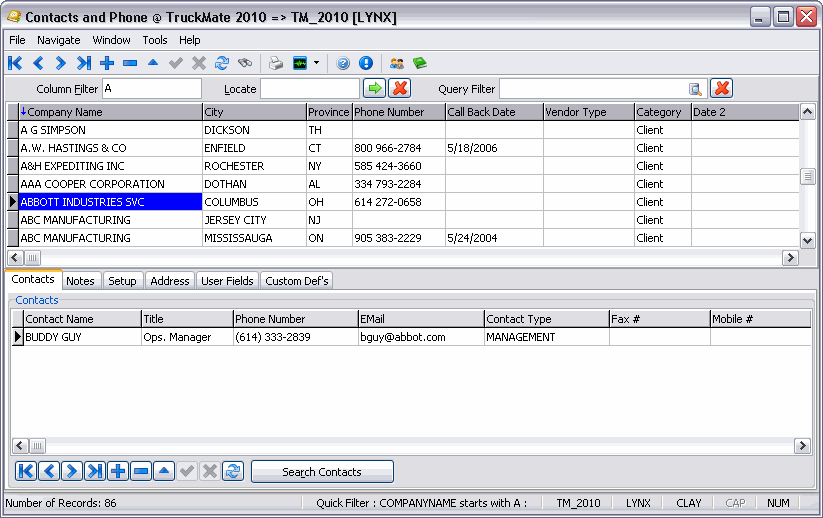
The grid at the top of the screen displays header records for all contacts that have been entered in the system (a header record can represent multiple contacts). Contacts can be manually entered by using this program. They are also automatically created by the Customer & Vendor Profiles program and the Driver Profiles program when you enter new profiles. See the 'Toolbar' menu description above for notes about the various header options available.
Note: The Contacts & Phone program grid is limited to displaying 500 records at one time. If you have more than 500 Contacts Grid records, use the Filter function to reduce the number of contacts for display.
Column Filter
Select a column header with your mouse and then enter text into this field to filter the contacts available in the database.
Locate
Once data is populated into the Contacts Grid, you can type the beginning of a contact name and then select the green arrow button to the right to move cursor focus to the closest matching record displayed.
Query Filter
Double-click in this field to select a SQL Filter to use as a filter for the Contacts Grid. The Filters available for selection here are created on the Setup Tab > Queries Tab.
Number of Records
This field (at the bottom of the program window) displays the number of records currently shown in the Contacts Grid. This number will change when Filters are applied.
Active Query
This field (at the bottom of the program window) displays the name of the currently applied SQL Query that is Filtering the results. If the text "View All Records" appears (as in the above example), there are no Queries being applied to the Contacts Grid. When a Query is active, the Query name will display in this area.
Contacts Grid
The Contacts Grid has the following fields:
Company Name
If this record was created automatically as a result of a new customer, vendor or driver profile (entered in the Customer & Vendor Profiles program or Driver Profiles program), the name assigned to the customer, vendor or driver will display in this field. Any changes made to the record will also change the record in the Customer & Vendor Profiles, or Driver Profiles program. If you are making a manual entry, enter the individual’s name or company’s name in this field.
Category
If this record was created automatically as a result of a new customer, vendor or driver profile (entered in the Customer & Vendor Profiles program or Driver Profiles program), the category is assigned by default. Categories are configured on the Categories Tab. The 'Equipment Repairs' and 'Cardlock Fuel Stations' categories are used by the Mobile Dispatch module to send location information to remote units for fuel and repair station locations. See the Communication Macro Setup program for more information. Aside from that circumstance, the Category field is for information and reporting purposes only. Click in the field for a drop down list box.
Phone Number / Phone Ext
If this record was created automatically as a result of a new customer, vendor or driver profile (entered in the Customer & Vendor Profiles program or Driver Profiles program), the phone number of the profile record will be displayed here. If you change the phone number in this field, the corresponding record in the Customer & Vendor Profiles program or Driver Profiles program will also be changed. If you are making a manual entry, enter the contact’s phone number in this field. Additional phone numbers can also be entered on the Contacts Tab.
Enter the Contact’s Phone Extension number in the 'Phone Ext' field, if applicable.
Fax Number
If this record was created automatically as a result of a new customer, vendor or driver profile (entered in the Customer & Vendor Profiles program or Driver Profiles program), the fax number of the profile record will be displayed here. If you change the fax number in this field, the corresponding record in the Customer & Vendor Profiles program or Driver Profiles program will also be changed. If you are making a manual entry, enter the contact’s fax number in this field.
Address / Address 2 / City / Province / Postal Code
If this record was created automatically as a result of a new customer, vendor or driver profile (entered in the Customer & Vendor Profiles program or Driver Profiles program), the address details of the profile record will be displayed in these fields. If you change the address in these fields, the corresponding record in the Customer & Vendor Profiles program or Driver Profiles program will also be changed. If you are making a manual entry, enter the contact’s address details in these fields.
Latitude / Longitude
These values are used by the Mobile Dispatch module to determine the proximity of fuel and service stations. Mobile Dispatch proximity search functions are configured in the Communications Manager program. Click in the field to display an search button, then click the button for a lookup form. Enter a city and province / state in the Point field, then click the PC*Miler Lookup button. If there a multiple latitude / longitude values for the city / province, select the desired value in the grid and click the Select button. Then click the OK button to copy the lat / long values to the record.
Note: The Mileage Server program must be running to use this function.
Timezone
The Time Zones Tab has a number of pre-defined codes used for the determination of the proximity of Service and Fuel stations. These values are used by the Mobile Dispatch module. If you are using this function, select the Time Zone that applies to this contact. Select a code from the drop down list box that corresponds to the timezone for this contact.
Hours of Operation
On the Hours of Operation tab, you can configure opening and closing hours for each day of the week. Select a code from the drop down list box that corresponds to the hours of operation maintained by this contact. Note that this field has no relationship with the Hours of Operation values configured in the Customer & Vendor Profiles program. It is used by the Mobile Dispatch module to determine proximity of fuel and service stations. Click in the field for a drop down list box.
Match Affinity
The value in this field is one of the factors used in determining the proximity of fuel and service stations in the Mobile Dispatch proximity search function (configured in the Communications Manager program). This field accepts a value from zero to ten, with 'ten' being the highest in terms of match affinity. That is, if two service stations are within their open hours (as configured on the Hours of Operation Tab) and the same distance from the remote unit, the station with the higher value in this field will be ranked higher in the proximity search function.
Client ID
If this record was created from a new entry in the Customer & Vendor Profiles program, the Client ID will display in this field.
Vendor ID
If this record was created from a new entry in the Customer & Vendor Profiles program, the Vendor ID will display in this field.
Driver ID
If this record was created from a new entry in the Driver Profiles program, the Driver ID will display in this field.
String 1 - String 8
These are free-format alphanumeric entry fields where you can enter miscellaneous data about the contact. Use the Customize Grid context menu option to customize the column labels.
Date 1 - Date 8
These are free-format date entry fields where you can enter significant dates for this contact. Use the Customize Grid context menu option to customize the column labels.
Number 1 - Number 8
These are free-format numeric entry fields where you can enter miscellaneous numeric data about the contact. Use the Customize Grid context menu option to customize the column labels.
Note: If you select a contact record and type the <F4> key, the Phone Number Lookup window will appear, listing the contact information for the selected Client ID.
Contacts Grid Context Menu
Attach/Open Related Files
Selecting this option will open the Attach/Open Related Files window for the selected Contact. Note that this function (as well as all third party imaging in the Contacts & Phone program) is only available via right-click from the Contacts Grid if the 'Category' of the record is 'Driver', 'Client' or 'Vendor'.
Contacts Tab
Multiple contacts can be added for each header record in the Contacts Tab. You can search all Contact records by clicking the 'Search Contacts' button. Select the 'Search By' value (either 'Name' or 'Phone Number'), then enter data in the Search Code field to display contact records that match the data entered. Contact records for all header records will be available for selection.

Contact Name
Enter the Contact’s full name.
Title
If required, enter the Contact’s title.
Phone #
Enter the Contact’s phone number.
Enter the Contact’s E-mail address. This address will be used by any automatic notification functions in TruckMate. Ensure that the 'Use in Email' value is set to 'True' as well.
Contact Type
Double click this field to select a 'Contact Type' for this Contact. This filed can be used to quickly determine where this Contact is located in your Company’s structure.
Contact Type
Double-click this field to select the Contact Type from a list of available codes.
Fax #
If required, enter the Contact’s Fax number.
Mobile #
If required, enter the Contact’s Mobile phone number.
Preferred Communcation
Double-click this field to select the type of communication preferred by this contact ('E-mail', 'Fax', 'Letter' or 'Phone). Ensure that the associated 'Number' or 'Address' column is correctly filled out.
Use in Email
When set to 'True' (and an 'E-Mail' address is specified), this contact’s e-mail address will be automatically populated by certain automatic e-mailing functions in TruckMate for the selected client or vendor (such as vendor remittance reports from the Direct Deposit program).
Comments
This is a 240 characters field, which allows the user to enter comments about a specific contact. These comments could be any thing that can help make better communications with this contact, preferred calling times could be an example.
User1,…., User10
Those are 10 user defined fields that can be used by TruckMate users for any future purpose. The column headers can be modified to reflect users' needs using the Grid Customizer.
Notes Tab
The Notes Tab displays all notes that have been entered for the contact selected in the header. To add notes, click the plus button on the navigator bar.

Clicking the '+' button on the TruckMate Navigation Bar will open up the Phone Notes window, where you will enter the details of the Note you would like to add.
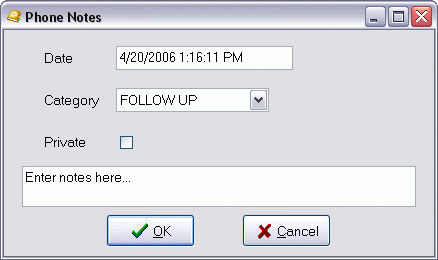
Date
This field will automatically populate upon entering this window, and will display the current Date / Time stamp.
Category
Use the drop-down menu to select a Note 'Category'. The default available Categories are: 'CALLEDBACK', 'FOLLOW UP', 'LEFT MESS' and 'SALES'. To add more Categories for selection, see the details of the Categories Tab.
Private
The Private checkbox, when checked, will allow only the User who created the Note record to see it displayed in the Notes Tab of the Contacts & Phone program.
Note
Use the large text field at the bottom of this window to enter the actual content of the Note.
Date
Will default to today’s date and time. You can manually change the values.
User
When you create a Notes entry, the user name (as entered in the program login screen, and configured in the Security Setup program) will default in this field.
Category
Notes categories are defined on the Categories tab. Select a category from the drop down list box.
Private
If a note if flagged as Private, only users logged in with the same User ID as the person who created the note will be able to view the note.
Note
Enter the note in the free format entry field.
Setup Tab
Queries Tab
You can create SQL (Structured Query Language) queries that can be saved and retrieved at will on the Queries Tab. Using SQL, you can create powerful queries that sort and select header records based on a number of criteria.
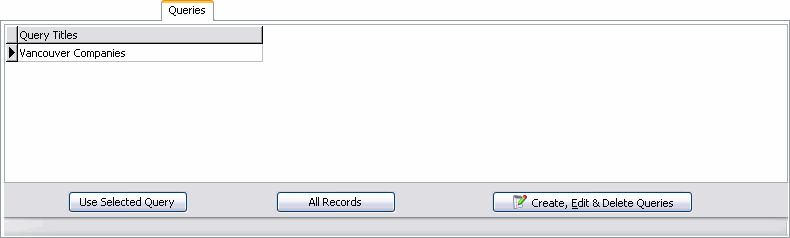
Query Titles
Displays a list of stored queries.
Use Selected Query
Will filter the records displayed in the header according to the query selected from the Query Titles grid. The query that is currently selected (black arrow next to the 'Query Titles' field) will be executed when you click this button.
All Records
Will return the header display to all records, and will update the View All Records area.
Create, Edit and Delete Queries
Selecting this button will open the Custom SQL Filter window, which will allow you to create a custom SQL Filter to use on the Contacts Grid.
Categories Tab
Phone List and Phone Note categories can be created on the Categories Tab to help you organize the phone records. You can use categories to create Queries that show only specific groups of phone records. Phone Note categories allow you to track your notes more efficiently. For example, you may want to create categories to show that your call was a sales call, or that the note is a message. Type 'P' Categories are available in the drop down list box of the Categories field on the All Records grid.
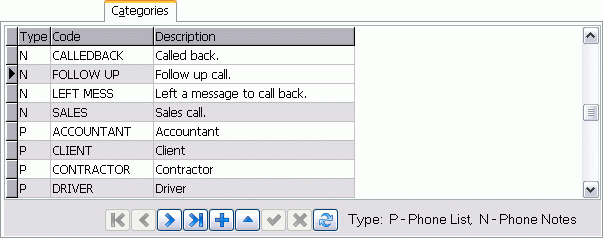
Type
Enter a 'N' to indicate that the category type is Phone Notes. Enter a 'P' to indicate that the category type is Phone List. Those codes created with an 'N' type will be available for use when entering Notes on the Notes Tab.
Code
Enter a code for the category.
Description
Enter a description for the category.
Contact Types Tab
The Contact Types Tab displays all the options that are available when the user double-clicks the 'Contact Type' field on the Contacts Tab (and on the Customer Profiles program > Contacts Tab). Select the '+' button on the TruckMate navigation bar to add a new Contact Type.
Time Zones Tab
The data on the Time Zones Tab is created automatically by the system, and should not be modified. The data on the Time Zones tab is used by the Mobile Dispatch module to determine the proximity of service and fuel stations, configured in the Communications Manager program.
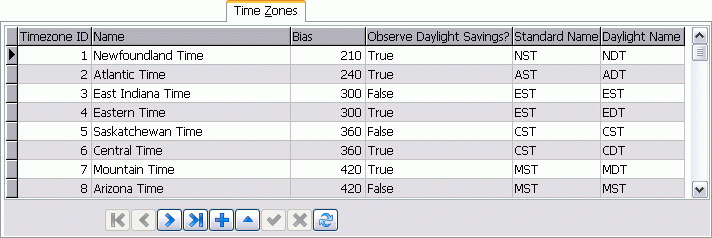
Click the '+' button on the TruckMate Navigation Bar to add a new record.
Timezone ID
This field will automatically populated once the new record has been completed and saved.
Name
Displays the Name of the Timezone. When creating a new record, you must type the name of the Timezone manually into this field.
Bias
The 'Bias' field displays the number of minutes added to the local time to equal Greenwich Main Time (GMT). Therefore, if Bias is '360', this indicates that the Timezone is 6 hours (360 minutes) behind GMT. \
Observe Daylight Savings?
If the Timezone you are creating needs to be changed for daylight savings, set this value to 'True' by double-clicking this field.
Standard Name / Daylight Name
Enter the corresponding 3 character values in these two fields.
Hours of Operation Tab
The Hours of Operation Tab is used to determine proximity of available service and fuel stations for the Mobile Dispatch module. Proximity searches are configured in the Communications Manager program. Use this tab to configure codes and associated open and close times. Assign these codes to records in the main grid in the Hours of Operation field. When the system searches for service or fuel stations, is checks the operating hours that have been assigned to the record in the main grid to see if the vendor is an appropriate match.
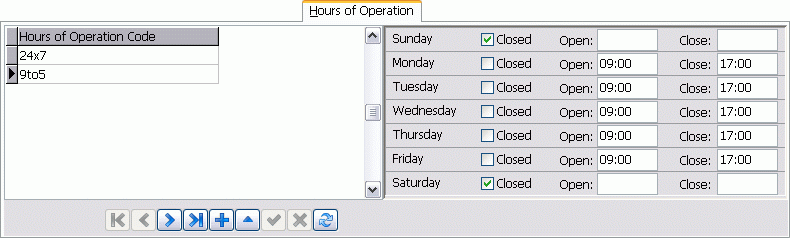
Click the '+' button to add a new record.
Hours of Operation Code
Enter the code name you would like to use for the new Hours of Operation record. You cannot use spaces in the name you enter.
Once entered, use the checkboxes to the right to specify the open hours for the code. All of the 'Closed' flags will be checked by default. When you un-check a 'Closed' day, the values '9:00' and '17:00' will populate in the 'Open' and 'Closed' fields, respectively. Click a time field and change it’s value manually using your keyboard to set a new value.
Address Tab
The Address Tab pulls information from the Customer & Vendor Profiles program for the selected Contact, including their geocoded location and hours.