Multi-Company
The Multi-Company feature allows a single database schema to handle more than one company’s business. Multi-Company functionality has been integrated into all standard TruckMate applications, and changes the behavior of the TruckMate system as a whole.
| Enabling the Multi-Company functionality within TruckMate requires the 47000 feature license and some configuration. |
Multi-Company menu options
When Multi-Company functionality is enabled, a new menu called Multi-Company will become available in TruckMate applications allowing users to switch from one company data set to another.
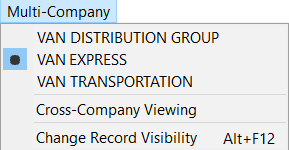
The ![]() icon in the Multi-Company menu indicates which company you are currently connected to and which data set is being accessed.
icon in the Multi-Company menu indicates which company you are currently connected to and which data set is being accessed.
There are specialized program specific Multi-Company menu options that will be made available in the Multi-Company menu depending on the program. For example, a Multi-Company menu option called Fix GL Accts in Details is available only within the GL Financial Statement Designer program.
Selecting a company to view
When a different company is selected from the Multi-Company menu, the system closes the current program window and reopens it to display the data from the selected company without requiring the user to login again.
The current application will be closed and restarted with the newly selected company.
Open one or more company windows at the same time
Holding the Shift key while clicking on a new company in the Multi-Company menu will prevent the first program window from being closed, allowing the user to work with two companies side-by-side with each running in its own instance of the same program. This is a great way to compare similar data between one or more companies.
| Only those companies where the user has been given access to as setup on the TruckMate > Profiles > Company Profiles > Window menu > Organizational Setup > Company Access tab will be displayed as options in the Multi-Company menu. |
Cross-Company viewing
In Multi-Company installations, there is often a need for users to be able to view and work with data from all allowed companies. Instead of switching from one company to another, the Multi-Company > Cross-Company Viewing option allows you to view and work with data from all allowed companies within one instance of a program. The application will behave as if all the various company data is part of a single unified dataset.
This option is always off when the application starts and is only available for specific TruckMate programs. Once the feature is toggled on, it only remains valid for the session duration (or until the user toggles it off again). The active company is always displayed at the right side of the status bar at the bottom of the application.
| When a program loads, TruckMate will check a system registry value and restore the Cross Company Viewing state (on/off) to match its state when the application was last closed. |
When selected, the Cross Company Viewing option will include other Company data within the dataset the current user is accessing (as long as that user has security access to that company as determined by the settings configured in the Profiles > Company Profiles > Organizational Settings window > Company Access tab). If the user cannot switch to a specific company in a regular Multi-Company configuration, they will not be able to see that company’s data in the dataset.
Those TruckMate programs which offer the Multi-Company cross company viewing menu option will also offer the Tools > Reload Configuration Options feature, which reloads all of the Application Configurator program settings for the current company should any of the settings have changed or if the settings for this company are different from the previously active company.
Refer to Cross-Company Viewing - Application Integration for details regarding using the Cross-Company viewing function in specific programs.
Reload Configuration Options
This option (when available) is a part of the Cross-Company Viewing functionality and allows any application that offers Cross-Company Viewing to re-load Application Configurator program settings on the fly to avoid having to close and restart the application for the changed options to take effect. This is an important feature since each company will likely have different configuration settings that will affect how the application should behave. In a Cross-Company scenario, TruckMate programs will store these configuration values in a validation cache. It is a good practice to select this option whenever a different company’s data is accessed.
Change Record Visibility
The Change Record Visibility Multi-Company menu option (when available, e.g. Customer Service and most programs) allows the user to control the selected record’s visibility within the organizational structure.
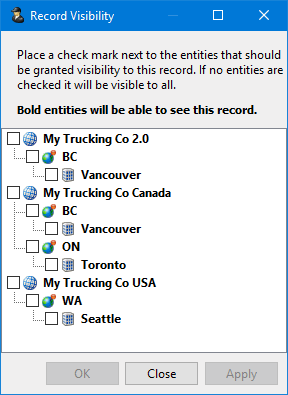
The Record Visibility window will appear, and will let you select which level of your company will have access to the displayed record (whether it be a Freight Bill record, GL Distribution Code, etc.). Enabling a parent entity will grant access to all those below it in the hierarchy. The window will display radio buttons or checkboxes depending on the rules associated with this data record type.
|
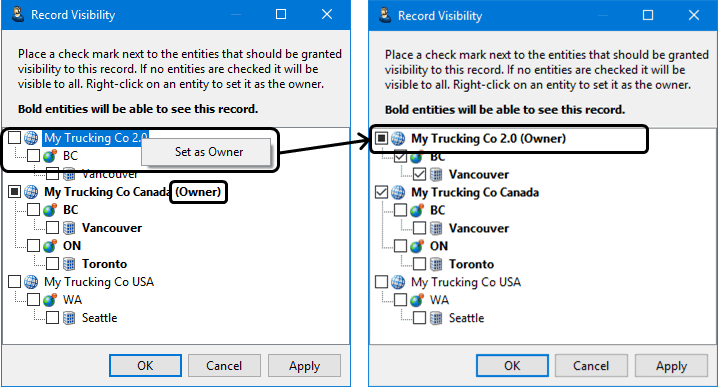
Set as Owner
In some cases, when using the Record Visibility window, you can right click a company record and use the Set as Owner context menu option. This allows a user to change the ownership of a freight bill in the company organizational hierarchy. Ownership designates the ability to edit a record (i.e. a freight bill) and run it through billing. When a freight bill is originally created, ownership is automatically granted to the company in which the bill was created.
For example, In the Customer Service program, it is possible to change the owner for a given freight bill.
-
Open the Customer Service program.
-
Go to a freight bill with an appropriate status (i.e. not cancelled).
-
Select Change Record Visibility from the Multi-Company menu.
-
Change the visibility settings and right-click to select the Set as Owner function.
-
The checkbox will display a black square to indicate the owner for this record.
-
Click OK.
-
The New Owner Setting window will appear and require you to define several characteristics of the new freight bill that will be created in the other company.
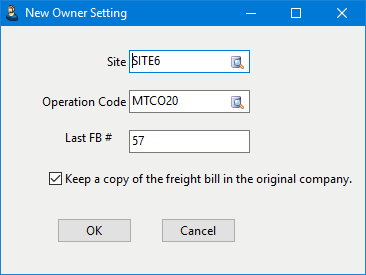
Field Definition Site
Select the Site code you wish to have the new freight bill created in. You’ll only have access to Site codes that are enabled for the company that will be taking ownership of the freight bill.
Operation Code
Select the Operation Code you wish to stamp to the new freight bill. If your Site code has a default Operation Code (as defined on the Codes Maintenance program > Site tab), this field will already be automatically populated.
Last FB#
This field will automatically populate when the Site and Operation Code fields are filled in, and shows the last generated freight bill number for the destination Site. The new freight bill number will be defined by the Site’s Bill Number Prefix and the integer value following the displayed value in this field.
Keep a copy of the freight bill in the original company
This checkbox setting allows you to maintain a record of the original freight bill in the originating company (i.e. when/where/by whom it was originally created). When selected, a new freight bill will be created in the destination company (with ownership), but the original freight bill will remain in the first company (with a status of Cancelled).
This checkbox can be defaulted by using the Utilities > Application Configurator > CSERV.EXE > Keep a copy of the FB in the original company option.
| After the new freight bill is created in the second company, you can view the original freight bill number on the Customer Service program > Trace tab of the newly owned bill. |
Program-specific Multi-Company features
Copy GL Accounts
Accessible from the Multi-Company menu in the Accounting and Finance > General Ledger > GL Chart of Accounts program, this option allows you to quickly generate the chart of accounts for a new company, based on the chart of accounts for an existing company (substituting the company segment). When you select the option, a screen prompts you for a "from company" and a "to company". If you set these to 2 different companies, 3 other fields, Segment Number, From Value, and To Value become disabled and are auto-populated based on your GLACCOUNT entity labels setup (in Organizational Setup option in company profiles). Again, this is useful for quickly setting up the chart of accounts for a newly added secondary company. If you set the from/to companies to be the same, then the three fields become editable; you may choose which segment you want to change when you do the copy into the same company.
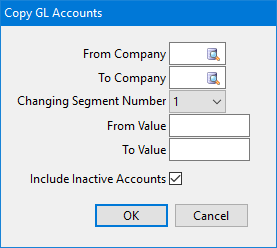
There is also an "Include Inactive Accounts" checkbox. Uncheck this if you never plan to use the inactive accounts ever again. On the other hand, leave it checked if you use the active flag to temporarily disable GL accounts.
To prevent conflicts, the "default" flag (default control account for a GL type - e.g. AR, AP, Driver Pay Payable, etc) is only copied if the "to" company has no accounts yet; otherwise, it is set to False on all accounts copied into the "to" company.
The copy need not be a one-time-only process. If you want your companies to have identical charts of accounts (other than the company segment), and you add some new accounts in one company, you can run this option to copy the new accounts to another company (the copy is smart enough to only copy the ones that don’t already exist in the "to" company).
Fix GL Accts in Details
Accessible from the Multi-Company menu in the Accounting and Finance > General Ledger > Financial Statements - GL Financial Statement Designer program, this option allows you to manually change the company segment in the GL accounts in the from/to range columns in the details grid. See the entry on Cross-Company Viewing in the GL Financial Statement Designer program below for more information.
GL Journal Entries
For multi-company databases, GL Journal Entries displays transactions that either a) will be posted to the current login company, or b) were created by a user while logged into the current login company. That is, for inter-company transactions, you will only see all transactions related to the batch in the login company, while in the "other company" of the inter-company batch, you will only see accounts for that company.
For example, suppose you log in to company 1 and:
-
Create an inter-company debit to company 2 GL account 'Y'
-
Create a "regular" credit to company 1 GL account 'Z'
In company 1, I will see both these transactions as well as a "due from" debit to a company 1 GL account and a "due to" credit to a company 2 GL account. So, in company 1, I see 4 transactions. In company 2, I only see 2 transactions: the first (debit) amount (to account Y) and the "due to" (credit) amount. In company 2, I see neither the posting to account Z nor the "due from" transaction.
Multi-Currency for Inter-Companies
If you setup inter-company (I/C) accounts for each currency (in company profiles), create a GL Journal Entry with InterCompany checked, and select a GL account that is in a foreign currency for that company, then the correct I/C GL account will be used and the amount will NOT be converted to base currency.
Also, if you run the 'Create Foreign Exchange Entry' option on a foreign currency I/C transaction, then that company’s exchange rate will be used, not the login company’s rate.
Fixed Assets
For multi-company databases, different fixed assets must be assigned to different companies, a specific fixed asset must be associated with a specific company. Default GL accounts can be assigned to a specific fixed asset type and those default accounts can be different across different companies. Moreover, fixed asset Depreciation Options can be set at the company level.
Interline Payables
The Interline Payables Register program supports inter-company interline payables records. Inter-Company IP will cause inter-company transactions to be added to the GL.
Profiles Applications
If a user adds a new record to the database while working in the various Profiles Module applications, and the database they are working with is a Multi-Company database, the new record will automatically be added into the currently logged-in Company. Following this, a prompt will appear, asking if the user would like to make the new Driver, Power Unit or Trailer, etc., visible to any of the other Companies they have access to (as defined by their settings on the TruckMate > Profiles > Company Profiles > Organizational Settings window > Company Access tab.
Security Patcher
The Security Patcher (available from the TruckMate > Utilities > Database Utilities > SQL Execute program > Tools menu) plays an even greater role in TruckMate, since it is the sole manager of the Table aliases in each user’s Schema that form the basis of a Multi-Company implementation. The Security Patcher must be run after adding or dropping a Table from the database and after adding or deleting a user in a Multi-Company scenario.
| As always, it is a good idea to run the Security Patcher as the last step after applying patches. |
Cross-Company Viewing - Application Integration
The following TruckMate programs have Cross-Company Viewing and the Reload Configuration Options features implemented.
Customer Service (CSERV.EXE)
Cross-Company Viewing in the Customer Service program allows the user to create, edit and audit Freight Bills for all of the Companies he/she has access to.
Status Bar
The Customer Service program’s 'Status Bar' (bottom of the program screen) will display the 'Company ID' of the company who 'owns' the currently displayed Freight Bill record. In a normal 'Multi-Company' integration, the Status Bar always displays the 'Company ID' that the user is currently logged into- in a Cross-Company scenario, the 'Company ID' will change depending on the record being viewed.
Related FB’s Tab (in the Freight Bill History pop-up)
If the Cross-Company Viewing option is on:
-
the grid will include a Company ID (integer) column;
-
the grid may show FB’s from other companies (depending on your filter choices);
-
a new checkbox filter, Inter-Company Transfer, will be displayed; if checked and the current FB is part of an IC transfer, then the FB from the "other" company will be shown in the grid.
If Cross-Company Viewing is off, the grid column and checkbox are invisible and no matter what filters are chosen, only FB’s from the current company will be displayed in the grid.
As the company of a Freight Bill is determined by the 'Operations Code', and an Operations Code must be assigned to each 'Site', the Site is thus used to determine the "active" company.
When finding a Freight Bill or when scrolling through the Freight Bills, the "active" company, as displayed in the status bar, will change accordingly. When entering a new Freight Bill, the "active" company will be that of the selected Site. In the Site selection pop-up, the user will be able to choose a Site for any of the companies to which he/she has access.
When accessing Tables where there is affinity to one company or one or more companies, the user will be limited to data for the active company only. For example, in the Customer search pop-up, only the Customers assigned to the active company or to no company (i.e. are therefore visible to all companies) will be listed.
Trip Tracer (TRACE.EXE)
When scrolling through records in the Trip grid, all operations occur in the context of the Trip’s company, as displayed in the window status bar.
Dispatch (DISPATCH.EXE)
Cross-Company viewing combines multiple companies onto a single dispatch board, enabling the user to see all allowed company’s trips, Freight Bills and resources at once.
Though the user is given visibility to all, he/she can only be active with one company at any given time. When scrolling through records in the Trip or Freight Bill grids, all operations will thus occur in the context of the Trip’s or Freight Bill’s company.
Checks are in place to ensure the user cannot assign a resource to a trip where the company of that trip is not visible to that resource. For example, if a user has visibility of Company 1, 2 and 3 and is currently working on a Company 1 Trip, he/she can see all drivers visible to all three companies, but would not be able to assign a driver unless that driver is visible to Company 1. Similarly, the user would be prevented from assigning a Freight Bill to a Trip if it is not a Company 1 Freight Bill.
Though not necessary, it is recommended that all the Application Configurator program > DISPATCH.EXE options are kept in synch across companies, otherwise the Dispatcher must be well-versed on the differences between the company configuration options.
Cross-Company Viewing in the Dispatch program will allow Dispatch users to quickly build out loads from all of the Companies they have access to. But because of the nature of the Dispatch program- where a multitude of different Freight Bills, Resources, Client and Vendor records come to meet- there is a significant amount of back-end processing that must occur during Cross-Company operations. The Dispatch logic must perform a substantial amount of validation, as a Freight Bill that is 'owned' by one company may get applied to a Trip 'owned' by another (with different security parameters), or may have resources from other companies that shouldn’t be available (and so on).
Error Messages
Most errors encountered when using Cross-Company integration in Dispatch will be related to Resource mismatches (i.e. adding a 'Company2' Driver to a 'Company1' Trip). In this case, because the Driver ID record does not exist in 'Company1', a 'Driver <NAME> does not exist' error will appear. Resources cannot be easily tracked, because they may belong to multiple companies.
CrossDock (CROSSDCK.EXE)
Cross-Company viewing combines multiple companies onto a single CrossDock screen, enabling the user to see all allowed company’s trips and Freight Bills at once.
Though the user is given visibility to all, he/she can only be active with one company at any given time. When viewing a Trip or scrolling through records in the Freight Bill grids, all operations will thus occur in the context of the Trip’s or Freight Bill’s company.
| Terminals themselves are globally accessible to all companies. |
Checks are in place to ensure the user cannot assign a resource to a trip where the company of that trip is not visible to that resource. For example, if a user has visibility of Company 1, 2 and 3, and is currently working on a Company 1 Trip, he/she will be able to see all trailers visible to all three companies, but will not be able to assign a trailer unless that trailer is visible to Company 1. Similarly, the user would be prevented from assigning a Freight Bill to a Trip if it is not a Company 1 Freight Bill.
| If a Door is in use by another company (of which the user does not have access, the text "Door in use by Company X" will display on the door. |
City Dispatch (CITYDISP.EXE)
Cross-Company viewing combines multiple companies onto a single dispatch board, enabling the user to see all allowed company’s trips and Freight Bills at once.
Though the user is given visibility to all, he/she can only be active with one company at any given time. When viewing a Trip or scrolling through records in the Freight Bill grids, all operations will thus occur in the context of the Trip’s or Freight Bill’s company.
| The Delivery Tab and Pickup Tab Summary line will summarize all the visible company’s Freight Bills onto one line. |
Checks are in place to ensure the user cannot assign a resource to a trip where the company of that trip is not visible to that resource. For example, if a user has visibility of Company 1, 2 and 3 and is currently working on a Company 1 Trip, he/she will be able to see all trailers visible to all three companies, but will not be able to assign a trailer unless that trailer is visible to Company 1. Similarly, the user would be prevented from assigning a Freight Bill to a Trip if it is not a Company 1 Freight Bill.
|
If a Route is in use by another company (of which the user has no access), the text "Route in use by Company X" will display on the Route. The Summary line (depending on if the user is on the Delivery or Pickup Tab) will also group all the visible company’s Freight Bills by Route Designation on one line. |
City Dispatch Check-In (DEMAN.EXE)
Cross-Company viewing enables the user to see and update trip information for all allowed companies at once.
Driver Call-In (DCALL.EXE)
Cross-Company viewing enables the user to see and update dispatch related driver information for all allowed companies at once.
A/P Inquiry
When the Cross-Company Viewing option is turned on in the A/P Inquiry program, vendor Purchase Totals will include amounts from all companies. As well, the invoices (lower) grid will show all invoices for the given vendor, regardless of company; a Company (number) column will be displayed in the grid (when option turned on).
Even with the option turned off, secondary (transaction / payment history and drill-down) screens for a given invoice now display info from all companies (e.g. in cases where one company receives payment for another company’s invoice). Screens / grids that show data for a given client (as opposed to a given invoice) still only show current company data unless Cross-Company Viewing is turned on.
Like other programs with Cross-Company Viewing, the option is "remembered" to registry (for the next time you run the program).
A/R Inquiry
When the Cross-Company Viewing option is turned on in the AR Inquiry program, client totals (Summary Aging, View Sales, etc) will include amounts from all companies. As well, the invoices (lower) grid will show all invoices for the given client, regardless of company; a Company (number) column will be displayed in the grid (when option turned on).
Even with the option turned off, secondary (transaction / payment history and drill-down) screens for a given invoice now display info from all companies (e.g. in cases where one company receives payment for another company’s invoice). Screens / grids that show data for a given client (as opposed to a given invoice) still only show current company data unless Cross-Company Viewing is turned on.
The Recalculate Current Client Balance option is an exception; it still recalculates the client’s balance in every company, regardless of whether Cross-Company Viewing is on or off and regardless of the company currently logged in.
Like other programs with Cross-Company Viewing, the option is "remembered" to registry (for the next time you run the program).
GL Financial Statement Designer
With Cross-Company Viewing on, the top grid (reports) displays reports for all companies, not just for the current company. The grid also shows an (integer) company ID. The grid is fully functional in cross-company viewing mode; you can add, delete, and edit reports. The company ID column is also editable; a double-click lets you pick the ID by company name. On a manual add where you leave the company ID blank, or if you use "Copy Report", the company ID will still default to the current company.
So, if you want to copy a report from one company to another, you could: 1) switch to the "to" company, 2) turn on cross-company viewing, 3) select/highlight the report you want to copy, and 4) run "Copy Report". Alternatively, you may skip step 1 (run Copy Report while logged into any company) and after the copy, manually edit the company ID column (again, an edit-pick is available via double-click).
Either way, on the copied report in the "to" company, you will probably want to change the company segment in the GL accounts in the from/to range columns in the details grid. You can do this manually (using the "Fix GL Accts in Details" option under Multi-Company menu), or, there is an option in the Application Configurator program > GL > GFS.EXE > "Auto-Fix GL Accts in Details" to do this automatically. It is initially set to Ask (so it prompts you every time you change a report’s company ID), but you can get rid of the prompt by changing it to True or False (as you prefer). Of course, this feature will only work with the proper multi-company setup (a GL segment flagged as the company segment in GL Chart of Accounts and the "to" company’s segment value indicated in the GLACCOUNT entity label in the Organizational Setup in Company Profiles). Since you may have to go into Company Profiles (the first time) to do the setup, a quick link has been added to it under the Window menu.
Like other programs with this option, the Cross-Company Viewing option’s setting (check or unchecked) is "remembered" to registry when you close, so it is set the same the next time you open the GL Financial Statement Designer program.