Dispatch

How do I Create 'Daily Trips' for Drivers?
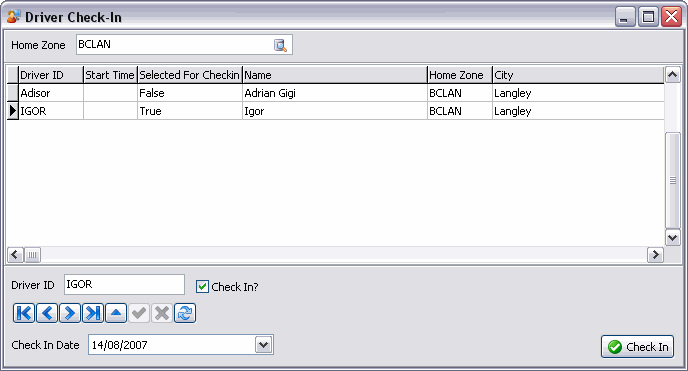
The Driver Check In function is used to create a 'daily' trip for drivers assigned to the selected terminal.
For example, if a driver works out of a terminal in an LTL situation, he is only assigned to one trip per day. The Leg From Zone, Leg To Zone, Current Zone and ETA Zone of the trip is the terminal zone. Multiple freight bills will be assigned to that trip, and the pickup and delivery of the freight bills is processed through the Drill Down function in the Trip grid. The Driver Check In window is used to create the driver’s daily trip.
| Field | Definition |
|---|---|
Home Zone |
Only zone codes that are flagged as Terminals in the Codes Maintenance program > Zone Codes Tab are available for selection in this field. Click the search button for a search form. Only Drivers with the same Home Zone (as configured in the Driver Profiles program) as the selected terminal zone will be displayed in the grid. If you select a different Home Zone than the one displayed, click in the grid to update the grid display. |
Grid |
Drivers whose Home Zone (as configured in the Driver Profile program) matches the Home Zone selected above will be displayed in the grid. If the driver has been assigned a start time on the Availability tab of the Driver Profiles program, it will display in the Start Time column. Drivers who have already been selected for Check In will have the value "True" displayed in the Selected for Check-in column. Otherwise, the field will be blank or display the value "False". |
Driver ID |
The code for the Driver currently selected in the grid is displayed in this field. |
Check In |
To select a driver for check in, select the Driver in the grid and then check this box. |
Check In Date |
If you wish to check in drivers for a date other than today’s date, click on the arrow to select the date from a calendar selection form. The trip dates will be configured accordingly when the trip is created. |
Check In |
Selecting this button will create Trips for the Drivers who have been checked in. If the Driver has been assigned a Default Power Unit in the Driver Profile program, that power unit will also be assigned to the trip. |
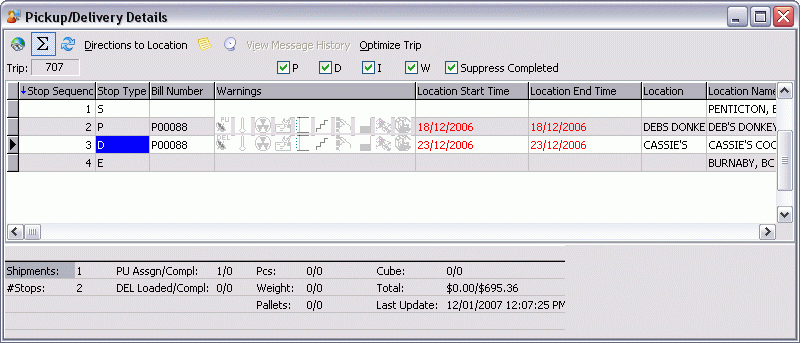
If you need to apply status changes to individual Freight Bills as the Driver completes pickups and deliveries, use the Trip Details option.
How do I Use Trip Details to Change the Freight Bill Status?
The Trip Details Drill Down function is used for LTL Dispatch operations management on the Pickup/Delivery Details window.
The Trip Details Drill Down function is used for LTL Dispatch operations management on the Pickup / Delivery Details window.
The process begins with the driver and equipment assigned to a single trip per day using the Driver Check In function, multiple freight bills are assigned to the trip and the trip is Optimized to create legs in the appropriate order. The trip is activated using a status code of the Dispatch code behavior. Then using Trip Details, status changes are applied individually to freight bills. At the end of the day, when the driver returns to the terminal, the trip is completed in the Trip grid.
| The last status code applied to the trip should be of the Docked behavior category, as this will cause any freight bills that have been picked up to be displayed in the Freight Bill grid (ensure the Docked box is checked) for assignment to a new trip. |
Toolbar Options
Map Route
Selecting this button will launch your default Mapping software to display the Trip route map.
Toggle Summary Information
Select this option to toggle Summary Information on/off from displaying in the panel at the bottom of the window.
Refresh
Select this option to refresh the data displayed in the Trip Drill Down Grid.
Directions to Location
Select this option to display the directions entered in the Customer & Vendor Profiles program for the shipper of the selected freight bill.
Shipment Notes
Select this option to display the Freight Bill Notes window, where you can view or add notes to the Freight Bill on the provided Tabs.
Load Offer
The Load Offer function is used to send a "Load Offer" message to the Driver for review/acceptance. The message is sent though the Mobile Dispatch system to the mobile device installed on the power unit that is assigned to the trip. By default, the Load Offer macro is configured in the Communication Macro Setup program with the specific information required for your Load Offer communication and displayed on the Batch TL Load Offer window.
View Message History
Displays the status of instructions sent for the selected freight bills. The message status codes are interpreted as follows:
-
NS: the message has not yet been sent by the Communications Manager program.
-
S: the message has been sent.
-
A: the TruckMate system has received an acknowledgment that the message has been received by the network.
-
D: the Driver has read the message (this option is only available with the Cancom and AMSC networks, and the Return Receipt option must be enabled on the Cancom or AMSC Tab in the Communications Manager program).
-
C: the message has been canceled.
Optimize Trip
The Trip Optimization feature is used to create trip legs based on the Pickup and Delivery locations of the freight bills assigned to the trip on the Load Optimizer window.
Stop Filters
These options allow you to choose what Freight Bills to display in the window based on status:
-
P: will display Pickup Freight Bills in the Trip Drill-Down Grid.
-
D: will display Delivery Freight Bills in the Trip Drill-Down Grid.
Suppress Completed
Will not display those Freight Bills with 'Complete' Status.
Trip Drill Down Grid
This Grid details the Trip information ordered by Stop Sequence. By default, the Stop Sequence reflects the order that the Freight Bills were added to the Trip or Trip Leg.
Context Menu
Select All
Selecting this option will select all of the displayed Trip Stops in the Drill-Down Grid.
Clear Selection
Selecting this option will clear the selection on any of the Trip Stops. Selecting this does not delete the Trip Stops but only removes their highlighting.
Full Screen
Select this option to expand the Pickup/Delivery Details window to a full screen view
Directions to Location
See 'Toolbar' section above.
Optimize Trip
The Trip Optimization feature is used to create trip legs based on the Pickup and Delivery locations of the freight bills assigned to the trip on the Load Optimizer window.
Load Offer (all) / Load Offer (selected)
You can send a Load Offer for all selected Trip Stops or for only those selected. See 'Toolbar' section above for details on Load Offers.
View Message History
See 'Toolbar' section above.
Mapping Software / Mapping Settings
Select the default Mapping software on your system and use the 'Mapping Settings' option to configure its default settings.
The process begins with the driver and equipment assigned to a single trip per day using the Driver Check In function, multiple freight bills are assigned to the trip and the trip is Optimized to create legs in the appropriate order. The trip is activated using a status code of the Dispatch code behavior. Then using Trip Details, status changes are applied individually to freight bills. At the end of the day, when the driver returns to the terminal, the trip is completed in the Trip grid.
| The last status code applied to the trip should be of the Docked behavior category, as this will cause any freight bills that have been picked up to be displayed in the Freight Bill grid (ensure the Docked box is checked) for assignment to a new trip. |
Choose what bills to display in the window based on status Pickups, Deliveries and Suppress Completed. Freight bills are displayed in order of their Stop Sequence. By default, the Stop Sequence reflects the order that the freight bills were added to the trip or leg.
How do I Edit Unapproved Driver Pay?
The Unapproved Driver Pay window is accessed from the Driver Pay option in the Dispatch Trips Grid Context Menu.
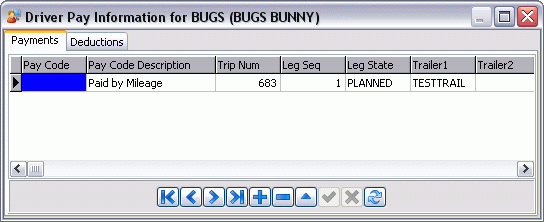
You can edit the automatically generated driver’s pay. On save you will be prompted to maintain these changes to the automatically generated pay values, select Yes to keep the changes, select to No to allow the changes to be recalculated on post.
Driver Pay is approved in the Driver Pay Audit program. The parameters for automatic driver pay are configured in the Driver Pay Contracts program and Pay contracts are assigned to drivers in the Driver Profile program.
How do I Send a Load Offer Message?
The Load Offer function is used to send a "Load Offer" message from to the Driver for review. The message is sent though the Mobile Dispatch system to the mobile device installed on the power unit that is assigned to the trip.
The Load Offer window is accessed in Dispatch from the Trips grid context menu.
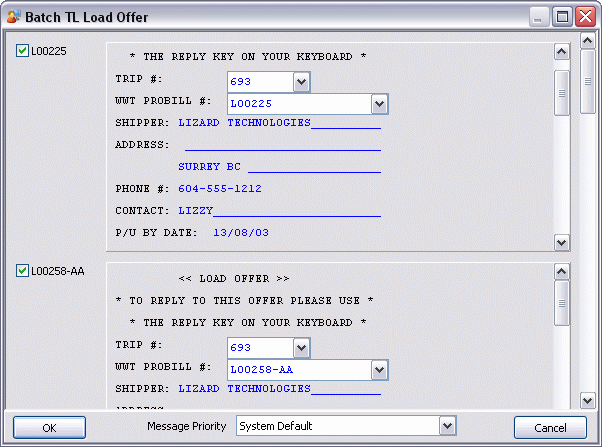
You can also send a different macro than the Load Offer macro, or a free form message. To do this, select the Skip button, then click the Macro button to select a different macro, or enter free format text. Also, you can change the Priority with which the message is sent. See the Communications Manager program for information about message priority.
A macro will be generated for each freight bill assigned to a trip on each unfinished leg. Check the boxes beside the freight bill numbers to de-select one or more freight bills.
The Load Offer macro is configured in the Communication Macro Setup program with the specific information required for your Load Offer communication.
You can configure the system to automatically change the status of the freight bills assigned to the trip when the load offer is sent (and also when the load offer is read by the driver, when the load offer is accepted, or when the load offer is declined.) To do so, see the General Tab in the Configuration options of the Communications Manager program.
Load Offer Status (Trip Grid field)
Displays the load offer status to provide dispatchers easy reference on driver availability. Statuses include 'Offered', 'Read', 'Accepted', 'Declined', 'Active', and 'Completed'. For example, if a driver reads a load offer, the status will be changed to 'Read', and only if the current load offer status is 'Offered'. If a load offer is declined, the load offer status will be set to 'Declined'.
A free-form message will be generated by the system to inform the Dispatcher(s) of this Status Change update. When a load acceptance arrives, the load offer status will change as appropriate. No status changes will occur at this time, except that if the driver has no current assignment, the usual logic will apply (i.e., to dispatch the trip). If the driver has a current assignment, nothing will be done at this time. When the driver completes his current assignment (through mobile communications), the system will scan for any trips, to which he is assigned, that have a load offer status of 'Accepted'. The one with the lowest sequence will be activated (by dispatching). His previous trip’s load offer status will be set to 'Completed', while the new trip’s load offer status becomes 'Active'.
Whenever a trip is activated through this interface, a free-form message will be generated indicating to the driver which assignment he should be working on. Any trip activated in this way will cause the load offer status to be set to "active". A new dialog will be created that will allow load offers to be managed for a particular driver. Specifically, it will allow the ability to re-order trips with a load offer status of "offered" or "read", will allow a load offer to be revoked (and send appropriate message to the driver), will re-offer a load (presumably with changed details), etc.
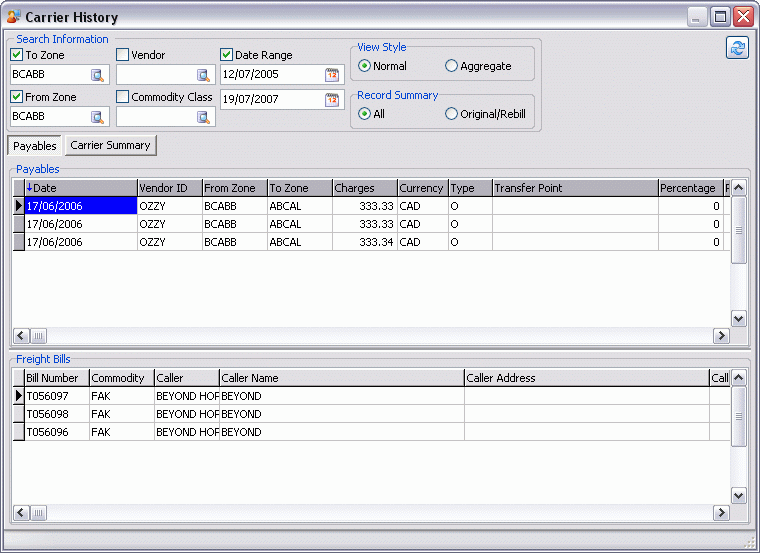
How do I View Carrier History?
The Carrier History option provides a search for historical payment information for carriers who have been previously assigned to trips. The Payables grid displays a summary of the interliner charge. Complete details about the charge can be viewed in the Customer Service program. The Freight Bills grid displays a summary of the freight bills that were included in the interliner charge that is selected in the Payables grid.
-
In the Dispatch program Trips Grid, select the trip.
-
From the context menu select Carrier History. The Carrier History window displays.
-
Define the search criteria to display previous interliner leg payments:
-
Check the boxes beside the required search criteria.
-
Double-click in the search criteria fields for data selection.
-
Select the Refresh button. The interliner payments display in the Payables grid and freight bill summaries for the payments display in the Freight Bill Summary grid.
Additional Carrier History Information
Search Information Details:
-
To Zone: to view interliner records with a destination in a specific zone, check the box and enter the zone code in the field. Double click for a zone selection form.
-
From Zone: to view interliner records that originated in a specific zone, check the box and enter the zone code (as configured in the Codes Maintenance program) in the field. Double click for a zone selection form.
-
Vendor: to view interliner records for a specific interliner, check the box and enter the interliners vendor code. Double click for a vendor selection form.
-
Commodity Class: to view interliner records based on a specific commodity, check the box and enter the commodity class. Double click for a commodity class selection form.
-
Date Range: to view interliner records of a specific range of dates, check the box and enter the dates. Note that the dates correspond to the Delivery By dates on the trip to which the interliner was assigned.
-
Refresh: if you change the selection criteria, click the Refresh button to re-display the Payables and Freight Bill grid information.
Freight Bills grid Context Menu:
-
View Freight Bills: launches the Customer Service program to view the selected Freight Bill details.
-
View Notes: to view any notes for the selected Freight Bill. The Freight Bill Notes window contains 6 Tabs to display notes associated with Billing, Container, Driver, OSD, Other & Write Off.