Payroll Time Sheets

The Payroll Time Sheets program is used to generate Pay Records based on the setup in the Payroll Setup program and the Employee Profile program. Also, Payroll Records generated by the Driver Statements program are displayed in the Payroll Time Sheets program. Both pay and deductions are entered in the Payroll Time Sheets program. After generating payroll pay and deduction entries, the entries are updated and check records are generated using the Payroll Processing program.
The header portion of the Payroll Time Sheets program is used to create payroll 'batches'. Batches are collections of pay and deduction records for a specific Pay Group and bank account. The bottom part of the screen displays a summary of the records entered on the Time Sheets / Earnings Tab, or on the Deductions / Adjustments Tab (depending on which Tab is currently displayed).
| A payroll batch is like an audit number: it is not possible to delete a batch once it has been created. The footer portion of the Payroll Time Sheets program is used to display a summary of the pay or deduction entries. You can disallow Users from viewing Restricted Batches using an option in the Security Setup program > Security > Business Events > Allow Changes Tab. |
To access Payroll Time Sheets:
| From this location | Go to |
|---|---|
TruckMate Menu and TruckMate Task List |
|
Windows Start Menu |
|
Windows Explorer |
C:\Program Files (x86) > TruckMate 20xx > TimeSheets.exe |
Procedures
Using the Import Function
The 'Import' function is accessed from the Quick Entry /Earnings Tab Context Menu.
Before you Import
The import function will extract data from any valid ascii text file in any folder you can go to with the standard Windows 'open file' window. There are some constraints that must be observed and they are as follows:
File type and format
The import filename can have a .txt, .dat, .imp extension, or whatever, as long as the contents are readable plain text.
Schema file
Along with the import file a schema file (.sch) must also exist in the same location, to provide the Timesheets program with the layout of the text file and a map of what data fields correspond to database fields.
File names
The names of the import file and the schema file must be the same. We recommend you use:
-
Timesheets.txt
-
Timesheets.sch
What this means is that each time you import your Timesheet entries from your time clock system or whatever, you must overwrite the existing 'Timesheets.txt'.
The contents of the schema file will look like this:
[TIMESHEETS] +
Filetype=Delimited +
Delimiter=' +
Separator=, +
CharSet=ascii +
Field1=EMPLOYEE_CODE,Char,10,00,00 +
Field2=PAY_CODE,Char,10,00,10 +
Field3=TX_DATE,Char,10,00,20 +
Field4=TX_TIME,Float,12,02,30 +
Field5=TIME_UNITS,Char,03,00,42
The contents of the import data file will look like this:
'LEE','REG','07/21/2001',8,'HRS' +
'LEE','REG','07/22/2001',8,'HRS' +
'LEE','REG','07/23/2001',6,'HRS' +
'LEE','REG','07/24/2001',7.5,'HRS' +
'LEE','REG','07/25/2001',9.25,'HRS' +
'STEVE','REG','07/25/2001',10,'HRS'
| You must provide a carriage return after the last record to indicate an EOF, otherwise the import will fail. |
How do I Print Pay Records based on the options in Payroll Setup and Employee Data?
-
Open the Payroll Time Sheets program (TIMESHEETS.EXE).
-
Select the '+' button (in the top right-hand corner) to create a new batch. A confirmation dialog box will appear asking if you wish to create a new batch number. Say 'Yes'. Enter the Payroll Date (it will automatically default to today’s date), Bank, Country and if you are using a weekly Payroll—enter the week number. If you are only paying one pay group, then enter the Group Code, otherwise leave it blank.
Note: For automated entry, in the Time Sheets / Earnings grid, use your context menu and select 'Recall Records by Employee', and then use the search to search for the Employee’s Code. All the pay details that have been set up in the applicable recall selection will be imported—this can be manually adjusted at this point.
For manual entry, select the '+' on the lower grid (bottom left-hand side of screen) and a new line will appear in the grid. Enter the pay information. Use the Deductions/Adjustments tab to enter any deductions or adjustments to the pay amounts.
-
When all the records have been entered, use your context menu and select 'Print Payroll Report'. A report selection dialog box will open. Select the 'PAYROLL.RPT' report and once it opens, review the accuracy of your entries.
Note: To see all three tabs: Time Sheets/Earnings, Deductions/Adjustments, and Quick Entry Earnings, the user must have the appropriate security settings enabled. Refer to the Security Maintenance Program-Tabs Setting options. By default, these tabs are enabled but you can modify the settings and allow only certain employees access to one or all of these tabs.
Some users may choose to use the Quick Earnings entry for adding pay records. You’ll note that the Quick Entry Earnings grid will not show any rates. Again, you may wish to limit access to some of these tabs.
How do I Change the Security Settings for the Time Sheets program?
If you cannot access the full functionality of the TIMESHEETS.EXE, follow these steps.
-
Open the Security Setup program (SECSETUP.EXE), click: Start > Programs > TruckMate > Utilities > Security Setup.
-
Click the 'Security Tab' at the bottom of the Security Setup window. The Security Options will appear.
-
Choose the appropriate User Group or User Name that you wish to allow access to Employee Time Sheets information.
-
Choose the 'Tabs Setting' option from the left window. When a series of small icons appears, choose 'Payroll'.
-
Choose the options you would like to allow for this User or User Group. You may also click the 'Check All - Payroll' button at the bottom of the window to quickly allow this User / User Group access to the full functionality of TIMESHEETS.EXE and EMPLOYEE.EXE (both programs work in conjunction for Payroll).
-
Next, click the 'Security' option in the left-side menu (where you chose 'Tabs Setting' earlier).
-
Choose the 'Employee Program' option and choose a Security Level appropriate to the User or User Group being used. The Details of Security Clearance Levels are outlined in the Security Setup documentation. A Security Level of '0' will allow most Users access.
-
The selected User or User Group now has full access to the TIMESHEETS.EXE program!
Menu Bar / Toolbar

Multi-Company
For more information on the Multi-Company options available from the Menu Bar, see the Multi-Company documentation.
Navigate Menu
The Navigate Menu contains the standard TruckMate Navigational Bar, as well as the following options:
Find
 Click this button to search for a specific Payroll Batch record using a variety of criteria.
Tools Menu
TruckMate Monitor
 Click the down arrow next to this button to access the various functions of the TruckMate Monitor.
Remember Position / Size
Checking this option will retain the position and size data for this program, and when you re-open the program, it will appear similarly.
Synergize Indexing
![]() This option invokes TMW Synergize Imaging. This will allow you to index and link documents to the selected sheet. Batch # and Employee Code are your indexing fields.
This option invokes TMW Synergize Imaging. This will allow you to index and link documents to the selected sheet. Batch # and Employee Code are your indexing fields.
Update Synergize Document
If a Synergize Document is already linked to the time sheet, you can use this option to update its information.
Skip to Next Document
This option allows you to brows through available Synergize documents by skipping one after another.
Window Menu
Employee Data
![]() Select this option to open an instance of the Employee Profiles program.
Select this option to open an instance of the Employee Profiles program.
Payroll Setup
![]() Select this option to open an instance of the Payroll Setup program.
Select this option to open an instance of the Payroll Setup program.
Test US Tax (Using Payroll DLLs)
![]() Select this option to open an instance of the Test US Tax program.
Select this option to open an instance of the Test US Tax program.
Payroll Processing
 Select this option to open an instance of the Payroll Processing program.
Help Menu
TruckMate Help
 Selecting this button will open the Payroll Time Sheets topic in the TruckMate Online Help file (the page you are currently viewing).
Service Portal
 Selecting this button will open an instance of your default Internet browsing software, with the https://www.tmwcare.com login page displayed.
About
 Selecting this button will open the standard TruckMate About window, which contains important information about the application you are currently using, including its version number (important for support calls).
Batch Information
Batch
When you create a new batch (using the navigator bar in the header section) the next consecutive batch number will be automatically assigned. This Batch ID is displayed in the Payroll Processing program.
Payroll Date / Check Date
These two fields are where you set the date the pay and deductions are to be posted to (Payroll Date) and then the date used to calculate the source deductions (Check Date). Having two dates allows for cases where the payroll expenses may be posted in one period, but the tax calculations must be based on rates in the next period.
Another important distinction which must be made here is that this Check Date does not necessarily correspond to the Check Date set in the Payroll Processing program. That Check date is the value assigned to the payroll checks themselves. This third date allows for cases where the payroll expenses are posted to period A, tax calculations are based on period B rates, but the checks are paid out in period B on a date that differs from the calculation date. An example would be where the normal pay date is the 15th, but it falls on a Sunday, forcing the checks to be dated for either the 13th or 16th.
PR Control Account
When a new payroll batch is created you must now specify a Payroll Payables control account. You can enter the value manually or click the search button to bring up a search window. If you do not specify an account you will see a warning window. This is now required to allow the posting of payroll expenses in one period and the actual pay-out in another period. If you have not added a Payroll Payables account to your Chart of Accounts, see the GL Chart of Accounts program for more information.
Bank
Select the description of the bank account from which the payroll will be paid. Only accounts of the 'Bank' type will be available for selection in the drop down list box. GL accounts are configured in the GL Chart of Accounts program.
Country
There are two countries available for selection: 'CAN' and 'US'. You will only be able to add pay and deduction entries for employees who are assigned to the same country that is specified in this field. Employees are assigned to countries in the Employee Profile program.
Pay Group
Select the group of employees for whom you wish to create payroll. Pay Groups are configured in the Payroll Setup program, and assigned to employees in the Employee Profile program. The Pay Group selected here will determine which pay group is used when the 'Recall Records by Pay Group' context menu option (in the Time Sheets / Earnings grid) is used. Double click for a Pay Group selection form.
Description
Enter a free format description for the payroll batch. This is for reference and reporting purposes only, and will display in the Payroll Processing program.
Week
This field refers to the payroll week in which deductions should be assigned to employee payroll. In the Employee Profile program, it is possible to configure deductions so that they are assigned only during a specific payroll run. For example, you might have a deduction that you want to be assigned to the mid-month payroll run, but not the end of the month payroll run. In that case, you would specify 'Week 2' in the code setup (in the Employee Profile program), and then specify '2' in the Week field in the Payroll Time Sheets program. Note that the term 'Week' is rather arbitrary; it is simply a way to link the deductions created in the Employee Profile program and the Payroll Time Sheets program.
Payroll #
Enter the Payroll Number.
Override Direct Deposit
Users now have the ability to flag a batch to NOT be processed to a Direct Deposit. Simply place a check in this field.
Not Regular Pay
Similarly, users can now flag a batch of non-regular pay (such as bonus checks) to avoid affecting the regular deduction cycles.
Filters
Employee
Select this flag you’d like to filter by employee names. Enter the employee name in the field provided, or click the search button for more choices.
Date
Select this flag if you’d like to filter by date. Enter the date or use the calendar menu to locate the requested date.
User ID
Select this flag, if you would like to filter the time sheets/earnings, deductions/adjustments and quick entry earning areas by the User ID associated with the detail record’s entry. Use the Database Search button to open a selection window with all of the User IDs in your system.
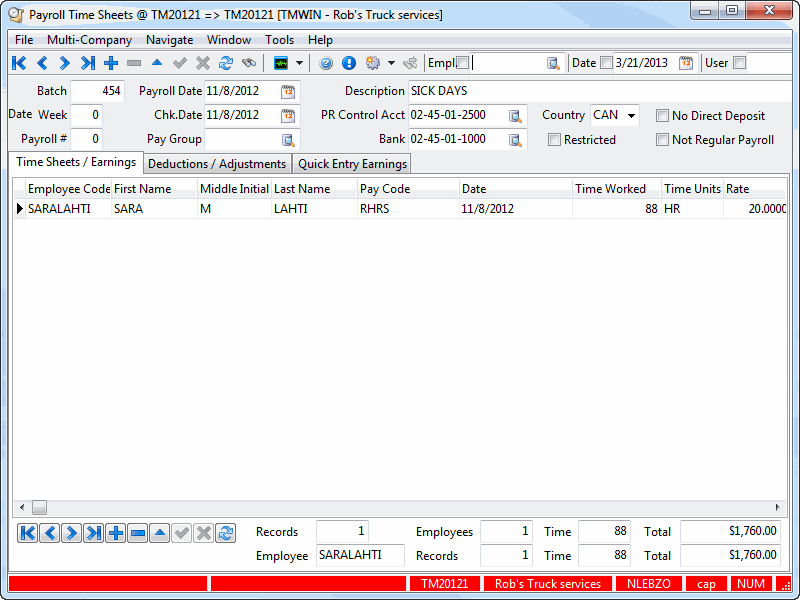
Batch Summary Information
The Batch Summary Information fields at the bottom of the program screen display a summary of the pay or deduction entries. The values will vary depending on whether the Time Sheets / Earnings Tab or the Deductions / Adjustments Tab is currently selected.
Records
Displays the number of entries in the grid.
Employees
Displays the number of employees who have pay or deduction entries (depending on which Tab is selected).
Time
Displays the sum of the values entered in the Time Worked field on the Time Sheets / Earnings grid. Note that this field only displays if the Time Sheets / Earnings Tab is in the front.
Total
Displays the sum of the pay or deduction entries.
Employee
Displays the code of the employee who is currently selected in the grid.
Records
Displays the number of pay or deduction entries (depending on which Tab is currently selected) for the employee displayed in the field to the left.
Time
Displays the sum of the values entered in the Time Worked field on the Time Sheets / Earnings grid for the employee selected in the field to the left. Note that this field only displays if the Time Sheets / Earnings Tab is in the front.
Total
Displays the total amount of the pay or deduction entries (depending on which Tab is currently selected) for the employee displayed in the field to the left.
Time Sheets / Earnings Tab
The Time Sheets / Earnings Tab is used to create pay entries. You can manually enter pay by using the navigator bar under the grid. Alternatively, you can automatically generate pay entries by using the context menu that is invoked from the grid.
Employee Code
Enter the employee code (if manually creating a pay entry). Double click for a code selection form. Employee codes are configured in the Employee Profile program.
Pay Code
Enter the pay code (if manually creating a pay entry). Double click for a code selection form. Pay Codes are configured in the Payroll Setup program. Only pay codes that have been assigned to employees on the Employee Profile program > Rates Tab will be available for selection. If the pay entry was created by using one of the right mouse 'Recall Records' options, the pay code will default to the code specified on the Employee Profile program > Pay Information Tab.
Date
Will default to today’s date (if manually creating a pay entry). If the pay entry was created by using one of the right mouse 'Recall Records' options, the date will default to the Batch Date specified in the header.
Time Worked
If you are manually creating a pay entry, enter a number in this field. The number in this field will be multiplied against the value in the Rate field to determine the Payment amount. If the pay entry was created by using one of the right mouse 'Recall Records' options, the value in this field will default to the hours entered for this employee on the Employee Profile program > Pay Information Tab.
Time Units
The value in this field will default to the 'Rate Per' value entered for the selected Pay Code on the Employee Profile program > Rates Tab.
Rate
If you are manually entering a pay entry, the value in this field will default to the Rate value entered for the selected pay code on the Employee Profile program > Rates Tab. If the pay entry was created by using one of the right mouse 'Recall Records' options, the value in this field will depend on the Pay Periods assigned to the employee on the Employee Profile program > Pay Information Tab. If the employee is of the Salary Pay Class (on the Pay Information Tab in the Employee Profile program), the Rate is determined by dividing the Salary Amount by the number of Pay Periods, and then by the Hours per pay period. If the employee is of the Hourly Pay Class (on the Pay Information Tab in the Employee Profile program), the Rate is defaults according the Rate value on the Rates Tab in the Employee Profile program.
O.T. Rate
If the code specified in the Pay Code field is of the type 'Over Time Earnings' (as configured in the Payroll Setup program > Pay Codes Tab), the value entered in the O.T. Rate Multiplier for the Pay Code will default in this field. This multiplier will be multiplied by the value in the Rate field, and then multiplied by the value entered in the Time Worked field to arrive at the payment amount.
Payment
Is a default value that is determined by multiplying the value in the Time Worked field by the value in the Rate field and the value in the O.T Rate field.
Department
Defaults according to the department assigned to the employee on the Employee Profile program > Address Tab.
GL Account
Defaults according to the general ledger posting references configured on the Payroll Setup program > Departments Tab.
Remarks
If you are manually entering a pay entry, this is a free format entry field that is used only for reference and reporting. If the pay entry was created by using one of the right mouse 'Recall Records' options, the value in this field will display the text 'Salary Entry', 'Hourly Entry' or 'Driver Pay Statement'.
Power Unit
If you are manually entering a pay entry, you can attach a power unit code (as configured in the Power Unit Profiles program) to the entry for the purpose of reporting. You can also edit automatically generated entries and add this code. Double click for a code selection form.
First Name / Middle Initial / Last Name
Will default to the name associated with the selected Employee Code, as configured in the Employee Profile program.
Context Menu
Recall Records by Period
You can only use this option if there are no pre-existing pay or deduction entries in the batch. Recall Records by Period will prompt you to select a pay period (as configured in the Payroll Setup program). For employees who are assigned to the selected pay period (in the Employee Profile program) and who are in the same Pay Group as the group specified in the batch header, an automatic pay entry will be generated. The pay record will be generated according to the employee’s setup on the Employee Profile program > Pay Information Tab. See the field descriptions above for further information.
Recall Records by Pay Group
You can only use this option if there are no pre-existing pay or deduction entries in the batch. Recall Records by Pay Group will generate pay entries for all employees assigned to the same Pay Group as the group specified in the Batch header. Pay Groups are assigned to employees on the Employee Profile program > Pay Information Tab. The pay record will be generated according to the employee’s setup on the Pay Information Tab in the Employee Profile program. See the field descriptions above for further information.
Recall Records by Employee
You can only use this option if there are no pre-existing pay or deduction entries in the batch. Recall Records by Employee will prompt you to enter an employee code (double click for a code selection form). The pay record will be generated according to the employee’s setup in the 'Recall' column of the Rates section in the Employee Profile program. See the field descriptions above for further information.
Delete All (Automatically Generated Records / Manually Generated Records / Delete All Driver Pay Generated Records)
These options delete time sheet entries from the Earnings Tab, the Adjustments / Deductions Tab, and the Quick Entry Earnings Tab depending on the type of entry made. Automatically Generated records are those created by using the Recall functions above. Manually generated records are those which were keyed in by users - example: overtime entries, which are generally not automated entries. Driver Pay generated records are those line entries which were created by transferring driver pay
Delete Employee Records
This function will delete all pay and deduction entries (whether manually or automatically generated) for the employee who is currently selected in the grid.
Assess Hours, All Employees / Assess Hours, This Employee
These will create entries into the Quick Entry /Earnings Tab for the allotted Employment Insurance Hours (EIHRS) for either a selected Employee or for All Employees.
Delete All Assessed Hours Records
This option will delete all of the generated EIHRS (Employment Insurance Hours) within the Time Sheets / Earnings Tab.
Recall Stat Holidays (By Period / By Pay Group / By Employee)
These options will display selection forms upon being clicked. If you have chosen the 'By Period' option, use the pull down menu to select an interval. Available values are: 'Yearly', 'Semi-annually', 'Quarterly', 'Monthly', 'Semi-monthly', 'Bi-weekly', 'Weekly', or 'Daily'.
-
Choosing the 'By Pay Group' option will bring up a new window, where you can use the search button to select a Pay Group Code.
-
Choosing the 'By Employee' option will bring up a new window, where you can click the search button to select an Employee Code. The information is gathered form the 'Stat Holiday' column in the Rates section of the Employee Profiles program.
Once your Filter value is chosen the Stat Holidays for that associated Period / Group / Employee will be displayed to the screen.
Print Pay Roll Report
Will display the Report Selection form. The Crystal Report template supplied with the TruckMate system is called PAYROLL.RPT. The report will preview to the screen. Click the printer icon at the top of the screen to send the report to the printer that is configured as the default printer for your workstation.
See the Crystal Reports Reference for more information on report functions.
Show Test Can Tax
This option will toggle the display of the Test Tax Calc Tab. The Test Tax Calc Tab is a worksheet used to model Canadian government source deductions based on parameters entered on the left side of the screen. Note that this worksheet is independent of any employee pay and / or deduction entries created on the other two Tabs. You must manually enter payroll values on the left side of the screen, then click the Calculate Tax button to display the calculated government payroll deductions on the right side of the screen.
Import
The 'Import' function allows you to pull your time sheet entries into the program from a text-based import file. See Using the Import Function below for more information.
Column Sort by Entered Sequence
Selecting this option will sort the Deductions / Adjustments grid detail lines by the order in which they were entered into your system.
| Many of these options can be disallowed for specific users using the Security Setup program > Security tab > Business Events > Misc. > TimeSheets. |
Deductions / Adjustments Tab
The Deductions / Adjustments Tab is used to create deduction entries. You can manually enter deductions by using the navigator bar under the grid. Deduction entries will be automatically created when you use one of the 'Recall Records' menu options on the Quick Entry /Earnings Tab. Automatic deductions will be created based on the configuration of the Employee Profile program > Deductions Tab.

| Government payroll deductions (such as Employment Insurance, tax and CPP contributions) will not display on this Tab. They are generated by the Payroll Processing program (using the 'Create Checks' button), and can be viewed using the 'Review Checks' button. Also, you can use the right-mouse menu option 'Show Test Can Tax' on the Time Sheets / Earnings Tab to model government source deductions for Canadian employees. |
Employee Code
Enter the employee code (if manually creating a deduction entry). Double click for a code selection form. Employee codes are configured in the Employee Profile program.
Pay Code
Enter the deduction code (if manually creating a deduction entry). Double click for a code selection form. Deduction codes are configured in the Payroll Setup program. When manually creating a deduction entry, the deduction code does not need to be assigned to the employee in the Employee Profile program.
Date
Will default to today’s date (if manually creating a deduction entry). If the deduction entry was created automatically, the date will default to the Batch Date specified in the header.
Amount
Enter the deduction amount (if manually creating a deduction entry). If the deduction entry was created automatically, the amount will default according to the configuration of the Employee Profile program > Deduction Tab.
Department
Defaults according to the department assigned to the employee on the Employee Profile program > Address Tab.
GL Account
Defaults according to the general ledger posting references configured on the Payroll Setup program > Departments Tab.
Remarks
This is a free format entry field that is used only for reference and reporting.
Power Unit
If you are manually entering a pay entry, you can attach a power unit code (as configured in the Power Unit Profiles program) to the entry for the purpose of reporting. You can also edit automatically generated entries and add this code. Double click for a code selection form.
Calc Amount
Will display the calculated amount of the deduction, according to the configuration in the Employee Profile program.
Calc Rule
Will display a code that indicates calculation rule configured for the deduction code. Deduction codes are configured in the Employee Profile program. The Calc Rule codes can be interpreted as follows: 'R' stands for a 'Rate time Amount' calculation rule; 'P' stands for a 'Percent Gross Earnings' calculation rule; 'N' stands for a 'N/A' calculation rule (ie, a flat deduction amount); 'V' stands for 'Percent Gross Earnings minus Vacation'; 'S' stands for 'Standard with Percent Net Check'.
First Name / Middle Initial / Last Name
Will default to the name associated with the selected Employee Code, as configured in the Employee Profile program.
Context Menu
Advance Checks
Selecting this option will bring up the 'Select Advance Checks' dialog box where you can highlight the check(s) you wish to be processed (use your context menu again), and when ready, select the 'Process Selected Records'. Once processed, your deduction entry will appear in the Deduction / Adjustments grid.
Column Sort by Entered Sequence
Selecting this option will sort the Deductions / Adjustments grid detail lines by the order in which they were entered into your system.
Attach / Open Related Files
Selecting this option will open the Attach / Open Related Files window, which will allow you to attach documents to this Deduction / Adjustment entry.
Quick Entry Earnings Tab
The Quick Entry Earnings Tab is exactly the same as the Time Sheets / Earnings Tab, except that many of the dollar value fields have been hidden from the grid. The purpose of the Quick Entry Earnings Tab is to allow payroll clerks to quickly enter time sheet information (as they would on the Time Sheets / Earnings Tab), without allowing them to view sensitive employee payroll information, such as their pay rates. The Context menu in this tab is also exactly the same as the Context menu in the Time Sheets / Earnings Tab. For information on the Context menu refer to the Context menu description in Time Sheets / Earnings Tab.

| Government payroll deductions (such as Employment Insurance, tax and CPP contributions) will not display on this Tab. They are generated by the Payroll Processing program (using the 'Create Checks' button), and can be viewed using the 'Review Checks' button. Also, you can use the right-mouse menu option 'Show Test Can Tax' on the Time Sheets / Earnings Tab to model government source deductions for Canadian employees. |
Employee Code
Enter the Employee Code (if manually creating a payment entry). Double click for a code selection form. Employee codes are configured in the Employee Profile program.
Pay Code
Enter the Pay Code (if manually creating a payment entry). Double click for a code selection form. Pay Codes are configured in the Payroll Setup program. When manually creating a payment entry, the Pay Code does not need to be assigned to the employee in the Employee Profile program.
Date
Will default to today’s date (if manually creating a payment entry). If the payment entry was created automatically, the date will default to the Batch Date specified in the header.
Time Worked / Time Units
Enter the appropriate time entry relevant to either hours, or days worked.
Department
Defaults according to the department assigned to the employee on the Employee Profile program > Address Tab.
GL Account
Defaults according to the general ledger posting references configured on the Payroll Setup program > Departments Tab.
Remarks
This is a free format entry field that is used only for reference and reporting.
Power Unit
If you are manually entering a payment entry, you can attach a power unit code (as configured in the Power Unit Profiles program) to the entry for the purpose of reporting. You can also edit automatically generated entries and add this code. Double click for a code selection form.
First Name / Middle Initial / Last Name
Will default to the name associated with the selected Employee Code, as configured in the Employee Profile program.
Test Tax Calc Tab
The Test Tax Calc Tab is used to model Canadian Payroll Deductions based on the amount of pay and other employee information. The Test Tax Calculation Tab can be toggled to Hide / Show by the using '<CTRL><T>' hot key combination or by using the Context Menu option 'Show Test Can Tax' on the Time Sheets / Earnings Tab.
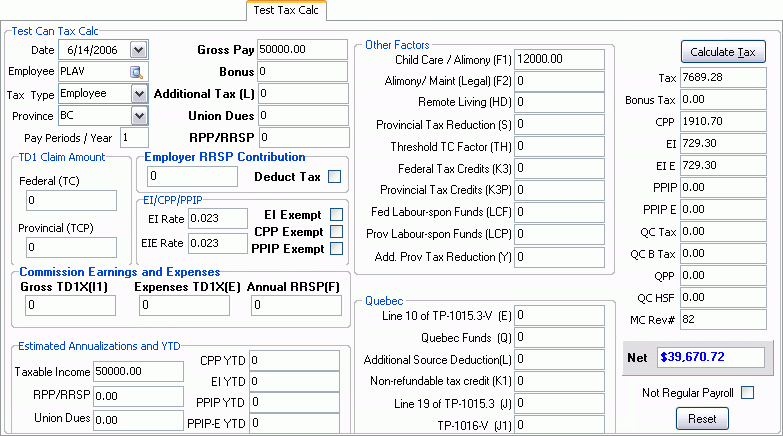
| This Tab does not create source deductions, nor does it use the payroll defaults configured for any particular employee. You must enter data in the fields (as applicable) in order to perform the test calculation. For a description of the fields, see the Employee Profile program > Can Tax Tab. |
Once the Tab is visible, set the calculation date and supply an Employee Code, which you can key in yourself or use the search to open a search window to find a code.
Click on the 'Calculate Tax' button and the program will generate a Test Tax calculation based on the information from the employee profile. You can change any of the source information returned from the Employee Profile program and click on Calculate Tax button to test the effects of your changes.
You may use the 'Reset' button located at the lower right at any time to reset the fields to their default state.