TruckMate 2021.3 New Features: Operations
Framework
SQL Execute can retain previous tab information (TM-112512)
A new SQL Execute > Tools > Options / Setup application option on the General > Application tab can be set allow the window to remember what had previously been run in the tabs prior to the SQL Execute application being closed. Previously, if SQL Execute was closed accidentally or possibly crashed, any queries or data that you were working with would have been lost.
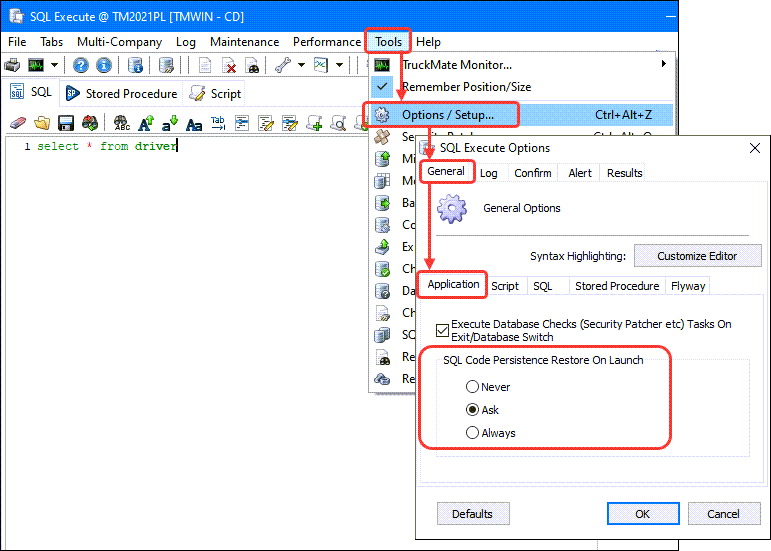
You can control the behavior by choosing one of three options:
| Option | Description |
|---|---|
Never |
No prompt will appear when opening the application and the SQL Execute tabs will be empty. (default) |
Ask |
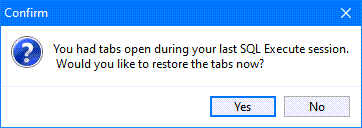
A prompt is displayed providing a choice as to whether to display the previously run data. (default)
|
Always |
No prompt will appear when opening the application and the initial three tabs in SQL will contain the previously run data. |
The previous data is stored in an XML file, called 'SQLExec.xml'. This is located under the AppData/Roaming/TruckMate folder and is present from the very first time a user opens SQL Execute. This file will automatically update every minute, and will also update when the application is closed to ensure the latest data is always saved in this file.
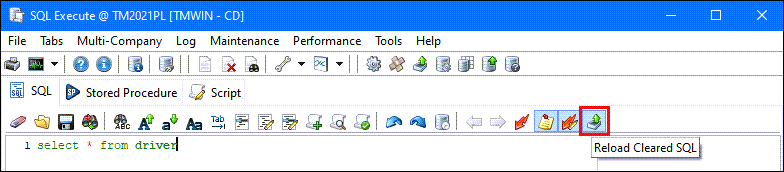
In addition, a new button was added to SQL Execute to allow you an easy way to bring back the last successful run query on the tab you were working with.
Optional table listing feature within SQL Execute (TM-137648)
A new SQL Execute feature will display a list of system tables when you type a period and wait a second when entering text in the SQL editor.
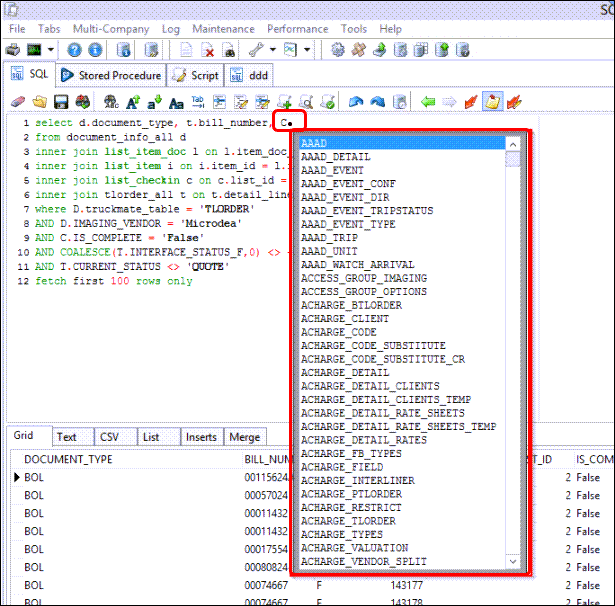
This feature can be turned on or off using the SQL Execute > Tools menu > Options / Setup > General tab > SQL sub-tab > Enable SQl Auto Complete checkbox.
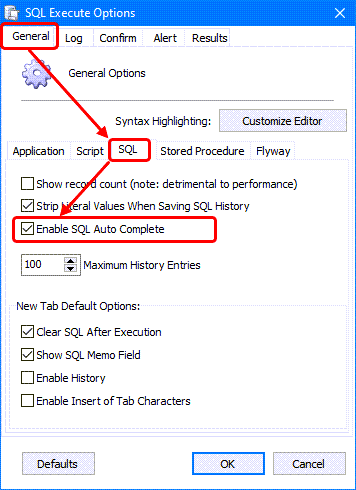
If this checkbox setting is changed, it will only take effect on new tabs that are opened after the change is made or if the SQL Execute application is closed and relaunched.
New Trimble Cloud Export Windows service (TM-152017)
A new Trimble Cloud Export Windows service has been added to the Truckmate Windows Services Host application to provide a method for exporting Truckmate freight bills (Orders) to the Trimble Transportation Cloud (TTC) environment. The data is exported to a designated account ID on the TTC environment where it is retrieved for processing by the desired parties or carriers.
The Trimble Cloud Export service also requires an ART service (Truckmate REST API) to be running and accessible from the Export service instance running in Truckmate Windows Services Host. The message format used in the export is generated through an API call made from the Export Service to the Truckmate REST API instance (tm/orders endpoint).
The Trimble Cloud Export service supports multi company functionality.
| The Truckmate username that is used to run the Trimble Cloud Export service requires a Truckmate API key (which is created using the Security Configuration application and should not be shared). |
To set up the Trimble Cloud Export Windows service
-
Go to TruckMate > Utilities > Security Configuration > API TruckMate Credentials and verify the username being used to run the Trimble Cloud Export service has a Truckmate API key. Create one if necessary.
-
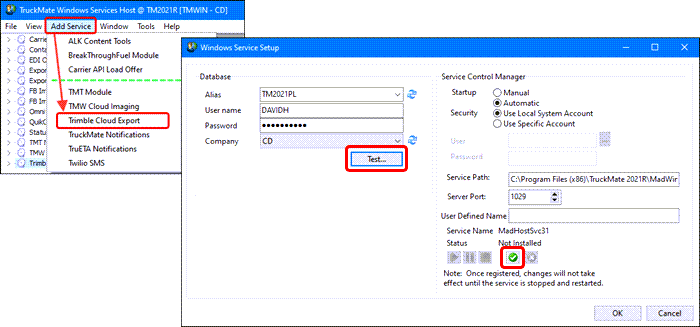
Go to TruckMate > Utilities > TruckMate Service Host.
-
Select Trimble Cloud Export from the Add Service menu.
-
Enter the database configuration information and use the Test button to verify the connection is successful.
-
Accept the defaults (or adjust if necessary) and click the
 Install Service button to install the service. (Wait until the service properties are configured before starting it.)
-
Click OK to save your entries and return to the Windows Service Setup window.
-
Configure the properties for the Trimble Cloud Export service. There are three tabs.
Service tab

| Option | Description |
|---|---|
Log Path |
Directory location to create the log files. |
Rotate |
Sets the number of days before creating a new log file. |
AutoStart Module |
Determines if this service will start automatically when the server is rebooted. |
AutoStart Activity Log Window |
Determines if the Activity Log Window for this service is started automatically. |
Wait Time before attempting restart |
Sets how long to wait in seconds before attempting to restart the service if there was a problem in starting the service. |
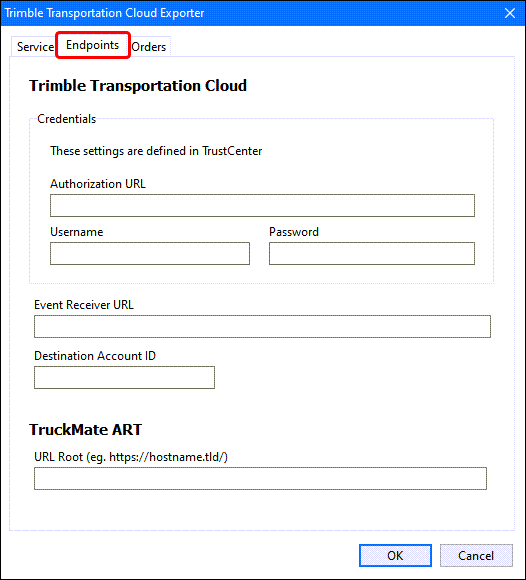
Endpoints tab
Authorization URL, username, password, event receiver URL and destination account ID relate to the Trimble Transportation Cloud environment. These values will be provided by Trimble. The Truckmate ART URL corresponds to the Truckmate REST API (ART) instance that will be called by this Export service to generate the related message format.
| Option | Description |
|---|---|
Authorization URL |
Provided by Trimble TruckMate implementer or support. |
Username |
Provided by Trimble TruckMate implementer or support. |
Password |
Provided by Trimble TruckMate implementer or support. |
Event Receiver URL |
Provided by Trimble TruckMate implementer or support. |
Destination Account ID |
Provided by Trimble TruckMate implementer or support. |
TrukMate ART - URL Root |
The URL for your TruckMate ART server. |
Orders tab
ART parameters for new orders/updated orders are fields where additional REST API ART parameters can be entered. This relates to the type of data that will be included in the generated export message for new orders or update orders. If left blank, the data included in the related export message will be consistent with the response received when making an API call to the tm/orders/{orderId} endpoint without additional parameters.
| Option | Description |
|---|---|
ART parameters for new orders |
REST API query parameters (e.g., limit, offset, expand, traceType, traceNumber). |
ART parameters for updated orders |
REST API query parameters (e.g., limit, offset, expand, traceType, traceNumber). |
Update latency (seconds) |
Indicates how old an update record needs to be before it is processed by the Export service. By default, this value is 5 seconds. |
Polling delay (seconds) |
The minimum duration allowed between the start of the current polling cycle and the start of the next polling cycle. If the current polling cycle takes longer than the value (in seconds) entered, the next polling cycle will execute immediately. |
The Export service uses a default tracking criteria to identify new orders and will allow for a custom hook for customized criteria. The default tracking criteria is:
-
The current order must have an active status. The current status of the order must not include the following status behaviors: Cancelled, completion, entry, locked.
-
The order is not yet tracked by the Export service.
-
The order is not a quote, rebill, credit or consolidated bill.
The Trimble Cloud Export service maintains an Order Tracking table. The service will look among the orders that are actively tracked in the Order Tracking table to find out which orders need to be checked for updates during each polling cycle. The actual order update audits will be tracked at a database level using custom database triggers. Whenever an update occurs to the order table or any of its related tables, an audit record will be captured. The Export service uses these audit records to determine if any actively tracked orders require updates to be exported to the Trimble Transportation Cloud.
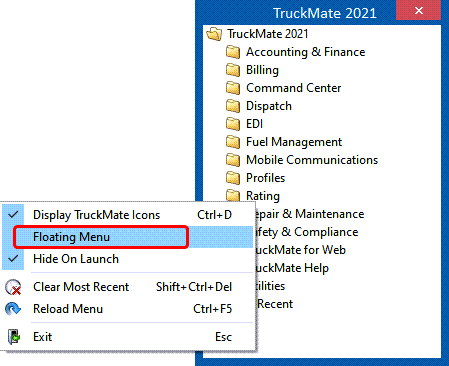
Ability to move TMTask window (TM-158592)
The TruckMate Task menu (TMTask.exe) can now be a floating window allowing you to reposition it anywhere on the screen and have the status and position retained.
The Floating Menu option has been added to the right-click context menu. This is set to disabled by default meaning the menu will remain fixed in place until you select and enable this option.
The last setting of the Floating Menu option is retained after the Task menu is closed, so if it was enabled and you moved the Task menu before closing it, it will open in that same location (unless any of the registry settings on the system were cleared in between opening the menu item).
Hidden SQL Logging for system administrators (TM-158713)
In accordance with the subscription model of TruckMate, a request was made to add new logging into the TruckMate SQL Execute program to track every single instance of when a user executed a function on any tab within a TruckMate application. This allows you to see what the users were actually doing to help remedy any issues arising from their changes and which user made the change in case more information is needed or user eduction is required.

By default, this new hidden app. config. logging option is disabled. In order to activate this, you will need to set the hidden SYSTEM > SQLExecuteLogging application configuration option to True.
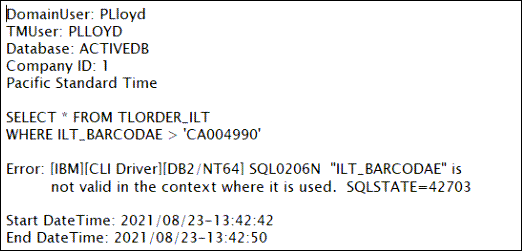
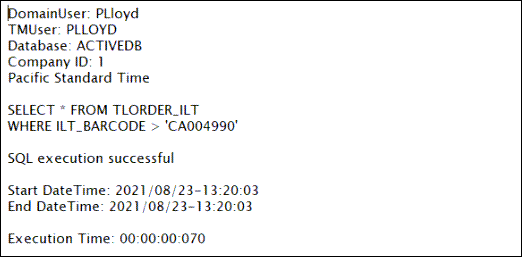
Once enabled, every time an action is executed in SQL, a log file will be created in this location (this path cannot be modified):
C:\ProgramData\TruckMate\SQLExecLog
Log files will are created with this naming structure:
application_datetime_tmuser.log (e.g., SQLExec_202108231148_PLLOYD.log)
Inside the log, the structure will contain the following recorded values:
-
Domain User
-
TruckMate User
-
Database Name
-
Company ID
-
Windows Timezone Setting
-
Statement Executed
-
Result of Execution
-
Start Datetime
-
End Datetime
-
Total Execution Time
Any executed entries in the SQL, Stored Procedure and Scripts tab will create a log file entry when the aoo. config. is set to True (along with any entries within any additional tabs created by the user in the application). The log file will report every success and every failure, to give a full history of all executions within the SQL Execute program.
A new log will be created every time the timestamp has changed (so a new file will be created after every minute if a statement is run), or if a different user runs a statement.
As a result, there is a risk that this folder could fill up rather quickly with log files if left on too long without maintenance. You should take care in ensuring that anyone using this feature properly rotates the files using a Task Scheduler to clear out old files, and only turn this on when necessary to do so.
Trimble Dispatch Advisor, Driver Retention updated to TID V4 (TM-158749)
The Trimble Identity (TID) authentication service used by the Trimble Dispatch Advisor and Driver Retention programs have been upgraded to Version 4 to replace TID v3 which was deprecated on September 01, 2021.
No functional changes were made to the Trimble Dispatch Advisor or Driver Retention programs as part of this change. They will continue to work in exactly the same way as they did before without any issues.
Trimble Identity is a centralized authentication service that manages user authentication. Trimble Identity offers a seamless experience to customers by enabling a single, common identity for all Trimble and partner applications. Identity is used to unify and streamline the sign-in/Authentication process & User/Account management.
Mileage and mapping
TruETA Map View beta modifications (TM-157380)
Trimble MAPS has a new endpoint for the map viewer allowing you to test TruckMate with the updated functionality available in this beta map view.
In the Mileage Server Configuration a new Use Beta Map checkbox haa been added to the TruETA tab to indicate whether you wan to use the new beta TruETA Map View.
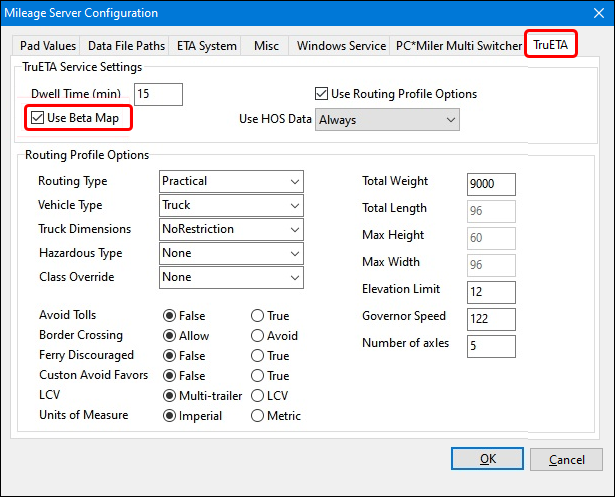
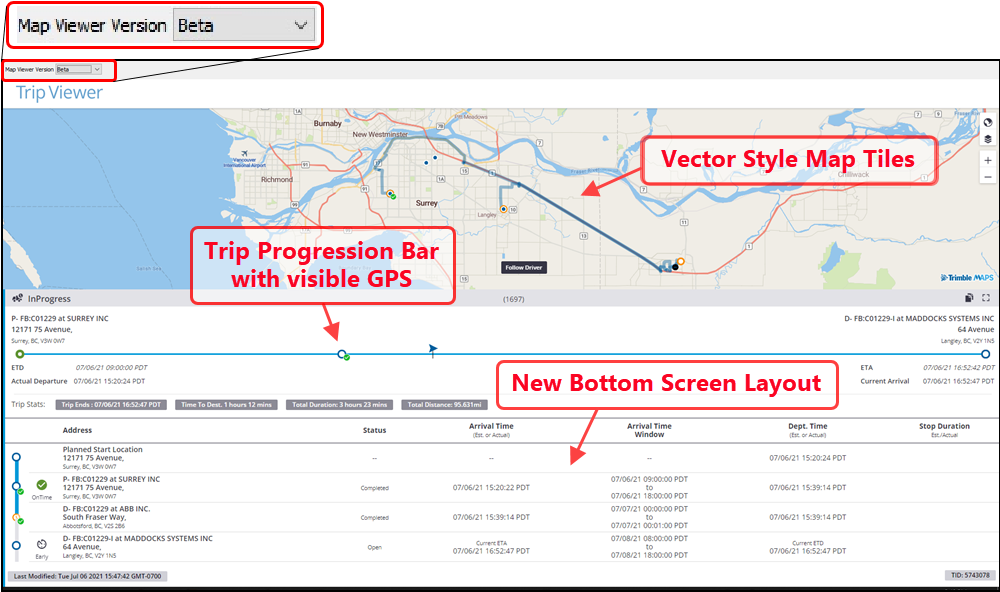
Some of the new features available when you set the Map Viewer Version to Beta include:
-
Vector style map tiles
-
A trip progression bar indicating where the load is at with respect to distance and location
-
A new layout for the bottom grid
Mobile communications
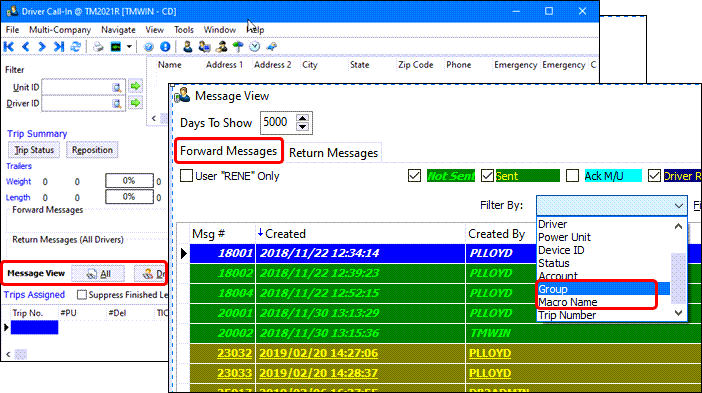
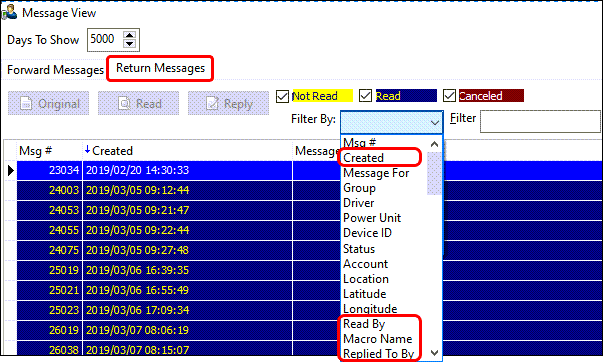
Improvements to Driver Call-In > Message View filter window (TM-152592)
Additional options were added to the Filter by menu in the Message View section of the Driver Call-In application as follows:
Forward Messages tab:
-
Group
-
Macro Name
Return Messages tab:
-
Created
-
Read By
-
Macro Name
-
Replied to By
This change allows both sections of the Message View to have the same filtering options and improve usability.
Omnitracs Odometer readings auto transferred into TruckMate (TM-154370)
A new Auto Odometer Options section has been added to the Omnitracs Portal Windows service on the QTracs properties tab providing the option to use the odometer value from the GPS position report.

-
When the Record odometer value with GPS position report is selected, an odometer entry will be made in ODOHIST with every position update.
-
The Update R&M odometer every drop-down list entry determines the interval for how often the new odometer will be saved into the RM tables.
-
When the Update R&M odometer every is set to something other than 'None', RM_MILE will be updated with the odometer value received with the position as per the interval setting.
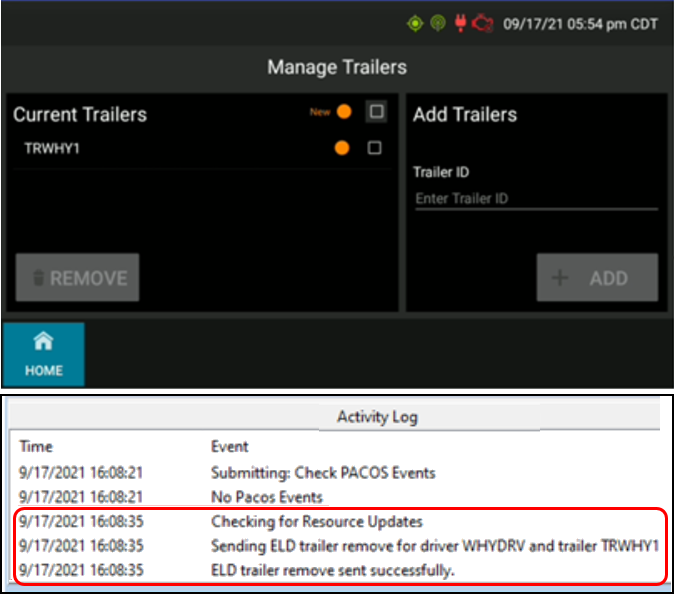
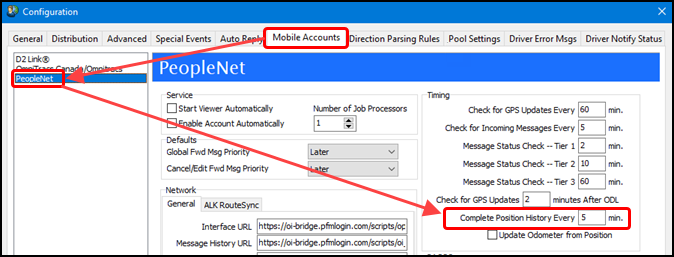
Send Trailer and Driver ID for trailer list in ELD (TM-155548)
The PeopleNet ELD integration has been expanded to include the trailer current being used by the driver in the Manage Trailers section.
In TruckMate, if a trailer is assigned with a PeopleNet driver and a vehicle, the trailer id will be sent to PeopleNet Fleet Manager (PFM) and be listed in the ELD information on the PeopleNet Instinct Display after the trip is dispatched.

If the trailer is removed from the trip, it will be removed from both PFM and ELD as well.
A new Check for Resource Updates time interval (in minutes) has been added to the Communications Manager application > Mobile Accounts tab > PeopleNet configuration.
Mobile Communications Enhancements for Container Drop Grid (TM-158227)
The ability to send a container drop grid number and container drop grid door location to the driver has been added to TruckMate mobile communications.
-
Container Drop Grid #: The forward macro will include the ‘Drop Grid #’ value from the selected freight bill. Container
-
Drop Grid Door Direction: The forward macro will include the ‘Door Direction’ value associated with the ‘Drop Grid #’ for the selected freight bill.

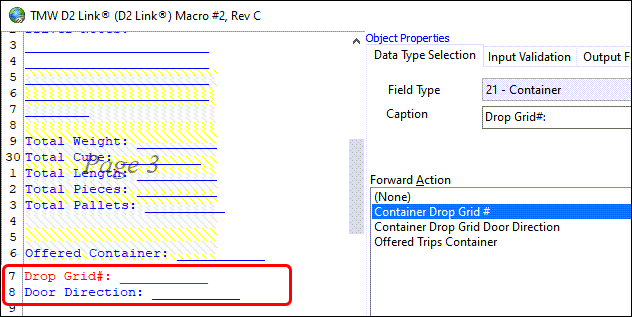
New "containernumber" Datatype for D2Link (TM-158613)
The new Foreign data type > "containernumber" has been added to the Communication Macro Definition Tool for D2link. When 21 - Container > "Match Container" is selected for a macro field, the default Foreign Type will be containernumber.

With D2link versions 3.1.41 and up, the container number is validated as soon as a driver enters the number.
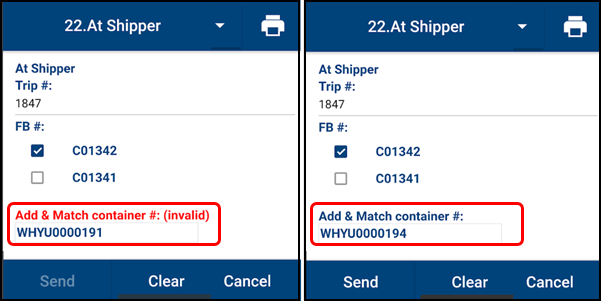
The validation is based on ISO 6346 (https://en.wikipedia.org/wiki/ISO_6346).
Dispatching operations
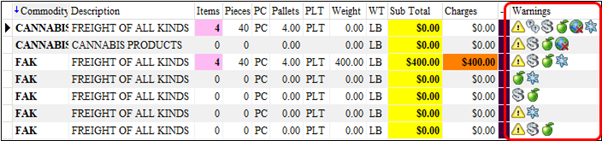
Implement standard warning icons ordering (TM-155469)
A consistent sequence has been applied to the Warning icons to standardize the order in which they are displayed. TruckMate applications will display warning icons by "group" (i.e., Freight Bill warnings first, then Trip warnings) and sub-sort alphabetically within each group.

| Freight Bill Warnings | Trip Warnings | |
|---|---|---|
Cash Collect |
Dock |
|
Client Popup Notes |
Elevator |
|
Dangerous Goods |
Site Survey |
|
Default Commodity Override |
Stairs |
|
Exclusive Freight |
Vehicle Restrictions |
|
High Value |
||
Hot Rush |
||
Perishable Goods |
||
Regional Restrictions |
||
Shipping Instructions |
||
Standard Bill Notes |
||
Temperature Controlled |
This new sort order appears in the following applications and locations:
-
Customer Service
-
Details Tab
-
Summary Tab
-
Order PreProcessor
-
Pending Tab
-
Details Tab
-
Quick Bill Entry
-
Details Tab
-
Dispatch
-
Freight Bill Grid
-
Trip Grid
-
Tree View Panel
-
Multi Mode Dispatch
-
Trip Grids
-
Freight Bill Grid
-
Trip Legs Grid
-
Deliveries, Pickups, CrossDock Grids
-
Tree View Panel
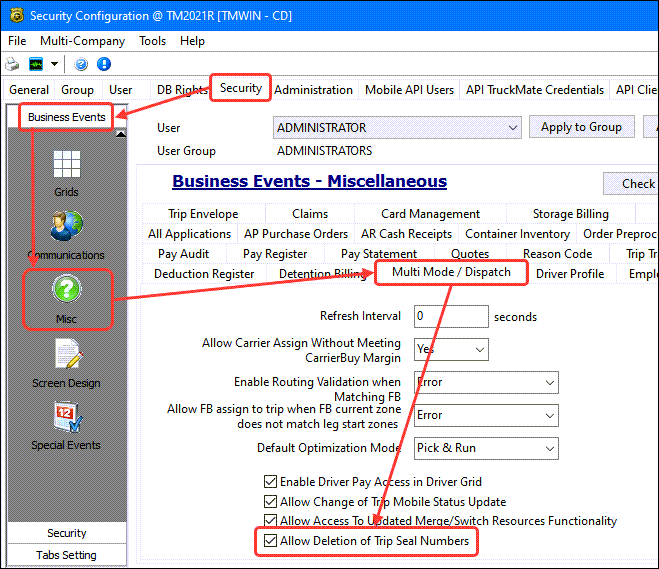
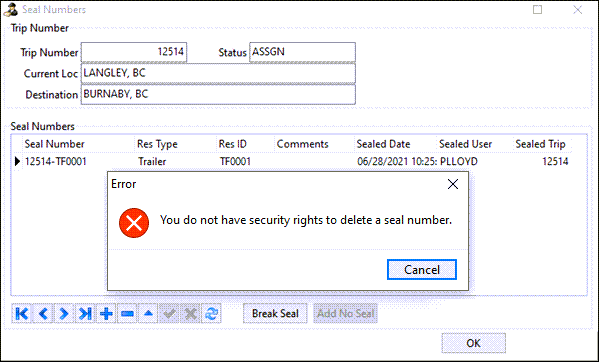
Prevent TruckMate users from deleting seal numbers (TM-157505)
New logic for additional security around Seal Numbers has been added in the form of a new Allow Deletion of Trip Seal Numbers security option in the Security > Business Events > Misc > Multi Mode / Dispatch tab to control whether the API is able to delete Seal Numbers. This checkbox setting will be selected as True for all existing users to match the current functionality.
When selected, this option allows you to add, edit, and delete Seal Numbers freely within the Multi Mode Dispatch application. This can be done from the Doors aspect (Loading, Suspend Loading, Unloading, and Suspend Unloading) or from the Seal Numbers grid.
If not selected, you will still be able to add or edit Seal Numbers but you will not be able to delete Seal Numbers from Trips and an error message will be displayed. You are still be able to break seal numbers - this is acceptable, as this records a history of when the Seal Number was opened (as opposed to deletion, which removes the record altogether).
This restriction applies to all of the Seal Numbers areas in Multi Mode Dispatch that can be edited.
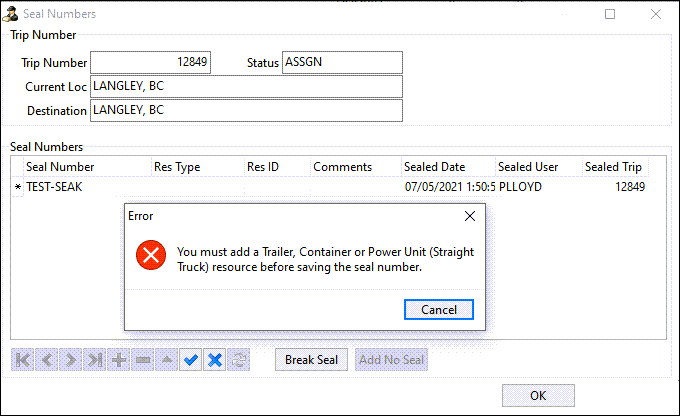
Ensuring seal numbers are associated to a sealable resource (TM-157506)
As part of a larger project for additional logic around Seal Number assignment, TruckMate now requires a Seal Number to be associated with a Trailer, Container or a Straight Truck within the TruckMate system.
If you attempt to seal a trip within TruckMate without one of these resources present (meaning the Res ID and Res Type will be null on the Seal Numbers screen), an error message will be presented stating that a Resource is required.
Once a resource matching this type is correctly associated with the trip, the items are auto-selected as the sealable resource.
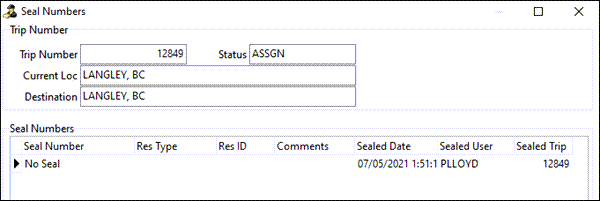
You can still use the "Add No Seal" option in Multi Mode Dispatch. This option provides the ability to state that no seal number exists on the trip. This will be 'auto-created' and not placed into edit-mode, meaning it will bypass the initial restriction. If a user attempts to circumnavigate this and put it back into edit mode without assigning a resource, the error will be received once the user attempts to save.
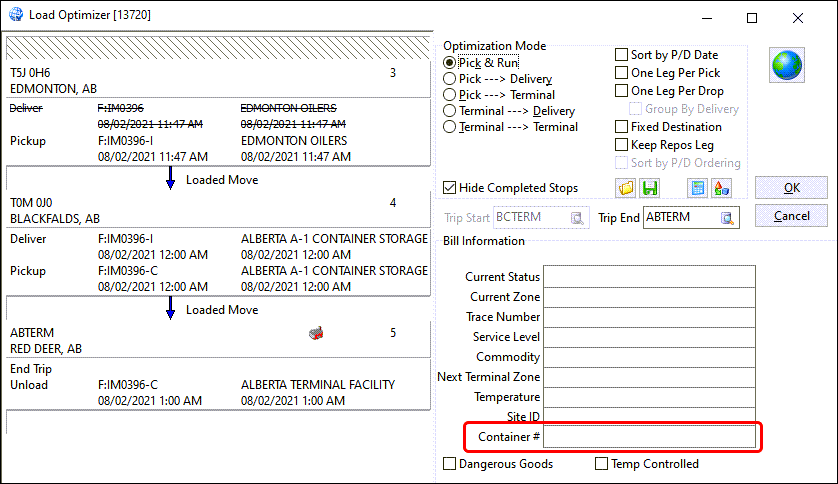
Updating UI elements within the Load Optimizer (TM-158095)
As part of a larger project to update certain Dispatch workflows, some improvements were made to the Trip Optimizer.
a) Hide Completed Stops
A new Hide Completed Stops checkbox has been added to the optimizer allowing you to choose whether to show, or temporarily hide, completed stops from within the Optimizer.
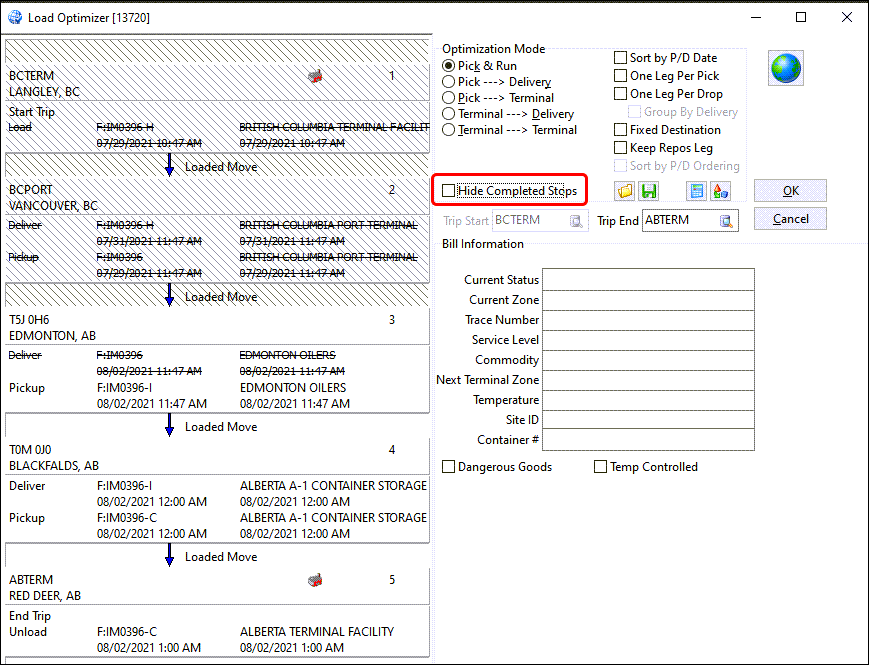
This checkbox is cleared by default so both completed and non-completed stops will be displayed. Selecting the checkbox will immediately hide all completed stops based on the following criteria:
-
If a Stop contains only one bill and the bill is not crossed out, the stop is considered OPEN and will not be hidden.
-
If a Stop contains only one bill and that bill is crossed out, the stop is considered FINISHED and will be hidden.
-
If a Stop contains multiple bills and none/some of the bills are crossed out, the stop is considered OPEN and will not be hidden.
-
If a Stop contains multiple bills and all of the bills are crossed out, the stop is considered FINISHED and will be hidden.
-
If a stop is hidden, it will not be visible on screen; the Load Optimizer will then slide up the highest OPEN stop and will show the rest of the trip from there.
The checkbox setting will be retained between opening/closing the Load Optimizer window.
b) Container #
A new field has been added to the Bill Information section on the right side of the Load Optimizer to display the container number associated to a freight bill within the Customer Service application. (The source of this field is CONTAINER_TLORDER.CONTAINER_NUMBER, which is a combination of the Container ID and the Check Digit.)
This will display against the following Intermodal Bills:
-
The Parent Bill
-
The Empty Container Bill (-I or -E).
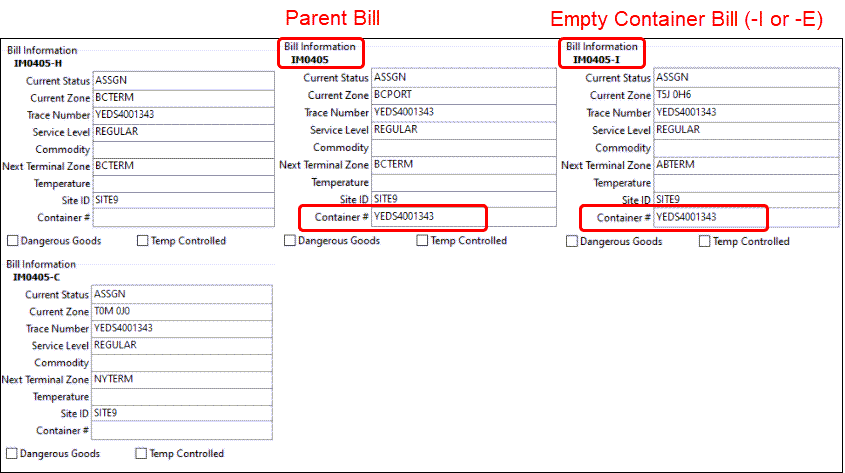
The Empty Chassis Bills (-H, -C) will not display a container number against them, given that these bills are not moving around containers, only chassis.
The Container # field is read only so it cannot be modified by a user and displays the container number for all available Movement Type records.
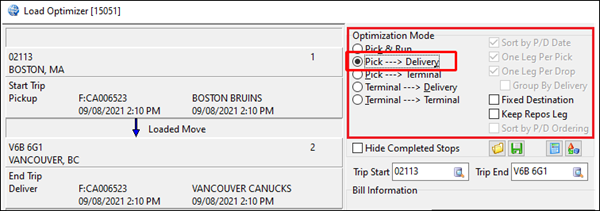
New 'Pick → Deliver' optimization mode (TM-158099)
A new 'Pick → Deliver' optimization mode will is available for Dispatch and Multi Mode Dispatch for situations where drivers will be picking up fFreight, taking it to a drop/delivery point, and repeating the process. This could apply to container movements (moving one container a time from point A to point B) are any situation where you want to apply something more like a "taxi-based" system.
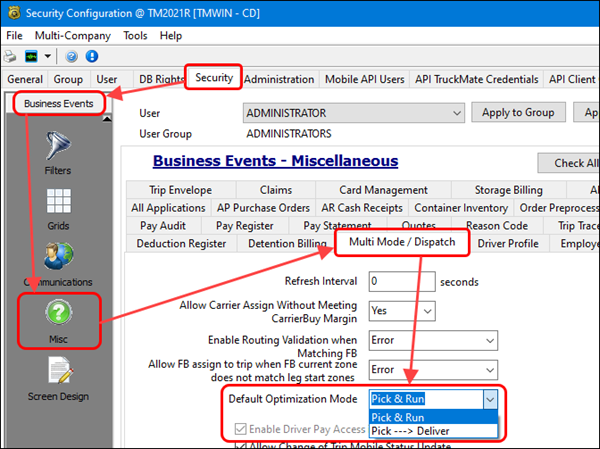
Security Configuration
A new Security > Business Events > Misc > Multi Mode / Dispatch > Default Optimization Mode option is used to set the default mode.
Every new trip that a user creates within the Dispatch application can be created as a Pick → Deliver based trip. Whether you create a new tTrip via dragging a freight bill onto the trips grid, or by right-clicking the trip grid and selecting New Trip from the context menu, it will be created as a Pick → Deliver tTrip.
These new Pick → Deliver Trips will use Optimization Mode "5".
-
0 = Not Optimized
-
1 = Pick & Run
-
2 = Pick → Terminal
-
3 = Terminal → Delivery
-
4 = Terminal → Terminal
-
5 = Pick → Delivery
The Load Optimizer
Other notable items to mention within the Optimizer include:
-
Sort by P/D Date
If a user recalculates the legs after bills have been added to this Trip, it will be restructured to sort the bills by P/D Date. If the bill has not yet been picked up, it will sort by PICK_UP_BY. If the bill has been picked up, it will sort by DELIVER_BY. These bills will not sort by P/D Date initially due to reasons covered below.
-
One Leg Per Pick
With this mode enabled, by default all stops/legs will only contain a single bill on them. Users are free to restructure the Trips to have more than one bill per leg, but proceeding to recalculate the Trips again will result in these changes being lost.
-
One Leg Per Drop
With this mode enabled, by default all stops/legs will only contain a single bill on them. Users are free to restructure the Trips to have more than one bill per leg, but proceeding to recalculate the Trips again will result in these changes being lost.
The Core Logic
The big difference between Pick → Delivery versus Pick & Run occurs when new bills are added to the trip. In Pick & Run based trips, when a new bill is added, it is placed on the same existing stops already present. A user would need to optimize the trip and could rearrange it as required.
For Pick → Delivery, when a new freight bill is added to the trip the system will automatically optimize the trip by creating two new stops for the new bill. The first stop will be the freight bill’s 'CURRENT_ZONE, the second stop will be the freight bill’s CARE_OF_ZONE and the two new stops will be automatically placed at the end of the trip.
Trips will be advanced as normal via status workflows. The only difference is the need to account for the empty movements while using this workflow, which typically will involve either a 'Spotted' or 'Terminal' based status behavior. But, if you already run these types of trips today and were manually optimizing them in this format, you will already have the statuses for these types of moves.
New bills can be added to these trips at any time and will added to the bottom of the movement. Dispatchers can always adjust the trip by moving the stops around, but they will never be able to add stops above ones that are already completed.
You can switch the Optimization Mode of a trip and set it to any of the other four modes. Any previously greyed out options will be made available again so you can setup and adjust the trip. Flipping the setting back to Pick → Deliver at any time and calculating will reset the trip in the new format.
As these trips could very quickly become large, we recommend using the 'Hide Completed Stops' option within the optimizer so Dispatchers will only see ACTIVE or PENDING legs remaining.
New 'Optimization Mode' field in Dispatch and MMDisp (TM-158101)
Within TruckMate, the optimization mode of a trip has always been stored in the OPTMODE field, which gives a numerical value associated with what type of optimization mode has been applied against the trip.
As part of a larger project, new functionality was added to display a calculated field that will give the exact description of how the Trip has been optimized in addition to the numerical value of the optimized-mode.
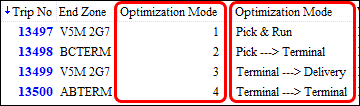

The Optimization Mode field has been added to Dispatch and Multi Mode Dispatch using this breakdown:
-
0/NULL = Not Optimized Note: This will very rarely be seen by the average user. Trips created in TruckMate will always fall, as standard, between 1-5. Only imported Trips may end up with a 0 or NULL value.
-
1 = Pick & Run
-
2 = Pick → Terminal
-
3 = Terminal → Delivery
-
4 = Terminal → Terminal
-
5 = Pick → Delivery
In Multi Mode Dispatch, these fields are present on all six Trip grids.
Within the Dispatch application, this field is present within the Trip Grid. The same value will display against all legs of the Trip for consistency.
Auto-Assign Misc. Equipment paired with Resources to trips (TM-158102)
As part of a larger workflow enhancements project, the Dispatch and Multi Mode Dispatch applications can now automatically assign Misc. Equipment to trips when paired with a trailer or chassis.
The Profiles > Trailer Profiles application already provides the ability to link a misc. equipment resource directly to a trailer or chassis record via the Equipment (Default Miscellaneous) tab. Each misc. equipment record can only be assigned to a single Trailer/Chassis, but each Trailer or Chassis can have more than one resource assigned.
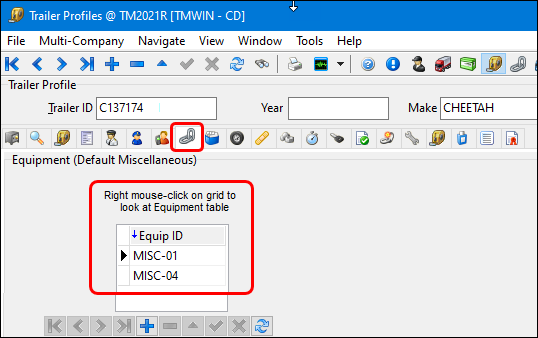
When you assign a trailer or chassis to a trip, the Misc. Equipment resource(s) will also automatically assigned (without a prompt) to the trip. Use the linkage system accordingly to shift or align the misc. equipment exactly where it needs to appear.

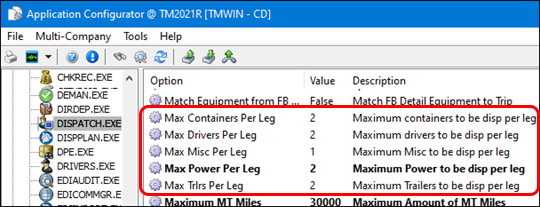
These assignments still respect the DISPATCH.EXE > Max Resources Per Trip app. config settings, so you must ensure these setting values are set appropriately to prevent assignment issues when assigning these resources.
In addition, the connection between the two is a "soft" connection, meaning that the misc. equipment can still be assigned to trips independently of the trailer or chassis, but they must be assigned to the trip when a trailer/chassis with that resource type is assigned to a trip. Users will need to keep this data up-to-date to prevent resources being assigned to more than one trip at the same time.
New 'Remove Empty Waypoint' app. config. (TM-158104)
A new DISPATCH.EXE > Remove Empty Waypoint application configuration was added into the TruckMate system to determine what Dispatch and Multi Mode Dispatch should do when a Freight Bill is deassigned or unmatched from a trip and this would leave a stop on a Trip empty (i.e., no other bills are associated with it), so it becomes a "waypoint".
Utilities > Application Configurator > DISPATCH.EXE
| Option | Description |
|---|---|
Remove Empty Waypoint |
Determines whether empty waypoints and associated legs are removed from a trip after deassigning / unmatching a freight bill.
|
Previously, you would receive a prompt asking whether to remove the now-waypoint from the trip, or keep it as a Fixed Waypoint.
Along with this new app. config., other improvements were done to ensure that Freight Bills will be smarter in determining which stops they belong to (in the event that other bills/stops are removed).
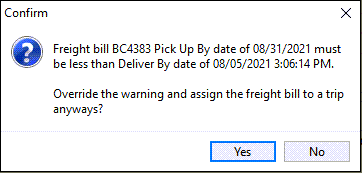
Allow assignment of freight bills where Pick Date > Delivery Date (TM-158124)
As part of a larger project, new functionality was added into a number of locations allowing freight bills to be assigned to trips where the PICK_UP_BY time is greater than the DELIVER_BY time. This includes changes to:
-
Dispatch
-
Multi Mode Dispatch
-
Mobile Communications
-
ConnectedDock
Within Dispatch and Multi Mode Dispatch, a new prompt asking users if they wish to assign these bills even though the Pickup Time is greater than the Delivery Time, or whether they wish to cancel the assignment process.
Within Multi Mode Dispatch, when a user attempts to use the drag-and-drop approach or in Dispatch, when a user attempts to double-click a bill, or use drag-and-drop approach, the system will also prompt you to indicate how to proceed.
-
YES = Proceed with the assignment process for this bill.
-
NO = Do not proceed with this assignment for this bill (this bill will not be included).
-
X = Do not proceed with this assignment for this bill (this bill will not be included).
In Dispatch, if any bills receive a YES prompt, the standard Dispatch bill assignment screen will appear, asking you to indicate how to assign the freight bill (either to a new trip, existing trip, multiple trips (if 2+ bills were included) or to cancel out of the process).
In Multi Mode Dispatch, if any bills received a YES prompt, they will be assigned to the Trip automatically.
If any "standard" bills were included in this process, they will not receive prompts - they will be included in the assignment process automatically (meaning, in this context, they automatically are "YES").
If you select NO on one or all bills selected, and no "standard" bills were included, no trip will be created.
Mouse cursor changes to improve performance (TM-158541)
A subtle but important change was made to modify the behavior of the mouse cursor icons displayed in the Dispatch, Multi Mode Dispatch and Customer Service programs.
To speed up page refreshing, eliminate screen flickering and improve overall window performance due to the large volume of queries and the amounts of associated data being assembled, some of the hourglass and spinning circle icons indicating the page was still waiting for the table data to updated or returned and all processes to complete were eliminated.
Without the screen mouse icon providing feedback during operations such as a post or the creation on an x-stop, the programs may appear to be unresponsive or locked up until the process is complete as a consequence of the performance gains. Especially if you are working with large databases.
Security controls added for Dispatch/MMDisp Trip Notes (TM-158626)
Within the Dispatch, Driver Call-In and Multi Mode Dispatch applications, users were previously free to access the Trip notes and add, edit and delete notes freely as required.
New security controls have been added around the Trip Notes features in each of these applications, adding layers of security allowing you to decide how much access a particular user should be granted inside of the Trip Notes windows.
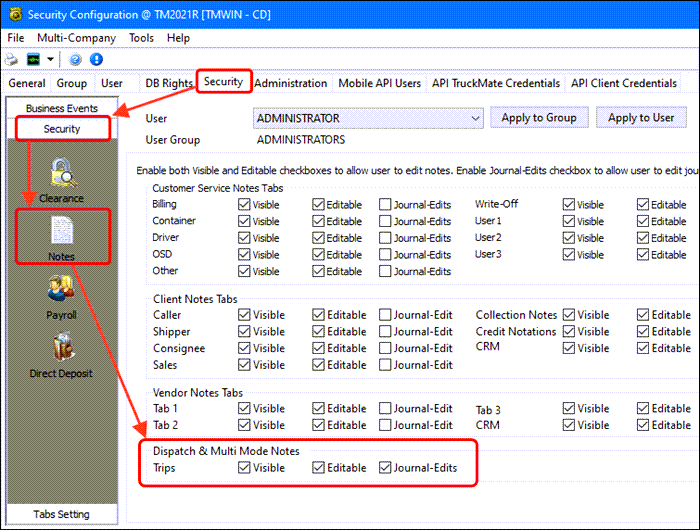
The following new layers of security options have been added to the Security Configuration program > Security tab > Security > Notes:
| Option | Description |
|---|---|
Visible |
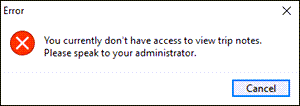
Determines whether the user can even access the Trip Notes window. If unchecked, the user will receive an error attempting to access notes. |
Editable |
Determines whether a user can add or edit/delete notes (non-journal style) within the Trip Notes window. |
Journal-Edits |
Determines whether a user can edit/delete notes (journal style) within the Trip Notes window. |
These new checkboxes follow the same structure as existing Notes options within the Security Configuration application.
Because each option is independent, be sure to set them in a logical fashion; for example, granting a user the ablility to Edit Notes but not View Notes would result in an error when they attempt to open the Trip Notes.
The considerations around granting permissions include:
-
Should the user have access to view Trip Notes, Yes or No?
-
If Yes, should the user have the ability to add new notes, and edit them (if using a non-journal style notes system), yes or no?
-
If using a journal style notes system, should the user have access to modify these historical note entries?
By default, all existing users will receive these three options as 'checked' - this keeps with the standard functionality from before they were added. New users created from here on will have these options set depending on how the user was created.
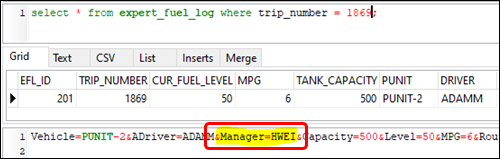
Driver Manager ID added to Expert Fuel request (TM-158846)
The Driver Manager field has been added to the Driver Profiles > Details tab to allow the Driver Manager ID to be included in the the Expert Fuel request query. This makes it easier for Compliance Reports to show your Fleet Managers only the trucks/drivers they are responsible for.

Change Dispatch font size with CTRL+MouseWheel (TM-159239)
Now you can press the CTRL key on your keyboard and use the scroll wheel on your mouse as another way to change the size of the text in the Dispatch application (Dispatch.exe) similar to the way this works on most web browsers.

Previously, you could only do this by pressing CTRL+SHIFT+ALT and the up or down arrows on your keyboard.
Customer Service
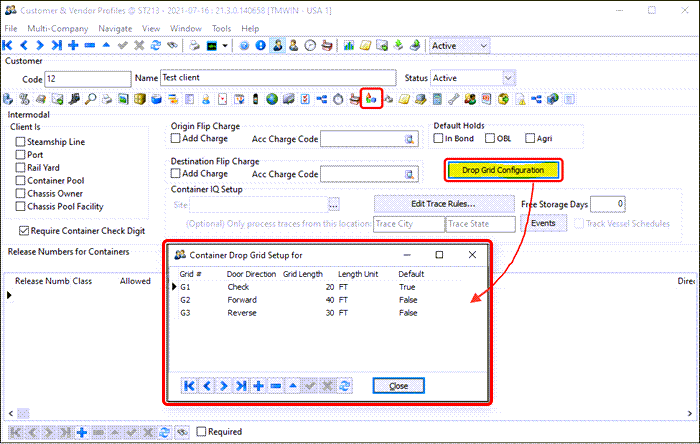
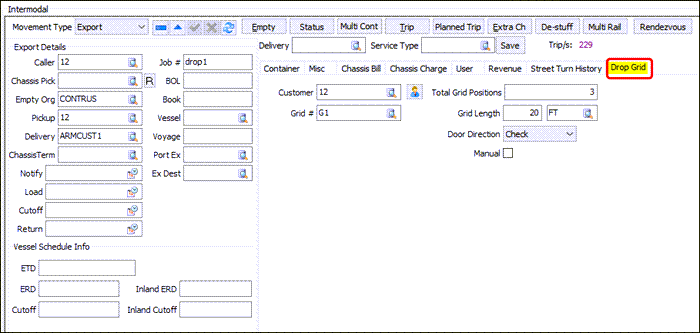
Populate default door direction and grid location for a site (TM-156048)
The container transport (intermodal drayage) options for New Zealand have been enhanced to accomodate transportation requirements dominated by customer delivery sites where the container is placed on the ground since there are limited customer sites where the trailer is placed at a dock, or where the trailer/chassis is left on site.
To manage these scenarios, most NZ delivery sites will have a “grid layout” for their site. This grid represents numbered locations in which containers can be placed at the site.
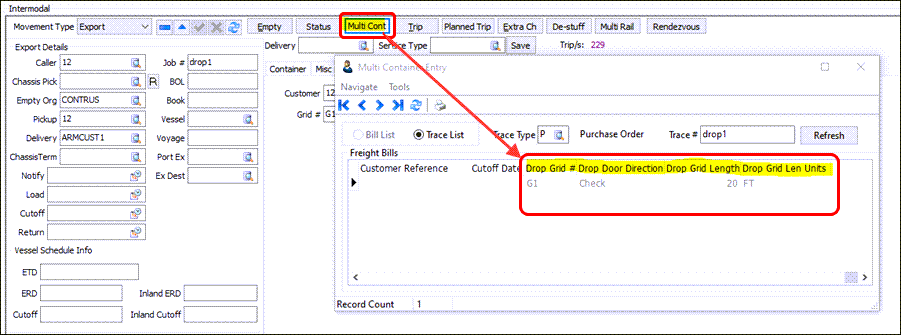
The key enhancements include:
-
Adding specific data fields to the customer profiles for inputting this "Drop Grid" information.
-
Adding these data fields to the Intermodal tab of Customer Service to select/override this "Drop Grid" information.
-
Adding the information to the Multi-container grid.
Additional future enhancements are planned to:
-
Add this information needs to the ‘Freight Bill Grid’ in dispatch as an immediately visible value
-
Add this information to the messages passed to the driver via mobility (D2Link).
View one detail record in a form (TM-158792)
A new View Current Row in a Window right-click shortcut option (Ctrl-Alt-D) opens a Details pop-up window to display the details grouped together in a single form. This logical grouping of options helps to find a particular field without having to scroll horizontally.
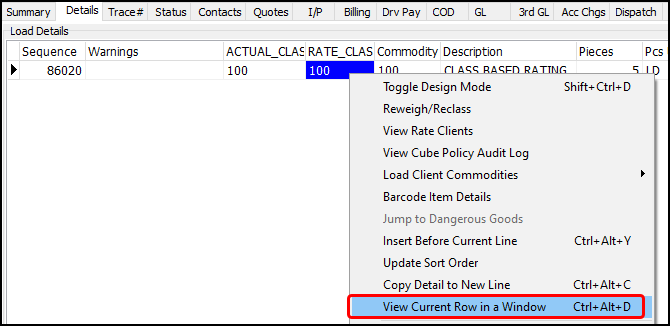
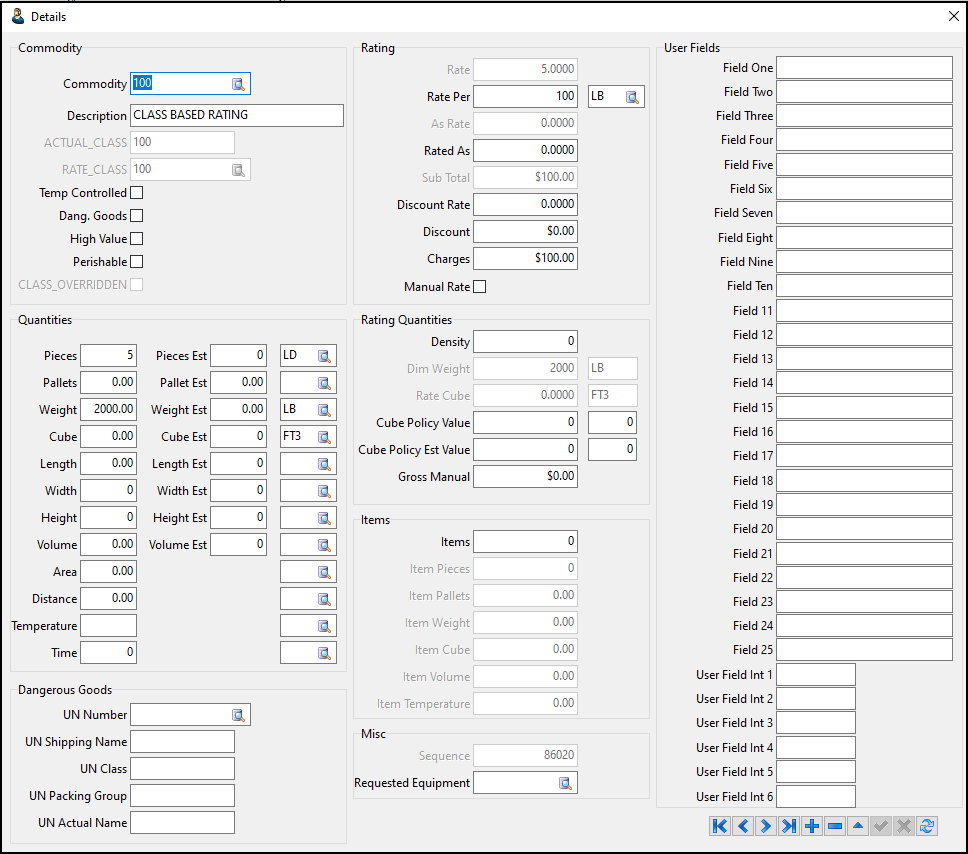
Visibility of the fields follows the Grid Layout definition so anything hidden will also be hidden on the pop-up form.
Trip Tracer
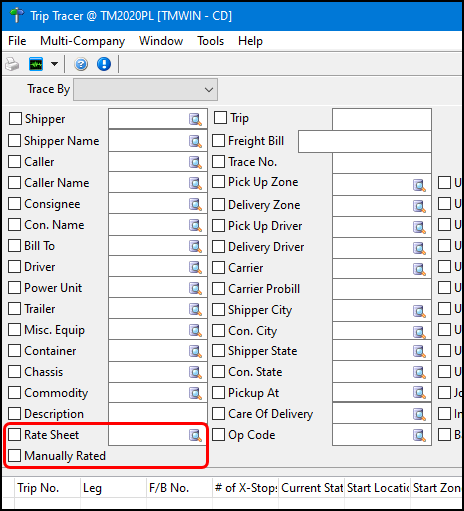
Additional Trip Tracer fields - Rate Sheet and Manually Rated (TM-138993)
Rate Sheet and Manually Rated filters were added to the Trip Tracer program to allow results to be restricted to manually rated bills and bills using a specific Rate Sheet.
Additional Trip Tracer fields - Shipper and Consignee States (TM-155767)
Shipper State and Con. State filters were added to the Trip Tracer program to allow results to be restricted to bills associated with a specific shipper’s of consignee’s geographic state or province.
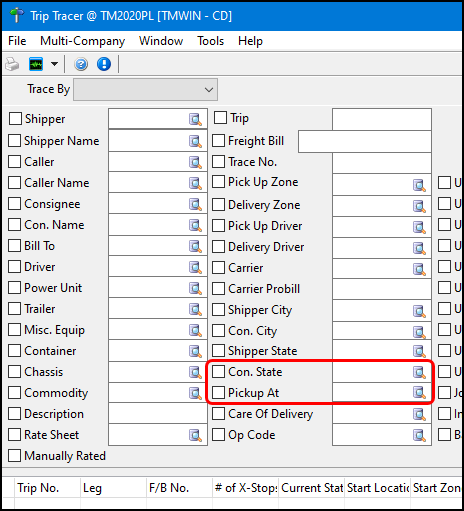
The drop-down pick list will include the state or province based on shipper and consignee profiles defined in the system.
Trip Operation Planning
Merging productivity information on LCV trips (TM-156796)
As part of the ongoing project around the Trip Operation Planning window, new logic was added to ensure that the ConnectedDock Productivity metrics were moved onto an LCV Trip when two Loaded-At-Terminal Trips were immediately merged via an Operation Point into a single Trip.
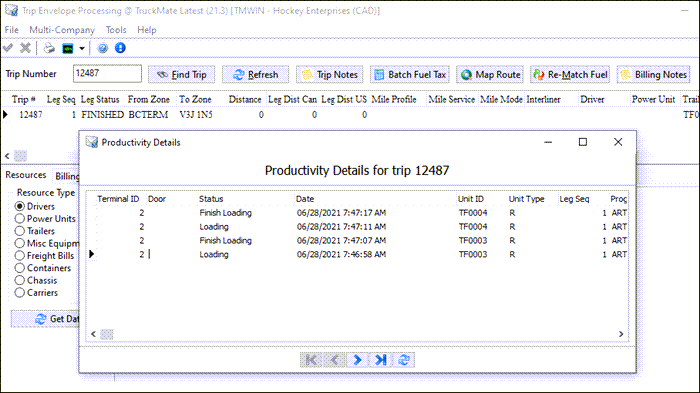
When Trips are Loaded/Unloaded in ConnectedDock, we record metrics about these actions in the WCD_PRODUCTIVITY table. This table stores the following events:
-
Start Loading
-
Suspend Loading
-
Resume Loading
-
Finish Loading
-
Start Unloading
-
Suspend Unloading
-
Resume Unloading
-
Finish Unloading
Previously for the Loading aspect, two trips would be loaded at the terminal, and then immediately merged into a new trip (as the loading trips were created for the sole purpose to load them up and nothing more). With this action, the system actually "Cancels" this trip, given it was not an official move in the system. But, with this happening, it led to the Productivity information being lost.
As a result, now, when trips are merged together directly at the terminal, the Productivity information will instead move to the newly merged trip so that it is not lost when the original trips are cancelled. Users can then refer back to this as required at any time via Multi Mode Dispatch or Trip Envelope Processing to view the productivity information.
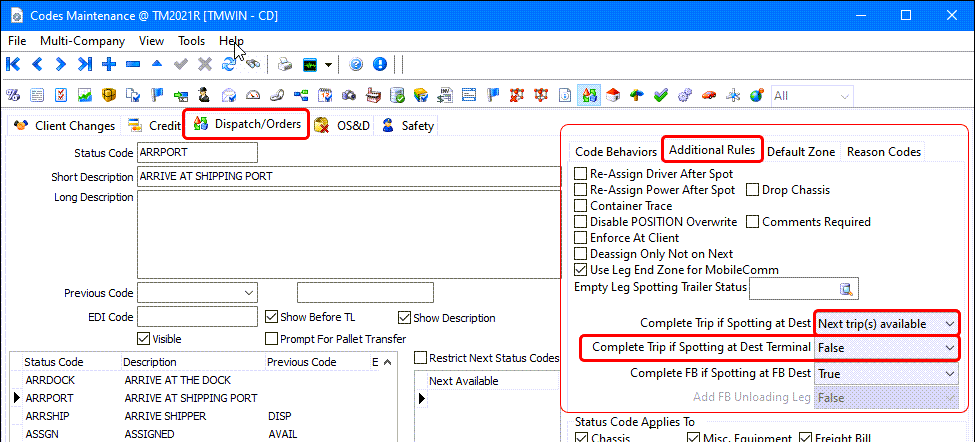
Enforce future trips are created before original trips are completed (TM-157198)
As part of the ongoing project around the TruckMate Trip Operation Planning tool, logic was added into the Dispatch applications to ensure that original Trips being spotted at a destination could not be completed without future Trips being planned. This also prevents LCV (Long Combination Vehicle) trips that haven’t been split from being automatically completed upon arrival at destination.
To support this, a new Next trip(s) available option was added to the Codes Maintenance > Status Codes > Dispatch/Orders > Additional Rules tab > Complete Trip if Spotting at Dest as an additional rule to be applied against spotted statuses.
When the spotting status is applied at the end of the trip, the purpose of this new rule is to verify that at least one of two conditions are true:
-
The trip is being spotted at the freight bill’s completion zone.
-
Future trips have been planned for this movement (via the Op Plan ID).
If neither of these are True when the spotted status is applied, the trip will remain open. You must either apply a different status to complete the trip, or proceed to use the TOP logic and create a merge/split, depending on the situation.
A new Complete Trip if Spotting at Terminal Dest additional rule containing the same options as the former was also added for spotted statuses. This new option will work parallel to the way the former rule does but this option is applied when a trip ends at a terminal zone, versus the other option, which will apply at all non-Terminal Zones.

Restrict ability to move FBs in Trip Operation Planning window (TM-157464)
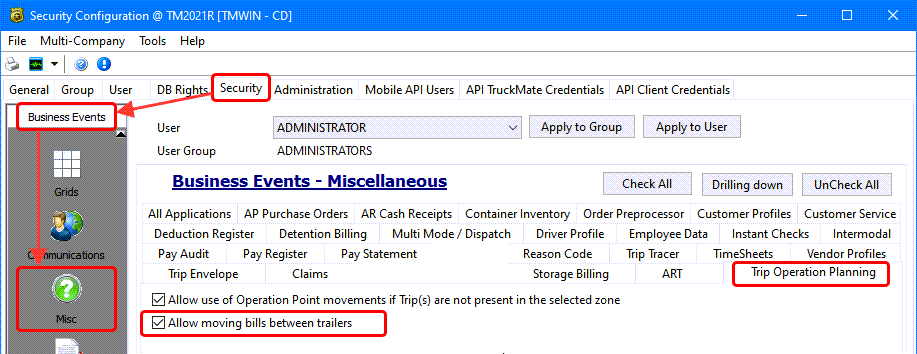
As part of the ongoing project around the Trip Operation Planning window, logic was added to restrict the ability for certain TruckMate users to be able to move freight bills around within the Trip Operation Planning window.
This restriction comes in the form of a new Security Configuration > Security tab > Business Events > Misc > Allow moving bills between Trailers checkbox setting. This option is nested on the Trip Operation Planning tab, under Misc, under Business Events. This setting will start as True for all existing users, given this will match the current functionality.
If this setting is True, you will have permission to move all Freight Bills within the Trip Operation Planning window under all scenarios. This includes moving freight bills:
-
from trip-level to trip-level
-
from trip-level to trailer-level
-
from trailer-level to trip-level
-
from trailer-level to trailer-level
In addition, you can add unassigned Freight Bills from the MMDisp Freight Bill grids into the Trip Operation Planning window. Freight bills can be added directly to the trip level and you can drag these bills directly onto trailers.
If this setting is False, you will not have permission to move all Freight Bills within the Trip Operation Planning since it will depend on the scenario. This means that you:
-
can move freight bills from trip-level to trip-level.
-
cannot move freight bills from trip-level to trailer-level.
-
cannot move freight bills from trailer-level to trip-level.
-
cannot move freight bills from trailer-level to trailer-level.
When the setting is False, you can add unassigned Freight Bills from the MMDisp Freight Bill grids into the Trip Operation Planning window and freight bills can be added directly to the trip level. However, without this security setting, you may only add the bills to the trip level and nothing more.
Prevent creating LCV plan when trips are not in last stage of current LCV plan (TM-157465)
As part of the ongoing project around the Trip Operation Planning window, logic was added to ensure trips that are not the last trip in a particular plan cannot be placed into new plans being built and to prevent an LCV trip being created by merging the trailer that is already part of another LCV plan. This restriction is automatic by design to prevent the creation of orphaned trips and there is no way to override it.
This applies to situations when a Planning Point move has been done, or a Merge & Split style Trip Operation Plan has been created. In these cases, there are two segments of Trips - the original trips that will occur first, and the new trips that are created as a result of the Merge/Split. Once this occurs, you will be unable to take the original trips and place them into new plans. In order to do this, you would be required to cancel the future trips first.
This logic applies to the following settings:
-
Merge on New Trip
-
Merge on X Trip
-
Split on New Trips
-
Split on X Trip
-
Merge & Split
For example:
Trip 1 - No Op Plan at the current time.
Trip 2 - No Op Plan at the current time.
-
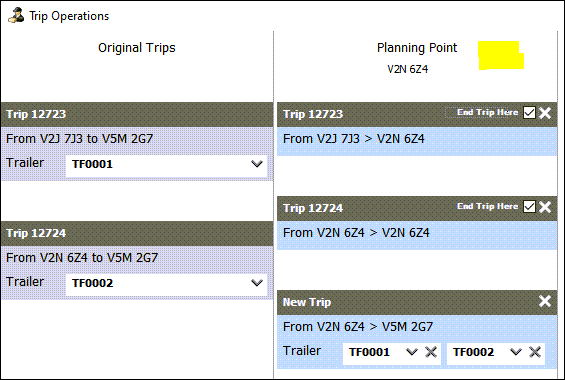
T.O.P window is opened, and the two Trips are merged together using a 'Planning Point' move. You now end up with:
Trip 1 - ID 500
Trip 2 - ID 500
Trip 3 - (NEW) - ID 500
-
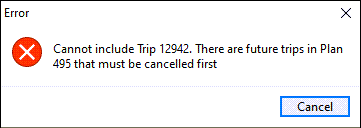
If another user attempts to place Trip 1 into a new plan, they will be prevented from doing so and will receive this error message.
Restrict ability of Operation Point movement in Trip Operation Planning (TM-157547)
As part of the ongoing project about the Trip Operation Planning window, logic was added to prevent users from being able to use an Operation Point move if all of the trip(s) in question are not present at the selected zone.
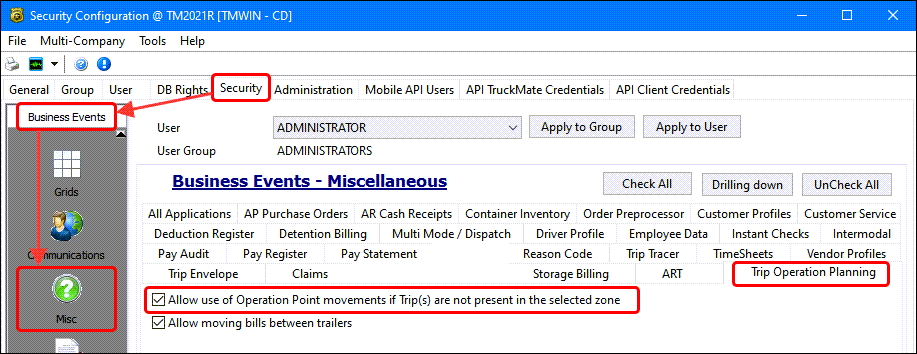
This restriction comes in the form of a new Security Configuration > Security tab > Business Events > Misc > Trop Operation Planning tab > Allow use of Operation Point movements if Trip(s) are not present in the selected zone checkbox setting. This setting will be set to True for all existing users, given this will match the current functionality.
When this checkbox option is selected, you can select any zone inside the Trip Operation Planning window and be able to specify whether that zone should be used as the Operation Point or Planning Point of a movement. You have the ability to forcefully move Freight from one point to another in one motion.
When this checkbox option is not selected, you cannot change between an Operation or Planning point zone if the trip(s) do not meet the criteria based on the following:
-
If all of the trip(s) selected in the Trip Operation Planning window share the same current zone, you can select the current zone as the merge/split point and specify it as either an Operation Point or a Planning Point move.
-
If all of the trip(s) selected in the Trip Operation Planning window share the same current zone, but if you select a different zone to that of the current zone as the merge/split point, you will be forced into using a Planning Point move.
-
If all of the trip(s) selected in the Trip Operation Planning window do not share the same current zone, you will be forced into using a Planning Point move, regardless of which zone you choose, (because the trips will not align with the current zone so you must use a Planning Point action).

Ability to reuse Op Plan ID when plan already exists on trips (TM-157610)
As part of the ongoing project about the Trip Operation Planning window, new functionality was added to allow Dispatchers the ability to reuse an existing Operation Plan ID if it already exists for a given Trip.

The long-term project goal is to allow you to re-open existing plans and make further additions or adjustments to a Trip Operations Plan after it has been created. As part of this larger project, an immediate solution has been created to provide you with a way to keep operation plans "linked together".
With this new functionality, if a trip, or multiple trips, are already linked to an Operation Plan ID, a Select Operation Plan prompt will appear if you access the Trip Operation Planning window again.
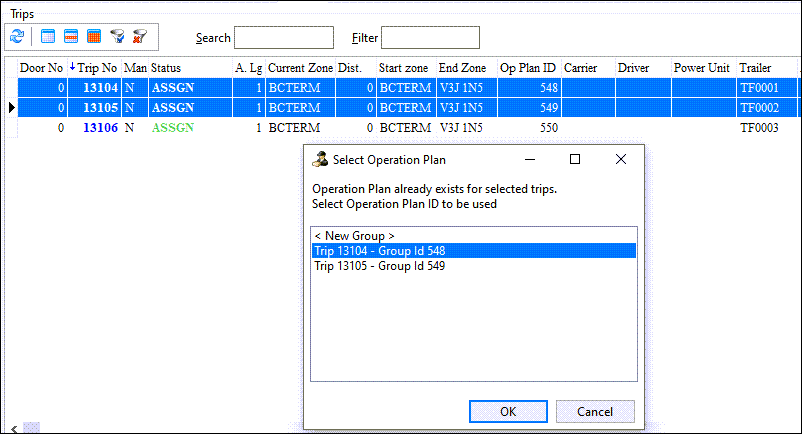

This new Select Operation Plan prompt will always contain at least two options:
1) A <New Group> option
Any Trip Plan created on the Trip Operation Planning window will use a new Op Plan ID, and therefore will not directly link back to the original plan a trip came from. Any "original Trips" brought in will have their ID’s updated to match the new plan they were involved in.
For example:
Trip 1 - Op Plan ID of 500
Trip 2 - Op Plan ID of 501
Trip 3 - Op Plan ID of 502
Trip 1 and 2 are selected, and the Select Operation Plan prompt appears. User selects <New Group> and a Plan Point move is done to create a new merge trip.
Results:
Trip 1 - Op Plan ID of 503
Trip 2 - Op Plan ID of 503
Trip 3 - Op Plan ID of 502
Trip 4 (NEW) - Op Plan ID of 503
2) One of the existing Op Plan ID’s
The second option will be one of the existing Op Plan ID’s from any trips selected that contain one. This can include as many ID’s as were present on any of the selected trips. All existing and new trips will be updated to match the selected ID.
For example (using the same structure as before):
Trip 1 - Op Plan ID of 500
Trip 2 - Op Plan ID of 501
Trip 3 - Op Plan ID of 502
Trip 1 and 2 are selected, and prompt appears. User selects "Trip 2 - Group ID 501 and a Plan Point move is done to create a new merge trip.
Results:
Trip 1 - Op Plan ID of 501
Trip 2 - Op Plan ID of 501
Trip 3 - Op Plan ID of 502
Trip 4 (NEW) - Op Plan ID of 501
This logic will work with all of the available selection options inside the Trip Operation Planning tool:
-
Merge on New Trip
-
Merge on X Trip
-
Split on New Trip
-
Split on X Trip
-
Merge & Split
Update Trip Operation Planning tool menu option (TM-158072)
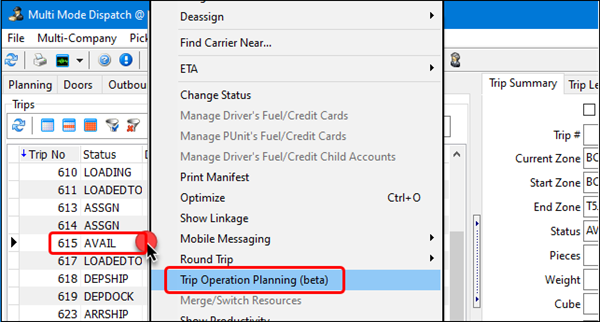
The new Trip Operation Planning window, first released in TruckMate 2021.1 was originally accessed from a right-click shortcut menu option labelled as Merge/Switch Resources (beta).
This menu option has been renamed to Trip Operation Planning (beta) and the title bar in the tool window itself has been renamed from Trip Operations to Trip Operation Planning.
This process continues to remain in beta form. The next release (21.4) will likely see the removal of the beta tag, meaning at this time the Trip Operation Planning process will replace the current workflow and this will be used moving forward.
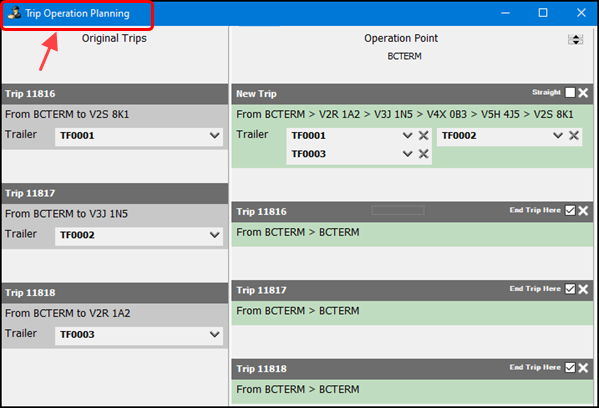
This new tool continues to remain in beta form but we anticipate that next TruckMate release (21.4) will see the removal of the beta tag, signifying the Trip Operation Planning process will replace the current workflow and will be used exclusively moving forward.
The Trip Operation Planning window can be accessed from the following locations:
-
The right-click shortcut menu > Trip Operation Planning (beta) option on ALL Trip Grids within the Multi Mode Dispatch application.
-
The right-click shortcut menu > Trip Operation Planning (beta) option on the Trip Grid within the Dispatch application (nested under the Trip Operations sub-menu).
-
The right-click shortcut menu > Trip Operation Planning (beta) option on the Yard tab within Multi Mode Dispatch application.
Intermodal Operations
Complete Street Turn on empty intermodal bills (TM-157798)
A new intermodal IM Street Turn Empties method has been added to the Dispatch application to handle situations where you want to process a Street Turn without having to create intermodal movements. This ability to create independent trips for each stage of an intermodal movement allows you to change your workflow strategy to make trips more "free flowing" without having to create movements for every load.
For example, you can use this for situations where you want to Street Turn just the empty bills to create the connecting journey from the Consignee of an Import bill to the start of an Export Bill.
You access this feature by going to Intermodal > IM Street Turn Empties.
A street turn is an intermodal process where an empty container from an import is reused for an export. In the drayage world, after a container has been in emptied, the container is returned to its owner at a container yard or back to the port. The previous Street Turn option works exactly as before and has been retitled as IM Street Turn Loaded.
Using the Street Turn Window
Once a user has correctly selected an Empty Import (EI, -I) and an Empty Export (EE, -E), and presses on the menu item, the system will open up the Street Turn Process window.
By default, this option will be greyed out. In order for this option to be selectable by a user, they must select both a -I Intermodal Bill and a -E Intermodal Bill from the Available Freight Bills grid. The status of these bills does not matter (Available, Entry, Docked) but the system must see that only two bills have been selected, and that one is a -I and one is a -E.
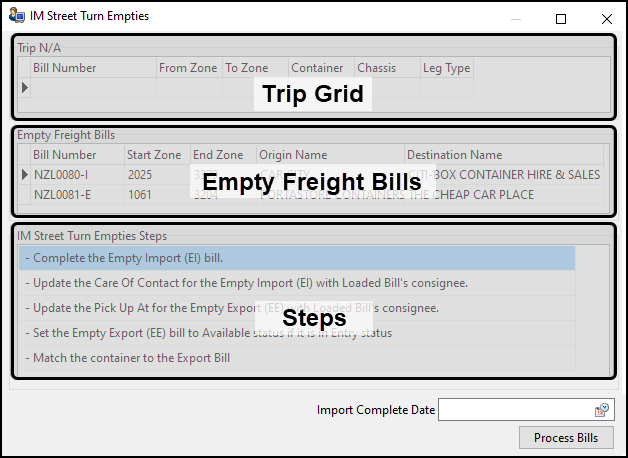
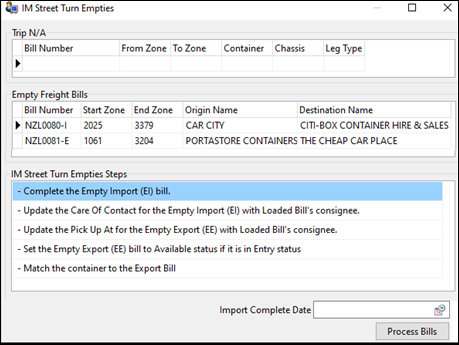
The screen is divided into three sections:
-
Trip Grid
-
This grid will always be empty, and this can be seen by the fact that the tag for this particular grid is 'Trip N/A'. The Empties process will never use a Trip, but in the interest of keeping both Street Turn dialog windows the same, it will remain here, but simply contain an N/A tag so no confusion will arise.
-
-
Empty Freight Bills
-
This grid will contain brief information about the Empty Import and Empty Export being included in this Street Turn, including:
-
The Start Zone of each IM Bill.
-
The End Zone of each IM Bill.
-
The Origin Name of each IM Bill.
-
The Destination Name of each IM Bill.
-
Some of these values will understandably be changed as part of the Street Turn process, and this will be covered further below.
-
-
-
Steps
-
The lower grid contains the five steps that will occur as part of the Street Turn Empties process. These steps will explain all of the changes that will occur on the Empty Import and Empty Export as a result of these changes. There is a workflow example in the section below that will cover all of the changes that will occur as a result of this modification.
-
Once a user has confirmed the information in the window, they can proceed to press the 'Process Bills' option, which will proceed to create the InterModal Empty Street Turn for these bills.
| To use this new logic, you will need to set the DISPATCH.EXE > Create IM Trip for IM Freight Bills from grid application configuration option to False. If this is set to True, you will likely receive errors when you try to create trips after this process has been run due to Freight Bills being in different statuses. |
| It is also recommended to adjust your Optimizer view to reference Pick Up At and Care Of Zone, rather than the Shipper and Consignee since the Shipper and Consignee values will not be changed on any of the bills as part of this process due to rating reasons. Instead, the only modifications will be made to Pick Up At and Care of Zone. In most cases, these will align with the Shipper and Consignee and should not result in a noticeable change. |
Improved logic for deassigning/assigning IM resources to trips (TM-158102)
As part of a larger project regarding workflow changes in Dispatch and Multi Mode Dispatch, modifications were made to how InterModal resources are assigned and deassigned from trips.
Deassigning IM resources
-
Freight Bill
-
When an interModal freight bill is deassigned from a trip, the system will scan to see if it is the only bill within the "IM Family". If so, the container and cChassis associated with the IM Bill (per the CONTAINER_TLORDER record/Intermodal tab of Customer Service) will automatically be deassigned from the trip.
-
In this case, however, the resource will remain associated to the iIntermodal bill itself.
-
If there is more than one bill from the same "IM Family", the resources will only be deassigned from the trip if all of the bills in that family are deassigned.
-
-
Container
-
When a container is deassigned from a trip, if it is associated with an interModal bill on the same trip it will be removed from that freight bill. This means the CONTAINER_TLORDER will be updated to clear out that container completely.
-
In this case, the freight bill will remain on the trip. In addition, if a non-paired Chassis is also associated with that freight bill, it will remain on the trip as well.
-
If more than one bill from the same "IM Family" are present on the trip, the container will only be disassociated from the intermodal bill if removed from all bills on the trip.
-
-
Chassis
-
When a chassis is deassigned from a trip, if it is associated with an interModal bill on the same trip it will be removed from that freight bill. This means the CONTAINER_TLORDER will be updated to clear out that chassis completely.
-
In this case, the freight bill will remain on the trip. In addition, if a non-paired container is also associated with that freight bill, it will remain on the trip as well.
-
If more than one bill from the same "IM Family" are present on the trip, the chassis will only be disassociated from the intermodal bill if removed from all bills on the trip.
-
Assigning IM resources
-
Container
-
If an interModal bill is assigned to a trip and does not have a container associated with the CONTAINER_TLORDER record, when a container is added to the trip it will automatically assign to the freight bill in question and update the CONTAINER_TLORDER record.
-
-
Chassis
-
If an interModal bill is assigned to a trip and does not have a chassis associated with the CONTAINER_TLORDER record, when a chassis is added to the trip it will automatically assign to the freight bill in question and update the CONTAINER_TLORDER record.
-
Paired IM Resources:
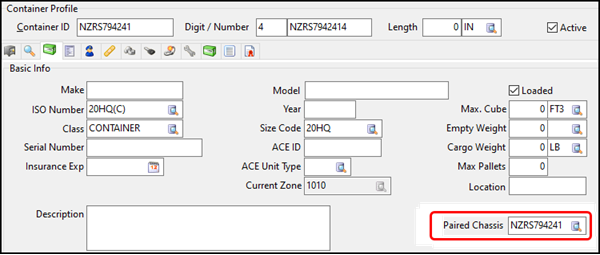
Additional logic has been added to ensure that paired container and chassis resources will now be assigned and deassigned from trips together. A chassis can be paired to a container through the 'Paired Chassis' field inside Container Profiles. When matched, this will be a "hard" connection between the two, meaning they must both be assigned together, or deassigned together. They are one-and-the-same in regards to resource assignment and deassignment on trips.
ConnectedDock
Ensuring Seal Numbers are associated to a sealable resource (in ConnectedDock) (TM-157507)
As part of ongoing improvements to the TruckMate REST API regarding Seal Numbers, an additional change was made to ConnectedDock and how it handles Seal Numbers.
Previously, when a resource was not present on a trip, the Seal screen would be prompted regardless, meaning that Dispatchers would end up sealing the "trip" itself, rather than a specific resource. In an effort to prevent 'trips' from being sealed, an adjustment was made within the ConnectedDock application to only prompt for a seal when a Finish Loading was activated and a resource was present on the Trip.
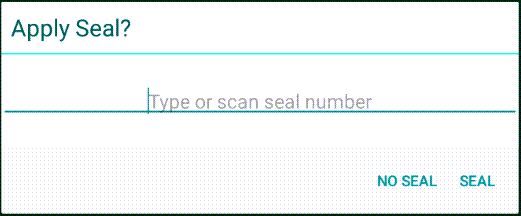
When the ConnDockAdmin configuration "Seal # on Close" option is set to Required or Optional, the Seal Number screen will appear when a Trailer, Container, or Straight Truck is present on the Trip (as the resource where items will be loaded).
If one of the suitable resources is not present, proceeding with the Finished Loading will not prompt for a Seal Number. Similarly, when the ConnDockAdmin configuration "Seal # on Close" option is set to Skip, the Seal Number prompt will never be seen inside of the ConnectedDock application.