Employee Profiles

The Employee Profiles program is used to define Payroll information for each Employee. Some of this information, such as the data entered on the Pay Information and Deductions Tabs, is used for payroll calculations performed by the Payroll Time Sheets and Payroll Processing programs. Other information, such as the information entered on the Holidays Tab, is used for reference and reporting only.
Carefully plan the structure of your Employee Codes. Consider these points:
-
The Employee Codes created now will remain in the system for an extended period of time. Even if employment is terminated, the Employee records will need to be kept in the system for several years.
-
You will find it convenient throughout the process if you can develop a standard code convention for your Employees. In this way, it is easy to recognize an Employee by their code, and also, it will be easier to create new records as new Employees are added to the system. Most often, a play on the Employee’s name, or a combination of a portion of their name and a number are popular conventions. Keep in mind that for reasons such as marital status changes, last names do change occasionally.
A new look has been applied to the Employee Profiles program. The program Tabs have been replaced with an Outlook-style bar on the left-hand side of the screen for better access and organization of the sections in the Employee profile. The Employee Code is still displayed at the top of the program screen. The program close button has been removed and you now close the program by using the window close button on the upper right-hand corner of the program.
-
Moving between records
The record navigation buttons are at the top of the screen; as is the search button. -
Moving between sections
Click on the section labels on the left-hand side of the screen to display the section you want. Click on the page icons to display the specific page within the section. -
Security Restrictions
Your system Administrator can restrict/enable your access to the Employee Profiles program as a whole by granting your User ID a certain Security Clearance value on the Security Setup program > Security > Clearance Tab. Security can also be limited by using the Payroll Restriction settings available on the Security Setup program > Security > Payroll Tab > Admin section.
To access Employee Profiles:
| From this location | Go to |
|---|---|
TruckMate Menu and TruckMate Task List |
|
Windows Start Menu |
TruckMate 20xx > Employee Profiles |
Windows Explorer |
C:\Program Files (x86) > TruckMate 20xx > Employee.exe |
How Do I?
How do I define payroll information for each employee using the Employee Data program?
-
Open the Employee Profiles program (EMPLOYEE.EXE).
-
Press the "+" button at the bottom navigational bar and complete the information on each tab. Certain informational fields must be completed. These are: Employee Code, Marital Status, Full or Part Time Status, Department Code, Birth Date, Hire Date, Pay Period, Pay Group Code, Pay Code, Pay Type, Province, Tax Credit Type, EI Level, Employer EI Level, Employee Rates.
See the Employee Profiles documentation for additional help with these fields.
Menu and toolbar options
This topic describes menu and toolbar options and functionality that are specific to the Employee Profiles window.
For information about common menu and toolbar options (i.e. File menu, Refresh, Multi-Company, etc.), see General menu and toolbar options.
Tools Menu
Diary
![]() Click this button to access the Diary window for the selected Employee. This option is also available on the Toolbar.
Click this button to access the Diary window for the selected Employee. This option is also available on the Toolbar.
Cards
![]() If you have a License for the Card Management program (key 30000), selecting this option will allow you access (view/edit/add) your Fuel/Credit cards for the currently displayed Employee by using the Card Management program > Cards Tab.
If you have a License for the Card Management program (key 30000), selecting this option will allow you access (view/edit/add) your Fuel/Credit cards for the currently displayed Employee by using the Card Management program > Cards Tab.
Note: Before you can access this function, you must have configured at least one Vendor in the Card Management program > Setup Tab.
General Information
Code
Enter an Employee Code. This can be up to ten characters in length. You can use the standard TruckMate navigation bar at the bottom of the screen to move through the Employee records currently setup in your system.
Search
Select the 'Search' button to display the 'Pick Employee Code' form where you can search by Employee Code, Last Name, or First Name.
Exclude Terminated
Works in conjunction with the Search button. If you place a checkmark in the box provided, the search function will eliminate terminated Employees. Without a checkmark in this box, your search will include all terminated Employees.
Terminated
Check this button if the current Employee has been terminated. The record will then not show up when the 'Exclude Terminated' option is checked and a Search is conducted.
Address Tab
The Address Tab is used to enter personal information about the Employee. Some of this information, such as Marital Status and Vacation Level, is required for payroll processing.
Last Name
Enter the Employee’s last name.
First
Enter the Employee’s first name.
MI
Enter the initial of the Employee’s middle name (as applicable).
Address 1
Enter the Employee’s home address.
Address 2
Enter the remainder of the Employee’s home address (if required).
City
Enter the Employee’s city of residence.
Prov./St
Enter the Employee’s residence 'Province' (Canada) or 'State' (USA).
Note: Changing this field for US Employees will invoke the Set Payroll States window, which enables you to quickly change the 'State' information for the employee throughout the Employee Profiles program.
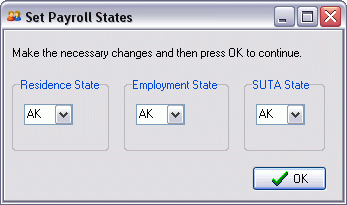
Due to the multiple number of 'State' fields throughout the Employee Profiles program, we now allow the User to quickly change these fields without having to browse through multiple Tabs.
Simply use the drop-down menus to select the State Codes required. The fields will all default to the field you have selected initially. In most cases, all you are required to do is click the 'OK' button, and the State information will be updated properly.
Postal/Zip
Enter the Employee’s residence postal code or zip code
Phone
Enter the Employee’s home phone number.
Emer. Contact
Enter the name of a person who should be contacted in the case of an emergency involving the Employee.
Emer. Phone
Enter the phone number of the Emergency Contact.
Email Address
Enter the Employee’s personal e-mail address.
Marital Status
Enter the Employee’s marital status. Select a value status from the drop down menu list box.
Full / Part Time
This field allows you to specify the Full or Part Time status of an Employee. Select the Database Search button and choose from one of the four available options: 'F' (Full Time Regular), 'P' (Part Time Regular), 'T' (Full Time Temporary) and 'C' (Part Time Temporary).
Department
Enter the Employee’s department code. Double click for a code selection form. Department Codes are configured in the Payroll Setup program, and are used to determine general ledger postings for pay and deduction entries for this Employee (in the Payroll Register program).
Job Title
Enter the Employee’s job title within your company. This is a free format entry field, for reporting and information purposes.
Supervisor / Manager
Select the Database Search button to choose the displayed Employee’s Supervisor/Manager from the available Employee Profiles in the system.
RPP Plan #
(Optional): Enter the Registered Pension Plan number for the displayed Employee.
WCB#
(Optional): Enter the WCB # under which the Employee is grouped within your company. Double click for a selection form. WCB numbers are configured in the Payroll Setup program. Associating an Employee with a worker’s compensation branch number will make it easier to format reports and gather required payroll information for compiling WCB remittance information.
Driver’s License #
(Optional): Enter the Employee’s driver license number.
Vacation Level
Select a vacation calculation level from the drop down list box. Vacation levels are configured in the Payroll Setup program. Earned vacation pay for the Employee will be automatically calculated based on the level specified here.
Vacation Type
Select the Vacation Type method for processing Vacation Pay for the displayed Employee by
-
No Vacation Pay*: vacation pay is not calculated or accumulated
-
Pay Out*: earned vacation pay is paid out on each pay check
-
Accrual*: earned vacation pay is accumulated and becomes a liability to be paid out to the Employee during the earned vacation period.
Country for Taxes
Select a country code from the drop down box. The choices are CAN (Canadian), or US (U.S.). This value will determine whether source deductions calculated by the Payroll Register program are calculated for Canadian or US payroll.
Gender
Use the pull down menu to select either 'Male' (M) or 'Female' (F).
Ethnicity
Select the Database Search button to open a window containing a list of system Ethnicity Codes. Select the Code that applies to this Employee, and click 'OK' to populate it within the Ethnicity field of the main screen of the Address Tab.
EOE (Equal Opportunity Employer)
Enter the Equal Opportunity Employer number for this Employee, if applicable.
Notes Tab
This Tab is used to record Free Format Notes relevant to the Employee. This is for reference and reporting purposes only.
Dates Tab
The Dates Tab is used to record Human Resources dates for the selected Employee. In most cases these values are for reference and reporting purposes only; however, the Employee’s Birth Date may affect payroll processing (by the Payroll Register program). Note that Sick Days and Holidays are recorded on the Holidays Tab.
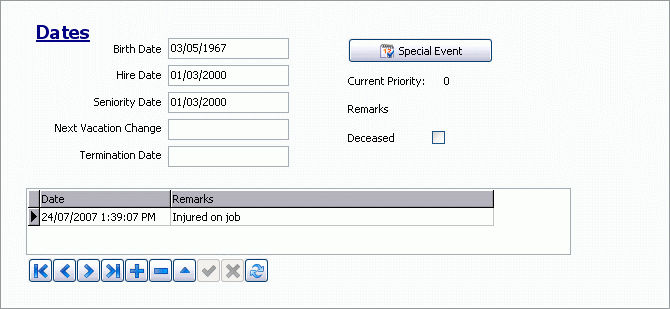
Birth Date
Enter the Employee’s birth date. Note that it is important to enter the Employee’s true birth date, as it is used to determine certain aspects of payroll calculations for the Employee. Double click for a date selection form.
Hire Date
Enter the date on which the Employee was hired. Double click for a date selection form.
Seniority Date
Enter the date on which the Employee began to accrue seniority. Double click for a date selection form.
Next Vacation Change
If applicable, enter the date when the Employee becomes eligible for an increase in vacation pay assessment. Vacation pay increases are mandatory in some jurisdictions. Consult the applicable governing payroll authority for more information. Double click for a date selection form.
Termination Date
If applicable, enter the date when the Employee was terminated. Double click for a date selection form.
Historical Dates
Enter as many important date records as applicable for the Employee. This information entered here is human resource information only and is optional. You may enter items such as when the Employee’s last promotion or raise was, or when a department change occurred, or when employment was terminated. The options are endless as you may also enter such date-related items as the Employee’s family members birthdays, when children were born, important anniversaries, etc.
Date
Enter the date for the record. Double click for a date selection form.
Remarks
Enter remarks that describe the event.
Special Events
This button will invoke the Special Events form, which is used throughout the TruckMate system to record events and dates. See the Driver Profiles documentation for further information.
Deceased
Check this option if the Driver is deceased.
User Info Tab
The ten fields on this Tab can be used to store free format information about the Employee. This is for reference and reporting purposes only. The field labels can be customized using the Application Configurator program.
Holidays Tab
The Holidays Tab is used keep to record sick days and vacation days.
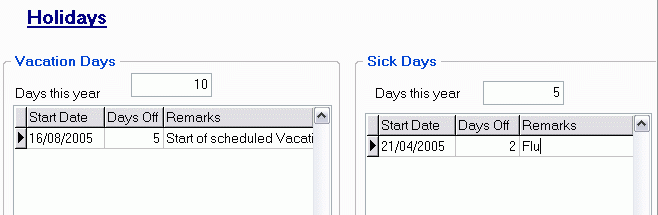
Vacation Days
Days this Year
Displays the number of days allowed for the Employee in the current vacation year (based on the configuration in the Payroll Setup program). The amount can be changed to reflect either the number of vacation days remaining, or the number of vacation days used.
Start Date
Enter the date of the first day of a holiday taken.
Days Off
Enter the number of sequential work days taken including the start date.
Remarks
Free format area to enter relevant notes regarding the entered record.
Sick Days
Days this Year
Displays the number of days allowed for the Employee in the current sick year (as configured in the Payroll Setup program). The amount can be changed to reflect either the number of paid sick days remaining, or the number of paid sick days used.
Start Date
Enter the date of the first day of sick days taken.
Days Off
Enter the number of sequential work days taken including the start date.
Remarks
Free format area to enter relevant notes regarding the entered record.
Employer Tab
The Employer Tab is used to link your Employee records to the Company Codes outlined in your system (defined within the Company Profiles program).
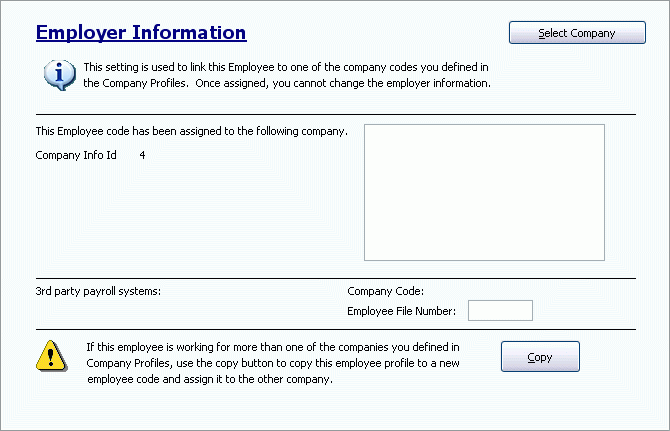
Select Company
Clicking this button will bring up a search form for the available Companies within your system. Use the pull down menu to select a Company by its Company ID (defined within the Company Profiles program). When you select a Company ID, the associated Company details will automatically display under the pull down menu. When you are sure of the Company you would like to link this Employee to, click the 'OK' button.
Once selected, the Company Information (including the associated Company logo) will display in the 'This Employee code has been assigned to the following company' section of the Employer Information Tab.
3rd party payroll systems
If the Company you are using uses a Third Party Payroll system, the 'Company Code' field will automatically populate with data. You may enter the 'Employee File Number' in the space provided, if applicable.
Copy
The copy button allows you to quickly enter records in the case of a Driver who happens to work for more than one Company. Clicking the Copy button will copy all of the Employee Profile information to a new Employee Code, which you can then assign to a new Company by using the 'Select Company' button.
Note: Once an Employee is assigned, the 'Employer Information' records for the selected Employee cannot be changed.
Security Tab
If some of your Employee Profiles should be hidden from certain Users of your system, use the Security Tab to set the level of clearance required to view their records.
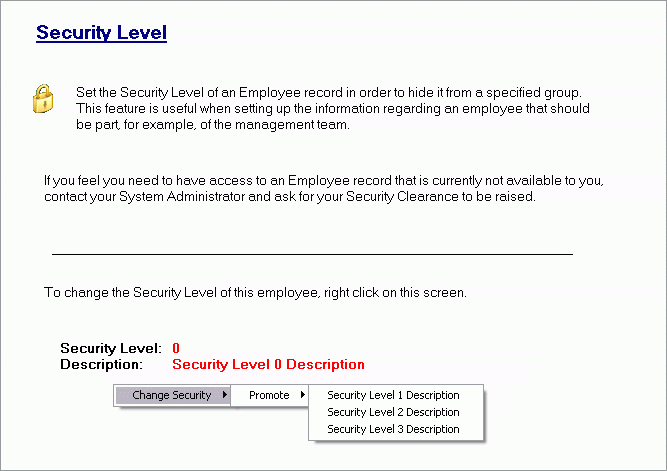
Context Menu
To make changes within the Security Tab, you must right click anywhere within it.
Change Security
Promote
Use the Promote option to raise the Security Level of the current Employee Profile. Employee Profiles default to the 'Security Level 0', which means that anyone using the system can access their information. The higher the Security Level, the harder it is for a User to access the information:
-
'Security Level 0' - No security, General Comment
-
'Security Level 1' - Safety Department Only
-
'Security Level 2' - Senior Executives Only
-
'Security Level 3' - For Your Eyes Only' (meaning the User who creates the record)
Note: These Security Levels are defined within the Security Setup program of TruckMate, and their descriptions are fully editable. See the Security Setup documentation for more information.
Demote
The Demote function works in exactly the opposite capacity of the 'Promote' option described above.
Pay Information Section
Pay Info Tab
The Pay Information Tab is used to configure payroll parameters for the purpose of automatically calculated (as opposed to manually entered) pay entries. Pay entries are recorded in the Payroll Time Sheets program.
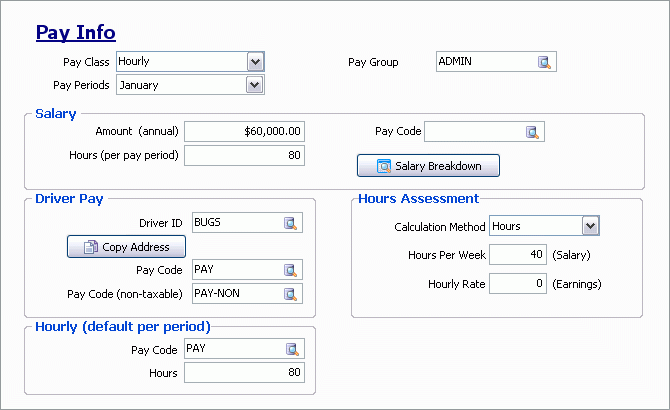
Pay Class
Select a pay class from the drop down list box. The pay class determines which section of the screen below is used to calculate the Employee’s pay in the Payroll Time Sheets program.
Pay Periods
select a Pay Period type from the drop down list box. Pay period types are configured in the Payroll Setup program.
Pay Group
Enter a Pay Group code (as configured in the Payroll Setup program). Double click for a group selection form. Each Employee must belong to a Pay Group. When creating a payroll batch in the Payroll Time Sheets program, the Employees to add to the batch can be requested this Pay Group.
Salary
If the Employee is in the Pay Class of 'Salary' (as configured above), you must fill in the fields in this section of the screen.
Amount (annual)
Enter the annual salary for the Employee. This is the base salary and does not include any extra pay that may be incurred during the year.
Hours (per Pay Period)
Enter the normal hours worked in a Pay Period. The hours specified here are for purposes of tracking and reporting earned Employment Insurance hours (Canada). Keep in mind, this number is only a default value and is meant to be edited for accuracy in the Payroll Time Sheets program when processing occurs. For Pay Periods that are not a standard number of days (such as monthly or semi-monthly based), enter the number of hours that will most commonly occur throughout the year.
Pay Code
Enter a pay code (as configured in the Payroll Setup program). Double click for a selection form. The pay code entered here is the default pay code which will track the gross salary paid to the Employee as well as reference the general ledger posting account as specified for the department to which the Employee is assigned. General Ledger postings for pay codes are configured in the Payroll Setup program, on the Departments Tab.
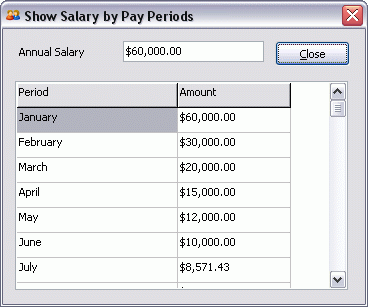
Salary Breakdown
Click this button to display the Salary Pay by Periods window, which shows the gross pay for each Pay Period to be paid to the Employee based on the annual salary entered. This feature has no purpose other than to display the calculation of the annual salary divided by the number of Pay Periods in a year for each available Pay Period frequency.
Driver Pay
If the Employee is in the Pay Class of 'Driver' (as configured above), you must fill in the fields in this section of the screen. Driver pay entries are generated by the Driver Statements program, and can be viewed in the Payroll Time Sheets program.
Driver ID
Enter the Employee’s Driver ID as configured in the Driver Profiles program. This creates the link between the Driver Statements program and the Payroll module.
Note: When searching for Driver ID codes, only those Driver’s whose 'Pay Type' is set to 'P' (Payroll) on the Driver Profiles program > Pay / Remuneration Tab will be available for selection.
Pay Code
Enter a pay code (as configured in the Payroll Setup program). Double click for a selection form. The pay code entered here is the default pay code which will track the gross salary paid to the Employee as well as reference the general ledger posting account as specified for the department to which the Employee is assigned. General Ledger postings for pay codes are configured in the Payroll Setup program > Departments Tab.
Pay Code (non-taxable)
Enter a pay code (as configured in the Payroll Setup program). Double click for a selection form. The pay code entered here is the default pay code which will track the gross salary paid to the Employee as well as reference the general ledger posting account as specified for the department to which the Employee is assigned. General Ledger postings for pay codes are configured in the Payroll Setup program, on the Departments Tab.
Copy Address
If the driver is already configured in the Driver Profiles program, you can copy common information (such as address details) from that program to the Employee Profiles program by clicking this button. Note that this button can only be used once, when the record is originally configured.
Hours Assessment
If the Employee is in the Pay Class of 'Hourly' (as configured above), you must fill in the fields in this section of the screen.
Calculation Method
Use the pull down menu to select the appropriate Calculation Method for this Driver. Available options are: 'Manual', 'Salary', 'Earnings' and 'Hours'.
Hours Per Week
Enter the Driver’s Hours of work per week.
Hourly Rate
Enter the Driver’s Hourly Rate of pay.
Hourly (default per period)
If the Employee is in the Pay Class of 'Hourly' (as configured above), you must fill in the fields in this section of the screen.
Pay Code
Enter a pay code (as configured in the Payroll Setup program). Double click for a selection form. The pay code entered here is the default pay code which will track the gross salary paid to the Employee as well as reference the general ledger posting account as specified for the department to which the Employee is assigned. General Ledger postings for pay codes are configured in the Payroll Setup program, on the Departments Tab.
Hours
Enter the normal hours worked in a Pay Period. The hours specified here are for purposes of tracking and reporting earned Employment Insurance hours (Canada). Keep in mind, this number is only a default and is meant to be edited for accuracy in the Payroll Time Sheets program when processing occurs. For Pay Periods that are not a standard number of days (such as monthly or semi-monthly based), enter the number of hours that will most commonly occur throughout the year.
Rates Tab
You can configure a default rate of pay schedule for each Employee on the Rates Tab. This is used when creating entries in the Payroll Time Sheets program. This is feature is especially used to set hourly pay rates.
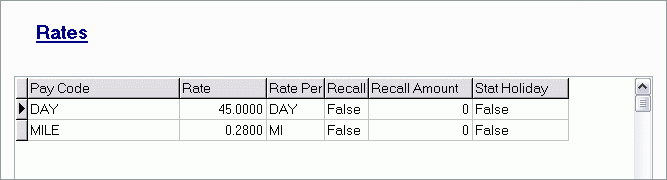
Pay Code
Enter a pay code (as configured in the Payroll Setup program). Double click for a selection form. The pay code entered here is the default pay code which will track the gross salary paid to the Employee as well as reference the general ledger posting account as specified for the department to which the Employee is assigned. General Ledger postings for pay codes are configured in the Payroll Setup program, on the Departments Tab.
Rate
Enter the rate of pay for the code and the Employee. If entering a salary amount, specify the total amount for the Pay Period. If entering an hourly wage, enter the rate per unit of pay. If you are entering overtime rates, you must enter the base pay rate. The amount entered in this field will be multiplied by the value in the 'O.T. Rate Multiplier' field (as configured for the payroll code in the Payroll Setup program).
Rate Per
Enter a rate unit such as 'HR' or 'SAL' as applicable for the code and rate entered. This is a free format code.
Recall
This is a 'True' or 'False' field. Setting this value to 'True' will allow the use of the 'Recall Records by Employee' Context Menu option in the Timesheets program. All records set to 'True' will be added to the Timesheets program grid when the User invokes the 'Recall Records by Employee' function.
Note: In the Application Configuration program, TIMESHEETS.EXE, setting the default to 'True' will allow you to enter payroll data into the Timesheets program, and then recall the Earnings information defined in Employee Rates for each day, rather than once for the payroll batch. The Deduction/Adjustments defined in Employee Deductions will only be recalled the first time.
Recall Amount
This value in this field will transfer to the Timesheets program if the 'Recall' option above is set to 'True' and the User invokes the 'Recall Records by Employee' function (see 'Recall' above).
Stat Holiday
This is a 'True' or 'False' field. Setting this value to 'True' will allow the use of the 'Recall Stat Holidays by Employee' Context Menu option in the Timesheets program. All records set to 'True' in this column will be added to the Timesheets program grid when the User invokes the 'Recall Stat Holidays by Employee' function.
Context Menu
Copy Rate Codes
Is used to copy the Rate Code Setup from an existing Employee record. When you enter a new Employee, rather than entering their rate codes, you can copy the rate codes from an existing Employee who has the same rate code setup.
Note: When you configure overtime rates for Employees, you must enter the base pay rate in the Rate field below. The amount entered in the Rate field will be multiplied by the value in the O.T. Rate Multiplier field (as configured for the payroll code in the Payroll Setup program).
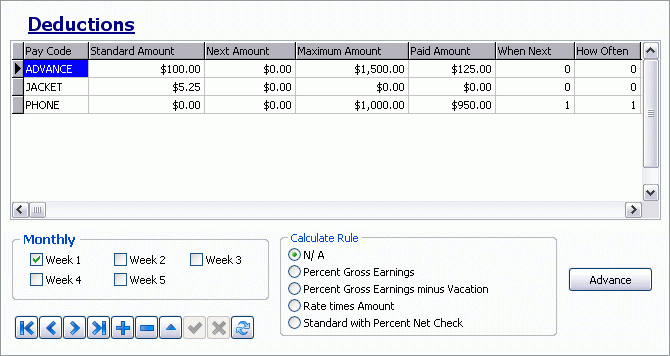
Deductions Tab
The Deductions Tab is used to configure recurring payroll deductions for each Employee. These deductions will be automatically added during payroll processing if you use the 'Recall Records' function in the Payroll Time Sheets program. These deductions are not automatically added when you create manual pay entries in the Payroll Time Sheets program. Government payroll deductions (such as tax and unemployment contributions) are calculated automatically by the Payroll Register program based on the tax setup configured on the Can Tax and US Tax Tabs, and on the defaults configured in the Payroll Setup program. It is not necessary to enter government source deductions on this Tab. Note that the amount of calculated deductions (ie, those based on gross or net pay) will not calculate until the Payroll Register program is run. The amounts can be viewed using the Review Checks function in the Payroll Register program.
Pay Code
Enter a pay code (as configured in the Payroll Setup program). Double click for a code selection form.
Standard Amount
Enter the standard amount that is to be deducted from the Employee’s pay. You should only enter a value in this field if a flat amount is to be deducted. If the deduction is calculated (ie, if it is not a flat amount), leave this field at zero.
Next Amount
If the next payroll process will require a different amount to be processed than the standard or calculated amount, enter it here. Otherwise leave this value at zero.
Maximum Amount
If applicable, enter the total or target maximum accumulated amount to be applied over the recursive payrolls. If the item is to occur indefinitely, leave the amount zero. If there is a total amount to be deducted and then the item should cease processing, enter the total amount here.
Note: Maximum Amount only applies when using the Calculate Rule 'N/A' (flat amount).
Paid Amount
This item works in conjunction with the previous field, 'Maximum Amount'. The field will reflect the total accumulated amount deducted for the Pay Code item. When the amount reaches the Maximum Amount, the item will cease to process on recursive payrolls. If the amount to be applied on the payroll exceeds the difference between the Paid Amount and the Maximum Amount, only the difference will be applied in order to reach the maximum or target total.
When Next
Enter the number of payrolls from today which the next occurrence of this item is to be processed on the Employee’s pay. If it is to occur on the next payroll, enter '1'. Note that if a value is entered here, you must enter a value in the 'How Often' field. Alternatively, you may specify the frequency of the deduction in the 'By Week' section (but not both).
How Often
Enter the frequency with which the deduction should occur. If the item is to be processed on every payroll, enter '1'. If the item is not to occur every payroll, be sure to set the 'When Next' value to the appropriate next payroll occurrence. Alternatively, you may specify the frequency of the deduction in the 'By Week' section (but not both).
Calculation
If applicable, enter the variable (for example, the percentage amount) to be used in the calculation of the amount to be processed. The type of calculation is specified 'Calculation Rule' section. Values in this field are entered in decimal format. For example, 2.5% would be entered as '.025'.
Remarks
Enter comments relevant to the recurring payroll item entered. The purpose of this field is to aid in reminding the payroll operator of the nature of this item.
Vendor ID
This field is used to link an Employee to a specific Vendor ID, which is then linked to specific Pay Codes in the Payroll Setup program, allowing the system to automatically generate AP Invoices for Employee deductions when the AP records are processed. You may use the same Pay Code for payments to multiple vendors (as could be the case with a pay code of GARNISHEE). In this situation, you can make the Vendor ID employee specific.
For example, the User can add a 'Vendor ID' code to the employee’s GARNISHEE deduction. When a Vendor ID is being added to a record by TruckMate, it will look first to see if there is an Employee Vendor ID. If there is none, it will look for the Vendor ID assigned to the Pay Code in the Payroll Setup program. If there is none there, it will not be assigned and invoices will not be created.
Link to Pay Code
Double-click this field to select a separate Pay Code (in the Payroll Setup program) to link the currently selected Employee deduction to.
Cap
This field has been added to contain the value that demarcates the maximum contribution that the Employer is adding toward Employee Deductions, as with the deductions related to the Employee’s 401K contributions (if the Employer is matching their contribution in some way).
Monthly
Specify which weeks of each month the item is to occur (if applicable). Alternatively, you may configure the 'When Next' and 'How Often' parameters in the grid above, but not both. Normally, this option would only be utilized for weekly payroll processing. For example, you may have deductions that occur on a monthly basis, but the payroll frequency is weekly based. This option allows control over how often within a month the item will occur. For weekly based payroll frequencies, most months will have the same amount of payrolls per calendar month, but there will be a few calendar months each year with an extra payroll.
Calculate Rule
Check the appropriate box that describes how the calculation should be performed. If other than 'N/A' (Not Applicable), be sure to have a value entered in the 'Calculation' field in the grid above as the two features work with each other to produce the desired results.
Note: When using 'Percentage' type rules, the values you enter into the 'Calculation' field should be decimal values. A '10%' deduction would be entered as '0.10', '20%' as '0.20', and so on.
NA
This value is generally specified for flat-rate deductions, where the same amount is deducted every time regardless of earnings variables.
Percent Gross Earnings
If the deduction is calculated as a percentage of the Employee’s gross earnings, check this box. Enter the percentage value in the Calculation field in the grid.
Percent Gross Earnings minus Vacation
If the deduction is calculated as a percentage of the Employee’s gross earnings less the Employee’s vacation pay, check this box. Enter the percentage value in the Calculation field in the grid.
Rate times Amount
This option only applies to Employees who are paid on the basis of time worked, rather than salary or driver pay. If this radio button is selected, the deduction will be calculated by multiplying the amount entered in the Calculation field by the number entered in the 'Time Worked' field on the Time Sheets / Earnings Tab of the Payroll Time Sheets program. This rule could be used, for example, in situations where an Employee is deducted a certain amount for every hour he or she works.
Standard with Percent Net Check
This deduction type will compare the value entered in the Standard Amount grid field against a calculated percentage amount. If the standard amount is greater the calculated percentage, the calculated percentage amount will be used. To create a deduction of this type, you must enter a value in the Standard Amount field, and a percentage value (in decimal format, ie '.5' for 50%) in the Calculation field.
Advance
The Advance button opens the Payroll Advance window, which is used to create a payroll advance check. The advance check can be viewed and printed in the Check Printing or Instant Checks program. Creating an Advance check will also create a one-time deduction entry for this Employee, so that the advance will be deducted from their net pay during the next payroll run.
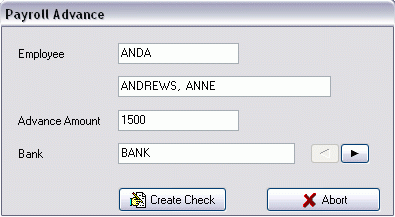
Employee
The first two fields will pre-populate depending on the Employee currently selected in the main program.
Advance Amount
Enter a numerical value for the Advance Check. Be sure not to add any periods or commas to the value.
Bank
This field will pre-populate with the name of the GL Account currently setup to handle the pay for the selected Employee.
Create Check
Click this button to create an Advance Check for the selected Employee. You will be prompted to confirm before the check is created. Click 'OK' to create the check.
Context Menu
Copy Deduction Codes
Is used to copy the Deduction Code Setup from an existing Employee record. When you enter a new Employee, rather than entering their deduction codes, you can copy the deduction codes from an existing Employee who has the same code setup.
Note: Please keep in mind that if you make any changes to the settings on the Employee Profiles' Deductions Tab after you used the 'Recall Records' function for that employee in the Payroll Time Sheets program, you will need to delete and re-recall all of the records for that employee and on the Payroll Time Sheets program > Earnings and Deductions Tabs before you use the 'Calculate Source Deductions' function in the Payroll Register program. This will ensure that any updates to the Employee Profile will be included when you calculate the source deductions.
Advance Tab
The Advance Tab allows you to create Advance Checks for your Employees.
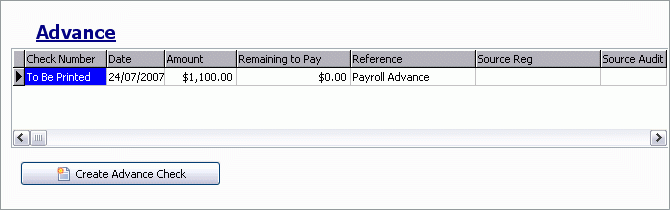
Create Advance Check
Select the 'Create Advance Check' button and a dialog box will appear. Enter the advance amount of the check and select 'Create Check'. A confirming message will appear. The entry will then appear in the Advance Tab grid. Print the check, and update the check entry using the Check Register program. Then, go to the Payroll Time Sheets program > Deduction/Adjustments Tab, and enter your deduction amount into the grid. Use your context menu to select the advance checks to create a deduction for this check. Once you’ve completed the process, the completed deduction entry will appear in the Time Sheet Deductions/Adjustments grid.
YTD Tab
The Year-to-date Tab displays a summary of payroll details that occurred in the year to date
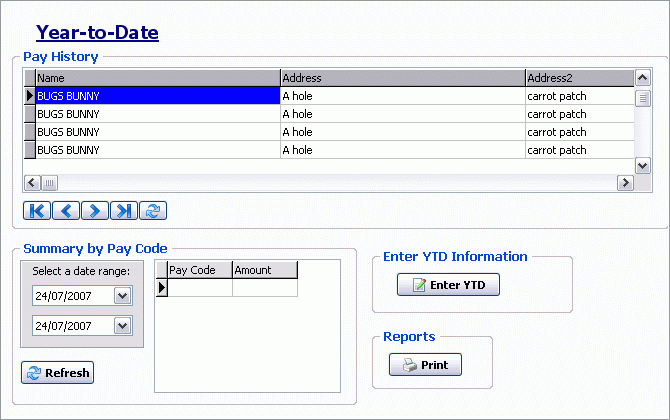
Pay History Grid
Displays the summary information of each payroll involving the Employee, including the check information, status and G/L posting status.
Context Menu
Void Check
Allows the check to be voided, which also reverses all of the posted and accumulated payroll amounts relevant to the check. The A/P Check Register program must be run before the reversing general ledger postings will be created. They can be viewed in the GL Journal Entries program.
Note: To enable this option, go to the Security Setup program, Security Tab, Business Events Tab.
Print Check Stub
Will display the Report Selection form. The Crystal Report template supplied with the TruckMate system is called 'CHECKSTUB.RPT'. After selecting the desired report (using the Report Selection form) and specifying the selection criteria (as applicable), the report will preview to the screen. Click the printer icon at the top of the screen to send the report to the printer that is configured as the default printer for your workstation.
See the Crystal Reports Reference for more information on report functions.
Summary by Pay Code
Displays a summary total of a specific pay code for the Employee within a specified date range.
Date
Specify a date range. Click on the calendar icon for a calendar selection form. Payroll codes that were processed within the date range will display in the window to the right with the accumulated amount which occurred for each code within the specified date range. Once the dates are entered, select the 'Refresh' button to check for codes and refresh the displayed data for the specified date criteria.
Refresh
Click the Refresh button to gather any new information into the 'Summary by Pay Code' Grid to the right of this button. Any new Advance Checks (within the specified Date Range) will appear when the Refresh button is clicked, for example.
Enter YTD Information
In order to produce payroll reports for the entire payroll year (such as T4 tax statements), you may need to manually enter prior pay information to reflect the payroll activity from before you started using the TruckMate payroll module. The Enter YTD button will display a form where you enter pay codes and amount for each historical Pay Period. Enter the payroll period date in the grid at the top of the form; then enter the payroll code (as configured in the Payroll Setup program) and the amount for each Pay Period.
Reports
Will display the Report Selection form. The Crystal Report templates supplied with the TruckMate system are as follows:
-
PRSTUBS.RPT*: summary of check information
-
EMPLOYEE LISTING.RPT*: listing of Employee recotds
-
WCB.RPT*: Worker’s Compensation Statistics report
After selecting the desired report (using the Report Selection form) and specifying the selection criteria (as applicable), the report will preview to the screen. Click the printer icon at the top of the screen to send the report to the printer that is configured as the default printer for your workstation.
See the Crystal Reports Reference for more information on report functions.
US Tax Section
For Employees paid under U.S. payroll rules, this section of the Employee Profiles program allows configuration of the U.S. tax rules to be applied.
Personal Tab
The Personal Tab allows you to enter Social Security information for the currently selected Employee.
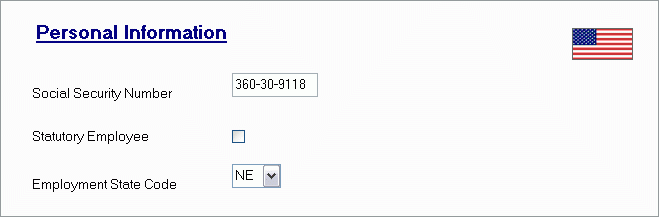
Social Security Number
Enter the Employee’s assigned Social Security Number.
Statutory Employee
If the selected Employee is Statutory, check this flag.
Employment State Code
Use the drop-down menu to select the Employee’s Employment State.
Note: The Employment State Code no longer allows user defined codes. You must select a valid State Code. Changing this field will invoke the Set Payroll States window, which enables you to quickly change the 'State' information for the employee throughout the Employee Profiles program.
Due to the multiple number of 'State' fields throughout the Employee Profiles program, we now allow the User to quickly change these fields without having to browse through multiple Tabs.
Simply use the drop-down menus to select the State Codes required. The fields will all default to the field you have selected initially. In most cases, all you are required to do is click the 'OK' button, and the State information will be updated properly.
Tax Tables Tab
The Tax Tables Tab is used to configure the Tax Table Codes applicable to the selected Employee. These Codes are setup in the Payroll Setup program.
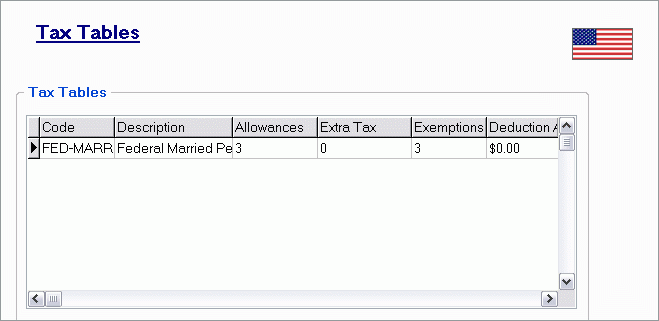
Code
Enter the appropriate tax Table code for this Employee. Double click for a tax Table selection form. Tax Tables are configured in the Payroll Setup program.
Description
The description will be defaulted according to the tax Table that was selected.
Allowances
Enter the number of federal tax allowances claimed on form W-4 submitted by the Employee. This value is multiplied by the Allowance amount configured for this Tax Table code in the Payroll Setup program.
Exemptions
Enter the number of federal tax exemptions claimed on form W-4 submitted by the Employee. This value is multiplied by the Allowance amount configured for this Tax Table code in the Payroll Setup program.
Extra Tax
If applicable, enter the additional tax to be withheld from each paycheck as specified by the Employee on form W-4.
Deduction Amount
To reduce an Employee’s gross pay prior to assessing taxes, enter the amount of the gross pay deduction in this field.
Federal Tab
The Federal Tab is used to define relevant details of this Employee’s Federal Tax information. The values entered here are used by the US Tax Payroll DLL file.
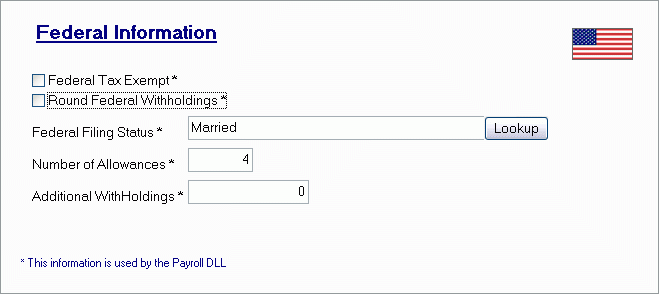
Federal Tax Exempt
If the selected Employee is exempt from Federal taxation, check this option.
Round Federal Witholdings
If you would like the selected Employee’s Federal Withholdings value to be rounded to the nearest whole dollar value, select this option.
Federal Filing Status
Enter the selected Employee’s Marital Status in the space provided, or click the 'Lookup' button to generate a list of applicable Marital Status values.
Number of Allowances
Enter the number of Allowances for the selected Employee.
Additional WithHoldings
Enter a dollar amount of any Additional Federal Withholdings for this Employee.
State Tab
The State Tab is used to define relevant details of this Employee’s State Tax information. The values entered here are used by the US Tax Payroll DLL file.
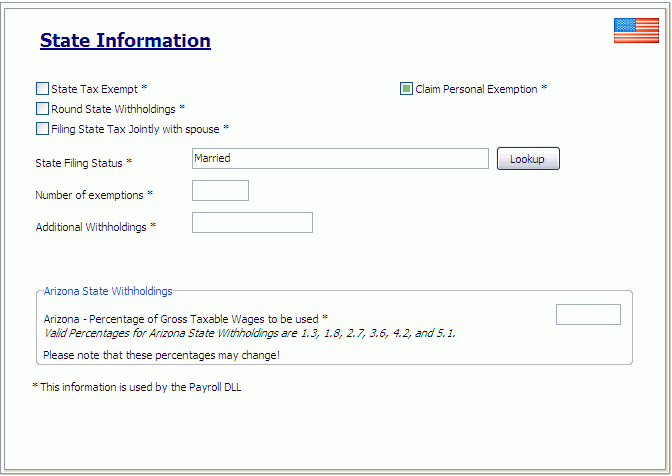
State Tax Exempt
If the selected Employee is exempt from State taxation, check this option.
Round State Withholdings
If you would like the selected Employee’s State Withholdings value to be rounded to the nearest whole dollar value, select this option.
Filing State Tax Jointly with spouse
If the selected Employee files his / her State taxes jointly with a spouse, select this option.
State Filing Status
Enter the selected Employee’s Marital Status in the space provided, or click the 'Lookup' button to generate a list of applicable Marital Status values.
Number of Exemptions
Enter the number of State tax exemptions for this Employee.
Additional Withholdings
Enter a dollar amount of any Additional State Withholdings for this Employee.
Arizona State Withholdings
For those employees working in Arizona, enter a valid percentage value in this field.
Local Tab
The Local Tab is used to define relevant details of this Employee’s Local Tax information. The values entered here are used by the US Tax Payroll .DLL file.
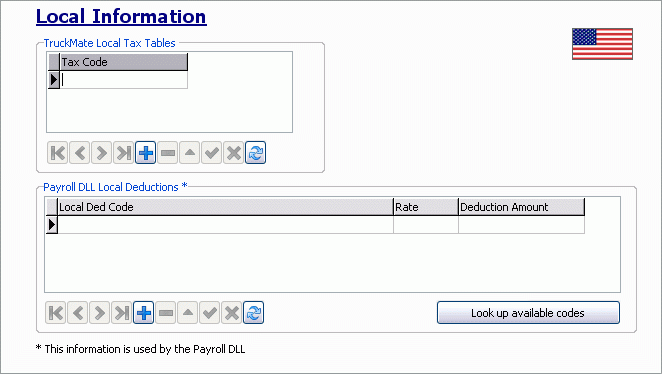
Tax Code
If a Local Tax Table value has been configured and is applicable to this Employee, enter the Local Tax Table code in this field. Local Tax Tables are configured in the Payroll Setup program.
Payroll DLL Local Deductions
You may specify any Local Tax Deductions for the selected Employee here. The 'Look up available codes' button will generate a list of Local Deduction Codes from the US Payroll DLL file. If you are not using the Payroll DLL, you may create these codes from within the Payroll Setup program.
FUTA/SUTA Tab
The FUTA / SUTA Tab allows you to specify the details of the selected Employee’s Federal Unemployment Tax Act / State Unemployment Tax Act information.
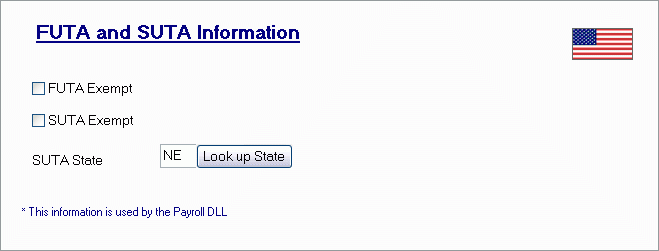
FUTA Exempt
If applicable, check this box to prevent Federal Unemployment taxes from being deducted for this Employee.
SUTA Exempt
If applicable, check this box to prevent State Unemployment Insurance from being deducted from this Employee.
SUTA State
Enter the appropriate state code under which State Unemployment Tax Act (SUTA) remittances will be calculated for with respect to the Employee. Unemployment codes are configured in the Payroll Setup program. Click the 'Look up State' button for a code selection form.
Note: The FUTA/SUTA State Code no longer allows user defined codes. You must select a valid State Code. Changing this field will invoke the Set Payroll States window, which enables you to quickly change the 'State' information for the employee throughout the Employee Profiles program.
Due to the multiple number of 'State' fields throughout the Employee Profiles program, we now allow the User to quickly change these fields without having to browse through multiple Tabs.
Simply use the drop-down menus to select the State Codes required. The fields will all default to the field you have selected initially. In most cases, all you are required to do is click the 'OK' button, and the State information will be updated properly.
FICA Tab
The FICA Tab allows the modification of the selected Employee’s Federal Insurance Contributions Act information.

FICA Exempt
If the selected Employee is exempt from FICA taxation, check this option.
Medicare Exempt
If applicable, check this box to prevent Medicare deductions from occurring for this Employee.
Social Security Exempt
If applicable, check this box to prevent Social Security deductions from occurring for this Employee.
HIRE Settings
This button, which is only visible if the setting in the Application Configurator program > EMPLOYEE.EXE > '2010 HIRE Act In Effect' is set to True, will open the 2010 HIRE Settings window. (The 2010 HIRE Act is only applicable for employees hired in 2010. After the close of the year, this setting should be set to 'False'.)
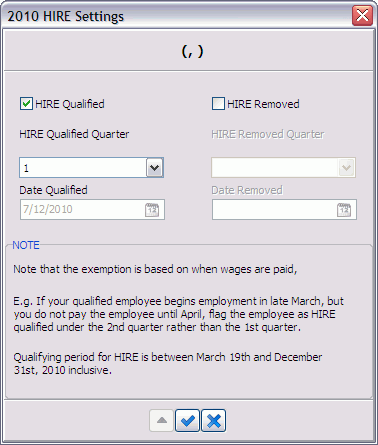
HIRE Qualified
The user can set the quarter in which an employee qualified for the HIRE plan.
HIRE Removed
The user can set the quarter in which an employee leaves the HIRE plan.
EIC Tab
The EIC Tab allows the modification of the selected Employee’s Employment Insurance Contribution information.
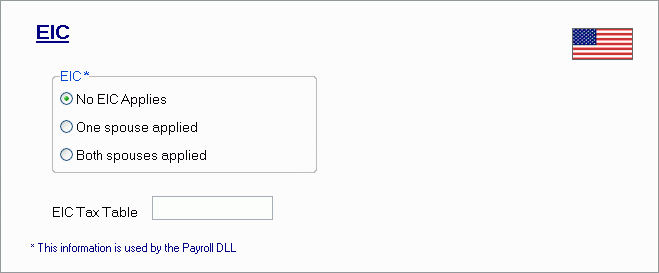
EIC
Select the EIC option that applies to the selected Employee.
EIC Tax Table
Enter the appropriate EIC Tax Table Code for this Employee. Double click for a code selection form. EIC Tax Tables are configured in the Payroll Setup program.
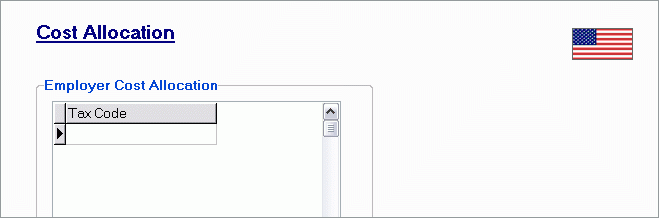
Cost Allocation Tab
Costing allocation codes are a new feature in 7.0 for US payroll which allow cost items such as uniform rentals to be generated as line items on the Employee’s payroll, but not as a taxable benefit. The Cost Allocation Tab is where you can assign one or more of this type of code to the Employee. For more information on these codes and how to set them up, see the Payroll Setup program.
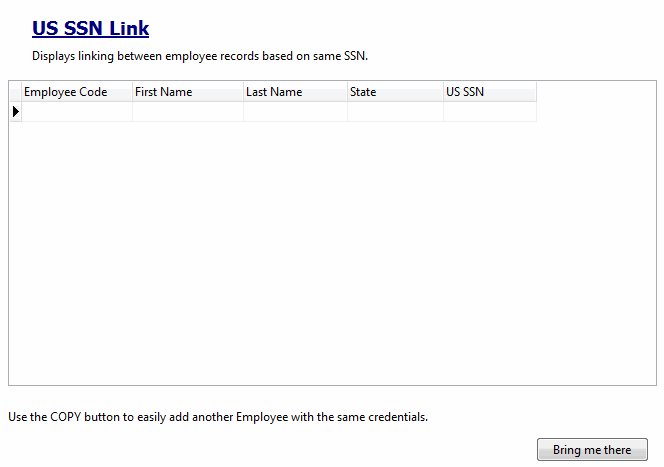
SSN Link Tab
The SSN Link Tab is where a link between an employee’s record and his / her Social Security Number is established and displayed.
Bring me there
Use this button when you want to duplicate the entered employees credentials, this is useful when an employee is working for more than one of the defined companies in Company Profiles at the same time. Clicking this button will invoke the 'Employer Information' tab where you can select the company you want the duplicated employee credentials to be linked to.
CAN Tax Section
This section offers Taxation setup options for Canadian Employee Payroll.
CAN Tax Tab
The Can Tax Tab contains many options for setting up your general Canadian taxation options.
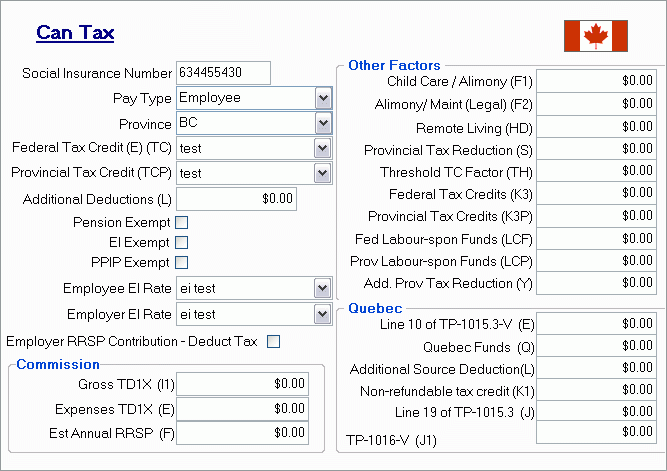
Social Insurance Number
Enter either the Employee’s social insurance number or the Employee social security number as applicable.
Pay Type
Enter a pay type from the drop down list box.
Province
Enter a Province Code, or select a province code from the drop down list box. Specify the proper province code for the Employee’s province of residence, as this will affect the tax and deduction calculations.
Federal Tax Credit (E) (TC) / Provincial Tax Credit (TCP)
Enter a Tax Credit description (as configured in the Payroll Setup program), or select a tax credit description from the drop down list box. The Tax Credit description must reference the proper tax exemption amount claimed on the TD1 form submitted by the Employee.
Additional Deductions (L)
If applicable, enter any extra tax to be withheld as specified by the Employee on the submitted TD1 form.
Pension Exempt
If the Employee is exempt from CPP or QPP contributions, check this box.
EI Exempt
If the Employee is exempt from EI premium contributions, check this box.
PPIP Exempt
If the Employee is not required to contribute to the Quebec Parental Insurance Plan, check this box.
Employee EI Rate
Enter an EI Rate Code (as configured in the Payroll Setup program), or select a Rate Code from the drop down list box. Be sure to select the code that represents the percentage rate to deduct from the Employee’s pay
Employer EI Rate
Enter an EI rate code (as configured in the Payroll Setup program), or select a rate code from the drop down list box. Be sure to select the code that represents the percentage rate to submit by the employer on behalf of the Employee.
Employer RRSP Contribution - Deduct Tax
Check this option if the selected Employee makes RRSP Contributions through Payroll.
Commission
These fields are only used for Employees who are paid on commission, and only if the Employee has submitted a TD1X form for commission calculations.
Gross TD1X (l1)
Enter the total remuneration amount as reported on form TD1X by the commission Employee.
Expenses TD1X (E)
Enter the total expense deduction as reported by the Employee on Form TD1X.
Est Annual RRSP (F)
Enter the total estimated RRSP contribution amount as reported by the Employee on Form TD1X.
Other Factors
These fields are used only for Employee’s with specific Taxation needs.
Child Care / Alimony (F1)
If applicable, enter the authorized annual deduction amount for the Employee.
Alimony / Maint (Legal) (F2)
If applicable, enter the amount of payments required by a legal document to be deducted at source.
Remote Living (HD)
If applicable, enter the annual deduction for living in a prescribed zone as indicated by the Employee on Form TD1 (E).
Provincial Tax Reduction (S)
(Not applicable) do not make an entry here.
Threshold TC Factor (TH)
Only to be used for special circumstances. Please consult your payroll MC deductions guide for an in-depth explanation and to see if it is applicable for the Employee.
Federal Tax Credits (K3)
If applicable, enter any Federal tax credit amounts.
Provincial Tax Credits (K3P)
If applicable, enter any Provincial tax credit amounts such as medical expenses and charitable donations authorized by a tax services office or tax center.
Fed Labour-spon Funds (LCF)
If applicable, enter the tax credit amount for purchase of shares of labour-sponsored venture capital corporations. Please consult your nearest Canada Customs and Revenue Agency (CCRA) taxation office for more information.
Prov Labour-spon Funds (LCP)
If applicable, enter the tax credit amount with respect to provincial-labour sponsored funds tax credits. Please consult your nearest Canada Customs and Revenue Agency (CCRA) taxation office for more information.
Add. Prov Tax Reduction
If applicable for the province of residence, calculate and enter the appropriate provincial tax reduction for the Employee. Please consult the latest MC guide to see if it is currently applicable for the province and the formulae to calculate it.
Quebec
As Quebec has different taxation rules than the rest of Canada, you will need to use this area if the Employee lives in Quebec.
Line 10 of TP-1015.3-V (E)
Enter the amount as reported on line 10 of Form TP-1015.3-V submitted by the Employee.
Quebec Funds (Q)
If applicable, enter the Q amount in this field.
Additional Source Deduction (L)
If applicable, enter the amount of extra tax the Employee has requested to be withheld at source.
Non-refundable tax credit (K1)
If applicable, enter the K1 amount in this field.
Line 19 of TP-1015.3 (J)
Enter the amount as reported on line 16 of Form TP-1015.3 submitted by the Employee.
TP-1016-V (J1)
If applicable, enter the J1 amount in this field.
R.O.E Tab
The R.O.E Tab generates a summary calculation of insurable hours for the Employee for the full year prior to the given cut-off date. It also generates a summary calculation of insurable wages for the Employee for the full six months prior to the given cut-off date.
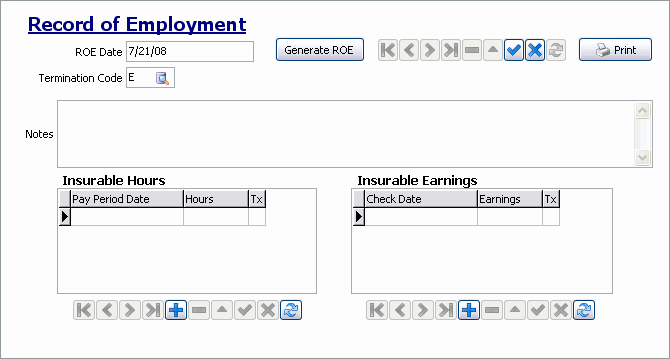
ROE Date / Generate ROE
Click the 'Generate ROE' button to select a Date from a Calendar menu. The Date chosen will then populate within this field.
The Print button is available for use, but a Crystal Report is NOT available to print these calculations onto a standard ROE form. You will have to enter the data onto the ROE form manually.
Note: Any custom Crystal Report that is to be used with this 'Print' button must use the PR_ROE_BATCH TruckMate Table.
Termination Code
If an Employee has been terminated, select the Database Search button to select a Termination Reason Code from those available in your Database.
Notes
Enter any Free Format text Notes concerning the Employee’s Record of Employment.
Insurable Hours
If any Insurable Hours data exists for the selected Employee (within the parameter specified by the ROE Date field), it will automatically populate here. If there is no data for the Employee, you may enter details here by clicking the '+' button.
Pay Period Date
Double click within this field to select a date from a Calendar menu.
Hours
Enter the number of hours worked by the selected Employee
Tx
This field will automatically populate based on the current Employee’s information.
Insurable Earnings
If any Insurable Earnings data exists for the selected Employee (within the parameter specified by the ROE Date field), it will automatically populate here. If there is no data for the Employee, you may enter details here by clicking the '+' button.
Check Date
Double click within this field to select a date from a Calendar menu.
Earnings
Enter the amount of earnings worked by the selected Employee
Tx
This field will automatically populate based on the current Employee’s information.
Note: Regarding the 'Cut-Off Date': there are 3 possible dates that could be used for this value. There is the Employee termination date, the date of the last payroll batch this Employee was processed on, and the date of the Employee’s last paycheck. In all cases, the date used for the cut-off must be the latest of all three in order for the insurable hours and insurable earnings to appear properly.
Exceptions
Letters and numbers shown in brackets beside some of the field headings refer to the Canada Customs and Revenue Agency (CRA) Machine Computation Guide’s (the 'MC Guide') variable codes which represent the items in computations and formulae. Please consult the most recent MC guide for an in-depth explanation. For Employees paid under Canada Customs and Revenue Agency (CRA) tax rules, the Exceptions Tab allows configuration of the Canadian tax rules to be applied.
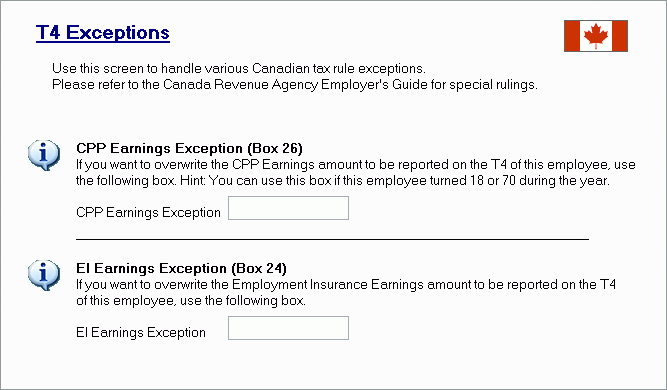
CPP Earnings Exception
Enter the Employee’s Canadian Pension Plan Earnings Exception number in the space provided.
EI Earnings Exception
Enter the Employee’s Employment Insurance Earnings Exception number in the space provided.
Code Link Tab
The Code Link Tab displays any links between Employee Records based on their Social Insurance Numbers.
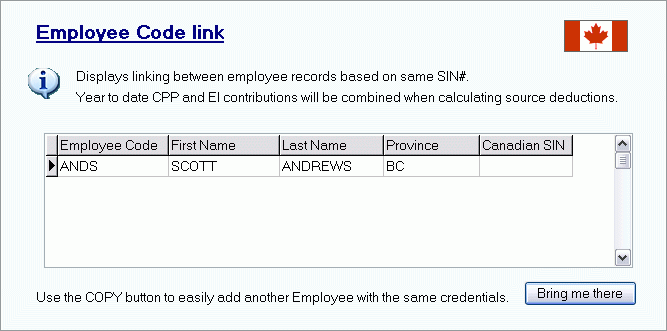
Bring me there
As the 'Copy' function of the Employer Information Tab is used to Copy Employee records from one Company to another, this button will take you directly to that Tab. See the Employer Information Tab for more information on Copying Employees.
Direct Deposit Section
This section contains only one Tab option, the Direct Deposit Tab.
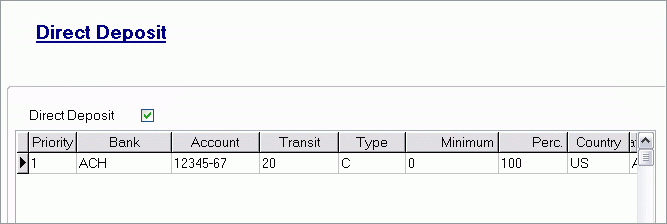
To choose a valid code for any of the 3 columns ('Type' / 'Country' / 'Status'), you previously had to click the cell to access a drop-down menu. You can simply double-click the cell or select the <Enter> key (when cell has focus).
Direct Deposit
If this Employee is paid by direct deposit, check this box. When the Payroll Register program is run, and a check entry is generated for this Employee, the check number will be 'DIRECT DEPOSIT' (after the check has been 'Marked Ready'), and will not display in the Check Printing program (although the check entry can be viewed in the Instant Checks program). It is not necessary to print checks for Direct Deposit payments; they will be updated by the A/P Check Register program without printing.
Priority
Pre-populates with a priority each time you select the '+' sign.
Bank
Enter the name of the Employee’s bank in this field. The bank that handles your direct deposit export file will provide you with a list of formats for bank names. Enter the Employee’s bank name in the format required by your bank- this might be in a character string (as in the image above), or an integer value.
Note: If you are using a Canadian Payments Association bank account, click here.
Account
Enter the Employee’s bank account number in this field.
Transit
In order to process a direct deposit, you must export the transit number from the Employee’s bank branch. Enter the number in this field.
Note: If you are using a Canadian Payments Association bank account, click here.
Type
Enter 'C' for a chequing account, 'S' for savings account or 'D' to deposit the funds directly to a T-Chek Fuel Card.
Minimum
If there is a minimum amount required before processing this amount, enter that minimum amount here.
Percentage
If there is a minimum percentage required before processing this deposit, enter that percentage here.
Country
Enter the Employee’s country here.
Status
An 'A' (Active) will appear automatically once you input your Employee’s bank account information. You can change the status to 'I' for inactive if need be.
GL Account
This is a required field when entering Direct Deposit entries for Employees. The GL Account selected here should be the bank that you pay the Employee out of. Entering several records with the same GL Account field value allows you to pay Employees multiple currencies.
Information for Users with Canadian Payments Association Accounts
The format required for Canadian Payments Association (CPA) Bank Accounts differs somewhat from the standard way of setting up your Users Direct Deposit information. The CPA requires a nine-digit Transit number, which includes the value that normally should be entered in the 'Bank Name' field in the 'Bank Transit #' field.
Warning: The 'Bank Transit #' field must be a total of 9 digits for CPA (Bank ID = 4, transit = 5). If a the 'Bank Name' is only 3 characters, prefix it with a '0' (zero).
Once you have setup your 'Bank Transit #' field correctly, you must also delete any information that is in the 'Bank Name' field- it must remain blank.