Driver Profiles
The Driver Profiles program is used to create and edit driver records. Along with general information (such as name and address), this program is used to enter information, such as driver details and pay used for automatic driver pay calculations. Driver availability and licensing information entered is also used by the Dispatch program. General notes about the driver can also be entered in this screen, and Special Events about the driver can be recorded.
To access Driver Profiles:
| From this location | Go to |
|---|---|
TruckMate Menu and TruckMate Task List |
|
Windows Start Menu |
TruckMate 20xx > Driver Profiles |
Windows Explorer |
C:\Program Files (x86) > TruckMate 20xx > Drivers.exe |
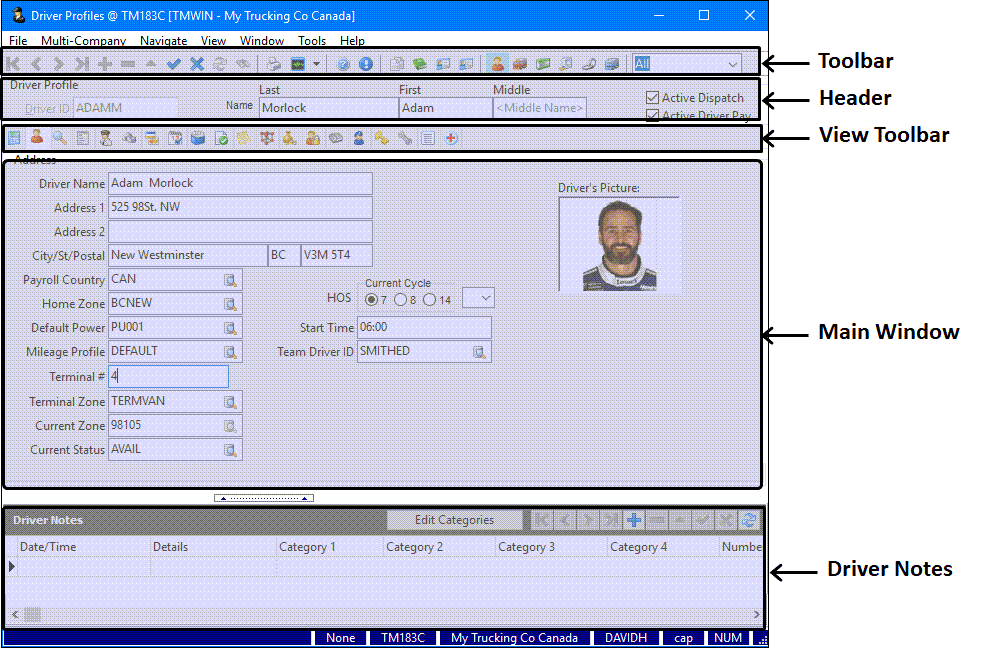
Layout of the Driver Profiles window
Header field definitions
![]()
Required field: *
| Field | Definition |
|---|---|
Driver ID * |
The Driver ID is manually entered when the new driver record is created and can be up to 10 characters in length. The Driver ID code is used throughout the Dispatch and Driver Pay modules. |
Driver Name |
The first, last and middle names for this driver. |
Active Dispatch |
Indicates whether the Driver is available for assignment in the Dispatch and Local Dispatch programs, and thus available for assignment to trips or Freight Bills. If a Driver is ill or on holidays or has been terminated, clear this checkbox to prevent them from being accidentally assigned to a trip or Freight Bill. |
Active Driver Pay |
Indicates whether the Driver is included in the Driver Pay record information and has GL Accounts setup to handle his Pay information. |
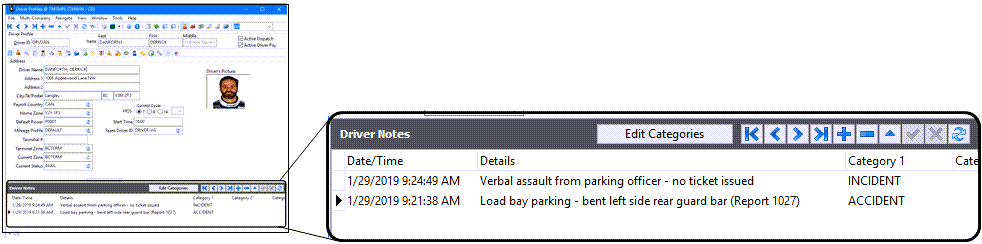
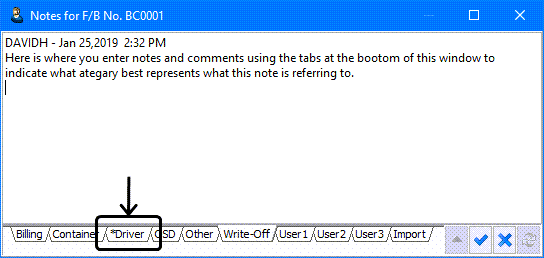
Driver Notes grid
At the bottom of Driver Profile screen is an extra Driver Notes section where you can enter any other relevant data for each driver that can be grouped using your own customizable categories.
To create a driver note in the Driver Notes grid:
-
Click
 Insert on the Driver Notes navigation bar.
 -
Make the appropriate entries to the following fields:
Required field: *
Field Definition Date/Time
Entered automatically by the system when the note is created.
Details
Enter any relevant text regarding this note entry.
Category 1 / Category 2 / Category 3 / Category 4
Double click within these fields to select a Category ID for this Driver. Category ID’s help to define what the Note is referring to, such as an accident involving this Driver, or a Driver status update. The more Categories you add, the more specific the Note becomes.
Number Value / Number Value 2
These number fields can be used for sorting or as extra reference number fields as required.
Reference Number
Enter a reference number for this driver note, (optional).
User
The user who created the note is automatically entered in this field.
Event Date
Double-click within this field to display a Calendar menu where you can select a date for the note entry or event.
Power Unit / Trailer / Customer
Double-click within these fields to select from a pick-list of valid options.
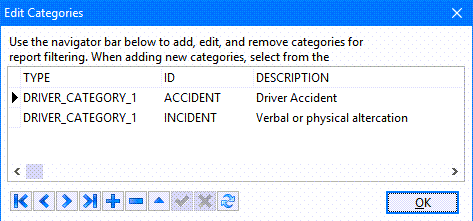
To customize the categories and create specific pull-down option lists for each category on the Driver Notes grid:
-
Click the Edit Categories button.
-
Double-click the TYPE field and select one of the four Category columns.
-
Enter ID values and descriptions to create a custom drop-down list for this category column.
Application Configurator for Driver Profiles
The following Application Configurator options are listed under DRIVERS.EXE.
| Option | Definition | Values |
|---|---|---|
Allow disable Active Driver Pay if Outstanding loan exists |
Allows you to disable active driver pay if driver has an outstanding loan. |
|
CHANGE_EMP_STATUS |
Allows Employee status changes within Driver Profiles. |
|
Combined Name Format |
This option embeds 'L' (Last), 'F' (First) and 'M' (Middle) in a 'Name' string indicating sequence and punctuation (commas, spaces). Examples: 'L, F M' (default) or 'F M L'. |
L, F M (default) |
Damage Deposit Label |
Sets the text that appears as the 'Damage Deposit Label'. You may enter any name required. Default is set at 'Damage Deposit'. |
Damage Deposit (default) |
Enable Insurance Web Services |
The default value for this option is False, in which case the 'Insurance Id' field in Driver Profiles > Details tab is a free text field. If this option is set to True the 'Insurance Id' field becomes read only. If False, the 'Insurance Id' field in Driver Profiles > Details tab is a free text field. If the Insured checkbox is selected in Driver Profiles > Details Tab, the driver’s information will be sent to NAL insurance though the web service accessed using the information set in the next 3 options 'Insurance Web Service Password', 'Insurance Web Service URL' and 'Insurance Web Service User Name' and the value of the 'Insurance ID' field is then auto populated. Any update to any relevant information will also be sent as long as he Insured checkbox is selected. If the Insured checkbox is unchecked, the driver insurance will automatically be discharged. Checking and unchecking the Insured checkbox populates two hidden date fields that can be read using Crystal Reports to track when the driver went on/off insurance coverage. |
|
Insurance Web Services
|
If the 'Enable Insurance Web Service' option described above is set to True, these three options become important and must be set properly to access the NAL insurance web service. Enter the correct URL, user name and password for the NAL insurance web service. |
* Valid web services connection information |
Maximum Days to Apply Shift Template |
The maximum number of days for which a shift template will be applied to a driver. |
Valid positive integer |
Maximum DD |
The number entered refers to the Driver Damage Deposit as shown on the Driver Profile Pay tab. You can enter an amount manually or set this Application Configurator option for a set Driver Damage Deposit as required by your company. |
2500 (default) |
RM User Field 1 - 10 |
In the R&M tab of the Driver Profiles program, you can access ten free format fields by using the <CTRL><U> key combination. The field labels for those fields are edited here. Enter the field label text as you want it to appear on the User Defined Fields form in the R&M tab. |
Text |
User Field 1 - 10 |
In the Container Profiles program, you can access ten free format fields by using the <CTRL> - <U> key combination. You can change the field labels for those fields here. In the Value field, enter the field label you wish to appear on the User Defined Fields form in the Container Profiles program. |
Valid integer |
Security Configuration for Driver Profiles
There are a number of security configuration features associated with the Driver Profiles program.
Security > Business Events > Misc
The following options are available in the Security > Business Events > Misc section of Security Configuration.
| Field | Definition |
|---|---|
Enable Mileage |
Enables user access to the Mileage button within the Driver Profiles program. |
Enable Password Service Setup Button |
Check this option to enable user access to the Setup button within the Driver Profiles program > Passwords tab. |
Can View Driver Licenses |
Check this option to allow users to view the information contained in the CDL #/State/Expiry fields of the Driver Profiles program > Details tab. If this flag is unchecked for a User, that User will see asterisks ('*') in the fields, instead of the actual information. |
Allow Changes of Pay Audit Filter Group |
If checked, this flag will allow the selected user to change and edit the Pay Audit Filter Group. The user can add new Grouping Codes, edit existing ones and delete unwanted Grouping Codes. |
Driver’s SSN/SIN access |
These checkbox options control who is allowed to view and edit the information contained in the SIN/SSN field of the Driver Profiles program > Details tab. Restricted - ensures the number is partially or wholly obfuscated with dots or asterisks. Viewable - allows you to see the entry (unless Restricted, in which case you can only see the last four digits). Editable - allows you to edit the entry (if Viewable and not Restricted). If all three checkboxes are cleared, the SIN/SSN field will behave as if Restricted. |
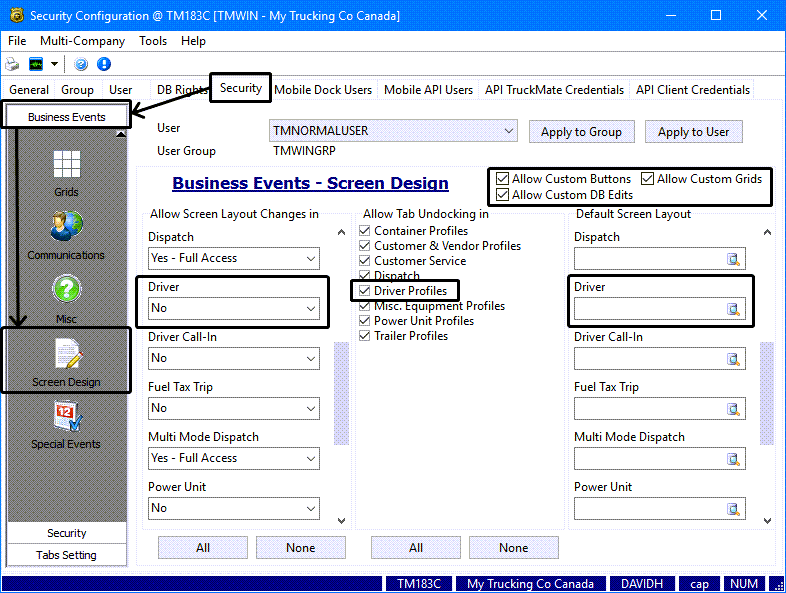
Security > Business Events > Screen Design
The following options are available in the Security > Business Events > Screen Design section of Security Configuration.
These settings control which users are allowed to modify the screen layout, perform the tab undocking function and whether custom grids, buttons and database edits are allowed.
Security > Business Events > Special Events
The following options are available in the Security > Business Events > Special Events section of Security Configuration.
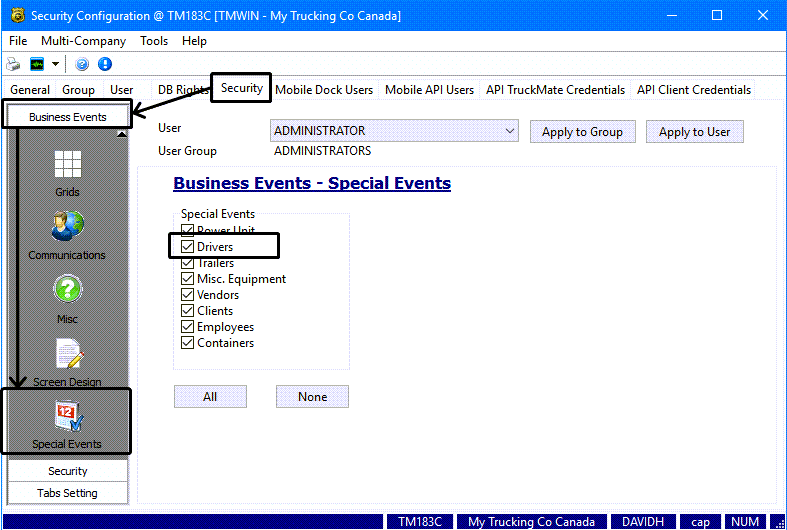
The Special Events tab allows you to set which applications will allow access to the Special Events option in the Tools menu.
Security > Security > Notes
The following options are available in the Security > Security > Notes section of Security Configuration.
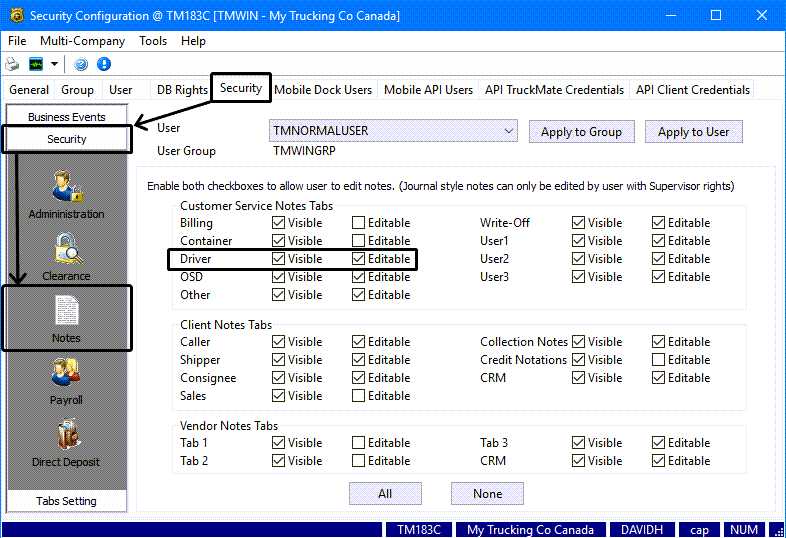
The Security > Notes section allows you to restrict access within the Note windows in the Customer Service and Customer & Vendor Profiles programs and which categories of notes they can view or edit.
Creating a driver profile record
To enter a new driver:
-
In Driver Profiles, on the Address tab, click
Insert from the top left navigation bar. -
Use the View menu or the Tool Bar tab icons to go to each tab and make the appropriate entries.
-
Click
 Post occasionally as you proceed through each tab to save your entries.
| The bare minimum you can enter to create a new driver would be the Driver ID and the Current Zone. The amount of detail and information you enter for a driver profile depends on your company’s specific needs and requirements. |
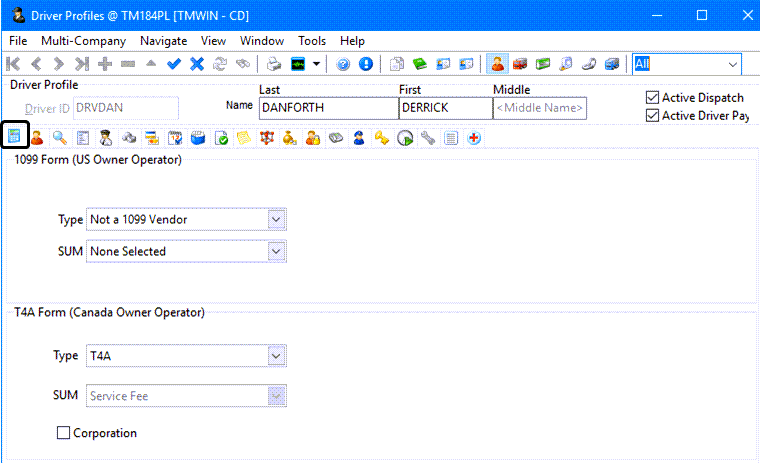
1099 tab
The 1099 Forms tab allows you to configure some of the details that are used by the Payroll and Returns Generator program when creating 1099 Taxation Forms for your Drivers. For more information on 1099s, see the Payroll and Returns Generator program.
Processing 1099’s with Payroll and Returns Generator
The following is only for users who will be generating 1099’s for their Drivers from the Payroll and Returns Generator. If you are planning to continue using the existing 1099 Crystal Reports for your Drivers, the following does not apply to you.
TruckMate allows for non-employee Drivers to be paid by check against their Driver code or by check against a vendor code. If your Driver is already attached to a vendor and the vendor receives the check you may also ignore the following.
1099 processing for Drivers receiving Driver checks requires the following:
-
A vendor Profile must be set up for the Driver in the Customer & Vendor Profiles program.
-
Appropriate values must be filled into the 1099 information area. You must also fill in the Social Security Number for the person receiving the 1099 and their federal identification number into the appropriate boxes.
-
The Driver Profile must now be updated to show the matching vendor code in the vendor code area on the Pay Tab.
-
Do NOT check the Vendor Checkbox. Doing so will affect the way your payroll processes and your Driver pay statement would not work (There is a different pay statement for vendor pay).
-
Do NOT fill information to the 1099 tab. This is not required since the Driver is already matched to a vendor that has the appropriate 1099 information filled in.
Required field: *
Read-only field: §
| Field | Definition |
|---|---|
1099 Form (US Owner Operator) |
|
Type * |
If you are required to provide US 1099 reporting for this driver, select the type of report you need to generate from the drop-down list. |
SUM * |
If you are required to provide US 1099 reporting for this driver, indicate the method by which you want to sum the values in the report. |
T4A Form (Canada Owner Operator) |
|
Type * |
If you are required to provide T4A reporting for this driver, select the type of report you need to generate from the drop-down list. |
SUM § |
Describes the method used by this report will use to sum the values. (Service Fee) |
Corporation |
Indicates if this Canadian Owner Operator is registered as a corporation in Canada. |
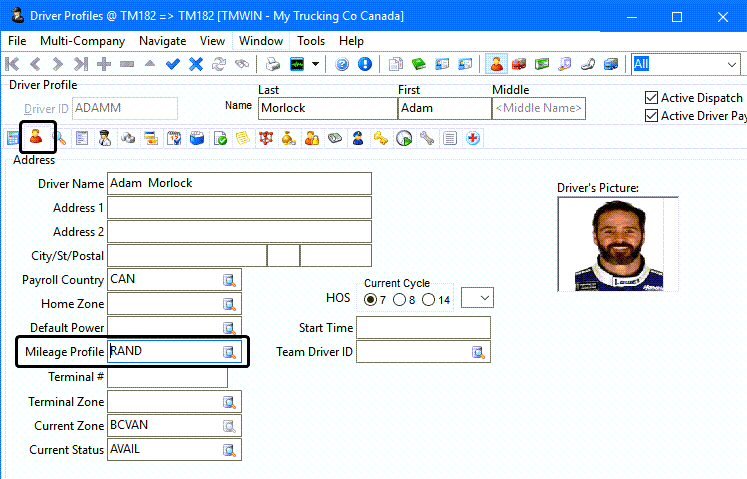
Address tab
The Address tab contains the address information for the selected driver record.

Required field: *
| Field | Definition |
|---|---|
Driver Name |
Definition |
Address 1 / Address 2 |
The Driver’s address. Note: There are two address fields: the second field can be used for cases where a Driver’s mailing address differs from their street address. You should decide on a standard for using the address fields. If you enter the street address in the first field and the mailing address in the second, be sure to follow this method for all Drivers. This will make check formatting easier. |
City / St / Postal |
The Driver’s city, province / state and zip / postal code. These fields can be used to format mailing address details on Driver checks. |
Payroll Country |
Determines the payroll currency to be used by other TruckMate programs with respect to this driver. For example, it identifies the destination currency used by the Direct Deposit program. |
Home Zone |
If the Driver works out of a specific terminal, enter that terminal zone (as configured in the Codes Maintenance program) in this field, or click the search button for a search form. This zone is used by the Driver Check In function in the Dispatch program. |
Default Power |
Can be used to select a power unit code that is, by default, this Driver’s power unit. The Default Power Unit is used by the Driver Check In function in the Dispatch program. When the Driver is checked in, a trip is created. The power unit specified here is also assigned to the trip. This information is displayed in the Driver grid in the Dispatch program. Note: This power unit is not used when manually assigning a Driver to a trip. When assigning a Driver to a trip, the Dispatch program suggests the power unit used by the Driver on his last trip. |
Mileage Profile |
Select a pre-configured Mileage Profile. For information on creating Mileage Profiles, see the Mileage Server Manager program > Configuring Mileage Profiles. The Mileage Profile selected here will determine the method by which miles are assessed for Driver payment purposes. |
Terminal Number / Terminal Zone |
Enter the Default Terminal Zone and or Terminal Number for this particular driver, or use the search button to select a Zone ID from those in your system. |
Current Zone |
This field is only available when you are adding a new record. It is used to record the current location of the Driver, for the purpose of subsequent location updates in the Dispatch program. |
Current Status |
This field allows you to set the selected Driver’s current status to one of the following behavior types in the Codes Maintenance program: 'V' (Available), 'U' (Unavailable), and/or 'O' (Other). |
Hours of Service |
Enter the current Driver cycle: '7', '8' or '14' hours, then select either 'U' (USA) or 'C' (Canada) to select which Hours of Service rules should apply. |
Start Time |
Enter the usual starting time for the selected Driver. |
Team Driver ID |
Select a Team Driver ID for this Driver, if applicable. |
Driver’s Picture |
Double-click in the Driver’s picture area to browse to the location of the Driver’s photo on your PC. You may also right-click the image box and select the 'Add/Change Picture' option. See Adding or changing a driver’s picture for details and specifications. |
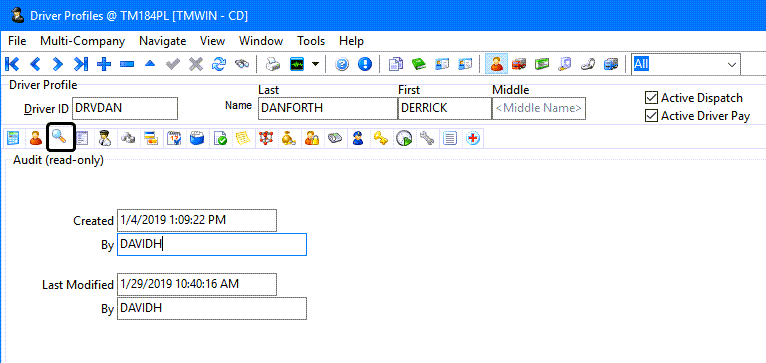
Audit tab
The Audit tab displays read-only data concerning the creation details of the selected driver record. The data displayed here is for informational purposes only.
| Field | Definition |
|---|---|
Created By |
Pre-populates with the date and time this entry was created and the TruckMate Username of the user who created the entry. |
Modified By |
Pre-populates with the date and time this entry was modified, and the TruckMate Username of the user who modified this entry. |
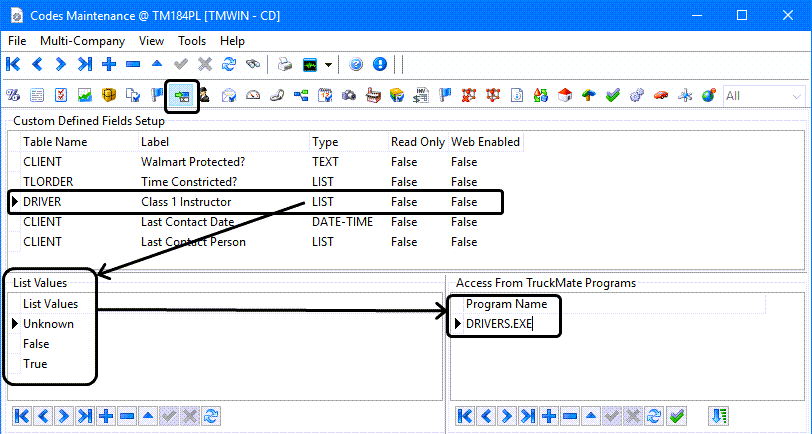
Custom Designed Fields tab
Displays any custom definitions that have been added to the Driver Profiles program.
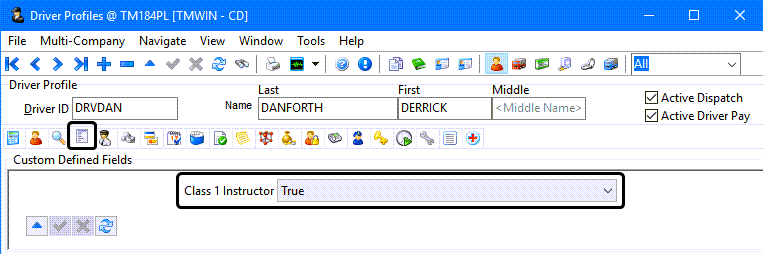
Adding and editing custom defined fields is done in the Codes Maintenance program > Custom Defined Fields tab.
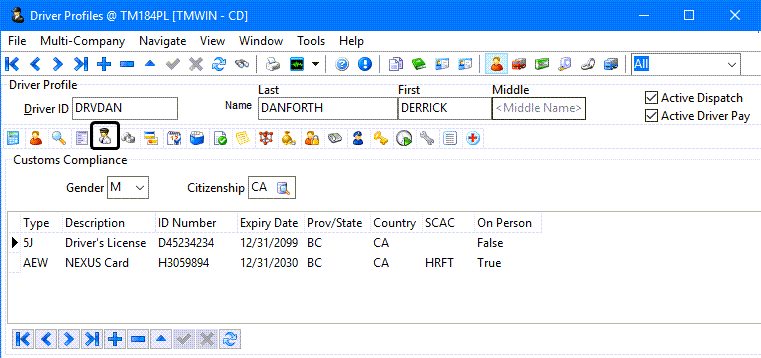
Customs Compliance tab
Used to configure the ACE (CBP) US Customs Compliance data for the selected Driver.
Required field (if a Customs Compliance grid entry is created): *
| Field | Definition |
|---|---|
Gender |
Use the pull down menu to select either 'Male' (M) or 'Female' (F). |
Citizenship |
Click the search button to select a Citizenship code from those available on your system. |
Type * |
Double click this field to select as Customs Type ID from those available on your system. |
Description * |
This field should automatically populate based on the 'Type selected above. If not, enter a brief description of the Type value in this field. |
ID Number |
Enter the selected Driver’s Customs ID number in the space provided. |
Expiry Date * |
Double click this field to select a date from a Calendar menu. |
Prov / State |
Double click this field to select a Province / State Zone code. |
Country |
Double click this field to select a Country code for this Driver. |
SCAC |
Enter this Driver’s Standard Carrier Alpha Code, defined by the National Motor Freight Traffic Association, which is sometimes required when crossing into the US. |
On Person * |
The 'On Person' field specifies if the Driver has on his person all the documents required to make a successful border crossing (birth certificate, passport, etc.). Double click this field to set the value to 'True' or 'False'. |
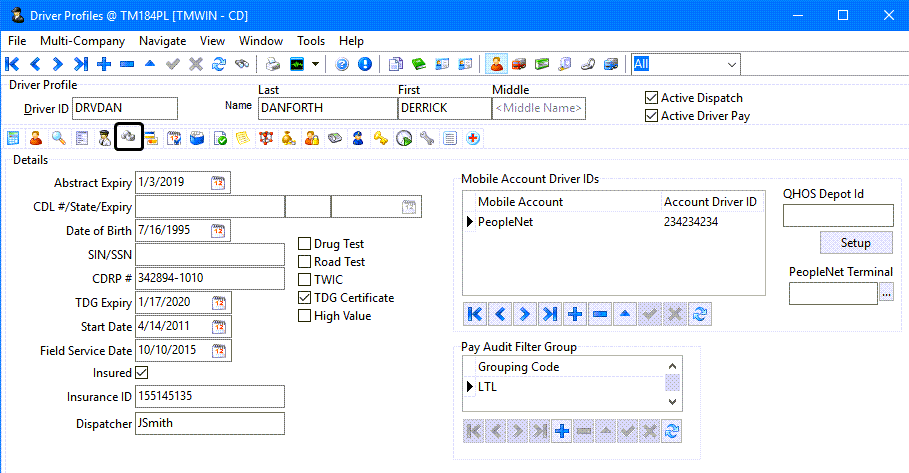
Details tab
The Details tab contains further details specific to the selected Driver, such as driver licensing information.
| Field | Definition |
|---|---|
Term |
Definition |
Abstract Expiry Date |
If your company requires a driver abstract, enter the expiry date here or click the Calendar button to select the date from a calendar menu. |
CDL #/State /Expiry |
Enter the Driver’s license number, the State or Province of issue and the expiration date of the driver’s license. Double-click the field to the right to select a Province / State from a list of valid options. The driver’s license and expiry date fields are displayed in the Drivers grid of the Dispatch program. When license renewal is overdue, the date is displayed in green text with a grey background. |
Date of Birth |
Enter the Driver’s birth date in this field or click the Calendar button to select the date from a Calendar menu. This field is used for reporting and information purposes only. If the driver is paid through the payroll module, you must enter a birth date for the driver when you create the payroll record in the Employee Profile program. The Birth Date record in the Employee Profile program will not be updated by changes to this field. |
Social Insurance Number / Social Security Number |
Enter the 9-digit number. This is for informational and reporting purposes only, and is not used elsewhere in the system. For drivers who are paid through the Payroll Module, Social Security numbers are also entered in the Employee Profile program. |
CDRP# |
Enter a CDRP (Commercial Driver Registration Program) number as required by Canada Customs and Revenue Agency. Once you enter a CDRP# for a Driver, then shipments requiring a CDRP driver will proceed. Any CSA shipments matched to a driver that does not have a CDRP# will result in a warning message being displayed in the Dispatch program. The CSA (Customs Self-Assessment) program provides CSA Importers with the benefits of a streamlined accounting and payment process for all imported goods. The CSA program also provides CSA Importers, CSA Carriers, and registered Drivers with the benefits of a streamlined clearance option for CSA eligible goods. The streamlined clearance option eliminates the requirement for any transactional transmissions of data related to eligible goods, allowing for the clearance of goods based on their identification as CSA goods and the presentation of the CSA Importer’s Business Number, the CSA Carrier Code, and registered driver identification at the border (called 'Commercial Driver Registration Program (CDRP)'). The signed delivery receipt will be proof of Canada Customs release for a CSA shipment. This information is taken from the CRA website located at: |
TDG Expiry |
TDG is the standard abbreviation for Transportation of Dangerous Goods. Enter the expiry date in the field provided or click the Calendar button to select the date from a Calendar menu and ensure the TDG Certificate checkbox is selected. |
Start Date |
Enter the date that the driver started working for your company in this field or click the Calendar button to select the date from a Calendar menu. This field is used for reporting and information purposes only. If the driver is paid through the payroll module, you must enter a start date for the driver when you create the payroll record in the Employee Profile program. The Start Date record in the Employee Profile program will not be updated by changes to this field. |
Field Service Date |
Enter the date for Field Service in this field or click the Calendar button to select the date from a calendar menu. |
Insured |
Select this checkbox to indicate if this driver is insured. If the 'Enable Insurance WebServices' application configuration option in Utilities > Application Configurator > Drivers.EXE is set to True, selecting this checkbox will send the driver’s information to NAL insurance via a web service. Any update to any relevant information will also be sent as long as the 'Insured' chick box is selected. If the 'Insured' chick box is unchecked, the driver insurance will automatically be discharged. Checking and unchecking the 'Insured' chick box, populates two hidden date fields that can be read using Crystal Reports to track when the driver went on/off insurance coverage. |
Insurance ID |
Enter the insurance policy number or ID value. This field is a free text field by default. However, If the 'Enable Insurance Web Services' application configuration option in Utilities > Application Configurator > Drivers.EXE is set to True, this field becomes read only and will be populated when the driver’s information is sent to NAL insurance via web service. This action takes place if the 'Insured' field described above is selected, while the 'Enable Insurance Web Services' application configuration option is set to True. |
Dispatcher |
Enter the name of the Dispatcher normally associated with or assigned to dispatch this driver. |
Drug Test |
Select this checkbox to indicate if a drug test is required |
Road Test |
Select this checkbox to indicate if a road test is required. |
TWIC |
Select this checkbox to indicate if this driver has a TWIC certificate. The Transportation Worker Identification Credential, also known as TWIC(r), is required by the Maritime Transportation Security Act for workers who need access to secure areas of the nation’s maritime facilities and vessels. |
TDG Certificate |
Select this checkbox to indicate if this driver has a Transportation of Dangerous Goods certificate. (Enter the expiration date in the TDG Expiry date field.) |
High Value |
Select this checkbox to indicate if this driver is allowed to handle High Value loads and is available for the Dispatch program to assign them to High Value loads. |
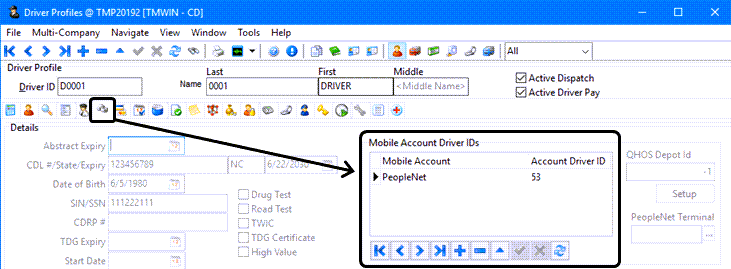
Mobile Account Driver IDs |
The Mobile Account Driver IDs information is only used by the PeopleNet and Omnitracs mobile solution provider platforms. It is used to connect the mobile device Driver Account ID to the TruckMate Driver ID for interpreting mobile device data for Hours of Service and driver pay hours. The information here is independent from the Device ID / Driver ID information setup in the Mobile Device Maintenance program. |
Pay Audit Filter Group |
This section is only available to users with the security permission to change the 'Pay Audit Filter Groups' set in Security Configuration > Business Events > Misc > Driver Profile > Allow Change of Pay Audit Filter Group. The Grouping Code field is used for filtering the Drivers that can be viewed in the Payments Audit program based on their 'Grouping Code' by different users. The value entered for this field is used in Security Setup > Security > Business Events > Miscellaneous > Pay audit tab to allow specific users to view groups of drivers. If a user does not have any grouping codes defined then that user can view all drivers regardless of their grouping codes. On the other hand, any user with defined grouping codes can only view drivers that belong to those grouping codes. |
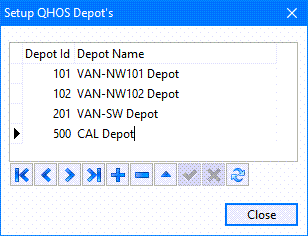
QHOS Depot ID (Omnitracs) |
Double-click this field to assign an Omnitracs depot ID to the selected driver. Omnitracs Hours of Service functionality requires that Drivers be associated to a Depot (as defined using the Omnitracs software). The Omnitracs client web site allows you to specify many depots with individual drivers associated to a specific depot. |
Setup |
The Setup button displays an entry window where you can add/edit/delete QHOS Depot ID codes for use with the 'Depot ID' field.
Note: This button may not be accessible, depending on the Users Security Access Level. |
PeopleNet Terminal ID |
Use the |
Direct Deposit tab
The Direct Deposit tab is used to indicate that a non-payroll Driver is paid by a direct deposit to his bank account, and to provide the details of their bank account.
| If a driver is paid through the TruckMate Payroll programs (i.e., 'Payroll' is selected as the 'Pay Type' on the Pay / Remuneration tab), the Direct Deposit fields in the Employee Profile program must be filled in instead. |

Required field: *
| Field | Definition |
|---|---|
Direct Deposit |
Select this checkbox to indicate this Driver is paid by direct deposit. When the Driver Pay Statements program is run, and a check entry is generated for this driver, the check number will be 'DIRECT DEPOSIT', and will not display in the Check Printing program (although the check entry can be viewed in the Instant Checks program). It is not necessary to print checks for Direct Deposit payments; they will be updated by the A/P Check Register program without printing. |
Priority |
Enter the type of priority here. Each priority number refers to a particular bank account. For example, you could prioritize depositing a specific amount to the bank of first preference, and then the remainder of your pay amount to a bank of your second preference. You can change these settings at any time. |
Bank |
Enter the name of the driver’s bank. The bank that handles the direct deposit export file will provide you with a list of formats for bank names. Enter the driver’s bank name in the format required by this bank. Note: If you are using a Canadian Payments Association bank account, see Users with Canadian Payments Association Accounts. |
Account |
Enter the driver’s bank account number. |
Transit |
In order to process a direct deposit, you must export the transit number from the Driver’s bank branch. Enter the number in this field. Note: If you are using a Canadian Payments Association bank account, see Users with Canadian Payments Association Accounts. |
Type |
Enter 'C' for a chequing account, 'S' for savings account or 'D' to deposit the funds directly to a T-Chek Fuel Card. Double-click this field to access a selection menu. |
Minimum |
Enter a minimum dollar amount that must be deposited to that account each pay. Minimum can be whatever dollar amount you specify. |
Percent |
Enter the percentage paid to the driver. This field allows you to divide your pay amount by set percentages. (Total percentages must equal 100%.) |
Country |
Enter the driver’s country of residence/employment by double-clicking this field to display a selection list window. For example, select 'CAN' for Canada, or 'US' for the United States. This field will default the currency that will later be used to pay the driver. |
Status |
An 'A' for active will appear automatically once you input your Driver’s bank account information. You can change the status to 'I' for inactive if need be by double-clicking the field to access a selection window. |
GL Account |
This is a required field when entering Direct Deposit entries for drivers. The GL Account selected here should be the bank used to pay the Driver. Entering several records with the same GL Account field value allows you to pay Drivers using multiple currencies. |
ABA Indicator |
Use this field to indicate the EFT (Direct Deposit) export type functionality for ABA (Australian Bankers Association. |
Users with Canadian Payments Association Accounts
The format required for Canadian Payments Association (CPA) Bank Accounts differs somewhat from the standard way of setting up Direct Deposit information. The CPA requires a nine-digit Transit number, which includes the value that normally should be entered in the 'Bank Name' field in the 'Bank Transit #' field.
-
The 'Bank Transit #' field must be a total of 9 digits for CPA (Bank ID = 4, transit = 5). If the 'Bank Name' is only 3 characters, prefix it with a '0' (zero).
-
Once you have set up your 'Bank Transit #' field correctly, you must also delete any information that is in the 'Bank Name' field- it must remain blank.
Drivers Days Off tab
The Driver Days Off tab is used to define regularly scheduled and unscheduled days that particular Drivers are unable to work.
Use the Filter By Year drop-down menu to display the days off for a particular Driver ID within one specific year.
When you ![]() Insert a new days off entry for this driver, the Driver, Date Off and Id field will contain default values.
Insert a new days off entry for this driver, the Driver, Date Off and Id field will contain default values.
Required field: *
| Field | Definition |
|---|---|
Driver * |
Driver ID is automatically populated. |
Date Off * |
Double-click this field to use the calendar window to select a date. |
Activity Code * |
Indicate whether this day off is scheduled or unscheduled. |
Comment |
Enter any additional notes. |
Id * |
Automatic system generated number. |
Fuel Card Mapping tab
The Fuel Card Mapping tab displays the Fuel Cards attached to the selected Driver and some of their details.
The Driver Profiles > Fuel Card Mapping tab is displaying (and allowing you to edit) the same data as the Import Data Lookup/Conversions window accessed within the Fuel Card Data Import program > Tools menu > Lookups.
Licensing Notes tab
Licensing information can be viewed in the Dispatch program by selecting the Licensing option from the right-mouse menu in the Driver grid. To set up a warning for License expiration, use the Special Events program. General, free format notes about the Driver’s License can be entered in this section.
Notes tab
General Free Format Notes about this Driver can be entered in this field. This field is for reference and reporting purposes only.
Optimization Preferences tab
Allows you to record some miscellaneous information for this Driver.
| Field | Definition |
|---|---|
Enabled for Optimization |
Select this checkbox to enable the settings on the Optimization Preferences tab. |
Seniority |
A free-format 10 character field used to store a code to indicate the seniority of the Driver. Even though this field is a free format field, you can use the find button to display and select from previously entered values for better consistency. This field is also displayed on the Pay / Remuneration tab and on the Driver grid in the Dispatch program. |
Preferred Start |
Use the pull-down arrow to enter driver’s preferred start day of the week. |
to |
Use the pull-down arrow to enter driver’s preferred ending day of the week. |
Able to Start |
Use the pull-down arrow to enter Driver’s 'Able to Start' day of the week. |
Prefer Multi-Stop |
If the driver prefers to Multi-stop runs, place a checkmark in the box provided and select the preferred locale using the search button. |
Prefer Handling |
Place a checkmark in the box provided if this driver prefer handling the goods. |
Prefer Outbound / Inbound Pairs |
Place a checkmark in the box provided if this driver prefers either Inbound or Outbound pairs. |
Allow Dangerous Goods |
Place a checkmark in the box provided if this driver will allow dangerous goods. |
Region 1 / Region 2 / Region 3 |
Use the search button to select preferred Regions for this Driver. |
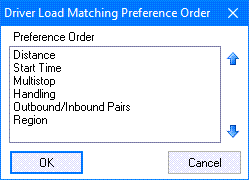
Order |
Selecting the Order button will bring up a Driver Load Matching Preference Order window where you can set the order preference sequence for this Driver.
Highlight a record and use the |
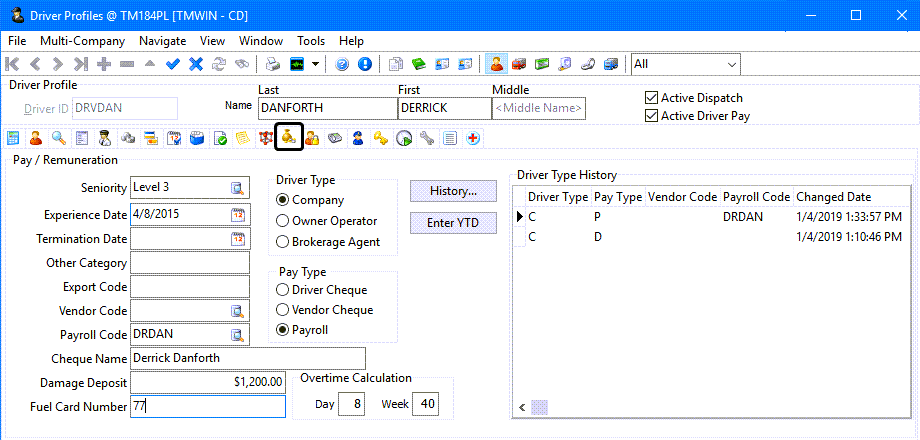
Pay / Remuneration tab
Allows you to enter information regarding how each driver is paid.
| Field | Definition |
|---|---|
Seniority |
A free-format 10 character field used to store a code to indicate the seniority of the Driver. Even though this field is a free format field, you can use the find button to display and select from previously entered values for better consistency. This field is also displayed on the Optimization Preferences tab and on the Driver grid in the Dispatch program. |
Experience Date |
This is a free format date field used for reporting and information purposes only. For example, you could enter the length of time a driver has held his Class 1 license in this field. |
Termination Date |
If the driver no longer works for your company, enter their termination date. |
Other Category |
A free-format 10 character field used as a custom category. This field is displayed in the Driver grid in the Dispatch program. Entries here will also appear in the Driver Pay Statements program when you select the search button, and in the Driver Pay Audit program > Get Loans Deduction window, which allows you to filter records by this value. |
Export Code |
If you export billing information to a third-party product, you can enter that product’s corresponding driver code associated with this driver. |
Vendor Code |
If this driver is also a vendor (for example, an interliner) you can enter the corresponding vendor code or display a search form by clicking the search button. Vendors are configured in the Customer & Vendor Profiles program. This field is displayed in the Driver grid in the Dispatch program. Payments made to this driver through the Driver Pay module will not have any effect on the vendor’s account (for example, they will not be displayed in the Invoice grid of the A/P Inquiry program for the vendor). |
Payroll Code |
If this driver is a company employee and paid through the Payroll Module, select the employee code (as configured in the Employee Profile program) from the search form using the search button. Only employee codes that are of the Pay Class 'Driver Pay' (as configured on the Pay Information tab of the Employee Profile program) will be available for selection. |
Cheque Name |
If a name other than the Driver Name should appear on the driver’s check, enter that name here. Note: This name will only be used if the Driver’s Pay Type is set to Driver Check, not Payroll Check or Vendor Check. |
Damage Deposit |
Enter the Damage Deposit amount for this Driver, if applicable. |
Fuel Card Number |
Enter the Fuel Card Number for this Driver, if applicable. This number is for informational purposes only and is saved to the 'FT_FUEL' table (and the 'CARDIMPORT_LOG' table that is used to produce the Cardimport Log file, if this option is selected in the Card Data Import program). |
Driver Type |
Indicate whether the driver is employed by your Company, is an Owner Operator or a Brokerage Agent. This information is displayed in the Driver grid in the Dispatch program. Also, in the Driver Pay Audit program, you can select drivers based on whether they are:
Note: 'Brokerage' drivers also have the ability to be selected as a 'Sales Agent' or 'Dispatch Agent' in the Customer Service program > Summary tab (as long as the 'Sales Agent' option in the Application Configurator program > CSERV.EXE is set to 'D'). If chosen as either a Sales or Dispatch Agent, the Driver’s Pay Contract (as configured in the Driver Pay Contract program) will automatically be applied as the Agent Fee. |
Pay Type |
Select the method by which you want to pay the Driver.
|
Overtime Calculation |
Enter the minimum number of hours per day and per week required before additional time worked is considered as overtime. |
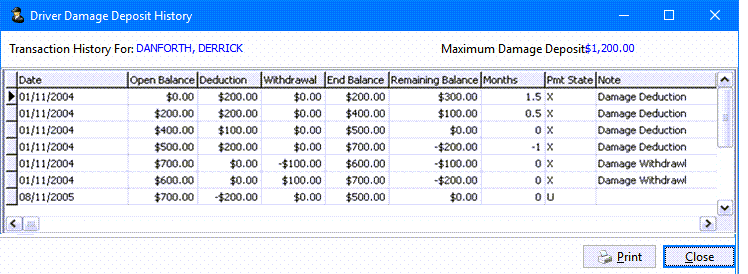
History |
Clicking the History button will bring up the Driver Damage Deposit History window where you can review Damage Deposit History information for this particular Driver:
The details for this Grid will be automatically populated if the current Driver has any Damage Deposit transactions. |
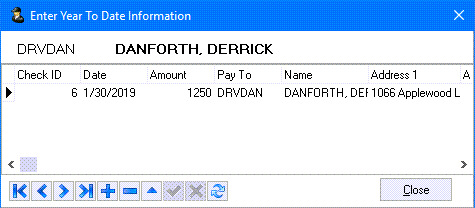
Enter YTD |
Clicking the Enter YTD button will display the Enter Year to Data Information window where you can enter 'Year to Date' check information for the current Driver.
Clicking |
Driver Type History |
The Driver Type History grid gives you a summary listing of 'Pay Type' and various other changes over the history of a driver’s employment. |
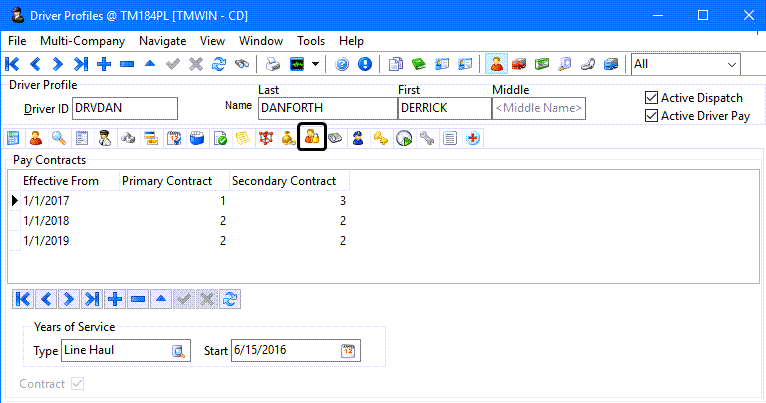
Pay Contracts tab
The Pay Contracts tab is used to assign driver pay contracts to drivers and to indicate when the contract will be in effect. You can also assign a secondary contract.
Contracts are configured using the Driver Pay Contracts program and are used to configure the rules for automatic payments for Drivers. Payments are generated as activity occurs in the Dispatch program.
Required field: *
Read-only field: §
| Field | Definition |
|---|---|
Effective From * |
Enter the date that this particular Driver will begin using this contract. |
Primary Contract * |
Refers to the contracts created in the Driver Pay Contracts program. The code selected will determine the rules by which the Driver is paid. The numerical value of the contract code is displayed in the Contract ID field; in the search form (accessed by clicking the search button), both the numerical code and the contract description are displayed. |
Secondary contract refers to a second pay contract (as configured in the Driver Pay Contracts program), and this contract will be in effect only for the duration of an assigned trip if designated as such. In the Multi Mode Dispatch and Dispatch programs > Trip Grid, the dispatcher can change the value in the Secondary Contract field to True, which will result in Driver pay calculations being based on the contract number specified in this field for this driver. |
|
Years of Service |
|
Type |
Click the A Service Type is associated with each contract and is configured using the Contract Details tab on the Driver Pay Contracts program. Service Type is used to group similar contracts and is often used in conjunction with Years of Service to reflect different pay grades based on seniority. |
Start |
Click the |
Contract § |
This read-only checkbox flag indicates whether a contract is currently in place with this driver. |
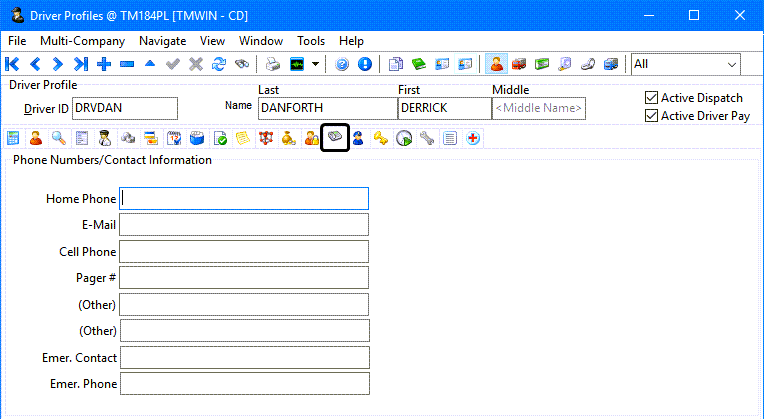
Phone Numbers/Contact Information tab
The Phone Number / Contact Info tab allows you to enter miscellaneous contact information regarding your Drivers.
| Field | Definition |
|---|---|
Home Phone |
Enter the Driver’s phone number, including area code. |
Enter the Driver’s e-mail address. Data must be entered in standard e-mail address format, i.e., '[email protected].' |
|
Cell Phone |
Enter the Driver’s cell phone number, including area code. |
Pager Number |
Enter the Driver’s pager number, including area code and extension number. |
(Other) |
Enter any other relevant Driver phone numbers. For example, vacation house, parent’s, etc. |
Emer. Contact |
Enter the name of the emergency contact person to be notified in case of an emergency involving the Driver. |
Emer. Phone |
Enter the telephone number, including area code, of the emergency contact. |
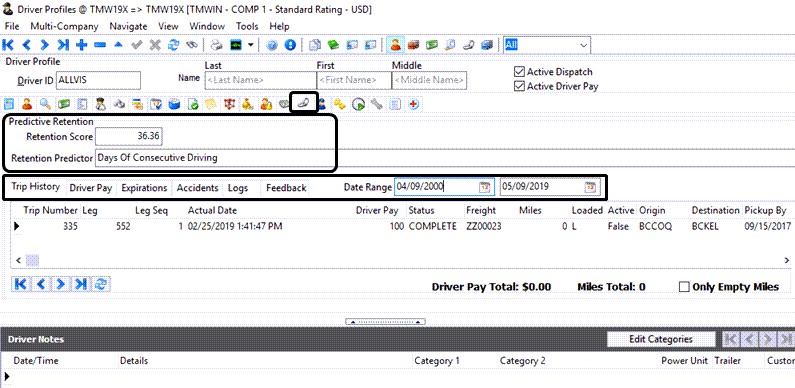
Predictive Retention tab
The Predictive Retention tab displays key driver metrics and a calculated summary score value using precision analytics and regulatory compliance services data provided by Vusion (a Trimble company). This information is regularly refreshed on a scheduled basis using the Driver Retention Windows service to help you identify drivers at risk of leaving the company so you can retain your drivers and avoid the costly recruitment/training process for new hires.
|
This feature requires that you contact and set up an account with Vusion.
|
Vusion specializes in data analytics for trucking companies; providing operational metrics to help fleet management make better, more predictive decisions about equipment, vehicles and people using proprietary modeling technology.
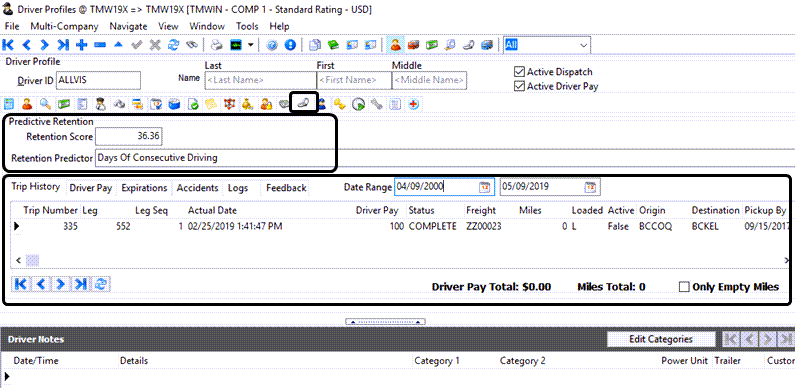
This information is used by the TruckMate Dispatch and Multi Mode Dispatch programs to alert the dispatcher if they try to assign an "at risk" driver with a high driver retention score to a trip.
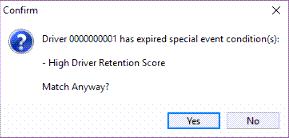
The Retention Score column in the Drivers grid for the Dispatch and MultiMode Dispatch programs allows the dispatcher to see the current retention score of the driver before assigning a driver to a trip and assess the high driver retention score warning message.
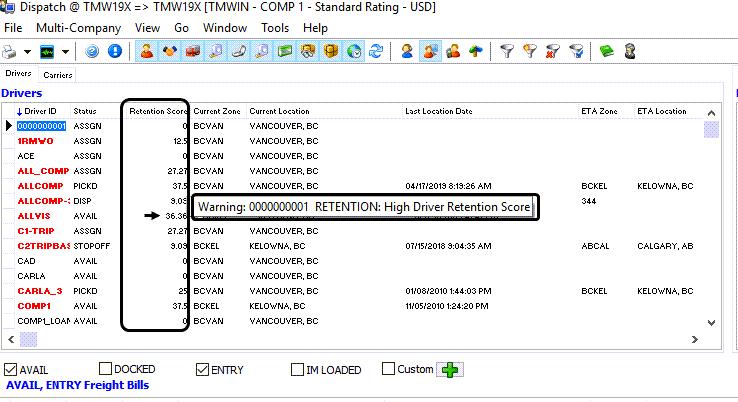
The retention score is a single point summary for dispatchers to see if a driver is at risk of leaving and to assess which trips, (if any), should be assigned. This value is calculated by the Vusion data analytics application.
-
High retention score indicates a driver at risk of leaving.
-
Low retention score indicate a more contented driver.
The Retention Predictor field indicates the predictor that is most influential on the Driver’s Predictive Retention Score. This entry is determined and supplied to TruckMate by the Vusion data analytics application.
The key metrics and relevant data associated with the driver’s trip history, driver pay, expiration, accidents, and HOS etc are displayed in the sub-tabs. The Feedback sub-tab provides a way to record some internal notes regarding the driver’s status and any insights.
By selecting the start and end date in the Date Range fields, you can limit or expand the results. By default, the start date is set to reflect the last 30 days.
The TruckMate Command Center > .Drvr Rtn KPI page provides a convenient way to view a summarized grid view of the driver retention data. See Viewing Driver Retention results in Command Center.
| Using the Driver Profile > Predictive Retention tab requires that the Driver Retention Windows service is installed, configured and running. See Setting up Driver Retention Windows Service. |
All sub-tabs have their own navigation bars and all are read-only grids (except Feedback). You can add a new record into the Feedback sub-tab but no editing or deleting is allowed once the entry is saved.
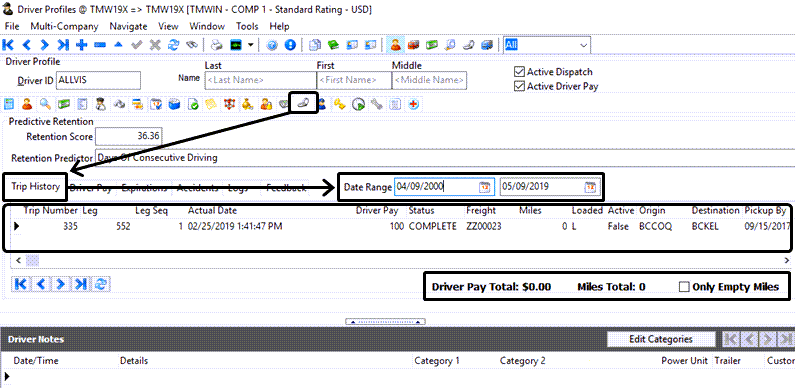
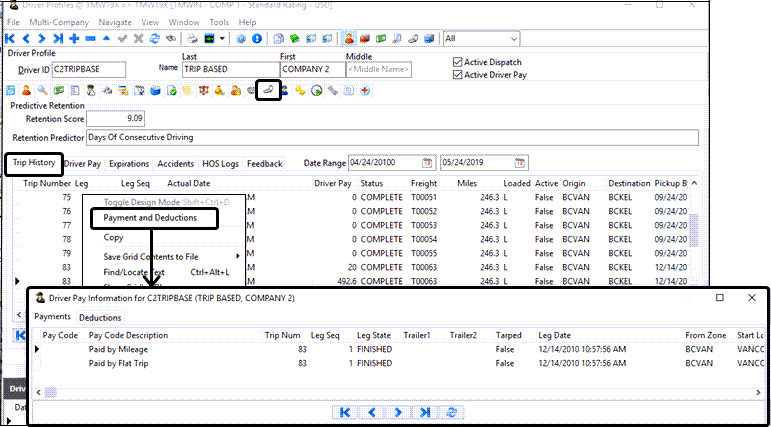
Predictive Retention > Trip History sub-tab
The Trip History sub-tab displays basic details and summary information such as freight bill, miles, empty miles, origin/destination, dates, and driver pay related to the set of trips that fall within the Date Range.
Use the Only Empty Miles checkbox to filter the data to display only the trips associated with empty miles.
Payment and Deduction details
Right-click and select Payment and Deductions from the shortcut menu to view the details for the selected trip. (This is view only. No payment or deductions can be added here.)
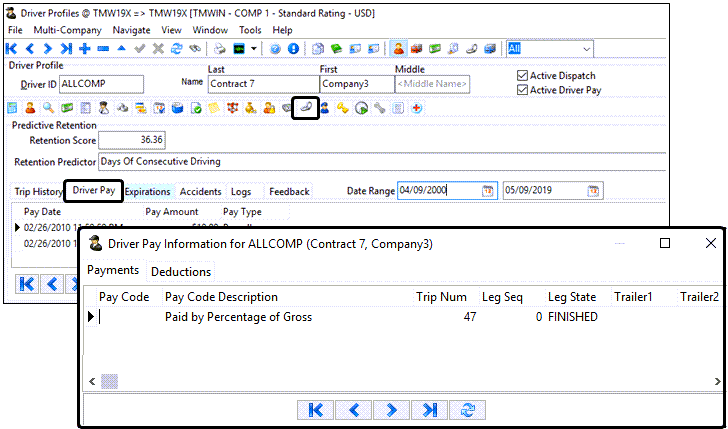
Predictive Retention > Driver Pay sub-tab
The Driver Pay sub-tab displays basic summary information such as the pay date, pay amount, and pay time, (driver pay or payroll), related to the set of trips that fall within the Date Range.
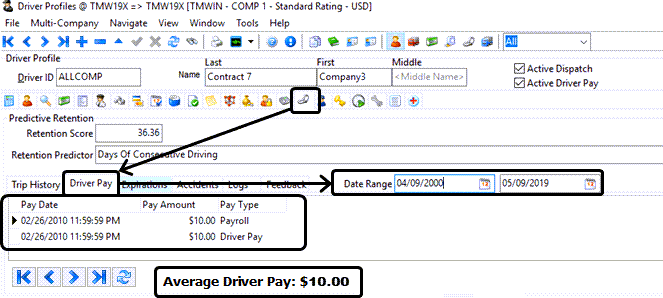
Payment and Deduction details
Right-click within the Driver Pay grid and select Payment and Deductions from the shortcut menu to view the details for the selected trip. (This is view only. No payment or deductions can be added here.)
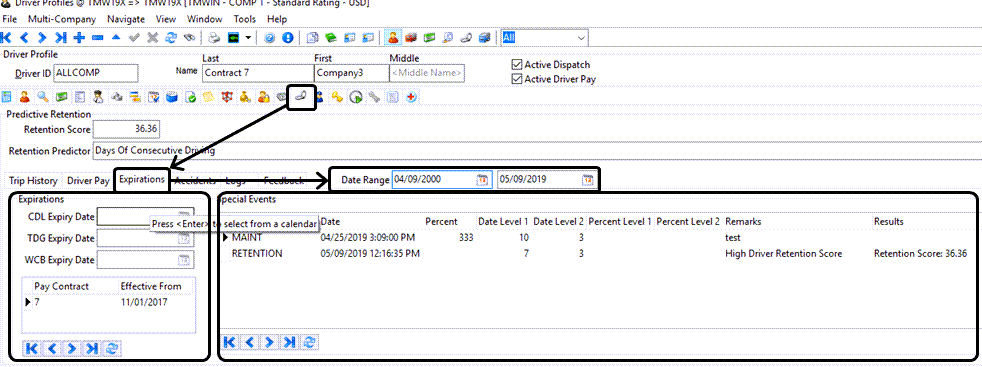
Predictive Retention > Expirations sub-tab
The Expirations sub-tab displays information related to expiry dates for key certifications and other entries that fall within the Date Range.
You can view all special events for this driver, in addition to driver license expiry, TDG Expiry, WCB expiry, and the TruckMate pay contracts for this driver.
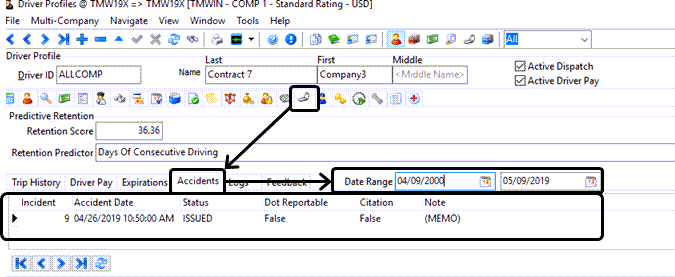
Predictive Retention > Accidents sub-tab
The Accidents sub-tab displays driver accident entries that fall within the Date Range.
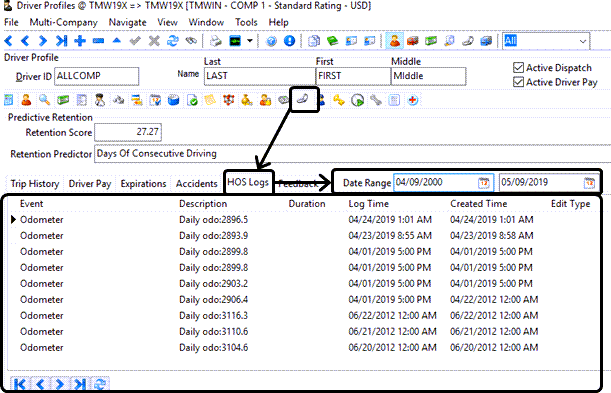
Predictive Retention > Logs sub-tab
The HOS Logs sub-tab displays the driver’s hours of service logs that fall within the Date Range.
Predictive Retention > FeedBack sub-tab
The FeedBack sub-tab allows you to record some comments or other insights regarding the driver’s score and situation by clicking ![]() Insert to add a new entry to the grid. You can also view historical notes where the Created Date falls within the Date Range.
Insert to add a new entry to the grid. You can also view historical notes where the Created Date falls within the Date Range.
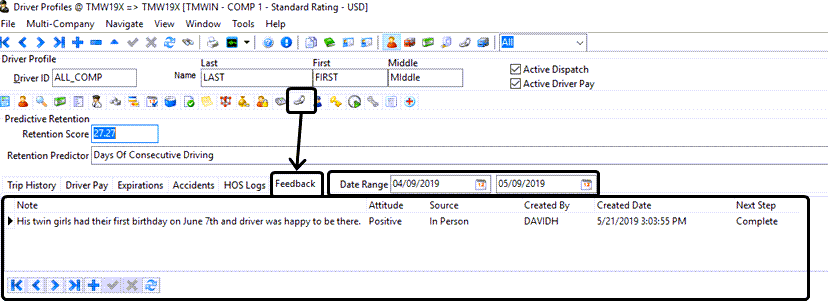
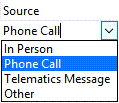
There are drop-down list for Attitude, Source and Next Step.

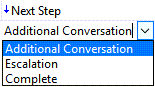
Next Step is a free form field and will allow you to enter select one of the existing entry options or enter your own text.
Predictive Retention > Creating a new Feedback note
-
Go to Profiles > Driver Profiles > Predictive Retention tab.
-
Go to the driver’s profile.
-
Go to the Feedback sub-tab.
-
Click
Insert to add a new note text entry for this driver.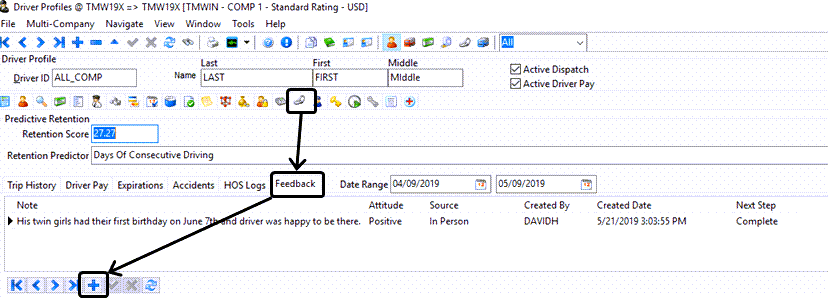
-
Enter your notes and comments.
-
Click
Post.
Predictive Retention > Safety (Incident Information) tab
The Safety tab lists any entered Safety Incident information that exists for the selected driver. This read-only information is automatically populated using data from the Safety & Compliance program.
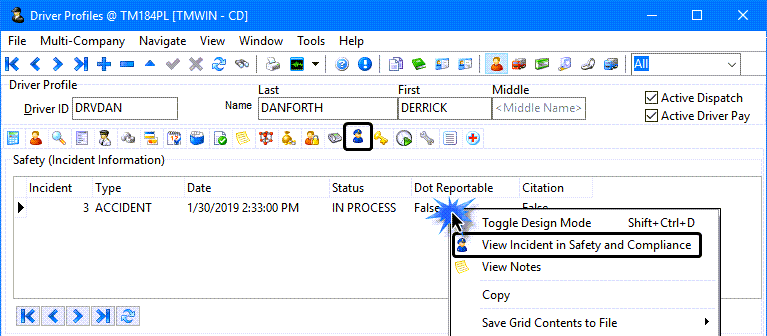
You can right-click any record in this grid and select View Incident in Safety and Compliance to open the Safety & Compliance program and view all the incident details.
All fields are read-only.
| Field | Definition |
|---|---|
Incident |
Displays the Safety & Compliance program ID number for this event. |
Type |
Displays the type of incident as defined in the Safety & Compliance program. |
Date |
Displays the date this incident occurred. |
Status |
Displays the current status for this incident. |
DOT Reportable |
Displays whether this incident was deemed to require Department of Transportation notification. |
Citation |
Displays whether this incident was associated with a legal citation. |
Service Passwords tab - Field definitions
The Service Passwords tab allows you to configure and maintain the login passwords associated with some of the specific TruckMate services that require a separate password, independent from the TruckMate login and this password needs to be match the information entered here.
For example, if you are using PeopleNet Fleet Manager, certain interactions with this software application will require the driver to log in. The login information entered by the driver must match what is setup for PeopleNet Fleet Manager on their Driver Profile.
Note: Access to this tab is controlled using configuration settings in the Security Setup program > Security > Tabs Setting section for Driver Profiles.
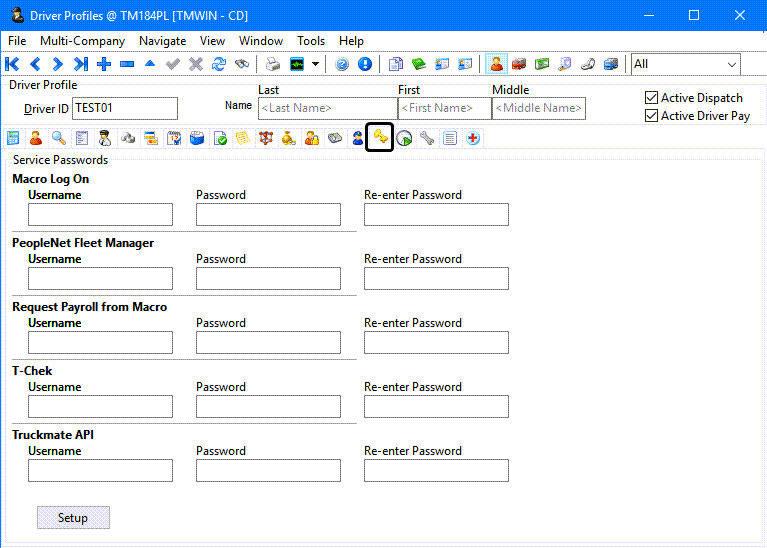
To set up or edit the driver’s password information, click the Setup button to open the Setup Password Services window.
(The details regarding the configuration for each service code type are described as part of the setup and configuration instructions for that service.)
Note: Access to this button depends on a setting in the Security Configuration program > Security > Business Events > Misc tab.
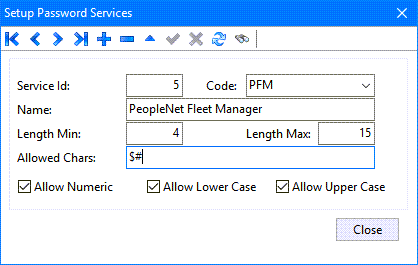
| Field | Definition |
|---|---|
Service ID |
This field is automatically generated when you generate a new record. |
Code |
Use the drop-down menu to indicate which service this password code applies to. For example:
|
Name |
Enter a descriptive name for this Password Service Code. |
Length Min |
The integer value entered here will control the Minimum Length that the Password for this Password Service Code must be. |
Length Max |
The integer value entered here will control the Maximum Length that the Password for this Password Service Code can be. |
Allowed Chars: |
Enter any 'special' characters that you wish to allow as valid Password character values. These could be, but are not limited to, values such as the following: '#', '$', '%', etc. |
Allow Numeric |
Select this checkbox if you wish to allow numerical values as password characters. |
Allow Lower Case |
Select this checkbox if you wish to allow lower case text values as password characters. |
Allow Upper Case |
Select this checkbox if you wish to allow upper case text values as password characters. |
Shift Management tab
The Shift Management tab is used to create shifts for each individual driver. It also allows you to create and edit the shift templates used to create the shifts.
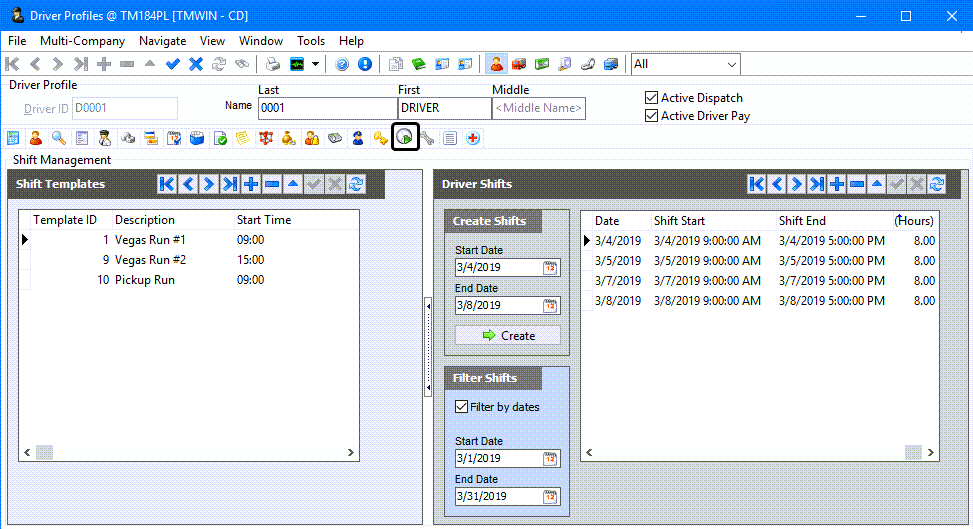
The ability to create shifts using a cycle setup (e.g., Day 1=yes, Day 2=yes, Day 3=No, Day 4=Yes) is unique to this tab and is not available on the Tools menu > Create Shifts > Create Driver Shifts window.
See:
| Driver shift information is used by the IDSC Match Advice Optimization feature used to match drivers to freight bills. |
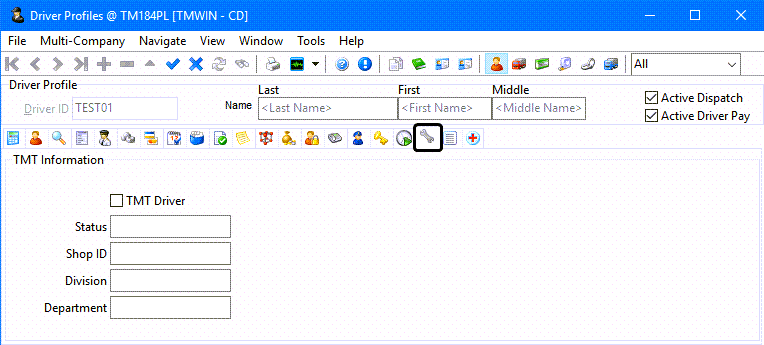
TMTInfo tab
The TMT Information tab is used to display some basic driver information as it relates to the TMT Fleet Maintenance program.
The TMT Fleet Maintenance management program is a separate software application that helps your vehicle repair and maintenance shop operations minimize downtime, control repair costs and provide the service needed to keep your fleets productive.
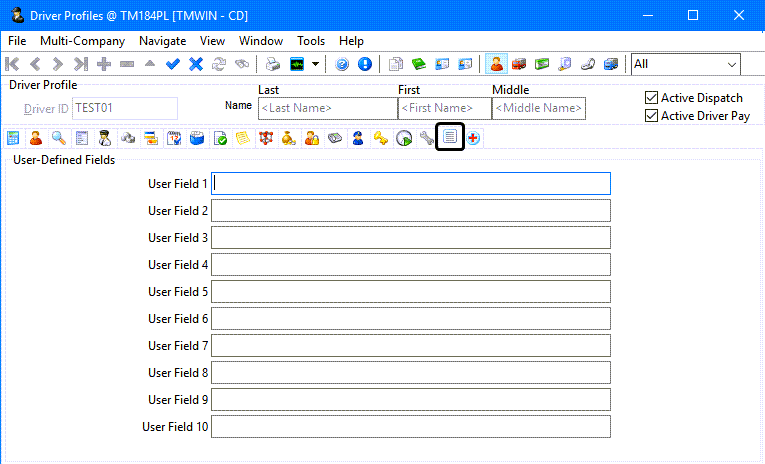
User Defined Fields tab
The User-Defined Fields tab allows you to enter data into any one of the 10 User-Defined fields available to the Driver Profiles program. The labels of these fields can be changed using the 'User Field 1 - User Field 10' options from the Application Configurator program > DRIVER.EXE section.
WCB Information tab
The WCB Tab allows you to enter details regarding your Company’s Workers Compensation Board claim information.
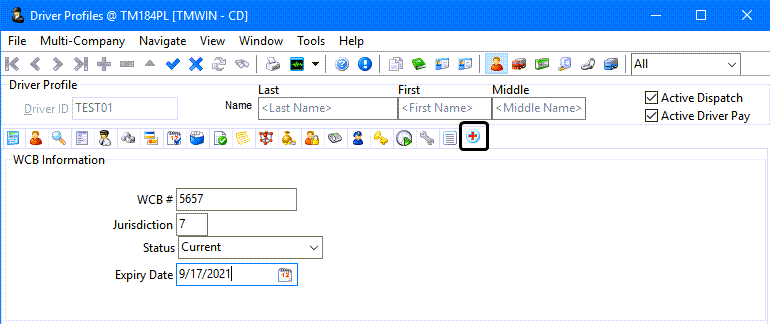
| Field | Definition |
|---|---|
WCB # |
Enter the Workers' Compensation Board (WCB) number assigned to this Driver. This area is for informational purposes only. |
Jurisdiction |
Enter the jurisdiction where the Driver is registered here. |
Status |
Select the status of the WCB account from the pull down menu. Available options are: 'Delinquent', 'Suspended' and 'Current'. |
Expiry Date |
Enter the date the WCB account expires or click the |
Click ![]() Post to save your entry.
Post to save your entry.
Adding or changing a driver’s picture
-
In Driver Profiles, on the Address tab, go to the driver’s profile.
-
Do one of the following:
-
Double-click the photo box.
-
Right-click the photo box and select Add/Change Picture from the shortcut menu.
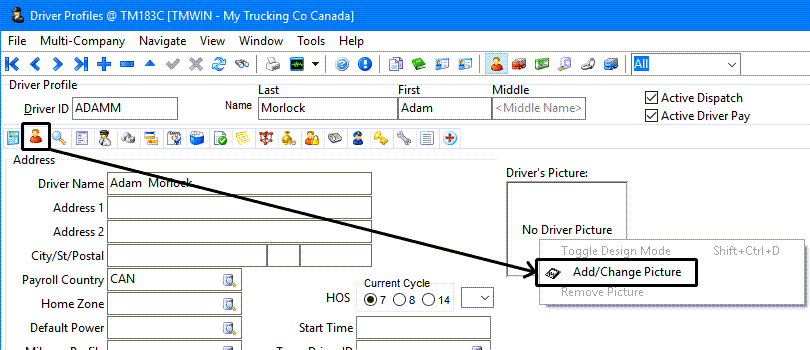
-
-
Browse to the image.
-
Click the Open button to attach the image to the driver profile.
Note: The image file used for the Driver’s Picture should be in '.JPEG' format only, and must be less than 100K (100,000 bytes) in total memory size. The photo box dimensions are about 100x120 pixels.
To determine the size and current dimensions of a '.JPEG' image, right-click the image file in Windows Explorer and select Properties from the shortcut menu. The file size appears on the General tab and the dimensions on the Details tab.
The image you select will automatically be adjusted to display properly in the image box.
Assigning a Contract to a Driver
Contracts are configured using the Driver Pay Contracts program and assigned to the drivers using the Driver Profile program. The Driver Pay Contracts program is used to configure the rules for automatic payments for Drivers. Payments are generated as activity occurs in the Dispatch program.
To assign a contract to a driver:
-
In Driver Profiles, on the Pay Contracts tab, go to the driver’s profile.
-
Click
Insert to add a new pay contract entry for this driver.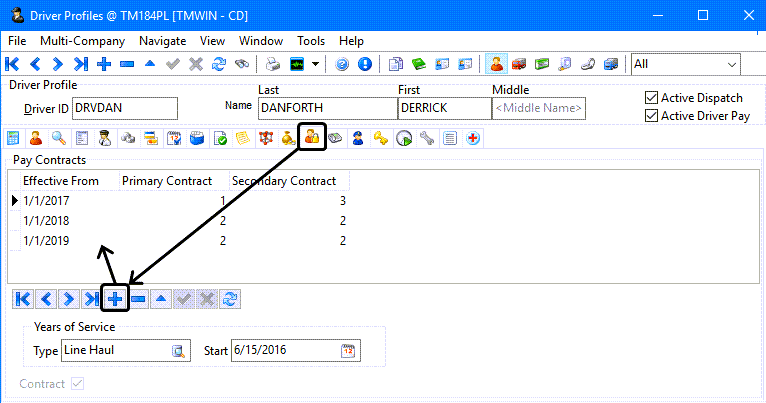
-
Double-click the Effective From field and use the calendar control to indicate the date this driver pay contract will take effect.
-
Double-click the Primary Contract field and select the contract ID from the Select Driver Contract list.
-
Double-click the Secondary Contract field and select the contract ID. The secondary contract can be the same contract as the primary contract.
Note: Primary indicates the usual contract, and secondary is the contract that will be used if the option to use the secondary contract is selected in the Dispatch program.
-
Review the Years for Service information to verify the Service Type and Start date for this service type are correct for this driver and update them if necessary.
-
Click
Post.
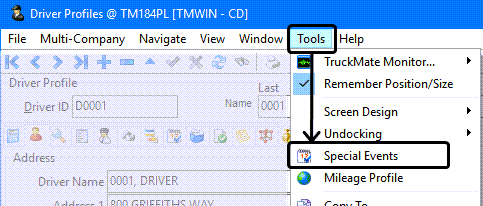
Viewing or editing Special Events
The Driver Profile Tools menu provides a window for viewing or editing driver related special events like license renewals, permit expiration, birthdays, etc.
-
In Driver Profiles, go to Tools > Special Events.
The Special Events window appears and lists any events related to this driver.
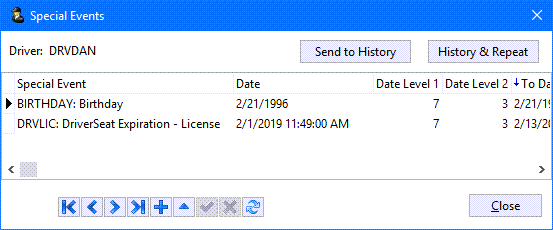
Note: Any additions or revisions made here will also update the information displayed by the separate Special Events program that summarizes all events for all resources including drivers.
The Date Level 1 and 2 fields are used to define the number of days to display warning colors before the event is due. Level 1 is the lowest (blue), level 2 is next (green) and level 3 is the highest (red).
For example, the code LICENSE will cause the driver’s code in Dispatch to turn blue seven days before it is due; green three days before it is due and on the day the driver’s license is due, the driver’s code will turn red and it will remain red until the Special Event is archived.
-
To archive entries, click the Send to History button. They will be removed from the drivers Special Events window but will still appear in the History tab on the Special Events program.
To archive an entry AND create another duplicate to repeat the renewal date event entry for the coming year, click the History & Repeat button.
Creating or editing a driver’s Mileage Profile
Independent Mileage Profiles are created for drivers, customers and vendors and are connected to the third party mileage software (as configured within the Mileage Server Manager program).
Mileage profiles determine the method by which mileage calculations are made and reported. Mileage Profiles can be assigned to Drivers (in the Driver Profiles program) and to Clients or Vendors (in the Customer & Vendor Profiles program).
The Mileage Profile will determine the method by which Freight Bill distances and the distance of trip legs are calculated for this Driver for use in other TruckMate programs, such as in the Driver Pay module.
If you do not specify a mileage profile for a driver, a customer or a vendor the 'DEFAULT' profile will be used.
To create a new mileage profile:
-
In Driver Profiles, go to Tools > Mileage Profile.
The Mileage Profile Maintenance window will appear.
All the services supported by TruckMate that are configured and running correctly on any of the mileage server machines that TruckMate is configured to access will appear in the Supported Services list on the left side of the Mileage Profile Maintenance window.
If you are running multiple mileage servers and one of your configured mileage services is not available (either the mileage server is not running, the server is not connectable to the network, or there is an access issue) that mileage service will be missing from the Supported Services list.
-
Click
Insert. -
Enter a name for the mileage profile.
The mileage profile name can be selected later using the Mileage Profile drop down list box on the Address tab within the Driver Profiles and the Customer & Vendor Profiles programs. If this Mileage Profile field is left blank, the DEFAULT mileage profile will be used.
-
Enter the mile mode to determine how mileage calculations will be determined and displayed using one of the following options:
Zone (City)
Uses the two Zone Codes (start and end) on the freight bill and the Trip to determine Mileage. If your company maintains a zone tree that is validated down to the zip code/postal code level and this is the desired granularity, use ZONE (CITY).
Zip Code
Calculates the mileage based on the Shipper and Consignee’s zip code/postal code on the Freight Bill. If there is an empty leg anywhere, that leg will use the zone codes for its portion of start or end. This would only be used if your company wants the granularity of zip code/postal code and does NOT have its' zone tree validated down to that level.
Street
Calculates mileage based on the addresses of the Shipper and Consignee on the Freight Bill. This does NOT require a zone to be created for each customer. The potential issue to be considered is addresses that are not entered correctly, i.e., P.O. Box numbers, suite numbers etc.
This feature requires a "streets license" in order for it to be used properly by the mileage software and TruckMate since it requires the Latitude/Longitude update utility to determine the addresses.
-
Use the drop-down list to select the Default Mileage Server Host. This will likely default to
localhost:6239. You only need to change it if you have multiple Mileage Servers or you have configured the Mileage Server to support Multi-company setup using different ports. -
Select the Service Matching Strategy for this mileage profile from the following options:
First Match
Uses the mileage value returned by the first service that recognizes the zones, (either the Start and End Zones on the freight bill, or the Leg From and Leg To zones on the trip leg). Only the services specified in the Rule Based Mileage Search grid will be queried.
Minimum Distance
Queries all the services in the Rule Based Mileage Search grid for the zone combination, (either the Start and End Zones on the freight bill, or the Leg From and Leg To zones on the trip leg). The lowest mileage value returned will be used.
Maximum Distance
Queries all the services in the Rule Based Mileage Search grid for the zone combination, (either the Start and End Zones on the freight bill, or the Leg From and Leg To zones on the trip leg). The highest mileage value returned will be used
Average Distance
Queries all the services in the Rule Based Mileage Search grid for the zone combination, (either the Start and End Zones on the freight bill, or the Leg From and Leg To zones on the trip leg). The mileage values will be averaged, and the average mileage value will be used.
Use Reporting 1 Only
Uses the mileage service specified in the Reporting 1 field.
User Reporting 2 Only
Uses the mileage service specified in the Reporting 2 field.
-
Use the Type checkboxes to indicate whether this mileage profile can be associated with drivers, customers, vendors or fuel tax profiles. = For example, if the Driver Profile checkbox is not selected and you go to the Address tab in the Driver Profiles program, this mileage profile will not appear as an option in the drop-down list and cannot be associated with any drivers.
Note: All Interliner DMILE lookups will use the VENDOR_DMILE Table first. If no records are found there, the Mileage Server will then use the DMILE Table.
-
Use the
 green arrow buttons to populate the list of Selected Services by only selecting the desired options from the complete list of Supported Services.
 -
Use the
 Delete Record button if you need to remove a service.
 -
Use the up / down arrow buttons to change the order. The list order for the Selected Services is important since it affects the First Match service matching strategy.
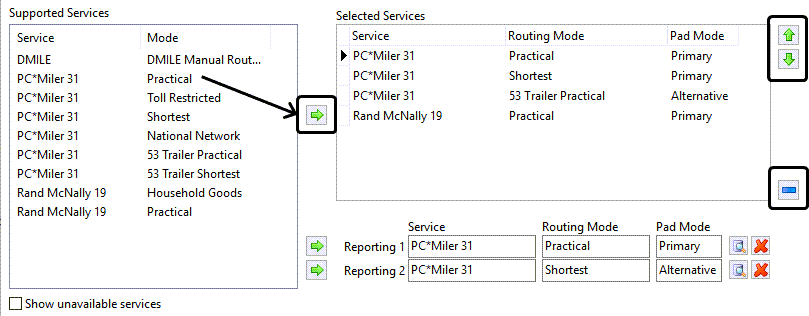
-
Indicate if you want this service to use any value adjustments and if so which, Primary or Alternative. Click twice to use the
 ellipsis button and select the Pad Mode.
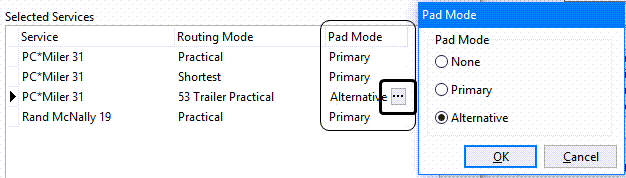
The Pad Mode adjustment values are set in the Utilities > Mileage Server Manager program on the Tools > Configure > Pad Values tab. 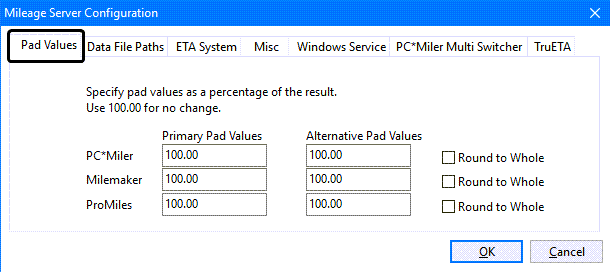
The Mileage Profile assigned to the driver is used to calculate leg distance in the Dispatch program but you may wish to specify alternative services for reporting purposes using the Reporting 1 or Reporting 2 options. These Reporting 1 and 2 options are typically used for the Fuel Tax Profiles.
-
To configure the Reporting 1 or Reporting 2 options, use the
green arrow buttons to select the service to use.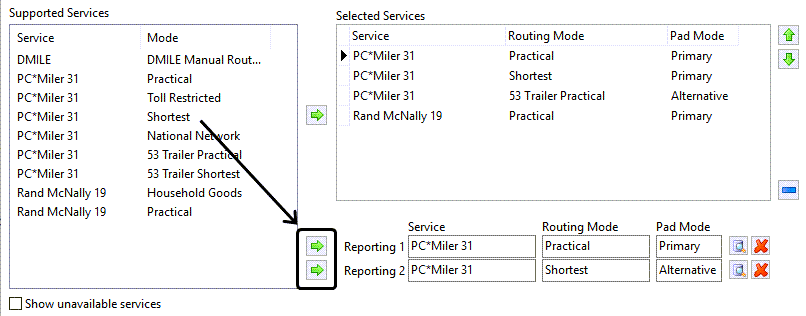
-
Use the
 Delete Record button if you need to remove a service.
 -
Use the
 browse button to select the Pad Mode.
Note: The mileage from the Reporting 1 and Reporting 2 services are stored in the LS_ALTMILES_1 and LS_ALTMILES_2 fields in the 'LEGSUM' table in the database.
-
Click the Close button to save your changes and return to the previous window.
-
Assign mileage profiles to the drivers, clients and vendors.
Assigning a Mileage Profile to a Driver Profile
-
In Driver Profiles, go to the Address tab and use the drop-down list to select a Mileage Profile.
| If the Mileage Profile is left empty, TruckMate will use the DEFAULT mileage profile. |
Using the driver Copy To wizard
The driver Copy To function will take the information for the selected driver and make an entry for this driver into the Employee Profile program or the Customer and Vendor Profiles (as a vendor) program.
-
In Driver Profiles, go to the driver’s profile that you want to copy from.
-
Go to the Tools menu and select
 Copy To.
The Welcome to the Driver copy Wizard window is displayed.
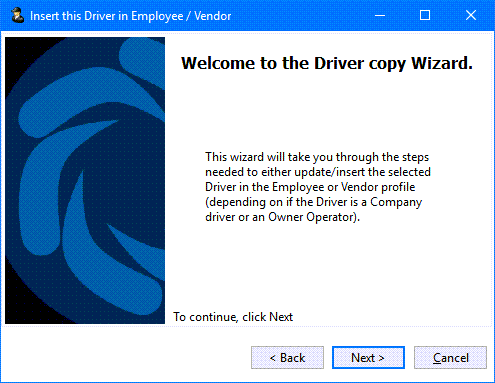
-
Click Next.
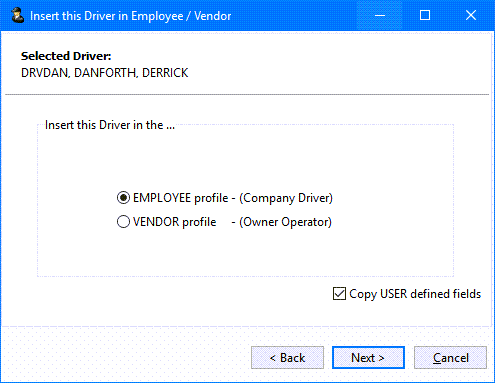
The wizard will ask you to indicate whether you want to update an existing EMPLOYEE or VENDOR profile or if you will be creating a new profile.

-
Click Next.
Depending on your choice in the previous step, you will see either an 'Update this Driver…' or an 'Insert this Driver…' window. Indicate whether you would like to update or create a company driver EMPLOYEE profile or an owner/operator VENDOR profile.
The Copy User Defined Fields checkbox defaults to True. If you would not like to copy the user-defined information into the new profile record, clear this checkbox.
-
Click Next.
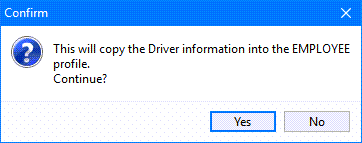
If you chose to Update a profile record, you will now be prompted to confirm the process.
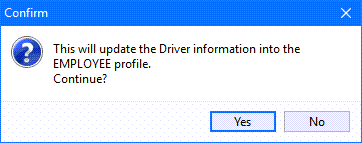
-
Click Yes to continue.
Upon completion, a summary screen will display, showing the details of what has been copied.
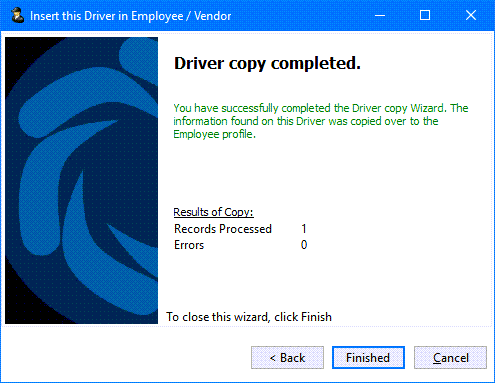
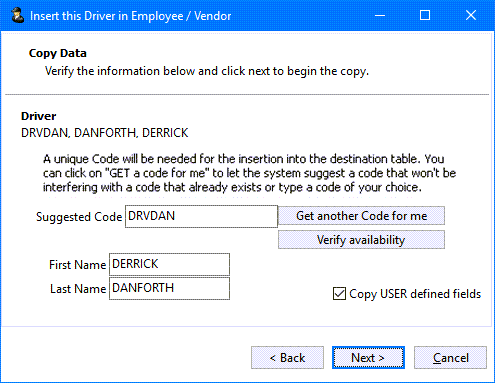
If you chose to Insert and create a new profile record, a summary screen showing the driver ID code and names will be displayed.
The Driver ID will display in the 'Suggested Code' field. You can click the 'Get another Code for me' button to alter the Driver ID slightly. It will append a suffix number, e.g., JOE_1).
The Verify availability button checks if a Driver record using this ID currently already exists to ensure the update or create function will work properly. A warning message will be displayed to prevent you from trying to update a non-existent record or create a new record using an ID that already exists in the table.
You can edit the 'First Name' and 'Last Name' fields if you would like them to appear differently in the employee or vendor profile.
-
Click Next.
A confirmation message is displayed.
-
Click Yes to continue.
Upon completion, a summary screen will display, showing the details of what has been copied to create the new profile record.

-
Click Finished.
Creating Diary entries using Driver Profiles > Tools > Diary
The Diary feature is as an advanced note-taking tool accessible from within the Driver Profile program.
Unlike the normal TruckMate Notes window, the Diary allows you to make multiple entries and it has its own security settings. For each entry, you assign a 'Date', 'Communication Type', a 'Note Subject', and either long notes (in a free format field) or a picture. There are columns for each resource type (power unit, trailer, etc.) so the Diary entry can be cross-referenced and accessed in the application that calls it.
-
In Driver Profiles, go to Tools > Diary.
The Diary for Driver window will appear. See Diary.
Viewing Fuel Card information using Driver Profiles > Tools > Cards
The Driver Profile program provides access to the fuel card information associated with each driver.
If you have a License for the Fuel Card Management program (key 30000), selecting this option will allow you access (view/edit/add) your Fuel/Credit cards using the Card Management program > Cards tab.
| Before you can access this function, at least one Vendor must be configured in the Fuel Card Management program > Setup tab. |
In Driver Profiles, go to Tools > Cards.
The Cards for Driver window will appear.
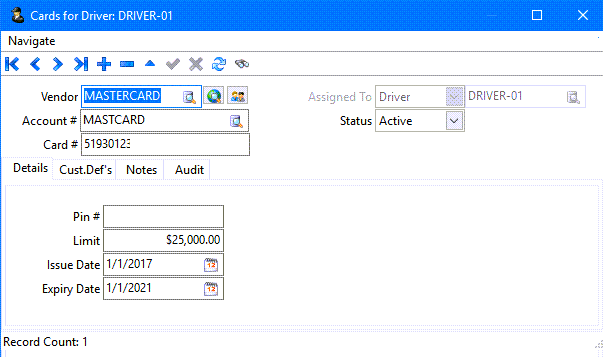
This is the same information that is displayed and managed within the Fuel Card Management program.
Viewing Fuel Card Child Account information
If your company is using a fuel card structure where a parent account is used to advance funds to one or more child accounts, the Driver Profile program can also provide access to this child account fuel card information for each driver.
In Driver Profiles, go to Tools > Child.
The Child tab window will appear.
See:
Creating Driver Shifts
To create driver shifts:
-
In Driver Profiles, on the Shift Management tab, select the driver shift template from the list of shift templates on the left side of the window.
-
Indicate the Start and End dates.
-
Click Create.
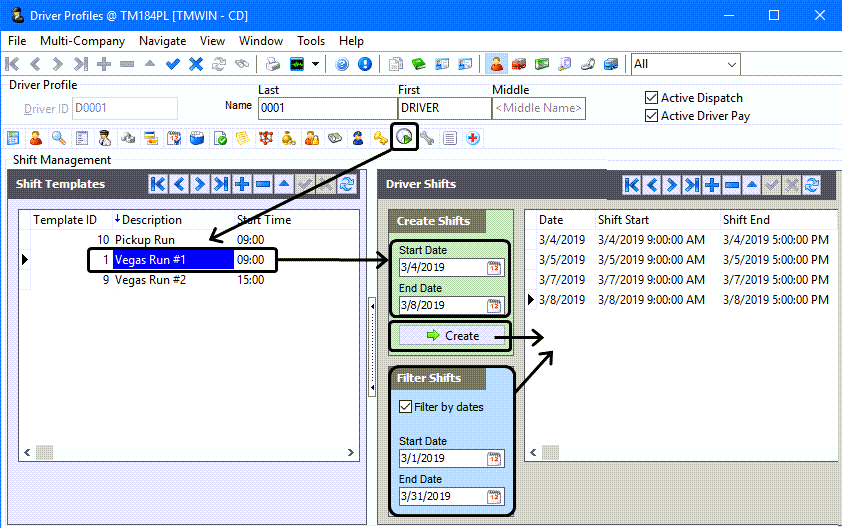
The shifts will appear in the Driver Shifts grid.
-
Use the Filter Shifts settings to ensure you can see the desired set of shifts.
-
Make any necessary revisions to the individual entries on the Driver Shifts grid. For example, you can add and delete a shift, change the start time as an exception for a given date or revise the start and end locations.
To create or edit a shift template, see Creating a Driver Shift Template.
To create shifts for many or all of the drivers at the same time, see Creating Driver Shifts for multiple drivers at the same time.
Creating Driver Shifts for multiple drivers at the same time
A driver shift template defines a start and end time to use when creating driver shifts. The template also allows you to set a start and end location for a shift, (optional).
Once the shift templates are defined, use them to create the actual driver shifts for specific days.
-
In Driver Profiles, go to the Shift Management tab.
-
Go to Tools > Create Shifts.
The Create Driver Shifts window is displayed.
-
Use the checkboxes to indicate which drivers to create the shifts for.
Note: The right-click shortcut menu includes options for Check All and UnCheck All.
-
Select the shift template to use.
-
Indicate the Start and End Dates.
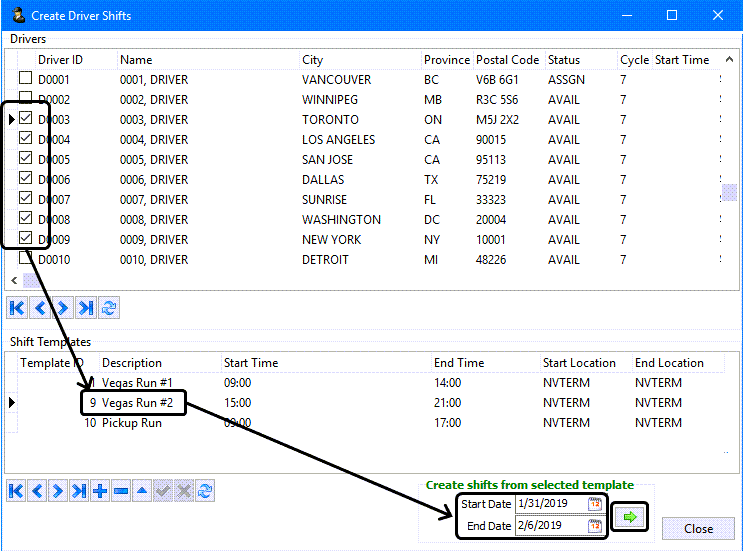
-
Click the
 Create Shifts button.
 -
A confirmation message is displayed.
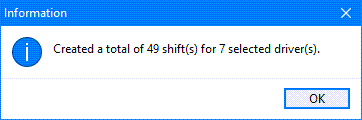
-
Click OK.
-
Click Close to exit the Create Drive Shifts window and return to the Shift Management tab where you can filter and edit the shift entries.
Setting up Driver Predictive Retention
Setting up TruckMate to use the Driver Retention features requires the following:
-
Contact Vusion to purchase and setup an account: [email protected]
-
Adjust Security Configuration for Driver Profiles to include new Driver Retention tab.
Setting up Driver Retention Windows Service
The Predictive Retention feature in the Driver Profile program uses a Windows service to receive updates from the Vusion (data analytics) software.
This Driver Retention Windows service requires you to setup a PeopleNet mobile device account, (if you do not already have one), and use the Mobile Device Maintenance program to assign mobile communication devices to drivers. See Setting up a PeopleNet mobile device account.
To install and configure the Driver Retention Windows service:
-
In Driver Profiles, go to the Details tab and verify that each driver has been assigned a unique PeopleNet mobile account driver ID.
See Setting up a PeopleNet mobile device account if you do not already have PeopleNet mobile devices setup.
-
Go to Utilities > TruckMate Service Host.
-
Verify the Driver Retention service does not already exist in the list of installed services.
-
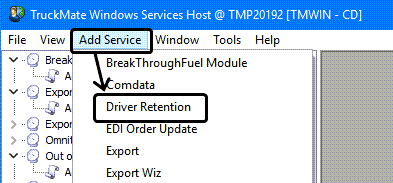
Select Driver Retention from the Add Service menu.
-
The Windows Service Setup window will open.
-
Enter the database configuration information and use the Test button to verify the connection is successful.
-
Select Peoplenet from the drop-down list for the Mob. Account.

-
If Peoplenet does not appear as on option in the drop-down list for the Mob. Account field, you will need to use the Mobile Device Maintenance program to setup a PeopleNet mobile device account and assign mobile communication devices to drivers. See Setting up a PeopleNet mobile device account.
-
Accept the defaults for the remaining fields (or adjust if necessary) and click the
 Install Service button to install the service. (Make sure Startup is set to Automatic to ensure the service will restart in the event of a server reboot.)
 -
Click OK to save your entries and return to the TruckMate Windows Services Host window.
-
Right-click the Driver Retention service and select Properties from the shortcut menu.
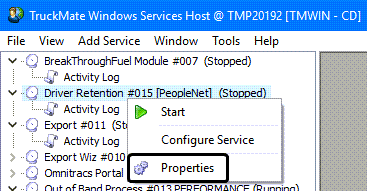
-
The Driver Retention Properties window is displayed.
-
Enter the Setup and Schedule setting information.
-
Enter the Setup and Schedule setting information.
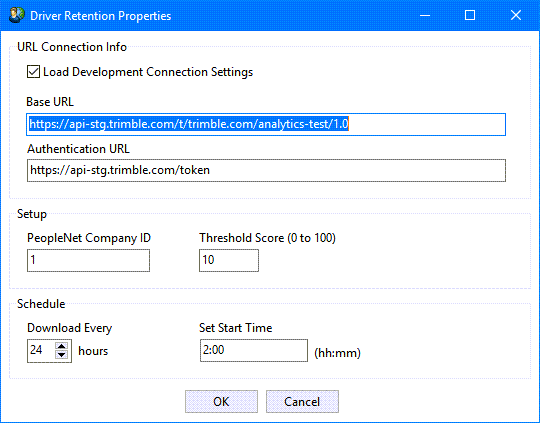
Required field: *
Field Definition Note: Do not change the default URL Connection Info settings unless necessary and with guidance from Trimble Transportation Support.
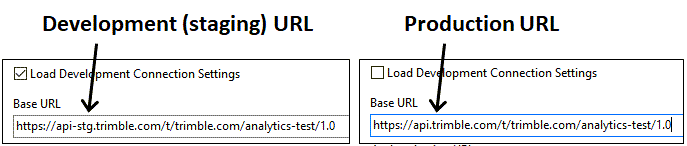
Load Development Connection Settings
Allows you to switch URLs to toggle between connecting to the Vusion development (staging) environment used for testing or the Vusion production environment.
Select this checkbox to set the Base URL and other connection information to connect to your Vusion development (staging) environment. The URL Connection Info values will be populated with preset values automatically.
Base URL *
Preset URL used to connect to the Vusion data environment.
Authentication URL *
Preset URL used for security authentication.
PeopleNet Company ID *
Obtain your PeopleNet Company ID value(s) from your PeopleNet support representative.
Note: If you are using the TruckMate Multi-Company features, you will need to setup a separate service for each company and associate each of them with their own PeopleNet Company ID.
Threshold Score *
The threshold score is a number between 0 to 100. This number determines which drivers will be flagged as being at risk of leaving and at which point the dispatchers will see a warning message if they assign a driver with a retention score equal to or higher than this threshold to a trip.
Default is 10.
-
High retention score indicates a driver at risk of leaving.
-
Low retention score indicate a more contented driver.
Download Every *
Determines how often TruckMate will refresh the drivers retention score information with the most recent Vusion values.
Set Start Time *
Sets the time to perform the first download of recent data. (hh:mm)
-
-
Click OK to save your property settings.
-
Right-click the Driver Retention service and start the service.
The TruckMate Service Host (Madservicehost,exe) program will connect to the Vusion API using the Driver Retention Windows Service to get a list of drivers and their scores. If the driver has a higher score then the threshold score, a special event will be created for this driver. Once the special event is added for this driver, whenever the user dispatches this driver to a trip, a popup warning message will be displayed.
Setting up a PeopleNet mobile device account
The PeopleNet mobile device account is used to associate each driver with a unique Mobile Account Driver ID to allow the Driver Profile > Predictive Retention tab to evaluate the statistics for each individual driver.
This procedure assumes you already have been assigned a PeopleNet account ID and that each of your drivers has been assigned their own PeopleNet mobile device account ID on the Profiles > Driver Profiles > Details tab.
| To obtain a PeopleNet account ID, contact Trimble Transportation.) |
To set up and configure your PeopleNet Mobile Communications account in TruckMate:
-
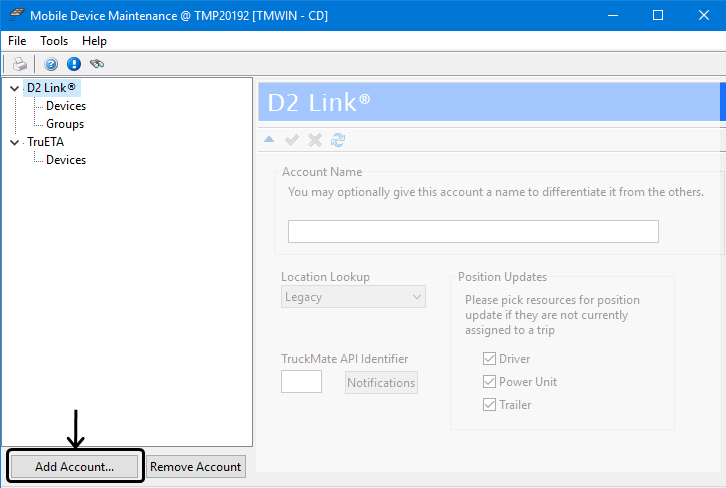
Go to TruckMate > Mobile Communications > Mobile Device Maintenance (Cfgcomm.exe).
-
The Mobile Device Maintenance window will open and display any existing accounts already setup. If the PeopleNet account does not already exist, you will need to add it.
-
Click the Add Account button.
-
The Create Account window will be displayed showing an alphabetical list of networks.
-
Select PeopleNet from the list and enter an Account Name if you have multiple company’s set up in TruckMate or if you have multiple PeopleNet accounts and need to identify them.
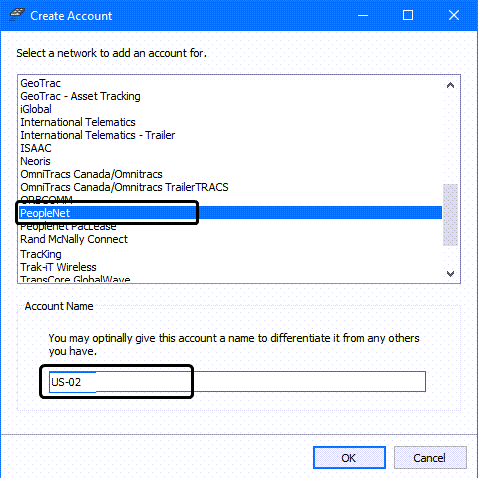
-
Click OK to return to the Mobile Device Maintenance window.
Running the Driver Retention Windows service
The Predictive Retention feature in the Driver Profile program uses the Driver Retention Windows service to make the connection and receive updates on an automated schedule from the Vusion (data analytics) software. Once it is setup and configured, it will run automatically as often as the schedule setting dictates, (e.g., Download Every 24 hours).
It is also possible to run the Driver Retention Windows service at any time just by stopping and restarting the service. This is very useful during the initial setup for testing to verify the data is coming in correctly.
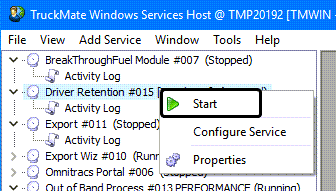
To manually stop and start the Driver Retention Windows service:
-
Go to Utilities > TruckMate Service Host.
-
Right-click the Driver Retention service and select Stop from the shortcut menu.
-
Right-click the Driver Retention service and select Start from the shortcut menu.
-
Open the Activity Log to view any messages associated with the Download.
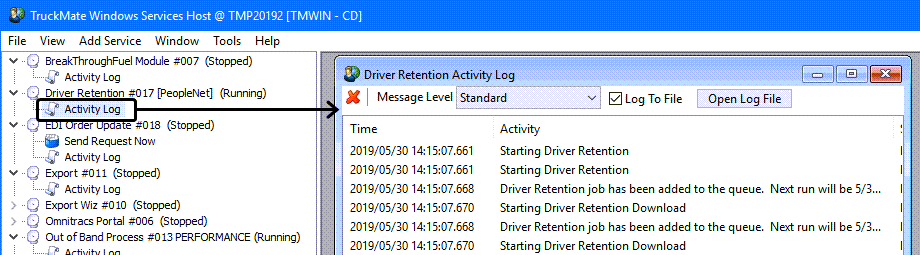
The messages provide useful insights such as a summary of the incoming data and whether any of the drivers are not mapped correctly. (i.e., the Driver Profile > Details tab > Mobile Account Driver ID does not match to a PeopleNet account entry for this company).
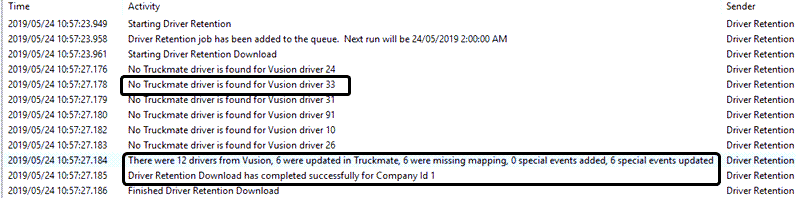
A "No TruckMate diver is found for Vusion driver __" indicates a PeopleNet mobile device ID entry for this company does not match any of the Mobile Account Driver IDs assigned to the drivers on the Driver Profile > Details tab. Each driver must be assigned a unique PeopleNet mobile device ID in order for their driver retention data to be imported into TruckMate.
The download summary provides a quick insight into the total result including the:

-
total number of drivers returned by the Vusion API
-
total number of matching drivers that got updated inTruckMate
-
total number of unmatched device IDs
-
total number of special events added, (eachrepresenting a newly endangered driver)
-
total number of special events updated.
Notes:
-
If the driver’s retention score exceeds the threshold limit setup in the properties for the Driver Retention Windows service, a special event entry will be created for this driver.
-
If the special event already exists for the driver, then the Results field for this event is updated with the latest retention score.
-
-
Click the
 red X if you want to clear the existing activity log entries and rerun the import.
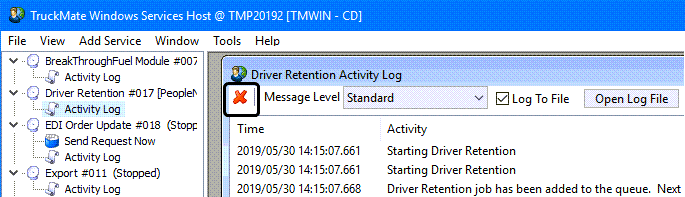
-
Each scheduled import event generates its own activity log stored in the ProgramData/TruckMate folder.
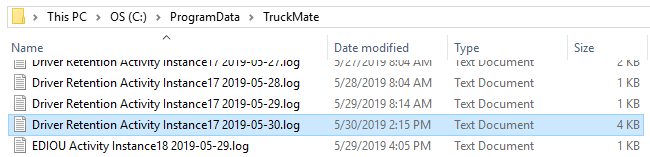
-
To see a summarized view of the Driver Retention statuses, go to the TruckMate Command Center > .Drvr Rtn KPI page.
Viewing Driver Retention results in Command Center
The TruckMate Command Center provides a KPI (Key Performance Indicator) page summarizing the results of the most recent driver retention score import data.
-
Open the Command Center program.
-
Find the .Drvr Rtn page and double-click to open it.
The .Drvr Rtn page is included as one of the pre-loaded, standard set of KPI pages that comes with the TruckMate Command Center program.
Note: A TruckMate system administrator or power user with sufficient security permissions must set the viewing permission properties on the Page Properties window for you to view the .Drvr Rtn page in Command Center.
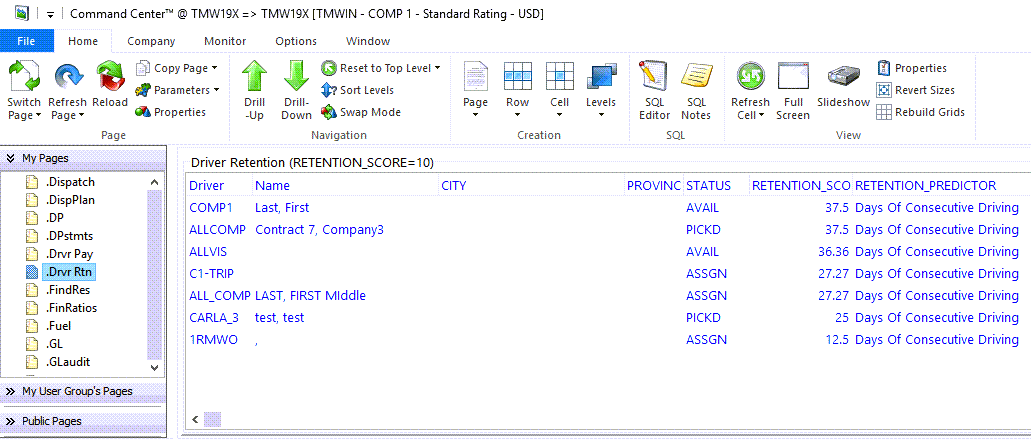
-
Double-clicking any driver entry on the KPI page will open the Driver Profiles program and display the details for this driver.
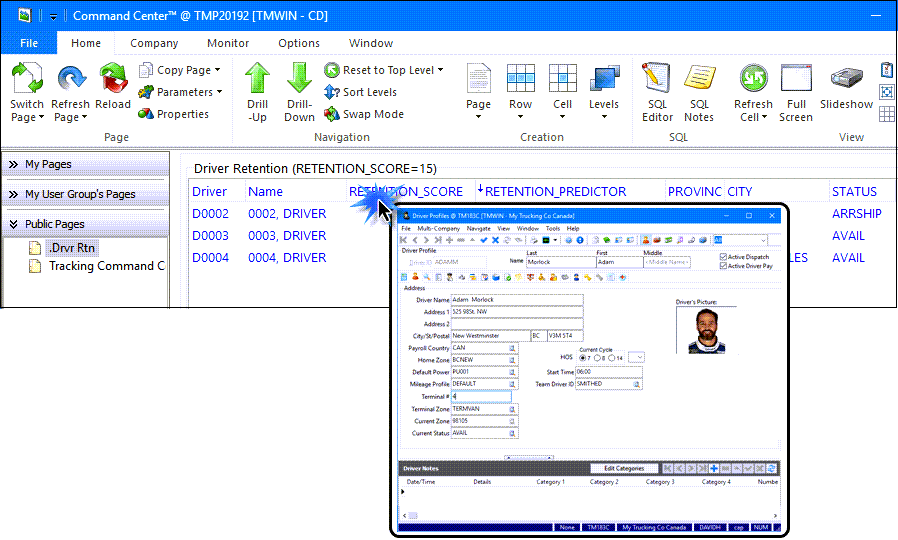
The input parameter for the retention score used by the Command Center KPI page is set to 10 by default.
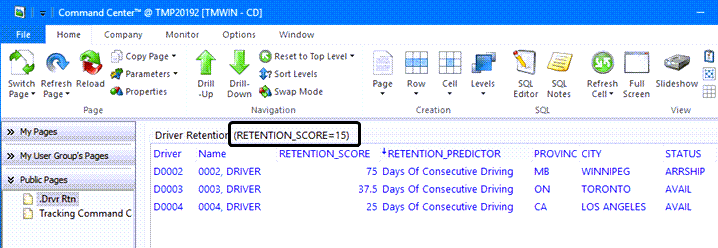
You can change the parameter to see which drivers exceed the revised driver retention score value. To change the RETENTION_SCORE parameter:
-
Select Edit Parameters from the Parameters menu.
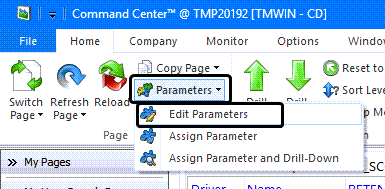
-
Change the Value and click OK.
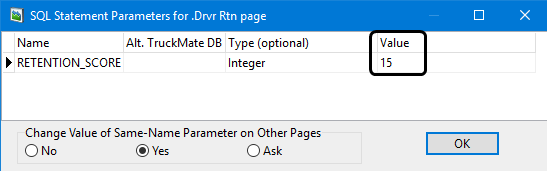
The page data is refreshed to display the drivers whose retention scores exceed the revised driver retention score value for this Command Center KPI page.
Creating a Driver Shift Template
A driver shift template defines a start and end time to use when creating driver shifts. The template also allows you to set a start and end location for a shift, (optional).
Once the shift templates are defined, use them to create the actual driver shifts for specific days.
-
In Driver Profiles, go to the Shift Management tab.
-
Click
Insert on the Shift Management navigation bar to display the Shift Template Creation window.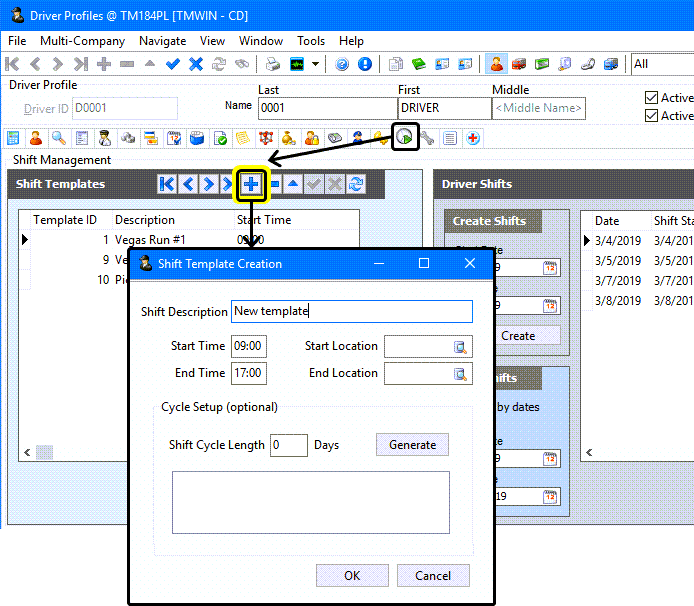
-
Make the appropriate entries to these fields:
Required field: *
Field Definition Shift Description *
Enter a short descriptive name.
Start Time *
Shift start expressed in military (24 hour clock) time.
End Time *
Shift end expressed in military (24 hour clock) time.
Start Location
Select a zone ID to indicate where the driver will be located at the beginning of this shift. (After the actual shifts are created, these values can be edited.)
Note: The start and end location information is used by the IDSC Match Advice Optimization feature to match drivers to freight bills.
End Location
Select a zone ID to indicate where the driver will be located at the end of this shift. (After the actual shifts are created, these values can be edited.)
Shift Cycle Length
(optional)
Enter the number of days involved with the shift cycle to provide enough days to indicate the desired pattern and click the Generate button. (There is no maximum value.) Use the checkboxes to indicate the pattern.
When shifts are created using this shift template, it will only create shifts for the indicated days.
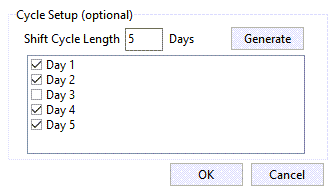
-
Click OK.
-
The new shift template will appear in the list and can be used to create driver shifts.