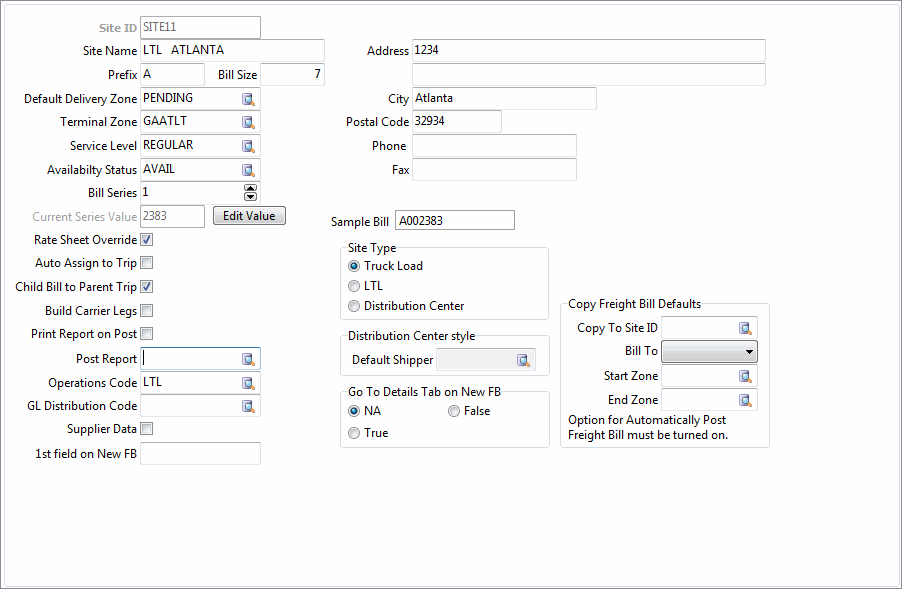
Site Setup

Site Setup is used to configure Billing 'Sites'. These Sites are used within the Customer Service program and the Quick Bill Entry program to differentiate groups of Freight Bills by their Freight Bill number prefix configuration.
The Site Code also provides a set of site specific data entry defaults such as the Service Level and Default Delivery Zone. The Site Code can also determine default billing behaviours and other rules.
| After creating a new Site Code, ensure that you run the Security Patcher utility from within the SQL Execute program. This will ensure that your user security settings are propagated to the new Site Code, allowing its use. |
Site Name
Enter the name of your Site. Make this as descriptive as possible as this is the text displayed to users when they select a Site.
Address Fields
Enter the Site’s address information, if needed. The address information entered here is used for reporting purposes.
Prefix
You can specify up to three characters as a prefix to the Freight Bill number. While the Freight Bill number will increase sequentially, the prefix will remain the same. Keep in mind that each character of the prefix reduces the possible number of Bills that can be entered for a Site. For example, if you configure a Bill size of 6 digits and a single letter prefix, the first Freight Bill will be number X00001 (a total of 6 digits), with a total number of possible Freight Bills being 99,999.
Bill Size
Is a maximum of 8 digits. This includes the Prefix.
Intermodal Customers:
The recommended 'Bill Size' value (including prefix) is '7' for Intermodal and De-stuff Freight Bills in Customer Service. Choosing this size will avoid duplicate bill numbers when creating De-Stuff FBs. If you wish to retain a dash character (-) when creating 100 or more De-stuff Freight Bills (up to a max of 1000), a 'Bill Size' of '6' is recommended.
See the Customer Service program > Intermodal tab and the De-Stuff button documentation for more information on Intermodal functions in TruckMate.
Site Type
Setting a Site to be a Truck Load Site does not add any additional functionality to the Customer Service program.
Configuring a Site as an LTL Site generates certain data entry defaults in the Customer Service program (for example, the caller’s name and details). For Freight Bills entered from LTL Sites, the shipper name and details will default to the caller’s name and details, the consignee name and details will not be required, and the cursor will move to the Details tab as soon as the Bill header is filled in.
Configuring a Site as a Distribution Center Site will make the 'Distribution Center style' section available near the bottom of the Site Setup window. Once a 'Default Shipper' is chosen in that field, that 'Shipper' will always be automatically entered in the Customer Service program whenever a Freight Bill is created while using this Site. Using the '<tab>' key of your keyboard when you have chosen a 'Caller' value will then move the cursor automatically to the 'Consignee' field. When you have chosen a 'Consignee' value the '<tab>' key will move the focus to the Details tab.
Distribution Center Style / Default Shipper
If you select a 'Site Type' of 'Distribution Center', you can further refine the 'Default Shipper' code for the site. You must save the site record as a 'Distribution Center' before the 'Default Shipper' field will become active.
Default Delivery Zone
If you specify a Zone description here, it will become the End Zone (in the Customer Service program), or the Consignee Zone (in the Quick Bill Entry program), when no other value is specified for those fields. Normally, those fields will default to the Zone code configured in the consignee’s profile (in the Customer & Vendor Profiles program). If consignee details are manually entered (rather than using a customer configured in the Customer & Vendor Profiles program), the Zone code specified in the Default Delivery Zone field will be used.
Terminal Zone
The Zone description selected here will be used by the CrossDock program to organize incoming freight for cross docking purposes. If you do not specify a Zone here, Freight Bills entered from this Site will not be displayed in the Cross Dock program. Only Zone codes that are configured as Terminal Zones in the Codes Maintenance program are available for selection.
Service Level
Select the default Service Level for this Site. Service Levels are configured on the Service Levels tab of the Codes Maintenance program. The level selected here will become the default on the Details tab of the Customer Service program, and the default Service Level in the Quick Bill Entry program.
Availability Status
When a Freight Bill is posted, it is assigned a Freight Bill number, and is displayed in the Dispatch program. You can assign the status that will be applied to the Freight Bill when it is posted. 'Available' and 'Docked' and 'Entry' Status Codes can be selected. See the Status Codes > Categories tab for more information on how these Status Codes behave during the TruckMate Dispatch process.
Bill Series
Determines the numbering convention used for Freight Bills generated from this Site. The Bill Series feature allows you to assign the same Bill numbering series to two different Sites. For example you may have Site 1 set with the prefix 'A' so that the Freight Bill number appears as 'A0001'. Site 2 may be set with the prefix 'B' so that the Bill number appears as 'B0001'. If you assign the same Bill series to both of these Sites, the system will number them consecutively.
For Example:
'A0001', 'A0002', 'B0003', 'A0004', 'B0005', … Notice that the prefix changes depending on the Site, but the rest of the Freight Bill numbers increase as if they were from the same Site. You can have up to twenty five Bill series. If you want each Site to have it’s own Bill series (eg: 'A0001','A0002', 'B0001', 'B0002', 'A0003', …); make sure that you select a separate Bill series for each.
Current Series Value
The highest number that has been applied to a Freight Bill in this Bill Series is displayed in this field.
Edit Value
Allows you to change the Current Series Value. If you change this value, the next Freight Bill posted in the Customer Service program or Quick Bill Entry program will have the next consecutive number above the one specified here. Be careful that you do not set the starting Freight Bill number to a value that has already been used. This value will apply to all Freight Bills in the same Bill Series.
Allow Rate Sheet Override
Select this when using Automatic Rating. Then, the system will allow a user to override the Rate Sheet selected and use an alternative one for this Freight Bill only.
Auto Assign to Trip
If you would like Freight Bills created for this Site to be automatically applied to a Trip when they are posted within the Customer Service program, check this option.
Child Bills to Parent Trip
If you would like Child (Extra Stop) Freight Bills to be applied to the Parent Freight Bill’s Trip when they are posted, check this option.
Build Carrier Legs
If this flag is set, the 'Build Carrier Legs' option (available from the Dispatch program > Trip grid right-click context menu) will automatically be applied for all Freight Bills added to Trips in the Dispatch program. Thus the flag can be used (along with the 'Auto Assign to Trip' flag) to setup automatic Carrier assignments (otherwise know as Pre-Planned Carrier Trips). Need to know how?
Print Report on Post
If you would like a Report to be previewed to the screen (with the option of printing) for all Freight Bills whenever the Customer Service program 'Post' button is used within this Site, check this option.
Post Report
Click the search button to select a Cyrstal Report formatting file for the Reports that you will Post when using this Site in other TruckMate applications.
Operations Code
Click the search button to define a default Operations Code for the selected site (as created on the Codes Maintenance program > Operations Code tab). This operation code will be used whenever a Freight Bill is created in this site.
GL Distribution Code
Click the search button to select a GL Distribution Code for the current site from those available on your system, as configured in the GL Distribution Setup program > Billing tab. If the Application Configurator program > BILDIST.EXE > 'Calculate GL Based On' option is set to 'Site', then when freight bills are created for this site, they will always use the GL Distribution code entered here (overriding the GL Distribution code selected for the individual clients on the freight bill).
Distribution Center Style
Default Shipper
Click the edit pick button to select a default Shipper for your Distribution Center Style Site. This field will only be available if you have selected 'Distribution Style' from the 'Site Type' filed above. The value that you select in this field will automatically be applied as the 'Shipper' in every Freight Bill you create when working in a Distribution Style Site.
Supplier Data
Selecting this option will default the selected Site as a 'Supplier' Site. When a Freight Bill is posted while working in this Site, a flag is set on the Freight Bill. If the flag is True, supplier data is created from the Freight Details and automatically entered into the Customer Service program > Supplier tab.
Sample Bill
This field displays a Sample Freight Bill number that might apply to the currently selected Site. This field is read-only.
Copy Freight Bill Defaults
This section contains several radio options that will configure the default field values that will be used in the Customer Service program when copying Freight Bills from this Site Code. When using these features, you must have the Application Configurator program > CSERV.EXE > Auto Post on Copy option set to 'True'.
Copy to Site ID
Use the Database search button to open a window that displays all of the Site Codes setup on the system. If, for example, you are working with the SITE1 record, and select the SITE2 ID in this field, all Freight Bills that are copied when working within SITE1 will have SITE2 selected by default when the Freight Bill Copy window opens.
Bill To
Use the drop-down menu to select which party you would like to default as the 'Bill-To' party on Freight Bills copied from the selected Site ID.
Start Zone / End Zone
Enter Zone Code values in either of these fields (or both) to specify a default Start or End Zone for Freight Bills copied from the selected Site ID.
Default to Details tab on new Freight Bill
This section allows you to setup a specific Site to be the default when creating new Freight Bills in the Customer Service program. The options you choose in this section may override certain Application Configurator program settings (namely, the CSERV.EXE > 'Default Details tab' and '1st Field on Insert' config options.
By configuring these options for a specific Site ID, you can setup "special" Site behaviours, such as a 'Site ID' that your company uses only for miscellaneous billing purposes. In such a scenario, Users of the Customer Service program can choose the miscellaneous billing Site ID when creating Freight Bills, which will default based on the option you select below. Because these miscellaneous Freight Bills have a different 'Site ID' than your regular Freight Bills (such as Dispatch Bills) your Dispatching staff will never see them: they can be interfaced straight to the accounting system. For more information on how to set this up, click here.
-
NA: Uses the value set in the Application Configurator program > CSERV.EXE > 'Default Details tab'. This is the 'global' value: if set to 'True' the Details tab will always be defaulted to visible when the User creates a Freight Bill in the Customer Service program.
-
True: When selected, this will override the 'global' variable set in the Application Configurator. Any Freight Bill created while working in this specific 'Site ID' will default to the Details tab automatically.
-
False: When selected, this will override the 'global' variable set in the Application Configurator. Any Freight Bill created while working in this specific 'Site ID' will not default to the Details tab.
1st Field on New Freight Bill
Enter the name of the TLORDER table field you wish to have the cursor default to when creating new Freight Bills for the displayed 'Site ID'. The User must enter a simple string into this field, such as 'TLORDER.CUSTOMER' (meaning the 'Customer' field in the Freight Bill header section of the Customer Service program.
Leaving this field blank (an 'empty string') will tell Customer Service to use the 'global' variable, set using the Application Configurator program > CSERV.EXE > '1st field on insert' option. Thus, you can have many different default behaviours for various Sites in your system. When working with a 'normal' billing 'Site ID' you can have the cursor default to the 'TLORDER.CUSTOMER' field (via App. Config. option) and then setup a miscellaneous billing 'Site ID' that defaults to a different field in Customer Service on Freight Bill creation.
| You can enter the value 'IM tab' (case sensitive) to have the Customer Service program default to the Intermodal tab. The 'Default to Details tab on new Freight Bill' radio option must be set to 'N/A' or 'False' for this to work. |
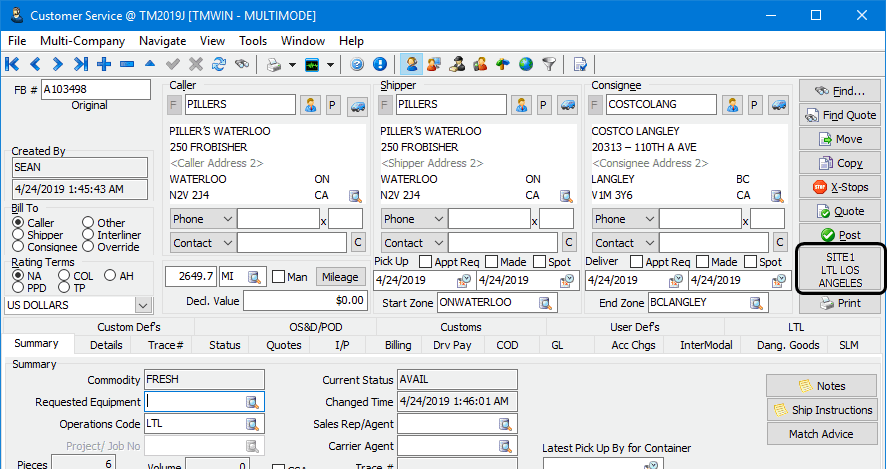
In the Customer Service program, you can set the Site prior to creating a new freight bill by clicking on the Site button in the bottom right corner of the screen.
| Once a freight bill has been created you cannot change its Site Code. You must select the Site Code first before you create a new freight bill since the Site Code will determine the freight bill defaults and the default billing behavior._ |
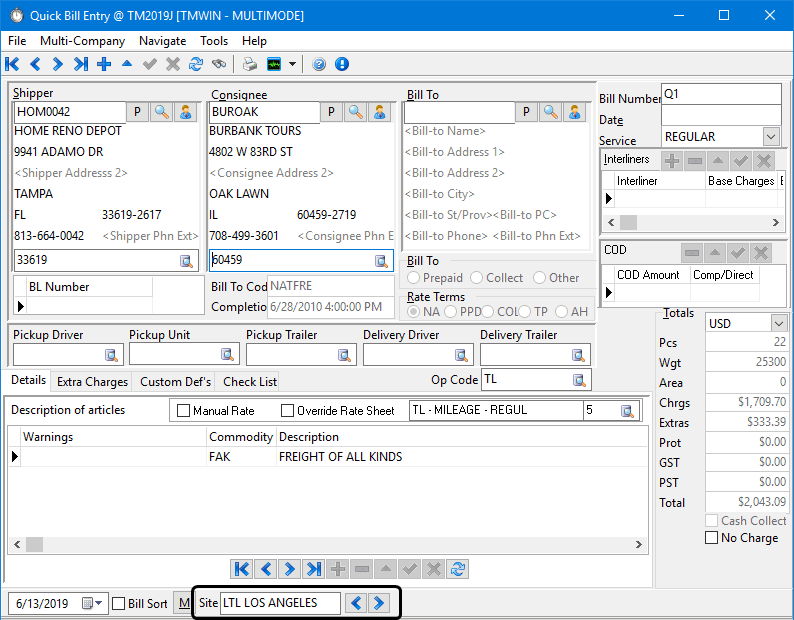
In the Quick Bill Entry program, you are prompted to specify the Site from which you wish to enter Bills as the program loads. You can also change the Site from within the program by using the arrow buttons beside the Site field at the bottom of the screen.
How do I create site codes?
The Codes Maintenance program is used to configure billing 'Sites'. These sites are used within the Customer Service program and the Quick Bill Entry program to differentiate groups of freight bills by their freight bill number configuration. Also, you can set defaults for data entry for different sites, such as the Service Level and Default Delivery Zone. In the Quick Bill Entry program, you are prompted to specify the site from which you wish to enter bills as the program loads. You can also change the site from within the program by clicking on the arrow buttons beside the Site field at the bottom of the screen. In the Customer Service program, you can change the site by clicking on the Site button in the bottom right corner of the screen.
-
Open the Codes Maintenance program ('CODES.EXE'), click: Start > Programs > TruckMate > Profiles > Codes Maintenance.
-
Click the 'Site' icon on the Toolbar, or open the 'Go' Menu on the Menu Bar and select the 'Site' option.
-
Enter the Site Name. Make this as descriptive as possible as this is the text displayed to users when they select a site.
-
Enter a Prefix. You can specify up to three characters as a prefix to the freight bill number. While the freight bill number will increase sequentially, the prefix will remain the same. Keep in mind that each character of the prefix reduces the possible number of bills that can be entered for a site. For example, if you configure a bill size of 6 digits and a single letter prefix, the first freight bill will be number X00001 (a total of 6 digits), with a total number of possible freight bills being 99,999.
-
Enter a Bill Size. This is a maximum of 7 digits. This includes the Prefix.
-
Enter a Default Delivery Zone. If you specify a zone description here, it will become the End Zone (in the Customer Service program), or the Consignee Zone (in the Quick Bill Entry program), when no other value is specified for those fields. Normally, those fields will default to the zone code configured in the consignee’s profile (in the Customer & Vendor Profiles program). If consignee details are manually entered (rather than using a customer configured in the Customer & Vendor Profiles program), the zone code specified in the Default Delivery Zone field will be used.
-
Enter a Terminal Zone. This is the zone description selected here will be used by the Cross Dock program to organize incoming freight for cross docking purposes. If you do not specify a zone here, freight bills entered from this site will not be displayed in the Cross Dock program. Only zone codes that are configured as Terminal zones in the Codes Maintenance program are available for selection.
-
Enter a Site Type. Configuring a site as an LTL site generates certain data entry defaults in the Customer Service program (for example, the caller’s name and details). For freight bills entered from LTL sites, the shipper name and details will default to the caller’s name and details, the consignee name and details will not be required, and the cursor will move to the Details tab as soon as the bill header is filled in.
-
Enter a Service Level. Select the default Service Level for this site. Service Levels are configured on the Service Levels tab of the Codes Maintenance program. The level selected here will become the default on the Details tab of the Customer Service program, and the default Service Level in the Quick Bill Entry program.
-
Enter the Availability Status. When a freight bill is posted, it is assigned a freight bill number, and is displayed in the Dispatch program. You can assign the status that will be applied to the freight bill when it is posted. Only status codes of the Available and Docked behaviors can be selected.
-
Enter a Bill Series. This determines the numbering convention used for freight bills generated from this site. The Bill Series feature allows you to assign the same bill numbering series to two different sites. For example you may have Site 1 set with the prefix "A" so that the freight bill number appears as "A0001". Site 2 may be set with the prefix "B" so that the bill number appears as "B0001". If you assign the same bill series to both of these sites, the system will number them consecutively. For Example: A0001, A0002, B0003, A0004, B0005, … Notice that the prefix changes depending on the site, but the rest of the freight bill numbers increase as if they were from the same site. You can have up to twenty five bill series. If you want each site to have it’s own bill series (eg: A0001, A0002, B0001, B0002, A0003, …); make sure that you select a separate bill series for each.
-
Enter a Current Series Value. The highest number that has been applied to a freight bill in this Bill Series is displayed in this field.
-
Enter an Edit Value, if applicable. This allows you to change the Current Series Value. If you change this value, the next freight bill posted in the Customer Service or Quick Bill Entry program will have the next consecutive number above the one specified here. Be careful that you do not set the starting freight bill number to a value that has already been used. This value will apply to all freight bills in the same Bill Series.
-
Place a checkmark in Allow Rate Sheet Override, if applicable. Select this when using automatic rating. Then, the system will allow a user to override the rate-sheet selected and use an alternative one for this freight bill only.
-
Select the Options Tab and fill in the following option:
-
'Commit frequency' = 500
-
Select the 'OK' button at the bottom of the 'Import Table - Zone' window.
-
Select the Options Tab and fill in the following option:
-
-
'Commit frequency' = 500
-
-
Select the OK button at the bottom of the 'Import Table - Zone' window.