EDI Communication Manager Master tab

Upon opening the EDI Communications Manager program, you will view first the 'Master' tab, which is really your Control Center for the EDI program. This is where you can specify the days, starting and ending times, and frequency of firing (when the system goes out to check for work to perform). The default is set at one minute intervals but you can easily change that to your Company’s preference. You can individually configure each Trading Partner and message type, depending on your preferences in case you, for instance, only want to send your 210 EDI’s out once per week.
The screen is broken down into sections: Master Timer, Active Processes, E-Mail Problem Notification, Master Archive Directories, Problems and Warnings, Miscellaneous, FTP Process, Transaction Processing.
Master Timer
Days
Select the days you wish to use the program.
Starting
Enter your starting hour/minutes. Often you’ll want the program running 24 hours a day so you could set this to 12:00:01 AM.
Ending
Enter the ending hour/minutes. Often you’ll want the program running 24 hours a day so you could set this to 11:59:59 PM.
Frequency
Enter the regularity of when the system goes out to check for work. For those using this 24 hours, you would set it to 1 minute.
Run / Stop
Starts and Stops the EDI Communications Manager.
Active Processes
This section expands or shrinks depending on your purchasing options.
Standard Sets
Place a check mark in the checkbox options you would like to include as Active Processes.
ACE eManifest Sets
Place a check mark in the checkbox options you would like to include as Active Processes.
Logistics Sets
Place a check mark in the checkbox options you would like to include as Active Processes.
Intermodal Sets
Place a check mark in the checkbox options you would like to include as Active Processes.
Functional Ack. Sets
Place a check mark in the checkbox options you would like to include as Active Processes.
Financial Set
Place a check mark in the checkbox options you would like to include as Active Processes.
Master Archive Directories
Generates daily logs for each of the options listed below. Users decide where on their system this log should reside.
FTP
Use the search button to browse to the location on your system where you wish this log data to reside.
TX (Transaction Log)
Use the search button to browse to the location on your system where you wish this log data to reside. A new log starts every day and is added to as transactions occur.
Dump
Use the search button to browse to the location on your system where you wish this log data to reside. Used when doing Inbound 204s. The dump is a directory where non-recognizable or files that cannot be processed are relocated to. If the EDI Communication Manager attempts to process an unrecognizable file, the file will be relocated to the Dump directory, and an E-Mail notification sent to the problem recipient.
EDI Communication Manager Messages
This is merely a window where you can view the current process as it occurs. The information is then transferred via e-Mail to the appropriate party as referenced above.
Miscellaneous
Host SCAC
(Standard Carrier Alpha Code) a common identifier within the EDI industry. Enter your Company SCAC code here.
Misc. Settings
Selecting this button will bring up a Miscellaneous Settings window where you can specify based on three categories of information: Miscellaneous Settings, Web Acceptance Mail, and Web Rejection Mail.apni
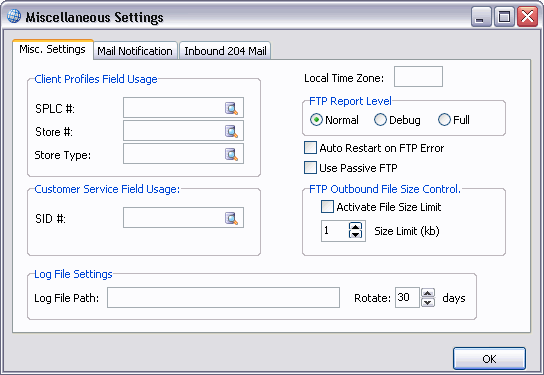
Misc. Settings Tab
SPLC #
Standard Point Location Code. You can put the 'SPLC #' in the Client Profile program, as a possible User Field.
Store #
You can enter this information to the Customer Profiles program, as a possible User Field.
Store Type
You can enter this information to the Customer Profiles program, as a possible User Field.
Customer Service Field Usage
SID #
Shipment Identification Number. Specify which field you wish to store this information in using the pull-down arrow. In the Customer Service program, using the '<Ctrl><U>' hotkey combination you’ll see a tab appear on screen with the 10 User Fields, select the one you wish to use to store the SID #. When a 204 comes in, the SID # will be stored in whatever field you specified, and the same for when sending out 210s or 214s, the SID# is usually required as well.
Local Time Zone
Enter whatever is relative to your system during the initial set up, but it should be the time zone where the Communication Manager host computer is located, i.e.,if it’s in Toronto, then 'ET', Vancouver 'PT'. Some examples would include: PT, PST, or PDST; MT, MST, MDST; CT, CST, CDST; and/or ET, EST, EDST. Users have room for a four digit time zone, but many only use a two digit as in PT, or sometimes a three digit as in PST.
FTP Report Level
Choose the FTP Session Report Level you wish to use. Select either 'Normal', 'Debug' or 'Full' by clicking the radio option next to the Report Level you wish to use.
Auto Restart on FTP Error
Check this option to Restart your computer when an FTP Error is logged.
FTP Outbound File Size Control
This section allows you to limit the Outbound File Size of your FTP files.
-
Activate File Size Limit
Checking this checkbox option will 'turn on' File Size control of your FTP files. -
Size Limit
Use the up and down arrows to select a File Size limit for you FTP files (in kilobytes).
Log File Settings
The EDI Communications Manager can now keep log files. Enter a hard drive location in the 'Log File Path' field and determine the number of 'Rotate' days, which determines the aging date of the log files (i.e. a value of '30' will only keep logs that are less than 30 days old).
Mail Notification Tab
This Tab allows you to setup the sending details for your outgoing E-mail Messages. You must provide an E-Mail Profile, as configured on the Codes Maintenance program > E-mail Setup Tab.
This Tab runs in the background of the system. Whenever the system encounters a problem, the information will appear in the 'Problems and Warnings' field.
Mail Profile
Use the edit-pick field to select one of your pre-configured E-Mail Profiles from the Codes Maintenance program > E-mail Setup Tab. You can use the 'Setup' button to access Codes Maintenance, if you require.
From
Enter a valid E-Mail address to send problem notifications from.
To
Enter the E-Mail address of the party you wish to notify that there is a problem occurring.
Cc
Enter the E-Mail address you’d like a Carbon Copy (Cc) of problem notification to go to. You can add multiple Users simply by separating their Email addresses with a semicolon.
Bcc
Enter the E-Mail address you’d like a Blind Carbon Copy (Bcc) of problem notification to go to. You can add multiple Users simply by separating their Email addresses with a semicolon.
Inbound 204 Mail Tab
This Tab allows you to setup a Notification Message for use when a 204 Load Offer is received by your system. This Tab will be familiar to anyone who uses Email. Simply enter the appropriate Email address data in the required fields.
Mail Notification Active
Check this option to enable Inbound 204 Mail Notification.