Resource tab details - Drivers

The Drivers tab displays a list of information about all active drivers as well as their current dispatch activity. The Driver tab grid uses colors to indicate important information such as 'Special Events' or 'License Expiry'.
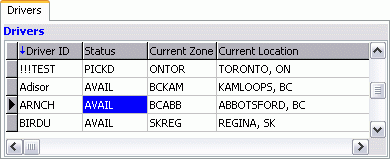
| For more information on General Color Codes, see the Color Code Information section. For more information on specific Driver tab Codes, see the Driver tab > Color Codes. |
Driver Codes (and their associated Details) are maintained in the Driver Profiles program.
Assign Driver to Trip
In most cases a double-click on a field in the driver grid will assign the Driver to the selected Trip. If there are multiple legs on the trip, the driver will be assigned by default to all legs subsequent to the leg currently selected in the Trip grid.
Update Fields
In a few cases the information in a field can be modified using a double-click in those fields, as follows:
ETA Zone / ETA Location / ETA Date / Planned Time Available: displays the ETA / PTA Adjustment window to make manual adjustments to the resources' Estimated Time of Arrival and Planned Time Available, as follows:
-
New ETA Zone: select the search button to select the zone the resource is expected to be in at the time entered in the ETA Date field.
-
New ETA Date: displays the calendar to provide Estimated Time of Arrival date selection.
-
New PTA Date: displays the calendar to provide Planned Time Available selection.
|
The ETA Zone, Location, Date and PTA fields are also updated automatically by activity in the Trip grid, and manual changes will be overwritten if trip activity occurs for this resource. You can disable the automatic calculation or ETAs if there is a business need for that. To do so, set the Application Configurator > Utilities > Mile - 'Calc Trip ETAs' option to 'False'. The default value for this option is set to 'True'. |
MSG_NR
Double-click this field to open the Message Center program, which will be filtered to display only messages for the selected Driver.
Hours Of Service (HOS)
If you are using a mobile communication provider with supported hours of service integration to TruckMate (such as PeopleNet’s eDriver Logs or Omnitracs’s QHOS), the Drivers grid will show you additional information about your drivers' available hours and current statuses. The information is read-only and is calculated by the mobile communication provider’s system.
On Duty Hours Avail (Today) / Driving Hours Avail (Today)
These two fields will return information from the Logbook window. The first field returns the available on-duty hours for the selected driver, and the second returns the available driving hours for the selected driver’s current duty period, as per the last recalculation.
Remaining Hours
This value holds the remaining hours for the driver’s Hours of Service. This field is populated by the lesser of:
-
Cumulative Hours: The number of hours remaining in the driver’s Cumulative On-Duty cycle, i.e. the 60/7, 70/8 or 120/14 (Canada) rule. This uses the Duty Cycle the driver has elected to use as setup in Driver Profiles > Address tab > Hours Of Service (HOS) - 'Current Cycle'.
-
On Duty Hours: The driver’s remaining On Duty hours available for the current duty period
-
Driver Hours: The driver’s remaining driving hours available for the current duty period.
| If the application configuration option 'Use HOS to Match Driver' In Application Configurator program > DISPATCH.EXE is 'True', Dispatch will warn you if you attempt to assign a load to a driver who has insufficient hours. |
Current Duty Status
This field displays the driver’s last known current duty status as reported by your Mobile Communications provider.
Driver Cycle
This field displays the driver’s duty cycle as defined in Driver Profiles > Address tab > Hours Of Service (HOS) - 'Current Cycle'. Possible values are: CAN 7 Day, CAN 8 Day, CAN 14 Day, US 7 Day, and US 8 Day.
Violation At
The estimated date and time the driver will be in violation of his/her hours. The calculation takes the last known duty status date and time and adds the Remaining HOS (Hours Of Service).
When this field is used in conjunction with TruckMate’s ETA’s calculations, this field can help you detect potential compliance issues before they occur.
Context Menu
Full Screen
The Full Screen option will enlarge the selected grid so that it fills the whole screen which allows you to view many more records and columns than in the normal view. To return to the normal view, right mouse click and de-select the Full Screen option. While in Full Screen mode, you can switch from grid to grid by selecting the right and left arrow buttons at the bottom of the window.
Reposition/Status Change
This option allows the user to Reposition resources, Change Status of selected resources or do both.
Location History
The Locations History Report is a summary report of the selected driver dispatch activity for the period selected.
For more information about report functions see the Crystal Reports Reference.
Find Drivers Near / Find Load for Driver
The Find Near option allows you to search for any Driver, Carrier, Resources, Freight Bill or Trip that is within a specified distance of the desired zone and other frames of reference.
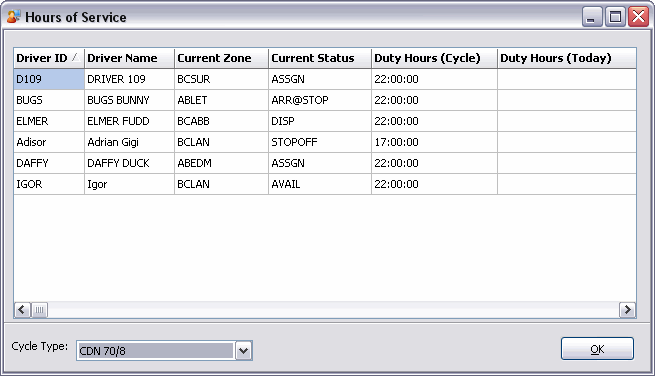
Find Driver by HOS
This option allows you to search for a Driver by their Hours of Service (HOS). Selecting the 'Find Driver by HOS' option will open the Hours of Service window, which allows you to select a specific HOS 'Cycle Type' in order to see which of your Drivers is available, based on their 'Current Zone', 'Current Status' and 'Duty Hours'.
Planning
The Planning option provides a calendar view, by day, of trips for each driver and power unit. This view includes icons to indicate late pick-up, late delivery, hours violation, hazardous and temperature controlled.
Set/Clear Filter
The Set Filter option supports the ability to create and apply a filter to any grid, regardless of the grid you were in when you opened the window.
Anchored Columns
To keep the columns on the far left of the grid from disappearing when you scroll the grid to the right, use the Anchored Columns menu option. You will be prompted to enter the number of columns you wish to anchor. The anchored columns will appear with a grey background and when you scroll the grid to the right, these columns will still be displayed.
Licensing
Driver’s License Numbers and License Expiry Dates are entered in the Driver Profiles program and displayed in the Licensing Information window. Also, the Driver’s License Notes can be modified, you will be prompted to save on Close. If a driver’s license has expired, the 'Expiry Date' field in the Driver grid will be displayed in bold green text and a grey background.
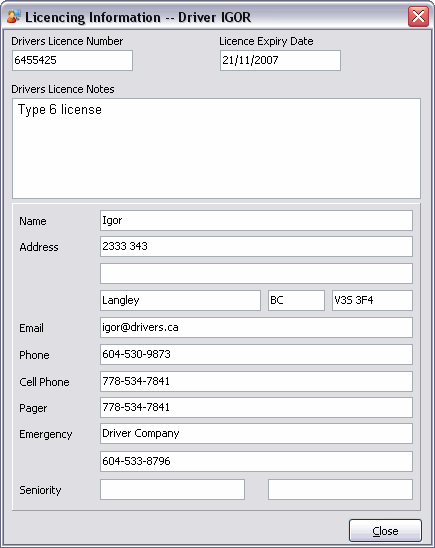
All of the information on this window will automatically populate in the various fields if has been filled out in the Driver Profiles program > Licensing tab and Tel #s tab.
Driver Diary
Select this option to access the Diary window for the selected Driver. You can also use the <Ctrl><Alt><D> hot-key to access the Diary. Access to this option is controlled by the Security Setup program.
Driver Pay
The Driver Pay option automatically generates unapproved driver’s pay based on the driver’s dispatch activity. The Unapproved Driver Pay window also supports the ability to add manual pay and deduction entries.
You can also edit the automatically generated driver’s pay. On save you will be prompted to maintain these changes to the automatically generated pay values, select Yes to keep the changes, select No to allow the changes to be recalculated on post.
Driver Pay is approved in the Driver Pay Audit program. The parameters for automatic driver pay are configured in the Driver Pay Contracts program and Pay contracts are assigned to drivers in the Driver Profiles program.
Trip View
The Trip View window provides very detailed information about a trip. When this option is invoked the trip on which the driver or equipment is currently active will be displayed. If the driver or equipment is currently available, or is assigned to a trip that is not yet active, the trip on which the driver or equipment was last active will be displayed.
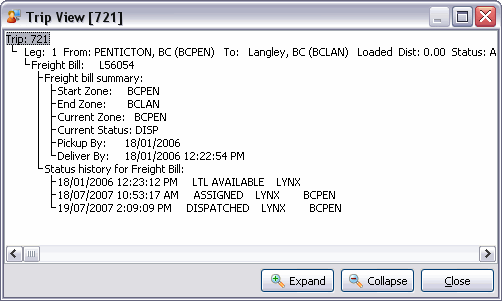
At the top of the hierarchy is the 'Trip number'.
Under the 'Trip Number' is each 'Trip Leg'.
Under the 'Trip Legs' is the 'Driver', Resources and Freight Bill(s) assigned to the leg.
Under each 'Driver' and Resource their location history (for the Trip) and their status history (for the Trip).
Under the Freight Bill is a Freight Bill summary and the Freight Bill status history (for the Trip).
Each level of the hierarchy can be collapsed or expanded by double clicking on the level above. The 'Expand' button at the bottom of the screen will expand all collapsed levels, while the 'Collapse' button at the bottom of the screen will collapse all expanded levels.
When this option is invoked from the driver grid, the trip on which the driver is currently active will be displayed. If the driver or equipment is currently available, or is assigned to a trip that is not yet active, the trip on which the driver or equipment was last active will be displayed.
Driver Check In
The Driver Check In function is used to create a "daily" trip for drivers assigned to the selected terminal.
Driver Call-In
This option opens the Driver Call-in program.
Manage Auto-Dispatch
The Manage Auto-Dispatch feature lets dispatchers view the status of any load offers, control the order of any newly offered trips for a particular driver, and automatically inform a driver when the system activates him on a particular trip or when dispatch revokes an offer.
New
This feature will launch the Driver Profile program to add a new driver to the system.
View Driver Profile
Selecting this option launches the Driver Profile program to view the driver profile details.
View Driver Logbook
Selecting this option will open the Logbook window, which pulls information from the Logbooks program for the selected Driver. However, if the selected driver is linked to Omnitracs’s Hours Of Service (QHOS) web service, some information are pulled from QHOS web service instead.
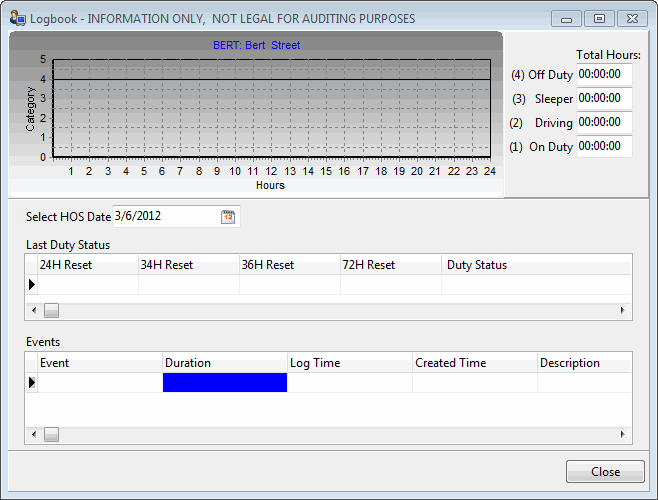
| The data pulled from Omnitracs’s Hours Of Service (QHOS), currently can’t populate the 24 hour, 34 hour, and 36 hour reset date/times. |
Status Change
You can change a driver’s status (available/unavailable) on the Resource Change Status window. The status codes defined with the code behavior of 'Availability' and 'Unavailability' as configured in the Codes Maintenance program are available for selection.
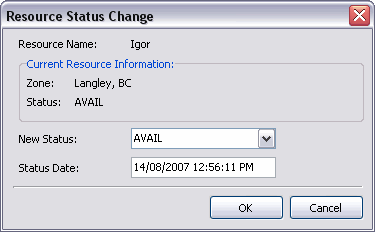
| Drivers who have a current status of 'Unavailable' cannot be assigned to trips. |
Special Events
The Special Events menu option displays all special events in the Special Events window, including those assigned to this power unit in the Special Events program or those created here.
| Using the Application Configurator program > DISPATCH.EXE > 'SE Warning Level' setting you can configure what level provides warnings for Special Events that are displayed when the equipment is assigned to a trip. |
View Vendors Profile
This option, if selected, will display the Vendor’s profile, in Customer and Vendor Profiles program.
Attach / Open Related Files…
Selecting this option will open the Attach / Open Related Files window.
Copy
Select this option to copy the text from within the selected field.
Navigate
The Navigate option contains the standard TruckMate Navigation Bar, used to browse the records within this grid.