Map View
| As of TruckMate 2021.1, the standalone Map View program is no longer available. For details, see the 2021.1 New Features Guide. |
To access Map View in TruckMate 2020.4 and earlier:
| From this location | Go to |
|---|---|
TruckMate Menu and TruckMate Task List |
Any of the following:
|
Windows Start Menu |
TruckMate 20xx > Map View |
Windows Explorer |
C:\Program Files (x86) > TruckMate 20xx > Mapview.exe |
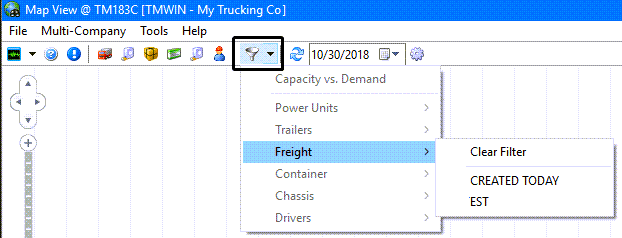
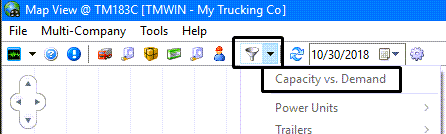
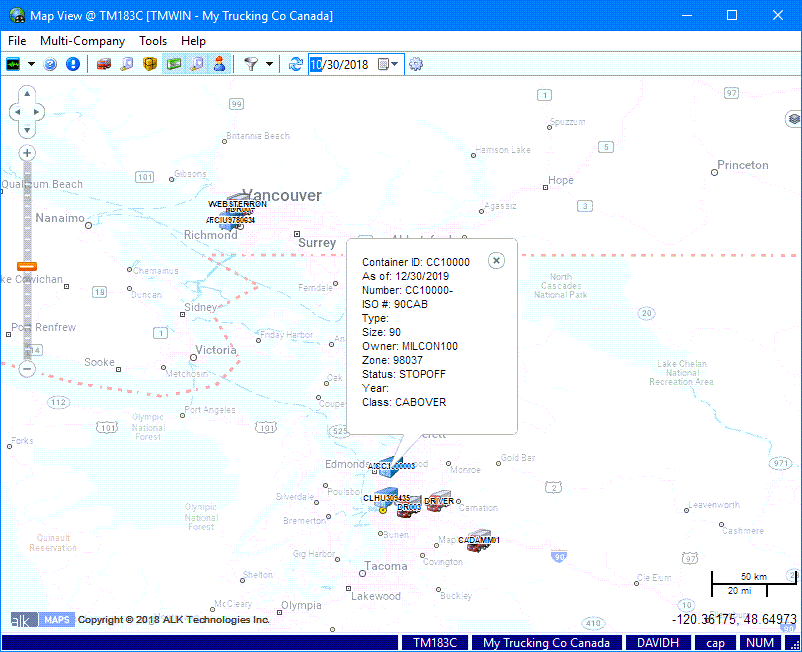
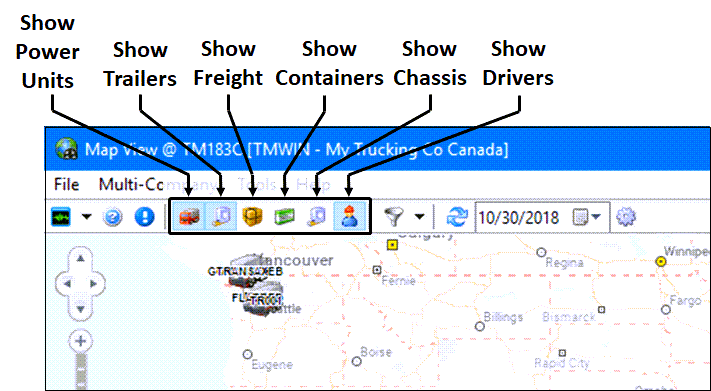
The Map View program is used to plot the location of resources such as:
-
Power units
-
Trailers
-
Containers
-
Chassis
-
Drivers
-
Freight
The position of these resources and equipment are displayed as icons on a map according to their current location (as described in the Dispatch and Multi-Mode dispatch programs, in the respective resource grids).
The program uses third-party mapping software, such as ALK Maps, PC*Miler Streets or Microsoft MapPoint, etc., in conjunction with what has been setup within the TruckMate Mileage Server Manager program.
Only equipment that has been designated as Active in Dispatch (as configured in the Power Unit Profiles program and the Trailer Profiles program, etc.) will be displayed. For information about mapping navigation tool and shortcut menu functions (e.g. for PC*Miler, refer to the respective mapping program documentation.
Before units can display, you must configure the colors that correspond to each of the status codes on the Map Configuration > Status tab.
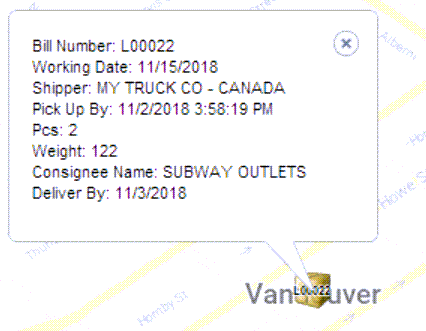
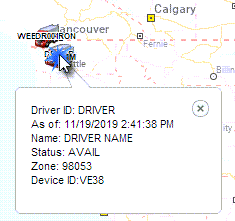
To view more information about the equipment, click the icon on the map that represents the equipment. The information displayed will be based on the options you selected using the Map Configuration function. If more than one piece of equipment is at the same location, you will be able to select the specific piece of equipment for which you wish to view more information.
Application Configurator for Map View
The following Application Configurator options are listed under Configuration Options > MAPVIEW.EXE.
| Option | Definition | Values |
|---|---|---|
ALK Maps API Key |
API Key for the ALK web maps. |
The key as provided during implementation or by Trimble Transportation Support. |
Max number of points to plot on map |
Controls the number of points displayed on the window |
Must be a whole number greater than or equal to 1. |
Use Debug |
Turns on debugging and writes the results to a log file. (C:\ProgramData\TruckMate) |
True False (default) |
Security Configuration for Map View
There are no specific options available in the Security > Business Events section of Security Configuration directly related to the Map View executable.
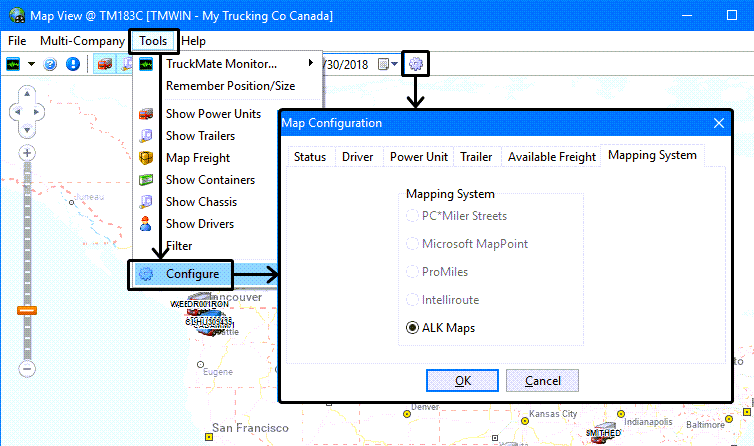
Configuring Map View - Map Configuration
The Map Configuration window contains several sub-tabs that control how the Map View program appears and functions.
To open the Dispatch > Map Configuration window, select Configure from the Tools menu.
Status tab
The Dispatch > Map Configuration > Status tab refers to the equipment’s current status, as configured in the Codes Maintenance program and assigned to equipment in the Dispatch program and the Driver Call In programs. The status options refer to the Code Behavior of the equipment’s current status. You can assign a color to the equipment icon that displays on the map based on the Code Behavior of the equipment’s current status.

| The color will only apply if just one piece of equipment is at any given geographic location on the map. |
Driver tab
On the Dispatch > Map Configuration > Driver tab, you can select which information values to display when you click to select a specific Driver’s icon on the map.
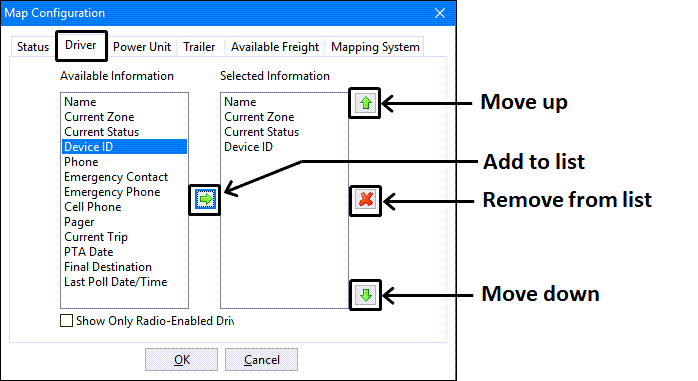
-
To add data to the display, select the desired fields from the Available Information column on the left and click the
 green arrow button to copy the field to the Selected Information column on the right.
 -
To change the display order the fields, select a field and use the green
 up and
  down arrows to relocate the position of the field in the display.
 -
Use the
 red X to remove items from the Available Information column. (They will not be deleted from the Available Information list.)
 -
Select the Show Only Radio-Enabled Drivers checkbox to display only Drivers that have allotted remote devices in the Mobile Device Maintenance program. Clear the checkbox if you want all Drivers to display on the map.
The fields in the Selected Information column determine what will appear on the main Map View window when you click to select a driver icon.
Power Unit tab
On the Dispatch > Map Configuration > Power Unit tab, you can select which information values to display when you click a power unit on the map. To add data to the display, click the desired field in the Available Information column, then click the ![]() green arrow to copy the field to the Selected Information column. The green
green arrow to copy the field to the Selected Information column. The green ![]() up and
up and ![]() down arrows are used to re-order the fields and the
down arrows are used to re-order the fields and the ![]() red X will remove the field.
red X will remove the field.
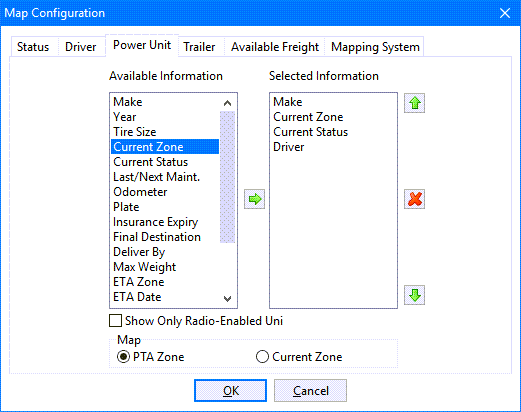
-
Select the Show Only Radio-Enabled Units checkbox to display only units that are equipped with remote devices and configured in the Mobile Device Maintenance program, check this box. Clear this checkbox if you want all units to display on the map.
-
Select from either PTA Zone (Projected Time of Arrival) or Current Zone.
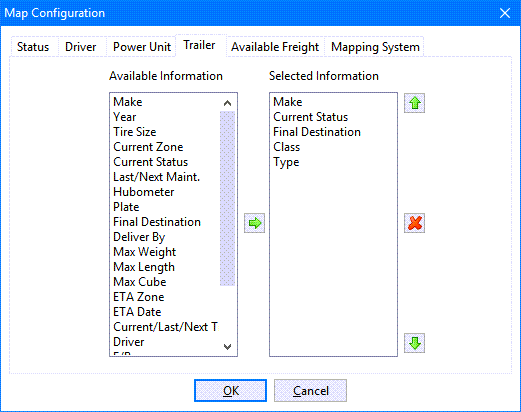
Trailer tab
On the Dispatch > Map Configuration > Trailer tab, you can select which information values to display when you click a unit on the map. To add data to the display, click the desired field in the Available Information column, then click the ![]() green arrow to copy the field to the Selected Information column. The green
green arrow to copy the field to the Selected Information column. The green ![]() up and
up and ![]() down arrows are used to re-order the fields and the
down arrows are used to re-order the fields and the ![]() red X will remove the field.
red X will remove the field.
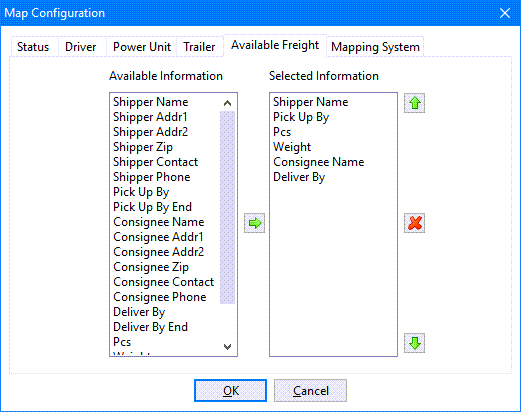
Available Freight tab
On the Dispatch > Map Configuration > Available Freight tab, On the Dispatch > Map Configuration > Trailer tab, you can select which information values to display when you click a unit on the map. To add data to the display, click the desired field in the Available Information column, then click the ![]() green arrow to copy the field to the Selected Information column. The green
green arrow to copy the field to the Selected Information column. The green ![]() up and
up and ![]() down arrows are used to re-order the fields and the
down arrows are used to re-order the fields and the ![]() red X will remove the field.
red X will remove the field.
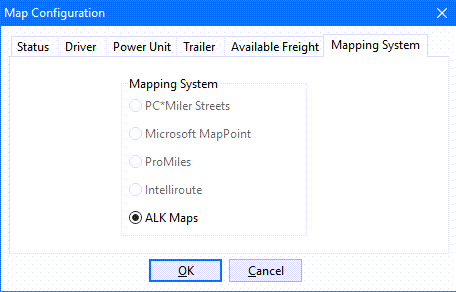
Mapping System tab
The Dispatch > Map Configuration > Mapping System tab details all of the installed Mileage Software solutions on your system. If you have multiple Mileage Software solutions installed on your machine, you may choose between them by selecting the radio option next to the installed software. Select the 'OK' button to return to the Map window.
Installing a new ALK Maps license key
If you are using the default ALK Maps as your Map View mapping tool of choice, an ALK Maps API license key is required. To obtain and install a new ALK API license key:
-
Contact Trimble Transportation Support if you do not already have an ALK API license key.
-
Go to Utilities > Application Configurator
-
Select MAPVIEW.EXE from the list of configuration options.
-
Double-click ALK Maps API Key, enter the key value and click OK.
-
Go to Dispatch > Truckload > Map View.
-
In Map View, select Tools menu > Configure.
-
The Map Configuration window will open.
-
Go to the Mapping System tab and verify that ALK Maps is selected.
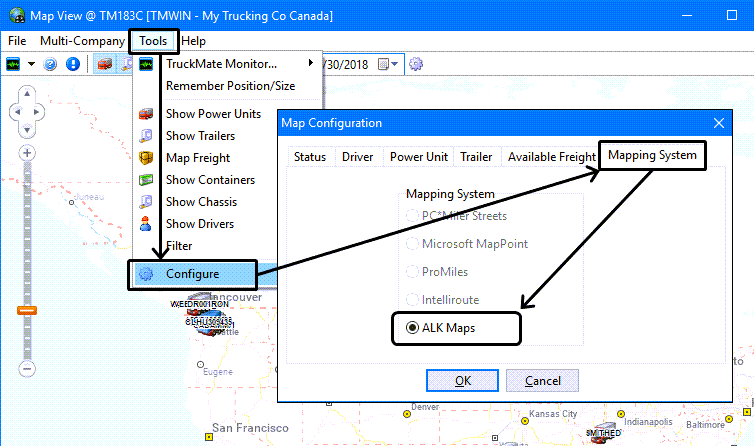
-
Click OK and accept the user agreement.
Plotting resource locations using Map View
-
Go to Dispatch > Truckload > Map View.
-
The Map View window will be displayed.
-
Click one or more of the resource type buttons in the tool bar to see icons representing individual items for each of the selected types appear on the map view. (The selected resource type buttons will be highlighted with a light blue color.)
-
Click the
 Refresh button.
Note: Before units can display, you must configure the colors that correspond to each of the status codes on the Map Configuration > Status tab.
-
To view more information about the equipment, click the icon on the map that represents the equipment. The information displayed will be based on the options you selected using the Map Configuration function for each resource type.
Note: Show Freight will display available load information.