Additional functions

Additional Customer Information
The Client Information / Specifications window will appear when the user clicks the 'Rolodex' button from within the header section of the Customer Service program. It displays some additional information regarding the highlighted Customer or Vendor.
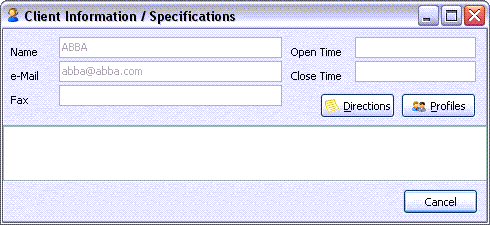
The information displayed on this window is all populated from the Customer & Vendor Profiles program. The large text field will display the notes entered into the Customer Profiles > Notes Tab 'Specifications' text field.
Click the Local Directions button to add Directions to the current Customer or Vendor.
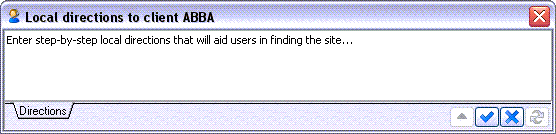
The Local Directions window allows you to enter free format Notes detailing the Directions to a Customer or Vendor’s site of operation. Enter the Directions as you would in any other 'Note' window.
Detention Form
The Detention window will appear when the user clicks the 'Detention' window on the Status Tab (or uses the <ALT><J> hot key). This window will automatically populate with the 'Pickup' and 'Delivery' information from the Freight Bill and any Detention Charges that have accrued against the Bill.
Pickup Information
The fields in this section will automatically populate with the Freight Bill’s Pickup information.
Delivery Information
The fields in this section will automatically populate with the Freight Bill’s Delivery information.
Billing Option
Choose how you would like the Detention charges to be applied:
-
Acc Charges: Detention charges will appear on the original Freight Bill as a Accessorial Charge.
-
Invoice: Detention charges will be applied on a new Freight Bill.
Manual Rate
Select this flag to manually audit the Detention information (dates, charges, rate, etc.) for the selected Freight Bill.
Currency
Sets the currency of the Detention charges.
Time Units / Rate Units
Select the Time and Rate Units for the Detention calculations using their respective drop-down menus.
History Grid
If any Detention e-mails have previously been sent out for the selected Freight Bill, they will be displayed in this grid. Select a particular e-mail record to have its details populated into the two-sided E-Mail window below the History Grid.
E-Mail Grid
When an e-mail record is selected in the History Grid, the e-mail message’s details will be displayed here. On the left pane of this window the e-mail message’s contents are displayed, while on the right page the e-mail addresses it was sent to are shown.
Detention Buttons
Calc
Select this button to calculate the Detention charges using the available Pickup and Delivery information. Detention Rating charges will be determined by the Detention Rating Rate Sheets as setup and applied to specific Clients on the Rates Maintenance program > Detention Tab.
| If no Detention Rates have been setup, the user can still calculate Detention manually in this window by selecting the 'Manual Rate' flag (above) and entering the required information. |
Select this button to access the TruckMate E-mail System, which will allow you to setup and send the Detention e-mails.
FB Notes
Select this button to access the Notes window for the selected Freight Bill.
Find Customer
The 'Find Customer' window will display when the 'Find' button is clicked from within the header section of the Customer Service program. It displays a list of the Customers configured on your system from within the Customer & Vendor Profiles program.

The Find Customer window implements a 'Partial Information Logic' feature to make your searches easier. What this means is that if you enter any text into the 'Caller', 'Shipper' or 'Consignee' fields before clicking the 'Find' button, that text will be used to filter the available records in your system. If you leave the text field blank, all records will be included in the 'Customer Search' window.
Freight Bill History
The Freight Bill History functionality is unknown to most users of Customer Service. To access these windows, simply click on the word 'Original', 'Credit', 'Rebill' or 'Inter Company' (depending on which type of Freight Bill you are viewing). If multiple versions (Credits / Rebills) exist for the current Freight Bill, these windows will let you view a listing of the previous iterations of the Bill. All of the fields within the Freight Bill History module are read-only and for informational purposes.
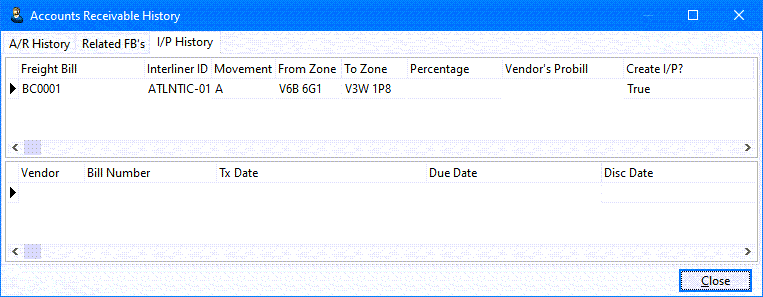
A/R History Tab
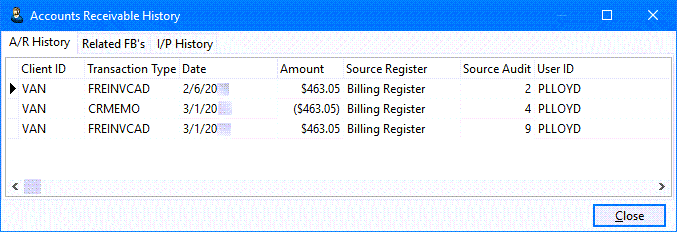
This Tab automatically populates with the current Freight Bill’s Accounts Receivable data from the Accounts Receivable Module of TruckMate.
Related FB’s Tab
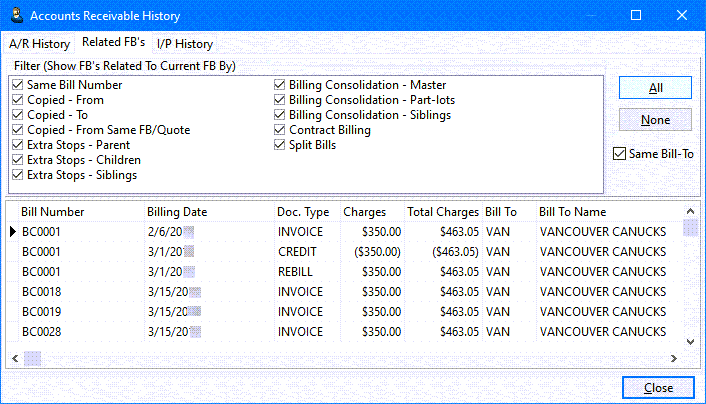
The Related FB’s Tab gives the user a quick way to see all of the Freight Bills in the system that are related to the currently displayed Freight Bill in the main Customer Service window. The user can use any of the flags in the Filter section to toggle the display of related Freight Bills, based on if they were 'Copied…', are 'Extra Stops' or are part of a similar 'Billing Consolidation…'.
| The user can employ the 'All' and 'None' buttons to quickly select/de-select the entire Filter set. |
The 'Same Bill-To' flag will toggle the display of the Freight Bills below based on their shared Bill-To party. If selected, only those Freight Bills with the same Bill-To party as the 'working' Freight Bill in the main Customer Service screen will display.
Cross-Company Viewing Functions
If the Cross-Company Viewing option is on:
-
the grid will include a Company ID (integer) column;
-
the grid may show FB’s from other companies (depending on your filter choices);
-
a new checkbox filter, Inter-Company Transfer, will be displayed; if checked and the current FB is part of an IC transfer, then the FB from the "other" company will be shown in the grid.
If Cross-Company Viewing is off, the grid column and checkbox are invisible and no matter what filters are chosen, only FB’s from the current company will be displayed in the grid.
For more information, see the Cross-Company Viewing documentation.
Freight Bill Imaging
Right-clicking any grey area in the Customer Service program will allow you to access Freight Bill Imaging, provided you have Imaging software configured in the Codes Maintenance program (and a contract with a supported Imaging software Vendor).
View Images Via <Vendor>
Hover your mouse over this option to see the available Image Types for supported Image types. When you select an Image, it will be displayed via the Imaging Vendor’s software. In TruckMate 20xx, if working with a Consolidated 'Master' Freight Bill, you can view the Images attached to the original Freight Bill as well. If you are on a Consolidated 'Master' Bill, the right-click Context Menu will show you separate lists for the Master and the Original bills. Each will have sub-menu of showing different type of available Images.
Freight Board Interface
The Freight Board Interface (FBI) is an application that runs in the system tray. It accepts requests (via TCP strings) from various TruckMate applications to post or cancel a Freight Bill load or equipment to various load matching websites. See the following list to see which load matching websites are supported.
-
TransCore’s DAT (license # 36001 required)
-
PostEveryWhere’s PEP (license # 36002 required)
-
GetLoaded (license # 36003 required)
-
Internet Truckstop (license # 36004 required)
-
Flying J (license # 36005 required)
-
TruckloadRate (license # 36006 required)
Right-clicking any grey area in the Customer Service program will allow you to access FBI functionality, provided you have installed the TMW FBI application, and have one of the six required licenses installed via the License Registration program. Once installed, just run the TMW FBI application (which will load into your system tray) and then access the right-click options in Customer Service:
Post Load
Selecting this option launches the FBI application, and attempts to create a posting for the Freight Bill data you right-clicked from. The first time you the FBI, you will need to fill out some setup info ('FTP site', etc.).
Cancel Load
Whenever loads have been posted to one of the six available load handling websites, the user can select this option to cancel the load (or truck,) removing the posting from the load boards.
For setup instructions for the Freight Board Interface, see How do I install the Freight Board Interface utility?
LTL Delivery Options
The Less than Truck Load Options window allows you to specify any additional information regarding LTL deliveries. If your LTL Shipment is being delivered to an office building, for example, you can input the 'Suite', 'Floor', and/or 'Dock Number' in the upper section of the window.
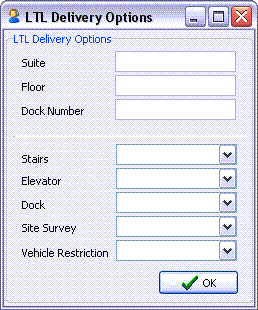
The lower section of the window allows you to specify some general characteristics of the Delivery site. Use the pull down menus to specify if there are 'Stairs' present at the site, or if an 'Elevator' is available.
If the Driver can make the Delivery via a 'Dock' specify this here, as well as if 'Site Surveys' or 'Vehicle Restrictions' are required.
Notes
There are nine Tabs available on the Notes form: 'Billing', 'Container', 'Driver', 'OSD', 'Other', 'Write Off', and 'User 1' - 'User 3'. Freight Bill Notes can also be entered and viewed in the Dispatch program, the Local Dispatch program, the Driver Call In program, the Trip Tracer program, and the AR Inquiry program. You can apply special formatting characteristics (such as bolding or colored text) to the Freight Bill notes. Right click in the Notes form for a menu of formatting options. After entering notes, be sure to click the Post button at the bottom right corner of the notes form.
You can also display the Notes window by using the '<CTRL><N>' Hot Key combination.
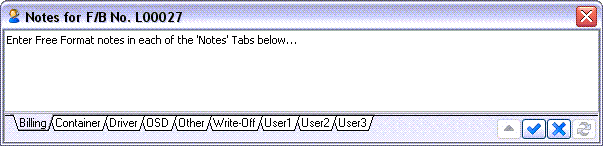
The 9 Notes Tabs correspond to various areas of the TLORDER Table. You can configure any of the Tab labels by changing their values in the Application Configurator program > NOTES section. The correspond configuration options are labelled 'TLORDER Tab 1 - 9'.
One example would be to change the labels of the custom 'User 1 - 3' Tables to something like 'Shipper', 'Consignee' and 'Bill-To' and enter specific Notes depending on the Freight Bill for each of the attached Clients.
The User can change also the Notes window’s format to either 'Normal' or 'Journal-Style' (which stamps each entry with the User name and Date/Time stamp) by changing a set of options in the Application Configurator program > NOTES section. Each of the 9 Tabs above pulls from the TLORDER Table, so use the NOTES.EXE options 'TLORDER Journal-Style 1 - 9' to change the style.
Using the Application Configurator program > NOTES > 'Rate Logging' option, you can configure one of the 9 Notes Tabs to display how the Rating logic for the attached Freight Bill was determined.
| If using 'Journal-Style' Notes, only those users with 'Supervisor' security clearance (as configured by the 'Supervisor' flag on the Security Setup program > Groups Tab per User Group) can edit the top section of the Note. |
Quotes
If the Bill-To customer (indicated by the radio button selected in the Bill-To section of the screen) has any Quotes issued to it, the number of Quotes will be displayed in the area below the Freight Bill number field (i.e. '3 Quotes'). You can view Quotes issued to the customer who is the Caller on the Freight Bill by double-clicking on the Quote text. Quotes can also be viewed on the Quotes Tab, or by clicking the Find Quotes button. Quotes are created clicking the Quote button after entering the Freight Bill on the Quotes window.
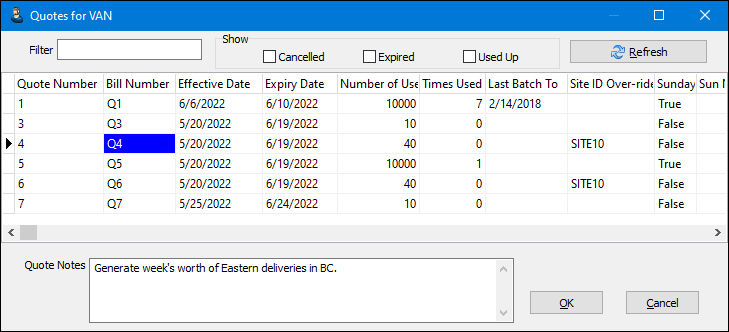
Filter
You can enter text strings to Filter the available Quotes.
Refresh
Click the Refresh button to apply any Filter values you have entered onto the records within the Quotes Grid.
Quotes Grid
The Quote window Grid contains hundreds of different fields detailing all aspects of the Quote in question. All of these fields are read-only and contain information relating to the quote. To easily search for records you need to work with, you can Filter the Grid at any time by double clicking the field name you would like to Filter by.
Quote Notes
Enter any free format textual Notes pertaining to the current Quote.
| Quotes can also be created in the Rates Maintenance program. |
Edit This Quote
This selection opens the Edit Quote window that allows the user to set the following values for the Quote.
Effective Date
This displays the Date from which the quote became Effective.
Expiry Date
This displays the last day for which the quote is effective.
Total Uses Allowed
This value is the number of times that the customer may use the quote.
Times Used To Date
Each time the quote is used, this value is incremented by one. When the Times Used value matches the # of Uses value, users will be prevented from creating Freight Bills from Quotes.
Last Batch Copy End
This field is read-only and indicates the highest end date of the Date Range Copy option used on this Quote.
Site ID Over-ride
Assign the specified Site ID to the new Freight Bills instead of the Site ID specified in the original Quote bill. If left blank, the Site ID from the main Customer Service screen will be used.
LTL Daily Order / LTL Terminal
Selecting the 'LTL Daily Order' flag and providing an 'LTL Terminal' will make the displayed quote available in the City Dispatch program > Daily LTL Quotes window when the City Dispatch user is working in the chosen Terminal.
Recursive Usage - Number to Create
These settings allow you to control which days the quote can be used to create a Freight Bill on. Check the flag next to the Days you would like to allow this Quote to be used for Freight Bill creation. This makes it possible to prevent uses of discounted rate Quotes on high service cost days such as weekends.
Creating Orders from Quotes
A User may use the Create Orders from Quotes window to create many orders from the Quotes in the system by setting a Date Range.
Quote Pickup / Delivery times Rule
Choose the way you would like the date of your Orders to be formatted. The 'Quote Date Time' option will simply use the Date stamp of the Quote itself for the new Order. Choosing the 'Set Date Time' or the 'Set Date and use Quote Time' will require you to enter a 'Pickup' and 'Delivery' time manually by double clicking in the fields directly below this section. If you choose the 'Create Batch (Pickup Date Range)' option, you must specify a Date Range in the 'Batch Pickup Date Range' section.
Create Trip and Assign Resources
The selected TLORDER quote record(s) must have a Driver, Power Unit, and/or Trailer assigned to the quote, so that these resources will be assigned to an automatically generated trip(s). If the Create Orders function was applied to multiple orders, then many trips will be created. In either case, the 'Automatically Post' option is overridden (cannot be unchecked) and the created order(s) will automatically be posted into a new Freight Bill number (or numbers).
A confirmation window will appear asking if you wish to exercise the copy feature - this is the core of the recurring freight feature.
Based on the settings in the Application Configurator applicable to copying Freight Bills, (defaults that show in the Copy Form), Quotes are copied to orders based on the number intended for that day of week.
Service Level Warning Notice
Under certain conditions when using Zone-based Service Levels (or the Service Level Matrix), the Service Level Warning Notice window will appear, stating that the Freight Bill’s route (defined by the selected Start / End Zone combination) is not serviced at the selected 'Service Level' (seen at the bottom of the Details Tab). If there are alternate Service Levels when the selected Route is serviced, they will appear for selection in the grid on this window. Selecting an alternative Service Level will alter the selected Service Level for the Freight Bill. If there are no Service Levels available, you can configure one in the LTL Service Level Maintenance program.
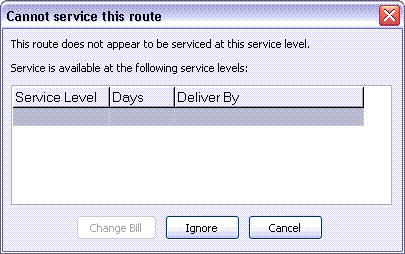
Change Bill
If a Freight Bill’s chosen route (Start Zone to End Zone) appears in the Zone Tree of one of the Service Levels in the TruckMate database, that Service Level will appear in the grid of this window. The user can then select the Service Level and click the 'Change Bill' button to change the Service Level on the Freight Bill, which will automatically be saved.
Ignore
Selecting this button will ignore the Service Level warning and save the Freight Bill with its chosen Service Level.
Cancel
Selecting this button will cancel out of this window and leave the Freight Bill in edit mode.
| To disable this appearance of this window, set the Application Configurator program > CSERV.EXE > 'Get Delv Time on Save' option to 'False'. |
Skid Dimensions Entry
Use the Hot Key combination '<CTRL><K>' from the Details Tab to open the Skid Dimensions window to access the Skid Dimension Entry form. This form will allow you to enter a Shipment’s Density by telling the program the measurements of the Skids involved in transport. A shipment’s density is one of the factors that determines the freight rate. Shippers need to know how to calculate a shipment’s density so they can properly describe their goods on the Freight Bill. The total weight of the shipment is divided by the total cubic feet to determine the density.
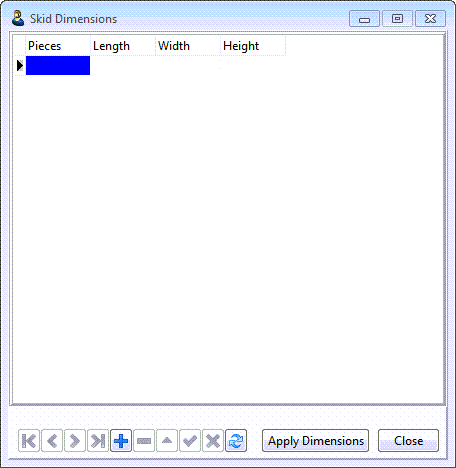
Unlike the Skid Dimensions window in older versions of TruckMate, which were limited to 30 entries, the new form is table based, which means there is no limit to the number of entries to be made.
| The old Skid Dimensions form can still be used if there is a need for it (for data compatibility reasons). To use the old form set the 'Use Old Skid Dimension Calculator' apps config option under 'CSERC>EXE' to 'True'. Utilities > Application Cofigurator > Bill > CSERV.EXE |
Pieces
Enter the number of pieces.
Length
Enter the length.
Width
Enter the width.
Height
Enter the height.
Apply Dimensions
Selecting this button will use the entered numbers to calculate 'Dim Weight' of the Skid according to a formula. The values you enter should be in inches.
Terminal Plan
The Terminal Plan window displays the current Freight Bill’s LTL Terminal Plan. A Terminal Plan, stored in the TLORDER_TERM_PLAN Table, provides visibility on the planned Terminal sequence for a Freight Bill before it arrives at a dock facility. A Terminal Plan allows users in the Crossdock program to plan for Freight Bills before they are en route to that CrossDock facility. This feature replaces the 'Next Terminal Zone' field throughout TruckMate.
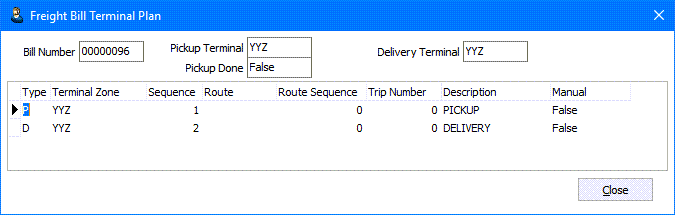
The Freight Bill Terminal Plan window displays some general information about the current Freight Bill in the header section, as well as the Terminal information defined on the Customer Service > LTL Tab. In the Terminal Plan window grid, you will see various records, each with a specific 'Type':
-
'P' (Pickup Leg): specifies the information for the Pickup Leg of the Trip.
-
'I' (Intermediate Leg): specifies the information for the Intermediate Leg of the Trip.
-
'D' (Delivery Leg): specifies the information for the Delivery Leg of the Trip.
-
'P01, P02, etc.' & 'D01, D02, etc.': these records refer to Attempted Picks and Attempted Deliveries (respectively). For more information on these kind of records, as well as how to set them up, see the LTL Tab.
Some data can be directly manipulated on the Terminal Plan window via right-click Context Menu.
Context Menu
Change Pickup Terminal / Change Delivery Terminal
These options allow you to edit the 'Pickup' and 'Delivery' Terminal Zones of the Freight Bill (as specified on the LTL Tab). Normally the Terminal Zone selected is chosen based on the 'Start' and 'End' Zones of the Freight Bill, but if you require to change the Terminal Zone, you may do so with these options.
Transfer To
This option is available for 'I' (Intermediate) detail lines. Selecting 'Transfer To' will allow you to designate a second 'I' detail line for the movement of Freight to another Terminal. When selected, a search window will open that will allow you to choose from one of the Terminal Zones defined in your database.
Set Trip Number
Selecting this option allows the User to manually enter a Dispatch Trip Number for a selected grid line, whether it be of 'P', 'I' or 'D' Type. A small window will appear, where the User must manually enter the Trip Number.
Set Trip to Zero
If a Trip Number was incorrectly entered against a Terminal Plan detail line, the User may use this option to reset it to '0'.
Delete Intermediate Record
Selecting this option allows the User to remove the 'I' detail line from the Terminal Plan window.
Set Route
Selecting this option will open a small window where the User may enter the City Dispatch 'Route' for the selected detail line.
Set Sequence
Selecting this option will open a small window where the User may enter the City Dispatch 'Route Sequence' for the selected detail line.
Miscellaneous Functions
Resizing the Screen
Most TruckMate programs were designed for screens set to a resolution of 800x600 and do not re-size optimally at higher resolutions. As of TruckMate 6.1 this has been changed for Customer Service. When the Maximize window button is clicked, the program window will increase to fill the entire screen and the button bar to the right of the screen will shift position upwards to allow the detail Tabs to fill the lower part of the screen.
Keyboard Shortcuts
Many Customer Service functions can be accessed using key combinations. See the Keyboard Shortcut documentation for more information.
Message Checking
The message checking setup, previously found in Customer Service, Trip Tracer, Dispatch, and Driver Call-in programs has been moved to the Security Setup program. This gives you greater flexibility over your message checking functions. Follow the steps found in the Security Tab to set up 'users' and even, 'groups' of users with the same security settings.