Load Optimizer Window

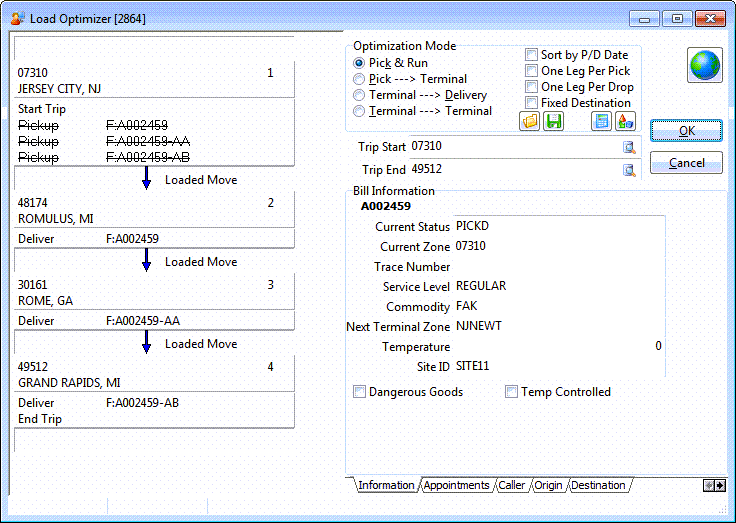
The Trip Optimization feature is used to optimize trips by creating trip legs based on the Pickup and Delivery locations of the freight bills assigned to the trip. In order to use this feature, the Optimize Interliner setting must be set to True in the Application Configuration program. The Load Optimizer window is split into three main areas, as follows:
| A trip can be optimized or re-optimized at any time using this function. For example, after one or more legs on a trip have been completed you may assign additional freight bills to the trip and re-optimize any pickups or deliveries that have not been completed. |
Trip Legs Section
The Trip Legs section of the Load Optimizer window (left side) displays a graphical breakdown of the Trips attached to the current Freight Bill. This section is used to manually optimize a Trip using your mouse. A small 'building' icon (as in Leg # 1 in the image above) indicates that the Leg is a Terminal Zone. The Trip Leg section is the 'working area' where you will be able to manually configure your Trip details. To edit the data in this Panel, use the Context Menu. This panel is also used to manually optimize the trip.
| If the user attempts to optimize a Trip with a Zone Code that does not exist or is set to 'PENDING', a pop up message will inform the user that this must be fixed before the Trip can be properly optimized. The process will not be stopped, but if the user ignores this warning, an exception is logged to the EXCEPTION_LOG Table. |
Optimization Mode Section
The Optimization Mode section provides the ability to Semi-automate the optimization by defining optimization rules and style. Also available is the Automated Optimization which uses the Mileage Server program to compare the distance between leg zones and create the most efficient trip.
Optimization Styles
Pick & Run
This option creates legs for all freight bill pickups and deliveries, based on the Current and End zone of each freight bill. If more than one freight bill has the same Current or End Zone they will be grouped on the same leg. Unless the One Leg Per Pick or Drop Optimization Rules have been selected.
Pick → Terminal
If this option is selected, you must enter a Terminal Zone in the Trip End field. When the Calculate Legs button is clicked the system will create legs for each pickup starting with the zone specified in the Trip Start field. The trip’s final leg will end at the terminal zone specified in the Trip End field.
Terminal → Delivery
If this option is selected, you must enter a Terminal Zone in the Trip Start field. When the Calculate Legs button is clicked the system will create legs for each freight bill delivery starting with the Terminal zone specified in the Trip Start field. The trip’s final leg will end at the zone specified in the Trip End field. Normally this option is only used for freight bills whose Current Zone is the same as the zone specified in the Trip Start field, such as freight bills that have been assigned a Docked status in the Dispatch program and are therefore currently located at a terminal.
Terminal → Terminal
If this option is selected, you must enter a Terminal Zone in the Trip Start and the Trip End fields. When the Calculate Legs button is clicked the system will create legs for the Terminal zone specified in the Trip Start and Trip End fields, and will assign the pickup of each freight bill to the Trip Start leg, and the delivery of each freight bill to the Trip End leg.
Optimization Rules
Sort by P/D Date
Selecting this flag will sort the Trip Legs by their Pick / Drop Dates, allowing the user to bypass mileage calculations altogether when optimizing their Trips.
One Leg Per Pick
If this box is checked, a leg representing each freight bill’s pickup (using the freight bill’s Current Zone) will be created, even if more than one freight bill has the same Current Zone.
One Leg Per Drop
If this box is checked, a leg representing each freight bill’s delivery (using the freight bill’s End Zone) will be created, even if more than one freight bill has the same End Zone.
Fixed Destination
If this box is checked the trip uses a fixed destination.
Optimization Buttons
Load Route
![]() To recall a route that has been stored using the Save Route function, select this button. Select the desired route from the form, and click OK to copy the route to the Trip Leg section of the Optimization form. When existing pickup and delivery legs in the Trip Leg section match legs stored in the route, the freight bill pickups and deliveries will be copied to the legs. If pickups and deliveries exist for zones not included in the route, they will be included in the new trip structure.
To recall a route that has been stored using the Save Route function, select this button. Select the desired route from the form, and click OK to copy the route to the Trip Leg section of the Optimization form. When existing pickup and delivery legs in the Trip Leg section match legs stored in the route, the freight bill pickups and deliveries will be copied to the legs. If pickups and deliveries exist for zones not included in the route, they will be included in the new trip structure.
| You can use the Filter in the Route Selection form to Filter the available routes based on the text you enter, making finding a route much easier than scrolling through the entire route list. |
Save Route
![]() This option is used to store the sequence of legs that is currently configured in the Trip Leg section of the Optimization form. After you have configured the desired trip structure by manually organizing legs in the Trip Leg panel, or by clicking the Optimize button, you can click the Save Route button to store the route for future use. To store the route, enter a description in the Title field and click the Save button. To delete a route, select the route in the grid and click the Delete button. To change a stored route, configure the desired trip structure, click the Save Route button, and then select the route that you wish to update in the grid. Click the Replace button to copy the new trip structure over the existing route. These routes can be recalled using the Load Route option above.
This option is used to store the sequence of legs that is currently configured in the Trip Leg section of the Optimization form. After you have configured the desired trip structure by manually organizing legs in the Trip Leg panel, or by clicking the Optimize button, you can click the Save Route button to store the route for future use. To store the route, enter a description in the Title field and click the Save button. To delete a route, select the route in the grid and click the Delete button. To change a stored route, configure the desired trip structure, click the Save Route button, and then select the route that you wish to update in the grid. Click the Replace button to copy the new trip structure over the existing route. These routes can be recalled using the Load Route option above.
Calculate Legs
![]() The Calculate Legs option will calculate Trip Legs based on the Freight Bill’s pickup and drop locations, the Optimization Style and Optimization Rules selected. The results display in the Trip Legs section for review.
The Calculate Legs option will calculate Trip Legs based on the Freight Bill’s pickup and drop locations, the Optimization Style and Optimization Rules selected. The results display in the Trip Legs section for review.
| The Calculate Legs function will create legs for each freight bill pickup and delivery, but will not attempt to order the legs in a logical sequence beyond creating the pickup legs before the drop legs. Use Automated Optimize procedure to have the system determine the logical order of legs, or manually order the legs in the Trip Leg section of the screen. |
Optimize
![]() Selecting this button will calculate the trip configuration and optimize the Trip. The results display in the Trip Legs section for review.
Selecting this button will calculate the trip configuration and optimize the Trip. The results display in the Trip Legs section for review.
| If the user attempts to optimize a Trip with a Zone Code that does not exist or is set to 'PENDING', a pop up message will inform the user that this must be fixed before the Trip can be properly optimized. The process will not be stopped, but if the user ignores this warning, an exception is logged to the EXCEPTION_LOG Table. |
| The Optimize function does not take into account the fact that pickups must occur before deliveries. Therefore, after using this function, you must check the results in the Trip Leg panel of the screen, and make manual adjustments as necessary. |
Show Map
![]() Select this button to view the Trip Route using your Default Mapping software. Right-click this button to access a context menu where you can choose your Default Mapping software from one of three options ('PC*Miler Streets', 'Microsoft MapPoint' (2004 or 2006) or 'ProMiles').
Select this button to view the Trip Route using your Default Mapping software. Right-click this button to access a context menu where you can choose your Default Mapping software from one of three options ('PC*Miler Streets', 'Microsoft MapPoint' (2004 or 2006) or 'ProMiles').
Bill Information Section
This section contains nine tabs to view Freight Bill information including 'Information', 'Appointments', 'Caller', 'Origin', 'Destination', 'Other Contact', 'Summary', 'User Defined Field' and 'Trip Template' information (if the selected Trip was generated from a Trip Template). A single click on a Freight Bill number in the Trip Legs section displays the details in these Tabs.
Options Tab
The Options Tab allows the User to limit the information displayed for each Trip Leg in the Trip Legs section (on the left side of the Load Optimization window). You can choose to display or hide the following TruckMate resources from the Trip Legs section: 'Freight Bills', 'Power Units', 'Drivers', 'Trailers', 'Containers' and 'Miscellaneous Equipment'.
Select the 'Refresh' button to see how the Trip Legs section is affected by your changes on this Tab.