TruckMate Tier Administration Tool
The TruckMate Tier Administration program is a tool used by TruckMate implementation staff for setting up and configuring the TruckMate SOAP based API. Following the initial installation of the TruckMate (SOAP) API on a client machine, implementation personnel must use the TruckMate Tier Admin tool to configure the components, services, and users that can access TruckMate API functionality.
For installation procedures for the TruckMate (SOAP) API, refer to the TruckMate API Implementation Guide (SOAP Interface) available on the Trimble Transportation Learning Center.
The configuration options appear in a tree menu on the left and the details for each are populated using the window on the right.
| Implementation staff should use the options listed on the API Parameters Tree in a chronological manner, starting with the first option 'Web Service' and continuing down towards the 'Log' and 'Register Supporting DLL’s' options (if required)._ |
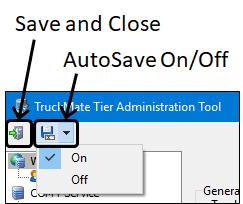
The two functions in the top task bar are used to save or auto-save changes.
To access the TruckMate Tier Administration Tool:
| From this location | Go to |
|---|---|
Windows Explorer |
C:\Program Files (x86) > TruckMate 20xx > TruckMateTierAdmin.exe |
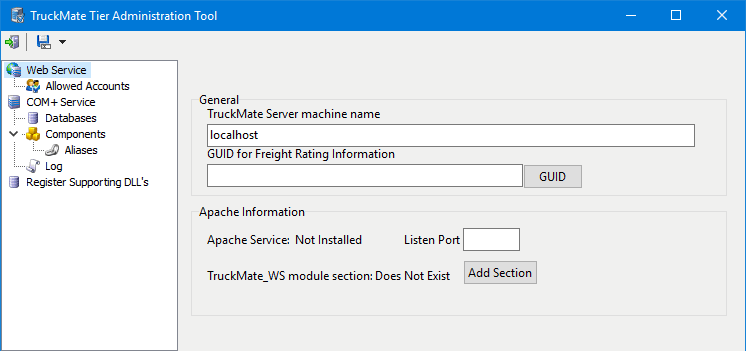
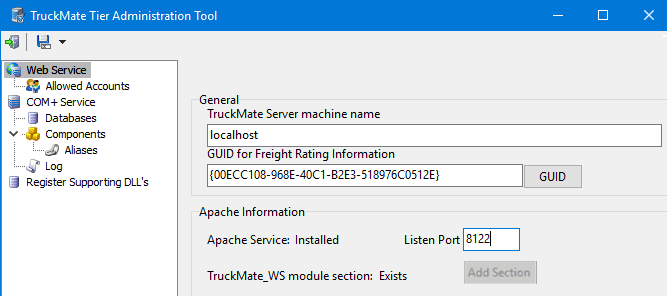
Web Service
The Web Service section determines the name of the web service and the port to use and includes a setting used for freight rating.
Field definitions
Required field: *
Read-only field: §
| Field | Definition |
|---|---|
TruckMate Server machine name |
The COM+ server’s network hostname. If Apache and COM+ are running on the same server this can be set to "localhost". |
GUID for Freight Rating Information |
Click GUID button to populate the GUID value allowing you to get TotalCharge based on FBRateGUID parameter. |
Apache Service § |
Indicates if this service is installed |
Listen Port |
Allows you to set a port for the Apache Service on this server. If this field is left blank, the default port is set to 8080. |
TruckMate_WS module section § |
Indicates if the Truckmate_WS.dll is registered and available to the Apache server. |
Allowed Accounts
The Allowed Accounts section is used to add the Windows User accounts that will have access to the TruckMate API. The Schema Owner user should definitely be added here.
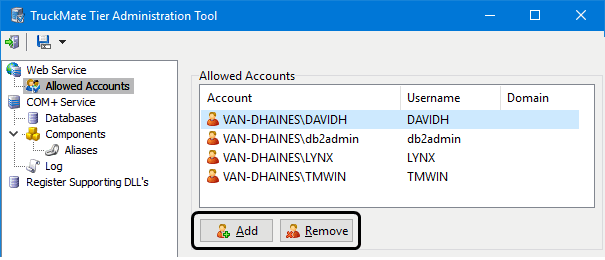
Add
Select the 'Add' button to open the Select Users window, which will allow you to add specific Windows User accounts to the Allowed Accounts grid.
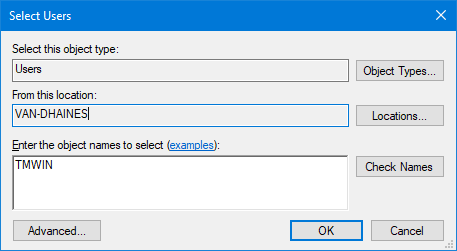
Enter the TruckMate User in the text field near the bottom and select the 'Check Names' button to verify that the entered user exists as a Windows User.
Once the name has been successfully resolved, select OK to add the selected user to the Allowed Accounts grid.
Remove
Select a user account in the Allowed Accounts grid and then select the 'Remove' button to remove that user.
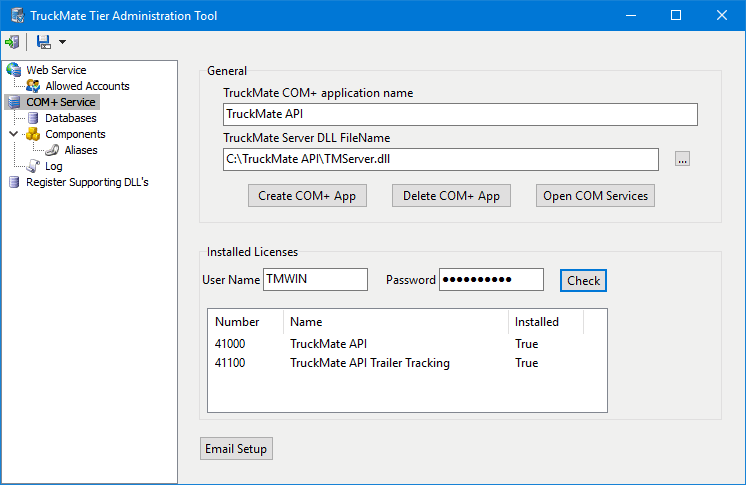
COM+ Service
The COM+ Service section is used to create the COM+ Service that the TruckMate API relies on to function. This service exists to call the TruckMate Server DLL (TMServer.dll) needed to perform the communication functions of the TruckMate API.
Field definitions
Required field: *
Read-only field: §
| Field | Definition |
|---|---|
TruckMate COM+ Application Name |
This field designates the name of the COM+ service that will be used by the TruckMate API. This field will automatically populate with the value "TruckMate API", but should be altered to meet your local specifications. |
TruckMate Server DLL FileName |
This field must contain the drive location of the TMServer.dll file. Use the ellipsis button to open a browse dialog and locate the file. |
Create COM+ App |
Selecting the Create Com+ App button will create the COM+ Service on the local system. Ensure that both above fields have been populated with their respective data. *Warning:* Implementation staff should then Verify the COM+ Service has been created! |
Delete COM+ App |
Deletes the COM+ Service on the local system. |
Open Com Services |
Opens the Windows Control Panel > Administrative Tools > Component Services window. |
User Name / Password / Check |
Enter the User Name and Password for the designated (allowed) account name and click the Check button. The read-only grid will display which license is associated with this database. Note: License 41000 already includes the 41100 trailer tracking functions so you would not need both licenses. Just one or the other. |
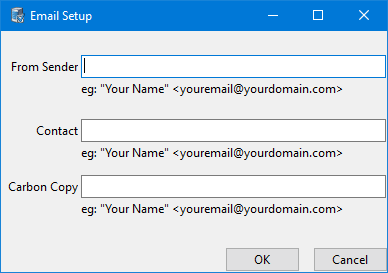
Email Setup |
Allows you to setup an API Email Notification associated with some of the API functions.
|
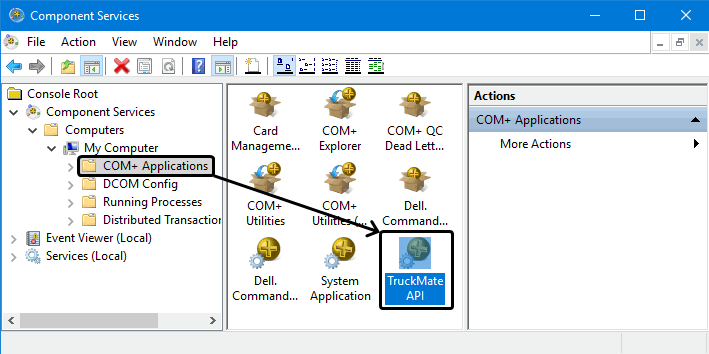
To verify that the COM+ application has been created:
-
Click the Open COM Services button or go to the Windows Control Panel, click Administrative Tools, and double-click Component Services.
-
From the ConsoleRoot folder, go to Component Services/Computers/My Computer/COM+ Applications folder.
-
Verify the COM+ application appears in the list with the name that was defined in the 'TruckMate COM+ Application Name' field,
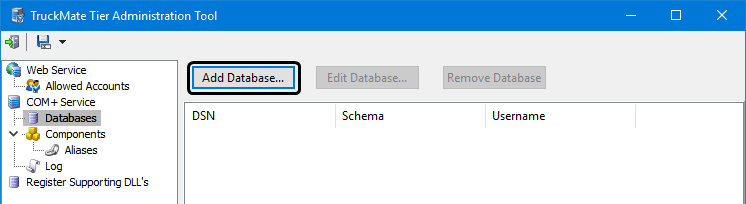
Databases
Once the COM+ Service is created, you must add the TruckMate Database DSN that the Service will access when communication with an API client is established. Implementation staff should first add a TEST DATABASE to test the settings.
Add Database
-
Select the 'Add Database' button to begin the process.
-
The COM+ Database Wizard will appear.

-
Select the TruckMate Database DSN you wish to use in concert with the API. If you do not see any DSN listings for the system’s TruckMate Databases, you need to use the Connection Manager program to establish the SQLDirect DSN connections.
-
Click Next.
-
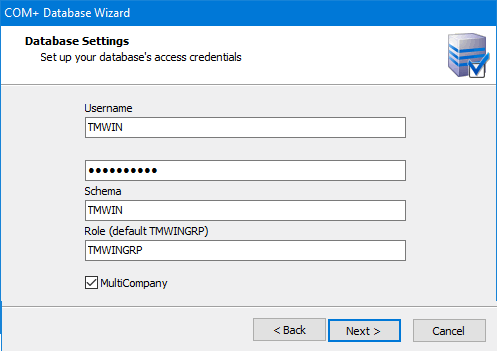
The Database Settings page appears. Enter the connection data normally used to access this TruckMate Database (Schema Owner credentials). Ensure the 'Role' field contains the default ('TMWINGRP').
Field definitions
| Field | Definition |
|---|---|
Username |
Enter the User Name. |
Password |
Enter the password. |
Schema |
This is the Schema Name specified during database creation (typically defaulted to TMWIN). |
Role |
The Role defaults to TMWINGRP. Do not modify. |
-
Click Next.
-
The Test Connection page appears. Select the 'Test Connection' button. The TruckMate Tier Admin program will attempt to connect to the TruckMate Database using the COM+ Service.
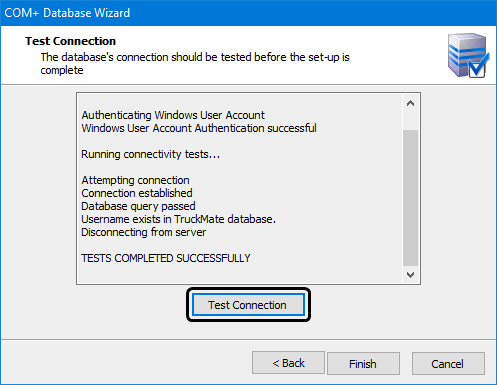
-
If the 'TEST COMPLETED SUCCESSFULLY' message appears, click Finish to exit the Wizard.
If the Test does not complete successfully, use the 'Back' button to re-enter the data in the Database Settings page, or VERIFY that the COM+ Service has been created on the local system (see above).
Components
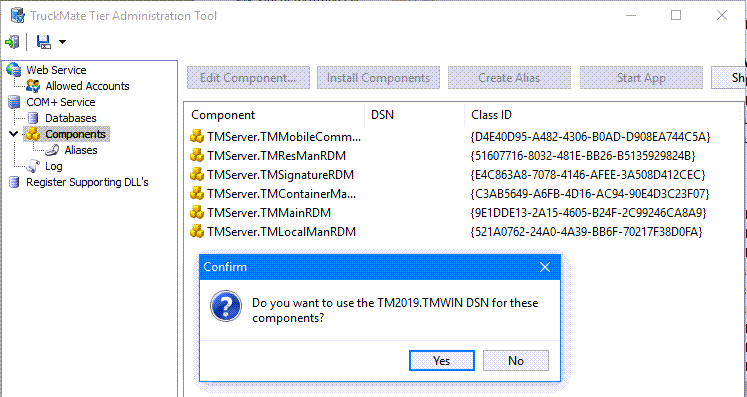
Once the DSN has been created, select Components from the left-side menu:
-
Click the Install Components button to install the COM+ components for the COM+ Application.

-
If only one DSN has been entered for the TruckMate API, the DSN for the COM+ components will populate automatically. You may be prompted to confirm the DSN to use for these components.
-
Use the Edit Component button to verify that each component is associated with the correct DSN and Schema.
-
Select the Database DSN from the 'DSN' drop-down field.
-
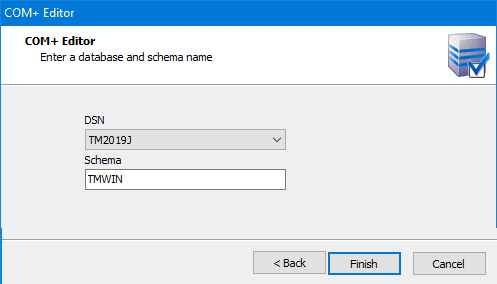
In the 'Schema' field, enter the Database Schema Name (normally 'LYNX' or 'TMWIN') and click Finish.
-
Repeat this for every component.
-
Aliases
If there is more than one DSN setup for the TruckMate API, you will need to create aliases for each component to associate them with the other DSN(s).
-
Select the first component and click the Create Alias button to display the COM+ Alias Creation Wizard window.
-
Use the drop-down list to select the Alias Database.
-
Click Create Alias.
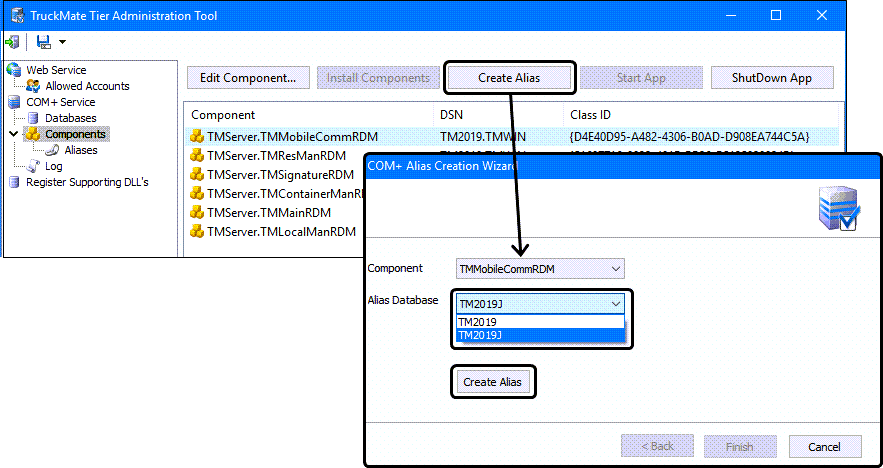
-
Repeat this for every component.
-
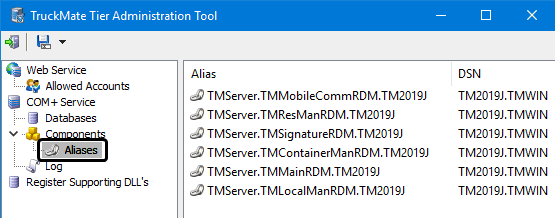
Click Aliases to view the list of aliases.
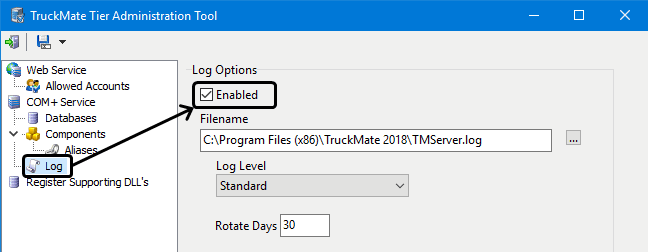
Log
Once the TruckMate API parameters have been successfully configured, Implementation Staff may want to setup a log file that can be used for troubleshooting of the API during testing.
Field definitions
| Field | Definition |
|---|---|
Enabled |
Select the Enabled checkbox to activate logging so you can review the resulting text files. |
Filename |
Enter, (or use the ellipsis button), to define a log file for the TruckMate API. The file names should use the .log extension format. |
Log Level |
Select your desired Logging Level from the drop-down list.
|
Rotate Days |
Number of days to keep the log files before deleting them. |
Register Supporting DLL’s
When updates to the TruckMate API are released via new versions of the API’s associated .DLL files, TruckMate implementation staff can use this section of the TruckMate Tier Admin program to install the new versions of the .DLLs. When this section is first accessed, a list of the installed API .DLLs will appear in the main program window.
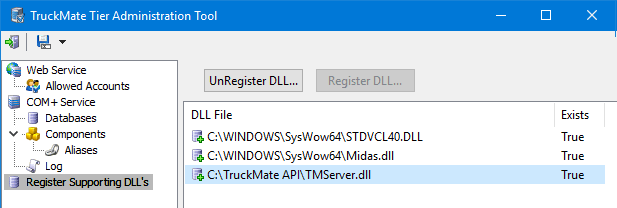
Implementers should start this process by backing up the previous versions of the 'STDVCL40.dll', 'Midas.dll' and 'TMServer.dll' files in their existing hard drive locations, unregistering these old versions and then copying the new versions of these files into the same location. Once all of the files have been updated and registered, the API upgrades will be complete.
To update a DLL, you must first unregister it, replace it with the new version and then register the new version.
UnRegister DLL
The first step is to select a .DLL file from the main program window and then select the 'UnRegister DLL' button. If not already completed, Implementers should copy the new .DLL file(s) to the same hard drive location as their previous version.
Register DLL
Once the new version of the .DLL file(s) has been copied to the hard drive location on the local system, select the 'Register DLL' button to install the new .DLL for use with the API. All new functionality will then be available.