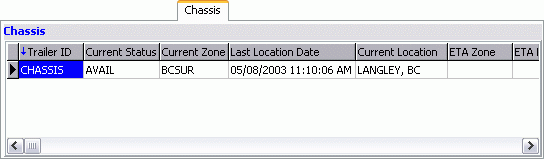
Resource tab details - Chassis

The Chassis Tab displays a list of summary information about all active chassis and their current dispatch activity. The columns include pertinent information from the chassis profile, as configured in the Trailer Profiles program.
| For more information on General Color Codes, see the Color Code Information section. |
Assign a Chassis to a Trip
In most cases a double-click on a field in the chassis grid will assign the Chassis to a the selected Trip. If there are multiple legs on the trip, the chassis will be assigned by default to all legs subsequent to the leg currently selected in the Trip grid.
| Chassis that have a current status of 'Unavailable' cannot be assigned to trips. |
Update Fields
In a few cases the information in a field can be modified using a double-click in those fields, as follows:
ETA Zone / ETA Location / ETA Date / Planned Time Available: displays the ETA / PTA Adjustments window to make manual adjustments to the resources' Estimated Time of Arrival and Planned Time Available, as follows:
-
New ETA Zone: select the search button to select the zone the resource is expected to be in at the time entered in the ETA Date field.
-
New ETA Date: displays the calendar to provide Estimated Time of Arrival date updates.
-
New PTA Date: displays the calendar to provide Planned Time Available updates.
| The ETA Zone, Location, Date and PTA fields are also updated automatically by activity in the Trip grid, and manual changes will be overwritten if trip activity occurs for this resource. |
In/Out Gate Status
This field shows if the equipment has been In-Gated or Out-Gated from the Container Depot.
Context Menu
Full Screen
The Full Screen option will enlarge the selected grid so that it fills the whole screen which allows you to view many more records and columns than in the normal view. To return to the normal view, right mouse click and de-select the Full Screen option. While in Full Screen mode, you can switch from grid to grid by selecting the right and left arrow buttons at the bottom of the window.
Clear Last Poll Zone
The Clear Last Poll Zone option is used to manually clear the last poll zone reported by the mobile communications provider. This option is selected when a leg of the trip is hauled by a vendor without mobile communications.
Reposition
The Reposition option is used to move a driver or piece of equipment from their Current Location to a new location.
Location History
The Locations History Report displays a summary report of the selected driver or equipment’s dispatch activity for the period selected and previews to the screen.
For more information about report functions see the Crystal Reports Reference.
Find Chassis Near
The Find Near option allows you to search for any driver, power unit, trailer, miscellaneous equipment, freight bill, or trip that is within a specified distance of the desired zone and/or other items of reference.
Set / Clear Filter
The Set Filter option supports the ability to create and apply a filter to any grid, regardless of the grid you were in when you opened the window.
Trip View
The Trip View window provides very detailed information about a trip. When this option is invoked the trip on which the driver or equipment is currently active will be displayed. If the driver or equipment is currently available, or is assigned to a trip that is not yet active, the trip on which the driver or equipment was last active will be displayed.
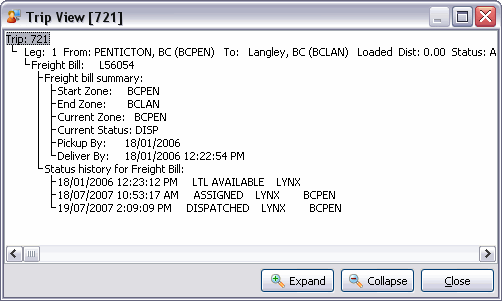
At the top of the hierarchy is the 'Trip number'.
Under the 'Trip Number' is each 'Trip Leg'.
Under the 'Trip Legs' is the 'Driver', Resources and Freight Bill(s) assigned to the leg.
Under each 'Driver' and Resource their location history (for the Trip) and their status history (for the Trip).
Under the Freight Bill is a Freight Bill summary and the Freight Bill status history (for the Trip).
Each level of the hierarchy can be collapsed or expanded by double clicking on the level above. The 'Expand' button at the bottom of the screen will expand all collapsed levels, while the 'Collapse' button at the bottom of the screen will collapse all expanded levels.
Permits
The Permit option displays permit information in the Permits window. The permit information for the Chassis has been entered in the Trailer Profile program. No data can be changed in this form.
New
This feature launches the Trailer Profile program to add a new Chassis.
View Chassis Profile
This feature launches the Trailer Profile program to view the Chassis profile details.
View Owner’s Profile
Selecting this option allows the user to view the profile of the selected power unit in Customer and Vendor Profiles program.
Quick New
The Quick New options provides the ability to add a new container with the minimum required information on the Quick Chassis Entry window.
| To use this feature the 'Allow Quick Chassis' option must be enabled in the Application Configurator program > DISPATCH.EXE section. |
Status Change
You can change the equipments' status (available/unavailable) on the Resource Change Status window. The status codes defined with the code behavior of 'Availability', 'Empty', 'LTL Available' and 'Unavailability' as configured in the Codes Maintenance program are available for selection.
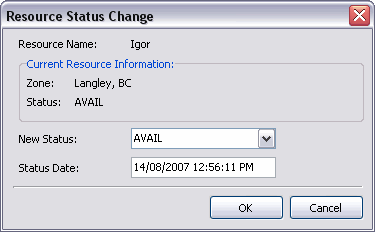
| Chassis that have a current status of unavailable cannot be assigned to trips. |
Special Events
The Special Events menu option displays all special events in the Special Events window , including those assigned to the equipment in the Special Events program and those created here.
| Using the Application Configurator program, 'SE Warning Level' setting you can configure what level provides warnings for Special Events that are displayed when the equipment is assigned to a trip. |
Attach / Open Related Files…
Selecting this option will open the Attach / Open Related Files window.
Copy
Select this option to copy the text from within the selected field.
Navigate
The Navigate option contains the standard TruckMate Navigation Bar, used to browse the records within this Grid.
| If you do not see the Chassis Tab, you may have to access the 'View Menu' and enable it (or do so using the Toolbar icon). |