Detail tabs: Status - User Defined Fields

This topic discusses the following tabs:
-
Status
-
Summary
-
Supplier
-
Trace
-
Trip Resources
-
User Defined Fields
Status
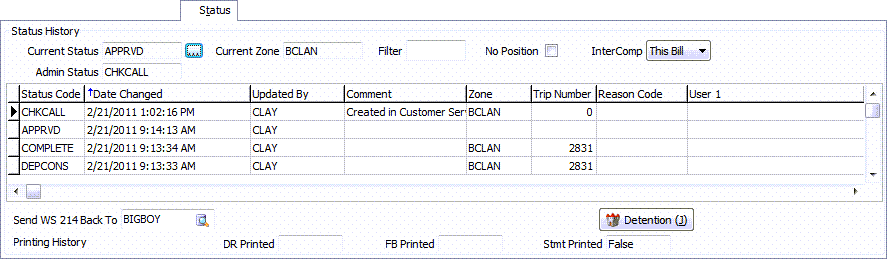
The Status Tab displays information current and previous events processed for the Freight Bill. These include dispatch events and locations as well as print history from the billing process. This is also where an EDI WS 214 reply recipient is assigned.
|
| Field | Definition |
|---|---|
Current Status |
Will pre-populate with the current Status as shown in the Customer Service program. Enter a Status Code in the field, or click the search button for a Status Code selection form. Only Status Codes with the Code Behaviors Types of 'Availability', 'Completion', 'Docked' 'Administrative' and 'Cancel' are available to be selected. It is possible to change a Freight Bill’s current status by clicking the |
Reason Code |
Reason Codes are set up in the Service Failure Codes section of the Codes Maintenance program, and are used as descriptors if a Freight Bill has encountered any difficulties as it is processed. |
Admin Status |
This field allows users to perform an Administrative status change which does not affect the current status of the freight bill. Administrative statuses can be made even when a freight bill is active on a trip. To change the Admin Status of a freight bill, simply use the standard 'Change Status' form and select one of the status codes you have configured for the 'Administrative' behavior category (Codes Maintenance program > Status Tab). |
Current Zone |
Will pre-populate with the current Zone as selected in the Customer Service program. |
Filter |
Depending on which column is being sorted on (i.e. must be of 'String' type) the user can enter text or numeric values into the 'Filter' field to show only those records in the column which match. |
No Position |
When this flag is selected all 'Position' status updates (those normally received from the Mobile Communications module) will be removed from the Status Tab display. |
InterComp |
When working with Inter Company Freight Bills, this drop-down can be used to display the Status Changes for the currently selected Bill, the Inter Company Bill, or both, allowing visibility across multiple TruckMate operating Companies:
|
Send WS 214 Back To |
Use the search button to select which Client you would like to send Web Services 214 data back to. |
Detention |
Selecting this button will open the Detention window, which details the Detention charges associated with this Freight Bill. |
Printing History |
The fields described here indicate Billing process functions which have been completed.
|
Status History Grid
| Column | Definition |
|---|---|
Status Code |
Displays all Status Codes assigned to the Freight Bill since it was entered. Note: If you’ve printed out this bill using the Invoice Printing program, the status Tab will show this bill printed as FB_PRINTED or DR_PRINTED (depending on if you’ve chosen to print a Delivery receipt). If you’ve printed out this bill using the Statement Printing program, then the bill will show as STMT_PRINTED on the Status Tab. |
Date Changed |
Displays the date and time that the Status Code changes were made to the Freight Bill. |
Zone |
If the Status Code change resulted from a change to the Freight Bills current location (for example, when a Freight Bill is delivered on a trip in the Dispatch program) the Freight Bills new zone will be displayed in this field. |
Updated By |
Displays the user name of the person who made the status change. |
Comment |
Comments can be recorded when the status of the trip to which the bill is assigned (in the Dispatch program) is changed. Also, if you recorded a comment when the Freight Bill was canceled or de-assigned from a trip in the Dispatch program, it will display here. If the Application Configurator program > DISPATCH.EXE > 'Show Lat/Long' option is set to 'True', the Latitude/Longitude positions of the Trip Leg when its Status was updated will display in this field. |
Trip Number |
If the Freight Bill has been assigned to a trip in the Dispatch program, the Trip Number will display in this column. Note that a Freight Bill can be assigned to more than one trip. For example, on one trip a Freight Bill might be picked up and dropped at a loading dock. Then, on a second trip, the Freight Bill is delivered to its destination. Also, more than one Freight Bill can be assigned to a trip. If no Trip Number is displayed, it means that the Freight Bill has never been assigned to a trip. |
Reason Code |
Double-click this field to choose a Reason Code for this detail line. Reason Codes are set up in the Service Failure Codes section of the Codes Maintenance program, and are used as descriptors if a Freight Bill has encountered any difficulties as it is processed. |
Date Inserted |
This field contains the Date/Time stamp of when the record was initially inserted into the Database, as opposed to the 'Date Changed' field above, which records the Date/Time stamp of when the Status was updated. |
Context Menu
Other than the standard options available in most grid context menus, one additional option exists:
The Print Manifest option is only enabled if the selected Status History record has an assigned Trip Number. If selected a report selection screen will pop up, the manifest report will be in the report selection list. The user can select the report and then select to view the report, e-mail it or fax it.
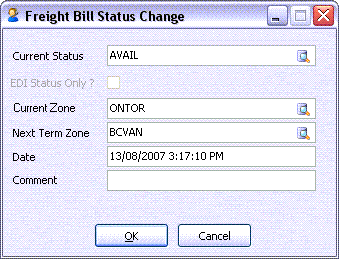
Freight Bill Status Change
This feature is disabled by default. To enable this feature, go to the Security Setup program > Business Events Tab. This function can only be used if the Freight Bill is not currently assigned to a trip in the Dispatch program.
There are several options available on both the Security Setup program > Security > Allow Changes and Approving/Printing Tabs that affect freight bills when specific statuses are applied.
Great care must be taken whenever manually changing the status of a Freight Bill, as this action may have severe ramifications throughout the system. For example, this can cause a completed bill to re-appear in Dispatch.
| Field | Definition |
|---|---|
Current Status |
Enter a Status Code in the field, or click the search button for a Status Code selection form. Only Status Codes with the Code Behaviors Types of 'Availability', 'Completion', 'Docked' 'Administrative' and 'Cancel' are available to be selected. |
EDI Status Only? |
Selecting this flag will allow the user to insert a status record to the ODRSTAT table without interfering with the current status of the order. If checked, the selected information will show all possible Freight Bill status codes and will be added to the status history only, depending on the EDI Communication Manager configuration, this may cause a 214 status update to the customers to occur. If this option is grayed out, it can be enabled by setting the Application Configurator program > CSERV.EXE > 'EDI Status Updates' option to 'True'. |
Current Zone |
To change a Freight Bills current zone, enter a 'Zone Code' in the field, or click the search button for a zone selection form. |
Next Terminal Zone |
To change a Freight Bills Next Terminal Zone, enter a 'Zone Code' (configured as a Terminal in the Codes Maintenance program) in the field, or click the search button for a zone selection form. |
Date |
Will default to the current date and time. You can manually alter this value as needed. |
Comment |
Is a free format entry field where you can record a comment about this status change. Because this is a manual status change, it is highly advisable that you enter a note explaining why the change was done. |
Working with detentions
The Detention Form window will appear when the user clicks the Detention button on the Status Tab (or uses the <ALT><J> hot key). This window will automatically populate with the 'Pickup' and 'Delivery' information from the Freight Bill and any Detention Charges that have accrued against the Bill.
Fields in the Pickup and Delivery sections automatically populate with the freight bill’s pickup and delivery information respectively. The remaining fields are described below.
| Field | Definition |
|---|---|
Billing Option |
Choose how you would like the Detention charges to be applied:
|
Manual Rate |
Select this flag to manually audit the Detention information (dates, charges, rate, etc.) for the selected Freight Bill. |
Currency |
Sets the currency of the Detention charges. |
Time Units / Rate Units |
Select the Time and Rate Units for the Detention calculations using their respective drop-down menus. |
If any Detention e-mails have previously been sent out for the selected Freight Bill, they will be displayed in the History grid.
Select a particular e-mail record to have its details populated into the two-sided E-Mail window below the History Grid. On the left pane of this window the e-mail message’s contents are displayed, while on the right page the e-mail addresses it was sent to are shown.
Detention Buttons
| Option | Definition |
|---|---|
Calc |
Select this button to calculate the Detention charges using the available Pickup and Delivery information. Detention Rating charges will be determined by the Detention Rating Rate Sheets as setup and applied to specific Clients on the Rates Maintenance program > Detention Tab. Note: If no Detention Rates have been set up, the user can still calculate Detention manually in this window by selecting the 'Manual Rate' flag (above) and entering the required information. |
Select this button to access the TruckMate E-mail System, which will allow you to setup and send the Detention e-mails. |
|
FB Notes |
Select this button to access the Notes window for the selected Freight Bill. |
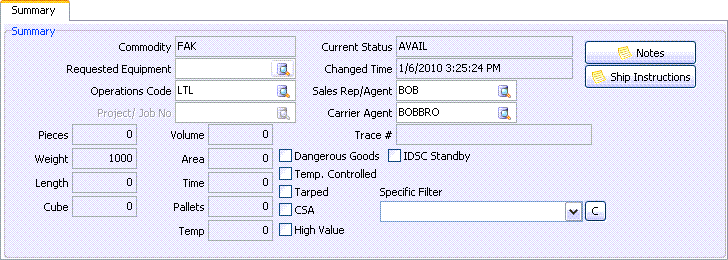
Summary
The Summary Tab offers several functions in addition to displaying summarized load information from the Details Tab. Shipping instructions, the current status of the Freight Bill, and CSA flag are examples of information found here. With the exception of selecting a Filter, adding or editing Notes and assigning Requested Equipment, the information on the Summary Tab is a read-only summary of information entered on the other Tabs, and cannot be changed.
| The Summary Tab can be enabled/disabled for specific Users via the Security Setup program. |
| Field | Definition |
|---|---|
Commodity |
This field displays the Commodity Code of the last alphabetical commodity. For example, if you’ve entered the following commodities: applies, zucchini, carrots with carrots being the last item entered. The commodity Tab will show zucchini. To create new Commodities, use the Codes Maintenance program. Note: If the Commodity field is blank when trying to save a popup message will appear notifying the user the commodity field is invalid. |
Requested Equipment |
In the Customer & Vendor Profiles program, you can configure a default Equipment Class for each customer profile. If an Equipment Class has been configured for the customer entered in the Shipper section, that equipment code will display here. (Equipment Classes are configured in the Codes Maintenance program). You can manually enter an Equipment Class code, or click the search button for a selection form. Automatic rating can be configured to rate based on the Equipment Class specified here. See the Rates Maintenance topic for more information. |
Operations Code |
Double-click this field (or click the search button) to choose an Operations Code to be attached to the current Freight Bill. If you have a 'default' Operations Code for the current Site, selecting an Operations Code in this field will override your default. For more information on Operations Codes, see the Codes Maintenance program documentation. |
Project / Job No. |
Double-click this field (or click the Database Search button) to choose a Job Code to assign to the Freight Bill. Only active Job Codes will display in the list. Filter the list down to assist you in finding the correct code (i.e. enter '2007-FRE' to list only the 2007 events for Division FRE). If, instead of selecting a code from the list, you entered the code directly into the field, there is a check done at saving of the Freight Bill to validate the code and disallow update if either invalid or expired (i.e. cancelled). Thus, the user is forced to enter only an active Job Code. Expired Codes are not checked for after a successful Post of the Freight Bill. This field is not a required field, but it can be added or amended at any time. If an incorrectly assigned Job Code is caught after billing, and the current User has the 'Allow edit of Job Code' flag enabled on the Security Setup program > Security > Business Events > Allow Changes Tab, then he/she can modify this field for an interfaced bill. Note: This field is disabled completely if the Application Configurator program > CSERV.EXE > 'Recursive Job Quotes' option is set to 'True'. Also, when creating Extra Stops, this value will be copied onto the Child Bills (if populated). |
Current Status |
This field displays the Status Code most recently applied to the Freight Bill. Click the Status Tab to view a history of the Freight Bill’s status. Status Code changes occur when Freight Bills are posted in the Customer Service program, when Freight Bills are assigned to trips, dispatched and delivered in the Dispatch program, when Freight Bills are approved for billing in the Customer Service program, and when Freight Bills are updated to the Accounts Receivable module using the Billing Register program. |
Changed Date / Time |
This field shows the date and time of the last edit to the record. |
Sales Agent |
Double-click this field (or click the search button) to select the Sales Agent Code associated with the Operations Code you have specified (if required). Defining a Sales Agent Code will allow for easier tracking of Brokerage Commissions, for example. Sales Agent Codes are configured in the Customer & Vendor Profiles program (on the Vendor > Types Tab). You can specify which kind of Users may be selected as Sales Agents by using the Application Configurator program > CSERV.EXE > Sales Agent option. |
Dispatch Agent |
Double-click this field (or click the search button) to select the Dispatch Agent Code associated with the Operations Code you have specified (if required). Defining a Dispatch Agent Code will allow for easier tracking of Brokerage Commissions, for example. Dispatch Agent Codes are configured in the Customer & Vendor Profiles program (on the Vendor > Types Tab).You can specify which kind of Users may be selected as Sales Agents by using the Application Configurator program > CSERV.EXE > Sales Agent option. |
Notes |
The Notes window has several of its own Tabs near the bottom of the window. These Tabs are used to quickly enter Notes for the different aspects of the selected Freight Bill. The default Tab is the Billing Tab, where you may enter Notes relating to the Billing information of the Freight Bill. Clicking on any of the other Tabs will allow you to enter free form Notes for the Container, Driver, etc. If there are no Notes currently associated with a Freight Bill, the Notes Button will appear like this. If there are existing Notes, the button icon will change, like this. |
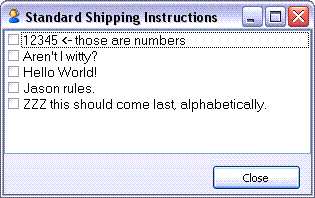
Ship Instructions |
This button opens a pop-up form that allows the user to select from a list of standard shipping instructions to attach to the Freight Bill. The 'Standard Shipping Instructions' available on the window are configured in the Codes Maintenance program.
Shipping instructions can be associated with a specific Client by entering data in the Customer & Vendor Profiles program > Client Tab > Shipping Instruction Tab. In addition, they need to be based on whether the Client is a Shipper or Consignee (receiver). The Shipping Instructions button will change in appearance depending on if there are Shipping Instructions attached to the displayed Freight Bill, similar to the behavior of the 'Notes' button (above). |
Trace # |
This field displays the trace number as defined in the Trace Tab. This field is populated according to the following logic: It will be populated with the first 'B' type (Bill of Lading) trace number if one or more of B type bills exist. If no 'B' type exists, then it will be populated with the first trace number (as defined in the Trace Tab), except for 'I' type (ProBill). If there is a 'P' type (Purchase Order) it will use the first P type number when the Bill To is the Consignee. |
Pieces / Weight / Length / Cube / Volume / Area / Time / Pallets |
These fields display the totals of these values from all the detail lines entered on the Details Tab. |
Temp |
This field is a read-only field and displays the lowest temperature from among all commodity temperatures of commodities entered on the detail lines in the Details Tab. The source of the value displayed in this field can be controlled with an Application Configuration option (App Config). The 'Temperature Lookup Field' in Application Configurator progarm > Billing > CSERV.EXE can be set to have the system either get the value of this field from 'TLORDER.TEMPERATURE', or TLORDER.ROLLUP_TEMPERATURE columns. |
Dangerous Goods |
If any of the commodities entered on the detail lines on the Details Tab are configured as a Dangerous Good (in the Codes Maintenance program) this box will be checked. You cannot change the value of this box on the Summary Tab. |
IDSC Standby |
This flag is used by companies who employ the IDSC Load Builder software to optimize their trips. When a freight bill is flagged as 'IDSC Standby', the IDSC Load Builder program will be able to import it for further optimization. For more information, see the IDSC documentation. |
Temp. Controlled |
If any of the commodities entered on the detail lines on the Details Tab are configured as Temperature Controlled (in the Codes Maintenance program) this box will be checked. You cannot change the value of this box on the Summary Tab. |
Tarped |
Click on this field to place a checkmark in the box indicating this Freight Bill requires a tarp. |
CSA |
Place a checkmark in the CSA box if this Freight Bill requires a CSA driver. Placing a checkmark in this box will cause the CSA column in the Dispatch program > Freight Bill Grid to display as 'True', and the 'CSA' column of the Trips Assigned grid of the Driver Call-in program will display as 'True' as well. The CSA (Customs Self Assessment) program provides CSA importers with the benefits of a streamlined accounting and payment process for all imported goods. The CSA program also provides CSA importers, CSA carriers, and registered drivers with the benefits of a streamlined clearance option for CSA eligible goods. The streamlined clearance option eliminates the requirement for any transactional transmissions of data related to eligible goods, allowing for the clearance of goods based on their identification as CSA goods and the presentation of the CSA importer’s Business Number, the CSA carrier code, and registered driver identification at the border (called 'Commercial Driver Registration Program (CDRP)'). The signed Delivery receipt will be proof of Canada Customs release for a CSA shipment. For more information refer to the Canada Border Services Agency web-site. On December 12, 2003, the Customs Program of the Canada Customs and Revenue Agency was transferred to the new Canada Border Services Agency (CBSA). When you enter your Driver information, in Driver Profiles, ensure you enter the Drivers CDRP # (Commercial Driver Registration Program #). If you attempt to match a Driver (without a CDRP #) with a shipment requiring a CSA Driver, the system will display a warning message. Two CSERV.EXE Application Configurator options are available to assist you in this function: 'Auto Set CSA Flag', and 'Warn Non CSA Driver'. 'Warn Non CSA Driver' is also an Application Configurator option available from DISPATCH.EXE. |
High Value |
The High Value flag determines if this commodity is of great monetary value. When this option is checked, a green '$' dollar sign will appear within the 'Warning' field of the Customer Service Details Tab. You cannot change the value of this flag within the Summary Tab, it must be configured for the selected commodity from the Codes Maintenance program. |
IDSC Standby |
Selecting this option will flag the currently displayed freight bill for import into the IDSC Load Builder application for optimization/routing. Freight bills that have this flag checked will be entered into the TLORDER_STATUSES database table, which will be accessed by the IDSC Load Builder application when gathering data. Note: In order for freight bills to be imported into Load Builder they must also have a 'Current Status' belonging to the status behavior category of 'A' (Availability). Once freight bills have been processed/optimized in the IDSC Load Builder application, they can be re-imported into TruckMate as Dispatch Trips. See the IDSC documentation for more information. |
Specific Filter |
Filter queries previously defined in the Filters Tab will appear in the drop-down list offered in. After selecting a filter, two arrow buttons will appear beside the filter field. These buttons are used to move forward and backwards through Freight Bills that match the criteria defined in the selected filter. For example, if your filter selects bills with the status of 'Complete', clicking the forward arrow button will move to the next Freight Bill with the status of 'Complete'. The arrow buttons on the main navigator bar will continue to move through records consecutively, by Bill Number. To clear the selected filter, click the button labelled 'C' to the right of the Filter field. |
Notes
There are nine Tabs available on the Notes form: 'Billing', 'Container', 'Driver', 'OSD', 'Other', 'Write Off', and 'User 1' - 'User 3'. Freight Bill Notes can also be entered and viewed in the Dispatch program, the Local Dispatch program, the Driver Call In program, the Trip Tracer program, and the AR Inquiry program. You can apply special formatting characteristics (such as bolding or colored text) to the Freight Bill notes. Right click in the Notes form for a menu of formatting options. After entering notes, be sure to click the Post button at the bottom right corner of the notes form.
You can also display the Notes window by using the '<CTRL><N>' Hot Key combination.
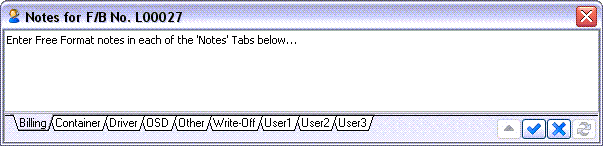
The 9 Notes Tabs correspond to various areas of the TLORDER Table. You can configure any of the Tab labels by changing their values in the Application Configurator program > NOTES section. The correspond configuration options are labelled 'TLORDER Tab 1 - 9'.
One example would be to change the labels of the custom 'User 1 - 3' Tables to something like 'Shipper', 'Consignee' and 'Bill-To' and enter specific Notes depending on the Freight Bill for each of the attached Clients.
The User can change also the Notes window’s format to either 'Normal' or 'Journal-Style' (which stamps each entry with the User name and Date/Time stamp) by changing a set of options in the Application Configurator program > NOTES section. Each of the 9 Tabs above pulls from the TLORDER Table, so use the NOTES.EXE options 'TLORDER Journal-Style 1 - 9' to change the style.
Using the Application Configurator program > NOTES > 'Rate Logging' option, you can configure one of the 9 Notes Tabs to display how the Rating logic for the attached Freight Bill was determined.
| If using 'Journal-Style' Notes, only those users with 'Supervisor' security clearance (as configured by the 'Supervisor' flag on the Security Setup program > Groups Tab per User Group) can edit the top section of the Note. |
Supplier
The Supplier Tab is used to manage Supplier transactions (both order records and charge-back transactions). This Tab uses data from within the Supplier Payables Module programs.
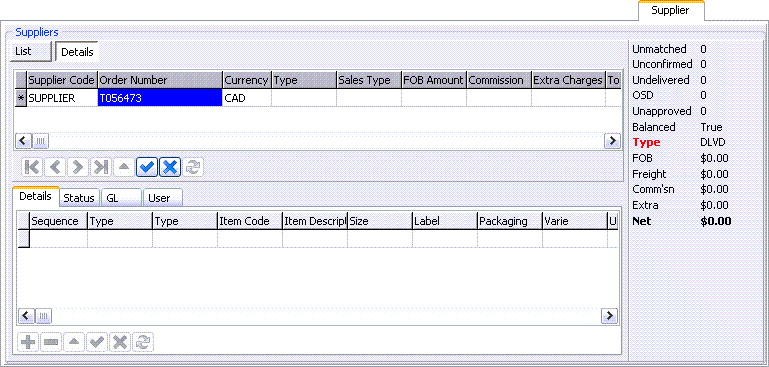
The Supplier Tab is split vertically into two sections: the left-hand section will show the user a grid listing Supplier Transaction records (both the order records and any charge-back transactions). Below the grid are various Tabs offering additional details about each transaction. The right-hand section offers summary information about the supplier transactions overall and how they relate to the Customer order.
The List and Details buttons modify the appearance of the Supplier Tab. Selecting the 'List' button will display a record of all Supplier transactions with some initial details. Selecting the 'Details' button will allow you to view the specific details related to the Supplier transactions in your Database.
Supplier Transaction List Grid
This grid lists a record of all Supplier transactions for the selected Freight Bill, with some basic summary information.
Context Menu
| Option | Definition |
|---|---|
Split |
Sometimes the supply-side record may be split into multiple records if more than one Supplier or Supplier order will be needed to fulfill the Customer order. To split the original record into multiple orders, highlight the record you wish to split in the Supplier Transaction grid. Then right-click to open the context menu, and then select the 'Split Order' menu option. A window will appear and the user can set the number of Supplier orders to add. For example: if a Customer order is to be split into two equal Supplier orders, the set the number of orders to add to '1'. This will add one more order to the original order, making two supplier orders in all. |
Process |
Missing information |
Supplier Information |
Selecting this option will open the Vendor Profiles program with the selected detail line’s Vendor details. |
Copy |
Selecting this option will copy the information from the selected detail line, allowing you to paste its contents into a separate line. |
Supplier Transaction Details Grid
| Column | Definition |
|---|---|
Supplier Code |
The 'Supplier Code' field indicates the Vendor who will be fulfilling the order. Double-click on this field to open an edit-pick form to find a valid Vendor code (of 'Supplier' type). When the Vendor code is set and the record is saved, the program will attempt to match the Vendor, commodity, and currency to a current contract. If a contract is found, the details will be updated with an entry for commission and any automatic extra charges. The order record itself will be updated to include the commission and extra charge amounts. If no contract is found, the information from the special default contract '0' will be used to determine what the commission, valid extra charges, and accounts will be used for the order and detail records. Supplier Contracts are configured and maintained in the Supplier Contracts program. |
Order Number |
This field displays the Vendor’s invoice or reference number. |
Currency |
This field will default to the same currency as the Customer order. It can be manually updated, but if no contract is found to match the Vendor, commodity, and currency, the order details will be updated accordingly. |
Type |
This field indicates if the transaction is a Bill (Vendor invoice), Debit memo, or Credit memo. This field will determine how the transaction is processed into A/P later on. |
Status |
This field displays the current status for the order. Users can change the status by double-clicking on the field to open a pop-up form which will let them set the new status, an 'as-of date' if the change is back or future-dated, and any comments needed. All orders will progress from 'Entry' to 'Approved' status. All transactions must be marked 'Approved' before the Freight Bill and Supplier transactions will be allowed to posted through the Billing Register program. In between they may also be updated to 'Confirmed', 'Received', 'Unapproved' or 'OSD' status. See the Status Tab description below for more information. |
Context Menu
| Option | Definition |
|---|---|
Split Order |
Sometimes the supply-side record may be split into multiple records if more than one Supplier or Supplier order will be needed to fulfill the Customer order. To split the original record into multiple orders, highlight the record you wish to split in the Supplier Transaction grid. Then right-click to open the context menu, and then select the 'Split Order' menu option. A window will appear and the user can set the number of Supplier orders to add. For Example: if a Customer order is to be split into two equal Supplier orders, the set the number of orders to add to '1'. This will add one more order to the original order, making two supplier orders in all. |
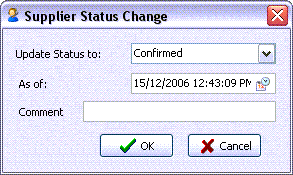
Status Change |
Selecting this option will open the Supplier Status Change window, which will allow you to update the status of your Supplier transactions. The Customer Service program will test that the associated Vendor is of 'Supplier' type before a Status Change is completed.
Use the drop-down menu at the top of the window to update the invoice’s status, then select a date by double clicking the 'As of' field and choosing a date from the calendar menu. You may add a comment reflecting the details of the status change, if desired. |
Delete Order |
Selecting this option will remove the selected detail line from the Supplier Transaction grid. |
Supplier Information |
Selecting this option will open the Vendor Profiles program with the selected detail line’s Vendor details. |
Copy |
Selecting this option will copy the information from the selected detail line, allowing you to paste its contents into a separate line. |
Layout > Customize Grid |
Selecting this option will open the Grid Customization Tool, common to all TruckMate applications. |
Details sub-tab
The Details Tab contains a grid which lists records describing the break-down for product, commission, and add-on charges. Users can add, delete, or update records in the grid. When the changes are saved, the Supplier order record they are matched to will be updated accordingly and the changes reflected in the main Supplier Transaction grid above.
| Column | Definition |
|---|---|
Type |
This column will indicate if the line item details product, commission, or extra charges. The program will behave differently in the columns that follow depending on the type selected. |
Item |
If the Type column is set to product, this field will default to the commodity code set in the Supplier order record. If the Type column is set to 'Commission', this field will default to a blank value. If the Type column is set to 'Extra Charges', this field will only allow extra charge code values which exist on the Supplier’s current contract. |
Description |
This field will default to the commodity description, the contract short description for commission entries, or the extra charge description from the contract. |
Unit |
Product line items will show this value as the piece unit type. |
Quantity |
All entries will show this as the item count to apply the rate value to. |
Rate |
All entries will show a rate to multiply by the quantity. |
Cost |
All entries will show a cost value extended from the quantity and rate. |
Contract |
This field will show the contract number used to generate/validate the commission and extra charge entries. |
Manual |
Users can double-click on this field to toggle it between 'True' and 'False'. If a user wants to manually override a commission or extra-charge Rate value from the contract, or set the Contract field value to blank (indicating a completely manual transaction), they must set this value to 'True'. Note: When orders are first generated, before the vendor is assigned, this value is set to 'True'. When a Supplier is set, this value will be reset to 'False' and the contract details applied. |
Size / Label / Packaging |
These fields provide additional information to the Supplier and may only be filled in for product line items. Users will be able to double-click on each field to open an edit-pick form to select from possible values for the given commodity code. |
Status sub-tab
The Status Tab displays a grid showing the status history of the currently highlighted order for users to review (but not edit) records with the following fields: Status, Updated, Updated By, and Comment.
As noted above, all records will progress through the 'Entry' and 'Approved' statuses. The following describes what each of the status codes indicates:
-
Entry
Indicates that order and details have not yet be finalized with the supplier and/or customer. -
Confirmed
Will indicate that the order details have been confirmed with the customer and the supplier has confirmed they can fulfill the order. -
Received
Indicates a POD document has been received from the carrier and/or customer. If the transaction does not have any product detail, ie. it is a charge-back, then the received status is not required before approval. -
OSD
Will indicate the customer has received the order but reports over-shipped, short-shipped, or damaged product. Adjustment of the order details may be needed before approving the transaction for processing. -
Approved
Indicates that the transaction details have been reviewed, the order is in balance, and is ready to be processed through the Billing Register. -
Unapproved
Will indicate that a user has reversed an approved order.
GL sub-tab
The GL Tab displays a grid which shows the GL entries (distribution) which are associated with each order.
These entries are automatically generated based on the default Supplier Payable for the transaction currency code and the default expense accounts set in the Supplier’s current contract. Users can set a check-box to indicate that the distribution will be done manually. If no contract is found (the transaction is manual), this check-box will be set automatically. However, the distribution will be out of balance as no expense entries will be created and only the Supplier Payable entry will be created. Users are expected to fill in the correct expense accounts.
The GL and order details must match or the order will be flagged as not in balance. An order which is not in balance will not post through the Billing Register program.
Trace Number (Trace#)
The Trace Tab allows additional identification numbers/text to be added to the Freight Bill. Container numbers, security seal numbers, and Release numbers are a few examples.
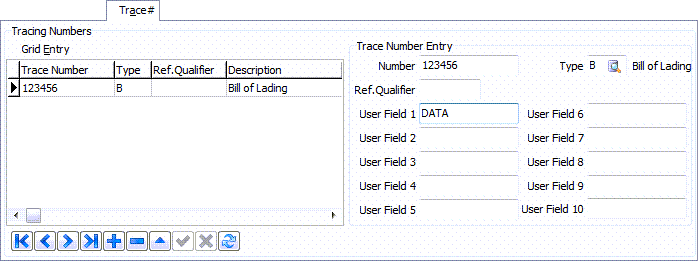
An unlimited number of Trace Numbers can be associated with a Freight Bill. They can be formatted to print on Freight Bills, can be used to find Freight Bills and trips using the Trip Tracer program, can be viewed in the Dispatch program, and can be updated and sent through Mobile Communications.
Trace Types are hard-coded into the TRACE_TYPE Table, and cannot be added or deleted. However, you can determine whether a particular Trace Type is available (in edit-pick fields) via the 'Active' flag on the Codes Maintenance program > Trace Number Types Tab.
| You can set the description of 3 of the available Trace Types (1,2, and 3) via configuration options in the Application Configurator program > CSERV.EXE section. In some TruckMate applications, if the configs are not set, then these Trace Types may not be available. However, most other applications will still show all 3 with default descriptions like 'User Trace X' (if configs not set). |
| Field | Definition |
|---|---|
Trace Number Type |
Click on the type of Trace Number that describes this entry. Select the Database Search button to select a Trace Number Type from those available on your system. Trace Number Types are activated or de-activated on the Codes Maintenance program > Trace Number Types Tab. |
Number |
Enter the Trace Number you wish to use for the selected Trace record. |
Ref. Qualifier |
The Reference Qualifier field is used for inbound 204 load offers to further qualify the Trace (reference) numbers received via EDI, as EDI Clients often need to return specific reference numbers to their Trading Partners in subsequent EDI Sets (210, 214, 990, etc.), as well as the original reference qualifier code. Thus this field value is how an EDI Client keeps track of a true reference meaning, relative to EDI. Note: This field is also available in the EDI Audit program and Order Pre-Processor program, but for ease-of-entry, it has been added to the Trace Tab in Customer Service. |
Description |
This field will automatically populate with the Trace Type description once a Trace Type is chosen. These descriptions are configured on the Codes Maintenance program > Trace Number Types Tab. |
User Field 1 - User Field 10 |
These ten User Fields can be used to enter any relevant data against the Trace number being added to the Freight Bill. The user can modify the field labels of these fields by changing the values of the Application Configurator program > CSERV.EXE > 'Trace User Field 1' - 'Trace User Field 10' options. |
Latest Pick Up By for Container |
This field can be used to specify the latest Date and Time for container pickup. This value will be shown in the Dispatch program > Trip Grid > 'Latest Pickup' column. Note: This field uses the main navigator bar, not the navigator bar on the Trace Tab. |
Trace Number Grid |
This grid can be used to view available Trace Numbers. To give the user an easier way to track and locate trace numbers a sort functionality is applied to this grid. Select a column header to sort the data in the grid using that column. You can also enter Trace Numbers directly into this grid. Use your Tab key to create a new line and then type in the Trace Number, and refer to the Trace Number Type and enter the corresponding letter. The field values should be treated as described above. |
Trace Number Validation Rules
If, at any point using the Customer Service program, you are not allowed to post or save a Freight Bill, it may be due to your configured Trace Number Validation Rules. On the Codes Maintenance program > Trace Number Validation Tab, a User can setup various validations rules that will be enforced against Trace Numbers that are added to a Freight Bill. If validation rules exist for the Trace Type you are trying to add to a Freight Bill, there are two ways the system will handle non-compliant Trace Number values:
-
If the Application Configurator program > CSERV.EXE > 'Trace Number Validation Override' option is set to 'False', the User will not be allowed to post (or save) the Freight Bill. Validation rules are strictly enforced.
-
If the Application Configurator program > CSERV.EXE > 'Trace Number Validation Override' option is set to 'True', the User will be warned about the validation rule not being satisfied, but will then offer the option of overriding the validation rule, so that the Freight Bill can be posted/saved.
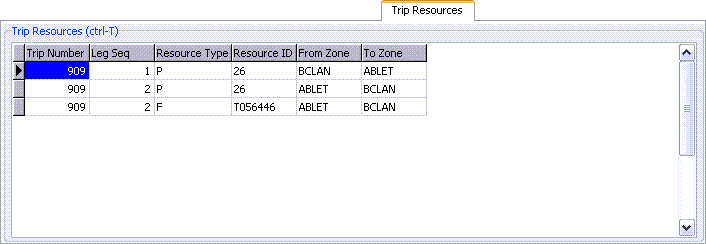
Trip Resources (Trip Res’s)
The Trip Resources Tab displays additional information regarding the Trips currently attached to this Freight Bill.
| Column | Definition |
|---|---|
Trip Number |
Displays the Trip Number, from the Dispatch program, on which the Freight Bill was carried. |
Leg Seq |
Displays the leg number for the trip (created in the Dispatch program) that was associated with the Freight Bill (Note that a Freight Bill may be associated with more than one leg per trip). |
Resource Type |
Displays the other resources assigned to the trip. 'D' stands for driver; 'F' stands for Freight Bill; 'P' stands for power unit; 'R' stands for resource (trailer or miscellaneous equipment). |
Resource ID |
Displays the unit code or Freight Bill number of resources assigned to the trip. |
From Zone / To Zone |
For resources assigned to each leg, these fields display the Leg From and Leg To zones. |
User Defined Fields (User Def’s)
Select this Tab (or use the Hot Key combination '<CTRL><U>') to access ten fields used to store user defined values. These fields display in the Dispatch program > Freight Bill Grid, and in the User Defined Fields form in the Local Dispatch program. You can change the labels that are assigned to these fields by using the Application Configurator program. This Tab refreshes when the main Freight Bill is saved, so that any changes to the user fields will update automatically.
| The User Defined Fields Tab can be enabled/disabled for specific Users via the Security Setup program. |