Resource tab details - Carriers

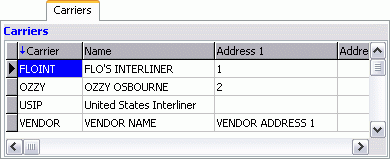
The Carriers Tab displays a list of active Carriers defined as Interliners in the Vendor Profiles program. The Carrier assignment supports the ability to manage independent/interliner carriers in a Brokerage & 3PL environment where carrier negotiations occur within the dispatch process.
| For more information on General Color Codes, see the Color Code Information section. |
Assign a Carrier (Interliner) to a Trip
In most cases a double-click on a field in a grid in dispatch will automatically assign the resource to the selected Trip. However, in the Carrier grid where an Interliner is being assigned the Carrier Information window displays. This allows rates to be entered, margins calculated and payment contracts defined.
The Carrier Information window is also where you de-assign a carrier from a trip.
Driver Score / Vehicle Score / Safety Score / Safety Rating
If any of these values fall below the default requirements (as configured via the options in the Application Configurator program at the links below), the Carrier will not be allowed to be assigned to Trips in the Trip Grid, and will not show up on the 'Find Near' window when searching for Carriers.
Contract Authorization
Displays the status of the Carrier’s authority ('Active', 'Pending', 'Revoked', 'Pending Revoked').
For more information regarding this functionality, see the documentation on Carrier411 integration and RMIS integration, or the various options available in the Application Configurator program > Dispatch and CARRIER411.WINSERVICE.EXE sections.
Context Menu
Full Screen
The Full Screen option will enlarge the selected grid so that it fills the whole screen which allows you to view many more records and columns than in the normal view. To return to the normal view, right mouse click and de-select the Full Screen option. While in Full Screen mode, you can switch from grid to grid by selecting the right and left arrow buttons at the bottom of the window.
Set / Clear Filter
The Set Filter option supports the ability to create and apply a filter to any grid, regardless of the grid you were in when you opened the window.
Anchored Columns
To keep the columns on the far left of the grid from disappearing when you scroll the grid to the right, use the Anchored Columns menu option. You will be prompted to enter the number of columns you wish to anchor. The anchored columns will appear with a grey background and when you scroll the grid to the right, these columns will still be displayed.
Find Carriers Near
The Find Near option allows you to search for any carrier that is within a specified distance of the desired zone and/or other items of reference.
| Access to the Find Carrier Near window is based on the availability of the 46000 License. If you do not have this license, you must obtain a copy of a new License file and enter it into the License Key Entry program. |
New
Launches the Vendor Profiles program to add a new Interliner type Carrier.
View Carrier Information
The Vendor Information window displays select vendor information including Address, Notes, User R&M and Contacts.
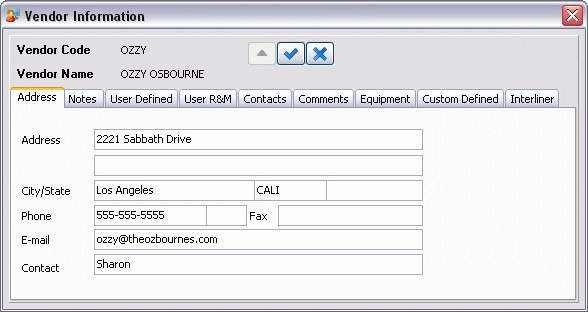
You can select any of the Tabs available to view the Vendor-specific information for the selected Vendor, as configured in the respective Vendor Profiles program Tabs.
View Carrier Profile
Launches the Vendor Profiles program to view the Carrier’s Profile information.
Special Events
The Special Events menu option displays all special events in the Special Events window, including those assigned to the Carrier in the Special Events program or those created here.
| Using the Application Configurator program, 'SE Warning Level' setting you can configure what level provides warnings for Special Events that are displayed when the equipment is assigned to a trip. |
Copy
Selecting this option will copy the text within the selected field.
This option contains the standard TruckMate Navigation Bar, which allows you to browse the records within this Tab Grid.
| If you do not see the Carrier Tab, you may have to access the 'View Menu' and enable it (or do so using the Toolbar icon). |