Trip Envelope Processing

Each time a driver goes on a Trip, he usually comes back with an envelope filled with important detailed information about that Trip. This program helps you enter and track all of that detailed information such as: billing information, mileage amounts, fuel tax bills, etc. Once these details are entered into this program, you can match it against the Trip number from Dispatch and then audit any relevant changes to reflect the actual Trip as opposed to the planned one. You can change the Trip details into a split leg Trip, or drop a leg of the Trip. You can even map the Trip route using PC*Miler, which shows leg summaries, and location histories and/or you can show one or both of these pieces of information. If you change any leg information, it will automatically be reflected in your Driver Pay program and Reporting features.
| You can use PC*Miler, Rand McNally or ProMiles software as your primary Fuel Tax Vendor. |
Start at the Resources tab to make sure the resources used were the correct ones. If they weren’t, this is where you can modify the information. Then, from there you can move through the other tabs at your leisure: Billing, Interline Pay, Driver Pay, A/P, Fuel Tax, and Round Trip.
To access Trip Envelope Processing:
| From this location | Go to |
|---|---|
TruckMate Menu and TruckMate Task List |
|
Windows Start Menu |
TruckMate 20xx > Trip Envelope Processing |
Windows Explorer |
C:\Program Files (x86) > TruckMate 20xx > TripEnv.exe |
How Do I?
How do I set up a Head Haul using the Trip Envelope Processing program?
Often, in trucking, it is easier to arrange for a truck to deliver an item but how do you get that truck back home without it costing the company extra money? Obviously, you try to arrange for a load coming back but sometimes that is not always possible. For example, suppose I need to deliver a tractor to Alberta and we call this Trip #1. The farmer has a second tractor he would like to send back to the manufacturer and we will call this Trip #2.
-
In Trip Envelope Processing, go to the Round Trip tab, use the Context Menu (right-click) to make 'Trip #1' your head haul.
-
Then, select 'Trip #2' and using the Context Menu (right-click), make this trip your back haul.
-
Now you can view your Round Trip costs. You can see exactly how much making this round trip has cost the company and where you would like to make any changes.
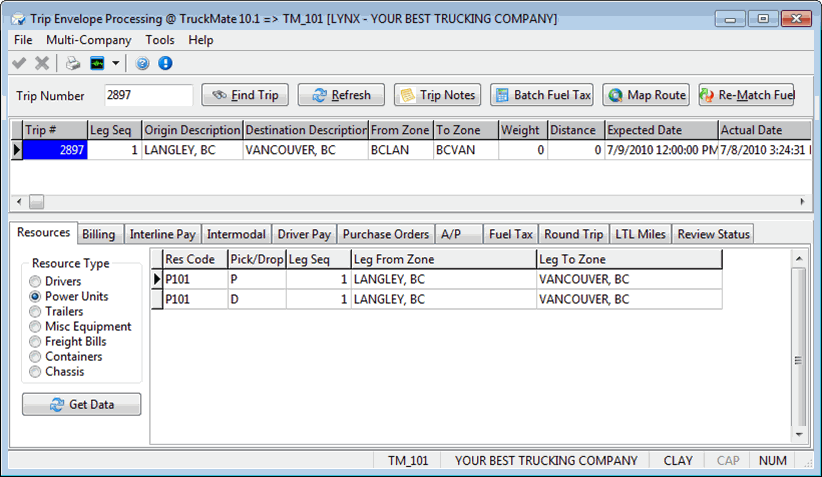
Trip Envelope Processing window
File Menu
Print Reports
Selecting the Print Reports button will bring up the report selection window, common to many TruckMate applications. Here, you will select a report file from those available in your system and a Crystal Report will be generated.
For more information on Report functionality in TruckMate, see the Crystal Reports Reference.
Exit
Selecting this option will close the Trip Envelope Processing program.
Multi-Company Menu
For more information on the Multi-Company options available from the Menu Bar, see the Multi-Company documentation.
Tools Menu
TruckMate Monitor
Click the down arrow next to this button to access the various functions of the TruckMate Monitor.
Remember Position / Size
Selecting this option will maintain the program window position and size upon close. When the program is re-opened, it will appear the same.
Help Menu
TruckMate Help
Selecting this button will open the Trip Envelope Processing topic in the TruckMate Online Help file (the page you are currently viewing).
Service Portal
Selecting this button will open an instance of your default Internet browsing software, with the https://www.tmwcare.com login page displayed.
About
Selecting this button will open the standard TruckMate About window, which contains important information about the application you are currently using, including its version number (important for support calls).
Header Information
Input the Trip Number in the field required and then hit 'Enter' and the program will automatically search for information about that Trip Number.
Header Buttons
Find Trip
If the program is unable to locate a Trip Number, select the 'Find Trip' button. The Find Trip window will be displayed.
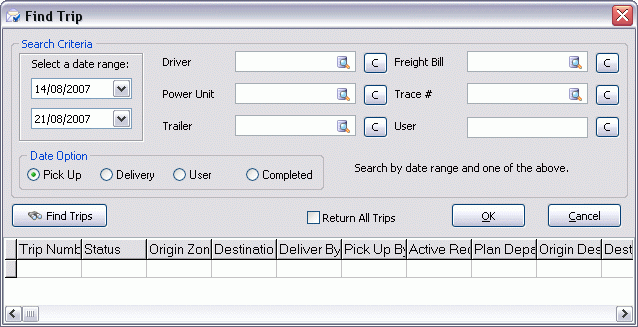
Input the correct parameters you would like to Search by in the 'Search Criteria' section, such as: 'date range', 'Driver', 'Power Unit', 'Trailer', 'Freight Bill', 'Trace #' or 'User' (and choose the correct 'Date Option' values) and then click the 'Find Trip' button in this new dialog box.
The values available from the Database Search button in the 'Trace #' field are configured on the Codes Maintenance program > Trace Number Types tab.
| You do not have to complete all of this information- the 'Date Range' values will suffice if this is all you know. But you must input at least a 'date range' in order for the 'Find Trip' button to work properly. The date you use should be the expected date, not the actual date for the Trip. Also, in a multi-Freight Bill scenario, the system searches based on the oldest date entered. |
When you locate the correct Trip Number information, select the 'OK' button and you’ll be returned to the main screen of the Trip Envelope Processing program. Here, you’ll see that all relevant information regarding that particular Trip Number is populated in the main program window’s grid. To modify this information, use your right mouse button to access the Context Menu options.
Refresh
Select this button to refresh the details of the Header grid.
Trip Notes
Once a Trip is found, either by manual entry or by using the 'Find Trip' functionality outlined above, clicking the 'Trip Notes' button will open a Notes window that will display any relevant Notes that were entered concerning the currently displayed Trip.
Batch Fuel Tax
Select the Batch Fuel Tax button to open the Fuel Tax Batch Copy window, which allows for a batch of trips to have the Fuel Tax Trips created.
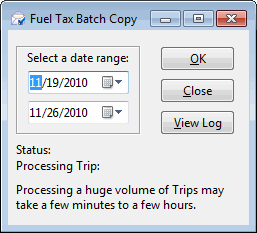
Use the two drop-down menus to select a Date Range, then select the 'OK' button to continue. Once the process has completed, you can select the 'View Log' button to view the Batch Copy details.
Map Route
Selecting this option will bring up the Mapping window (similar to the Mapview program), where you can view / modify the route taken.
| Right-clicking this button will allow you to configure which Mapping Vendor you wish to use in the Mapping window. You can choose between any of your installed Mapping software providers. Currently available are 'PC*Miler', 'Rand McNally' and 'ProMiles'. |
Re-Match Fuel
Selecting the Re-Match Fuel button will find any un-matched fuel records that have been imported into your system (via the Fuel Card Data Import program) and rematch the fuel onto Fuel Tax Trips by using the date the Fuel was purchased, then matching that date with the Start & End Dates of the Power Unit’s Trip record. Basically, if an un-matched fuel record’s date falls in the Date Range provided by the Power Unit Trip record, it will be applied to that Power Unit.
Billing Notes
Once a Trip is found, either by manual entry or by using the 'Find Trip' functionality outlined above, clicking Billing Notes will display the Billing tab and indicate (bold and underline) Freight Bills that have notes (with the selected note type for warning).
Context Menu - Header
Split Leg
Selecting this option will bring up a 'Split Leg' dialog box where you can enter a zone to split the leg. Select the search for more choices.
Change From Zone
Selecting this option will bring up a 'Change From Zone on the Leg' dialog box where you can enter the correct 'Change From Zone'. Select the search for more choices.
Change To Zone
Selecting this option will bring up a 'Change To Zone on the Leg' dialog box where you can enter the correct 'Change To Zone'. Select the search for more choices.
Drop Leg
Selecting this option will bring up a 'confirmation' dialog box confirming which leg you want to drop.
Recalculate Mileage
Select either 'Current Leg' or 'All Leg’s and the mileage will be recalculated. This option will perform an Interactive Mileage recalculation of mileage distance records in the LEGSUM table’s 'LS_LEG_DIST' field. For this function to work, ensure that the Mileage Server program is running.
Batch Recalculate Mileage
Select this button to Recalculate the Mileage of all displayed Trip Legs. This option will add records to the MILESERVER_JOB table and get the Mileage Server program to do a complete recalculation of all miles on the Trip. This will update the LEG_MILEAGE_SPLIT table, and the 'LS_LEG_DIST_CAN' and 'LS_LEG_DIST_US' fields of the LEGSUM table.
The Mileage Server will also recalculate the Driver Pay for the Trip, though there may be a delay until it can process the job. The Driver Pay tab will show the read-only details of all Trip Legs and their Driver Pay breakdowns (from the LEG_MILEAGE_SPLIT table).
For this function to work, ensure that the Mileage Server program is running.
Map Trip Route
Selecting this option will bring up the Mapview program where you can modify the route taken.
Reports
Selecting 'REPORTS' brings up the Report Selection dialog box where you should see the reports available for this program. The report you might find most helpful for this program is entitled: 'FTTRIP.RPT'. To locate this report, double-click in the path file, browse through your hard drive to where the reports are located (usually this is C:/Program Files/TruckMate 20xx) and then locate FTTRIP.RPT' or another report of your choosing.
For more information on report setup, refer to the Crystal Reports Reference.
Maintenance Request
Selecting the 'Maintenance Request' option will bring up a 'Driver Call-In' dialog box where you can identify the piece of equipment that is malfunctioning as well as note the date, name, priority, and add any relevant remarks.
Print Trip Costs
Selecting this option will bring up the Trip Costing Information for this particular Trip. Simply select the 'print' button to print out a copy.
Change Secondary Contract Setting on Trip
Choosing this option will change the Secondary Contract value associated with the selected Trip to either 'True' or 'False', depending on it’s current value. A dialog box will display, asking the User for confirmation of this change. Click 'OK' to change the value.
Carrier Assign
Selecting this option will open up the Carrier Information window. When opened from the Trip Envelope program, the user is able to change information, assign or un-assign carriers, and adjust the charges for completed trips.
Trip Status History
This option will allow you to view the status history of the trip for all resources.
Trip grid information
Most of the fields within this grid will automatically populate based on information gathered from other TruckMate applications. You do, however, have some customization options. Fields that can be changed in the grid are any 'Date' fields, any 'User' fields, the 'Leg Status' field, the 'Loaded' field, and the 'Alt Mile 1' and 'Alt Mile 2' fields. To change the data in a grid field, simply double click the field or manually enter its associated value.
Modified By / Modified Date
When the LEGSUM TruckMate table is updated/created by any other programs, these fields will allow the Trip Envelope Processing User to be able to see who modified it and when.
Resources tab
The information shown in the Resources tab grid will be automatically generated through the Trip Number. Once the information is showing in the grid, you then have the option of modifying or correcting it, to reflect any last minute changes (i.e. different Trailer used, Driver replacement, etc.
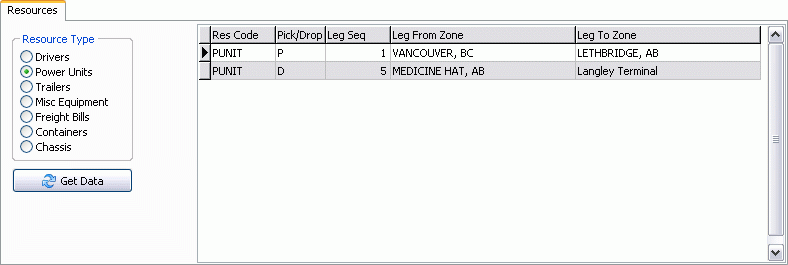
Resource Type
Choose the resource you would like to modify from the menu of items on the left-hand side of the screen. After your selection, you can then view that particular resource information in the grid. Select and highlight the item in the grid you would like to change.
Get Data
After selecting a resource from the left-hand side of the screen, relevant information will appear in the grid to the right specific to the resource you’ve chosen. If you modify any of the information in the grid, select 'Get Data' to save this information to a newly entered record.
Context Menu - Resources tab
Change Pick Leg
Selecting this option brings up a 'Resource Change' dialog box where you can select a new pick-up leg from the grid shown.
Change Drop Leg
Selecting this option brings up a 'Resource Change' dialog box where you can select a new drop leg from the grid shown.
Remove Resource
Selecting this option will bring up a 'confirmation' dialog confirming your desire to remove this resource from this Trip.
Add Resource
Selecting this option will bring up an 'Add Resource' dialog box where you can add the resource particulars to this Trip.
Update Resources on Freight Bill Records
Choosing this option will Update all changes to the Freight Bill associated with these Resources.
| When the Application Configurator > TRIPENV.EXE > 'Recalc IP on Update of Resources' option is set to 'True', the system will automatically call the Interline Payables recalculation logic (SP_CALC_LINEHAUL_COST) when this option is selected. |
Billing tab
The Billing tab is to track and handle freight bills on a trip. It has pane, 'Bill Number' (on the left hand side of the screen), and four sub-tabs titled 'Information', 'User', 'Pallets' and 'Status History' (all lined at the bottom of the screen).
Bill Number Pane
The bill number pane displays the numbers of all bills on the selected trip. You can select a Bill Number to see the details of that bill in the different sub-tabs as described later in this section.
Context Menu - Bill Number panel
View Freight Bill
Choosing this Context Menu option will open an instance of the Customer Service program highlighting the current Freight Bill.
Approve
Selecting this option will set the Freight Bill to your default 'Approval' behavior status code, marking the Freight Bill for further processing by the Billing Register program.
Select
This option is a selection tools for the user to select (highlight) freight bills from the 'Bill Number' pane. The user can select the current bill, all bills on the selected trip (Ctrl +A) or deselect the selected bill/bills (Ctrl+L). Another way of selecting a bill is using the Ctrl with the mouse click.
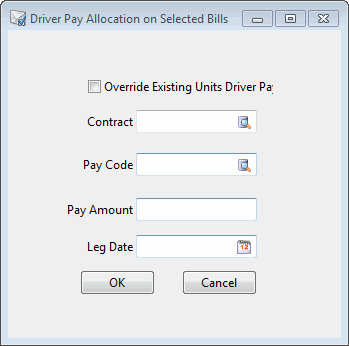
Allocate Driver Pay
This option gives the user a tool to allocate an amount of the Driver Pay to selected bills. Select (highlight) the desired bills and then select 'Allocate Driver Pay' option. This will open a new form, Driver Pay Allocation on Selected Bills. The user should fill the 'Contract', the 'Pay Code', the 'Pay Amount' and the 'Leg Date' fields.
| Field | Definition |
|---|---|
Override Existing Units Driver Pay |
If this checkbox is UNCHECKED, the new driver pay records will be generated and existing unit driver pay records on selected bills will be untouched. If Checked, the new flat amount will be allocated into existing Unit Driver pay on selected bills, replacing the old amounts. |
Contract |
Use the search button to select the driver’s contract. |
Pay Code |
Enter/Select a Pay Code |
Pay Amount |
Enter the amount of money to be allocated. |
Leg Date |
Use the calendar button to select the date of the Leg Date. |
OK |
This button if selected will distribute the entered amount to the selected bills based on the proportionate weight on each bill. Note: The 'Contract' and the 'Pay Code' must be both associated with the drivers on the trip, otherwise an error will be generated. |
Change Status
Selecting this option will open the Status Change form, which allows you to change the Status of the selected Freight Bill. For more information on this window, see the Customer Service program documentation.
Change Pickup Date
This option allows the user to change the 'Pickup Date' for the selected bill. If more than one bill is selected this option can change the 'Pickup Date' for all bills selected. In addition, even if only one bill is selected, the 'Change Pickup Date' popup window offers the option to apply the change to only the selected bill(s) or to all bills on the selected trip.
Attach/Open Related Files
Selecting this option will open the Attach Related Files window.
Common tabs
The Trip Envelope Processing program has five common tabs that are displayed within each of the Billing sub-tabs, entitled 'Addresses', 'Accessorial Charges', 'Trace Numbers', 'Rating Details' and 'Dispatch Information'.
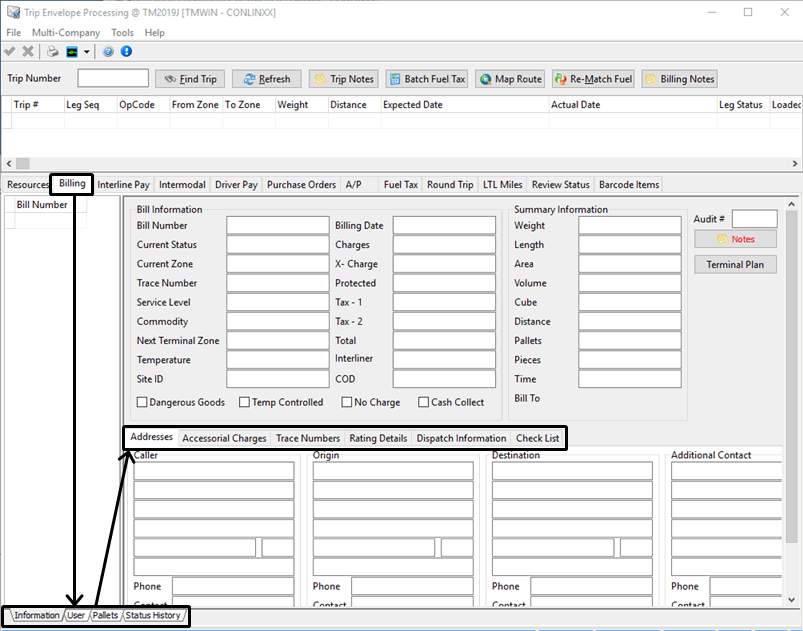
Addresses tab
The Addresses tab will pre-populate based on information entered into the Customer Service program > Header Information section.
Accessorial Charges tab
The Accessorial Charges tab here will pre-populate based on information entered in the Customer Service program > Accessorial Charges tab.
Trace Numbers tab
The Trace Numbers tab will pre-populate based on information entered in the Customer Service program > Trace Numbers tab. You may also add Trace Numbers to the record by clicking the '+' button and entering a Trace Number manually in the 'Trace Number' field and selecting a 'Trace Number Type' from the right hand section of the tab. Click the 'Checkmark' button to save your new Trace Number.
Rating Details tab
The Rating Details tab will pre-populate based on information entered in the Customer Service program > Details tab.
Dispatch Information tab
The Dispatch Information tab will pre-populate based on information entered in the Dispatch program’s 'Pickup' and 'Delivery' sections.
Checklist tab
Displays a read-only list of the checklist items associated with this freight bill. (The checklist items are defined in Utilities > Profiles > Codes Maintenance program > Checklist Items and assigned to customers using the Customer Profiles program > Freight Bill Check-List tab.)
Information sub-tab
The Billing and Summary information as taken from the Customer Service program will pre-populate in the Summary Information section. Review the charges and verify the data for accuracy.
Notes
Selecting this button will display a Notes window which details any Notes (separated by their own tabs) associated with this Freight Bill (as entered in the Customer Service program).
Terminal Plan
Selecting this button will open the Terminal Plan window. For more information on the use of this window, see the Customer Service program documentation.
User sub-tab
User Field 1 - User Field 10
This sub-tab grants access to the ten free-format user fields from the TLORDER table. You can change the field labels for these fields by altering the Application Configurator program > CSERV.EXE > 'User Field 1' - 'User Field 10' options. In the 'Value' field, enter the field label you wish to appear on the User Defined Fields form in the Trip Envelope Processing program.
Pallets sub-tab
The information in the Pallets sub-tab is pre-populated based on entries to the Pallet Tracking program.
Status History sub-tab
This sub-tab comprises two grids.
Status History for Selected Bill
This contains all the status codes attached to the selected freight bill (listed under Bill Number on the left). If the user has the proper security, there is the ability to add, edit or delete status records from this grid for the freight bill selected on the left. Permission for editing this grid is controlled via the Security Setup program > Allow Changes > CSERV - Allow Edit of Freight Bill Status History after the Freight Bill is Posted to A/R.
Status History for All Bills
This contains one single record for each freight bill status/trip leg combination for all freight bills on the trip. If multiple freight bills have the same status on the same leg there will only be one record. However, if a freight bill has the same status but different legs then multiple records could be displayed. This is to allow for situations where the same status code may occur more than once for the same freight bill or on different legs for different freight bills on the same trip (that is, different pickup locations).
Context Menu - Status History sub-tab
Copy this status code/trip leg
Allows the user to copy the code/trip leg either to the selected freight bill or to all freight bills.
Copy all status code/trip leg combinations
Allows the user to copy all code/trip leg combinations either to the selected freight bill or to all freight bills.
Status #
The total number of freight bills that have the same status code/leg combination of the status code that is clicked on in the All Freight Bills grid.
Total #
The total number of freight bills on the trip.
Bill Number/Change Pickup Dates
When right-clicking on the bill number located on the left side of this section, users can select the option "Change Pickup Dates". When selected, a pop-up window will display two dates for the selected freight bill: Pick Up By and Pick Up By End. Users with permission can alter these as needed, and can choose to update Selected Bill or All Bills. Permission for this option is controlled via the Security Setup program > Business Events - Approving/Printing > Allow Edit of Posted (Bill Reg) FB - Pickup Details.
Interline Pay tab
The Interline Pay tab will pre-populate based on entries made in the Customer Service program > I/P tab, or you can make the entries here and the changes will be reflected in the Customer Service program. The Interline Section has two tabs: Freight Bills and Trips.
Freight Bills sub-tab
The Freight Bills section consists of a left-side window with two fields, 'Bill Number' and 'Cnt', which will list all the freight bills that have IP charges attached to the current trip. To the right of this list is the standard Customer Service program > Interline Payables tab, which can be used to review the IP charges for each leg of the freight bills chosen on the left. The Interline Payables information will pre-populate based on the Freight Bill selected, but you may add new Interliner charges, or change Interliners altogether (if required) by using the standard TruckMate navigation bar buttons.
Trips sub-tab
The Trips tab contains a grid that displays carrier assignment records attached to the selected trip (from the VENDOR_LOAD_SUMMARY table). Users can double-click or right-click on fields to edit information. By right-clicking, users can also click Carrier Assign to access the Carrier Information window. When opened from the Trip Envelope program, this page allows the user to change information, assign or de-assign carriers, and adjust the charges for completed trips.
| If an intercompany vendor is assigned to a completed trip, the program will warn the user that the intercompany bill will not be created. When an intercompany vendor is unassigned, any intercompany bills already created will be cancelled (unless currently assigned to a trip). If any intercompany freight bills are currently on a trip, the user will receive a warning message, and will then be able to de-assign them. |
Intermodal tab
View Intermodal Details for this Freight Bill as entered in the Customer Service program > Intermodal tab, or enter new Intermodal details using the Intermodal tab. For more information on the InterModal tab, including instructions on the options shown in the image above and the additional tabs shown within the InterModal tab, see the Customer Service program > Intermodal tab.
Driver Pay tab
View or enter new Driver Pay or Driver Deductions using their respective sub-tabs on the Driver Pay tab. When entering a new driver pay record, certain fields can be automatically copied to the new pay record. A number of App Config options are available including 'Copy Driver ID in Driver Pay tab', 'Copy Leg Date in Driver Pay tab' and 'Copy User Fields in Driver Pay tab'. For more details on what these options are for go to Application Configurator > Dispatch > TRIPENV.EXE.
Driver Pay sub-tab
This tab contains Driver Pay information. The information displayed on this grid are the same information available in the Driver Pay sub-tab from Customer Service program > Driver Pay tab. Refer to the link for details.
Recalculate Trip Pay
Selecting this button will recalculate Trip pay based on the information entered in the grid above.
Recalculate Round Trip
Selecting this button will recalculate the Round Trip driver pay based on information entered in the grid above.
| Manual Driver Pay records can only be created in the in Trip Envelope Processing program for Drivers that hold contracts with the currently logged-in company. |
Purchase Orders tab
The fields on the Purchase Orders tab will automatically pre-populate with Purchase Order information as entered in the A/P Purchase Order Entry program.
View Purchase Order
When in the grid, use your right-mouse to open the Purchase Order program with the current purchase order’s details.
A/P (Accounts Payable) tab
The grid on the A/P tab will automatically generate all Accounts Payable entry information specific to this bill number.
View AP Bill
When in the grid, use your right-mouse to open the A/P Invoice Entry program with the current Trip’s details.
Fuel Tax tab
On the Fuel Tax tab you have the opportunity to enter the actual travel location, if it is different from the planned destination, plus enter any information regarding fuel purchases.
The grid displays a number of fields relating to the currently selected Trip. These details are gathered from the Customer Service program.
Context Menu - Fuel Tax grid
Create Fuel Tax Records
Selecting this option opens a 'Create Fuel Tax Records' dialog box where you can use the information shown, or modify it. After you create a fuel tax record, the information will appear in the first grid. Once the information is showing in the grid, a second choice appears when you use your right-mouse menu:
Edit Fuel Tax
Selecting this option opens the Fuel Tax Trip program showing the current Trip ID. Modify any inconsistencies here and it will automatically appear in the Trip Envelope Processing program as well.
Delete State Miles
Selecting this option will remove all data from the State Miles tab in the bottom section of the Fuel Tax tab.
Delete Trip
Selecting this option will remove the currently selected Detail Line from the Trip ID grid.
View Satellite Info
Selecting this option will open a new dialog window detailing the information gathered from Pings related to this current Trip. Click the 'Close' button when you are finished reviewing this information.
Create Driver Deduction
Clicking this option will open a new dialog window where you may enter Driver Deductions pertaining to the currently selected Trip. Double click or manually enter data into the fields in the new window to enter the Deduction data. Click the 'Recalculate' button to apply the new Deduction to the Trip ID grid in the main window.
Summary sub-tab
Much of the data on the Summary tab is populated from other TruckMate applications, but there are a few customizable options from within the Trip Envelope Processing program.
FT Miles Created Using
Choose the option that was used to create the Fuel Tax data, either 'Dispatch and Pings' or 'State Cross. Miles'.
Recalculate
If any values have been modified in the main Fuel Tax tab’s Trip grid, click the Recalculate button to see reapply the data to the fields within this tab, as well as the 'Mileage % Difference' graph.
Edit Via
This button opens the Via window where you may add 'Additional points used for leg creation'.
Edit FT Trip
Clicking this button will open an instance of the Fuel Tax Trip program with the current Trip displayed.
State Miles sub-tab
State Miles grid
Will pre-populate based on your selections in the main Fuel Tax tab’s Trip grid.
Round Trip tab
Often, in trucking, it is easy to arrange for a truck to Deliver an item, but is often not so simple to arrange for a Truck’s return without it costing the company extra money. Obviously, you try to arrange for the Truck to return with a Load, but sometimes that’s not always possible. The Round Trip tab will allow you to plan for some possible situations.

Context Menu - Round Trip grid
Once Trips appear in the top grid, place your cursor in the first column of the lower grid, entitled 'Round Trip'. Use your context menu to view the following options.
Set As Head Haul
Selecting this option will make this highlighted Trip the head haul. The Trip will then appear in the lower grid in red.
Set As Back Haul
Selecting this option will bring up the 'Set Back Haul Round Trip' dialog box where you can enter the front haul Trip number in the field provided.
Set As Back Haul (Searching)
Selecting this option will bring up the 'Trip Number' dialog box where you can search for a particular Trip by Trip number, origin, destination, or pick-up by date. Alternatively, Trips may already display in the search box, highlight the desired one, and select 'Okay' to set this Trip as the back haul.
Set As Back Haul (Advanced)
Selecting this option will bring up the 'Trip Number' window where you can search for a particular Trip by Trip number, origin, destination, or pick-up by date. Alternatively, Trips may already display in the search box, highlight the desired one, and select 'Okay' to set this Trip as the back haul. The Back Haul Advanced grid will then show all the Trip Legs and their details (the number of detail lines are determined by the 'Back Haul Advanced' option in the Application Configurator program > TRIPENV.EXE section).
For example: let’s say you need to deliver a tractor to Alberta (we’ll call this Trip #1). Then, luckily enough, the farmer in Alberta has a second tractor he’d like to send back to the manufacturer (we’ll call this Trip #2). With the Round Trip tab in the Trip Envelope Processing Program, use your right mouse button to access the Context Menu and make 'Trip #1' your Head Haul. Then, select 'Trip #2' and using your right-mouse menu, make this Trip your Back Haul. Now you can view your Round Trip costs.
LTL Miles tab
The LTL Miles tab displays LTL Trip distances that exist in your system, and allows you to delete / re-calculated LTL Miles, if necessary.

Filtering Options
P
Selecting the 'P' flag will only display those records in the LTL_MILES table for this Trip that were entered as 'Pickup' Legs.
D
Selecting the 'D' flag will only display those records in the LTL_MILES table for this Trip that were entered as 'Delivery' Legs.
Attempts
Selecting the 'Attempts' checkbox will only display those records in the LTL_MILES table for this Trip that were entered as 'Attempted Pick' or 'Attempted Delivery' Legs.
See the Customer Service program > LTL tab for more information on Pickup / Delivery Attempts in an LTL environment.
Context Menu - LTL Miles grid
Recalculate
Selecting this option will recalculate the LTL Miles (and associated Driver Pay) by deleting LTL Trip distances and regenerating them based on any changes made manually on the LTL Miles tab.
| If you cannot view the LTL Miles tab, you may have no records in the TRIP_LTLMILES table, or your User security settings may not allow you access. You may have to ask your system administrator to change your security privileges in the Security Setup program > Security > tabs Setting section. |
Review Status tab
The Review Status tab allows the user of the Trip Envelope Processing program to attach a 'Review Status' to a completed Trip, so that other users will know if a Trip is under review/being changed.
Review Status
This field will display the Review Status of the currently selected Trip. The user can select the 'Review' button to change the Review Status from 'Not Reviewed' to 'Reviewed'. Once a Trip is set to 'Reviewed', the 'Last Modified' and 'Last Modified By' audit fields will be stamped on this tab and the CUSTOM_TRIP_REVIEW_STATUS_CHANGE procedure will be called (which can contain custom logic on a per-customer basis).
Once the Trip’s Review Status is 'Reviewed', the button label will change to 'Correct'. After the user changes the required aspects of the completed Trip, they should return to the Review Status tab and select the 'Correct' button, to change the Review Status to 'Corrected'.
| If you cannot view the Review Status tab, you may have to ask your system administrator to change your security privileges in the Security Setup program > Security > tabs Setting section. |