eManifest tabs: Manifests, Vehicle, Equipment, Crew

Manifests Tab
The Manifests Tab provides a summary of all the Manifests created by the eManifest program, and provides a Status History for each manifest record.
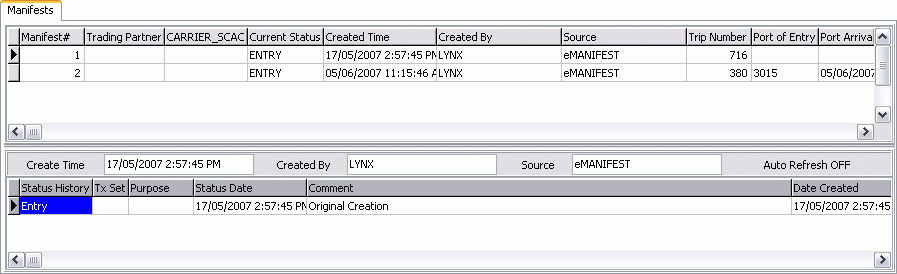
Manifest Summary Grid
The Manifest Summary Grid displays your Manifest records, depending on the filters currently set. Using the 'Status' and 'User' Filters available on the eManifest program’s Toolbar, you can have only certain records display here.
The details listed for each Manifest are entered using the eManifest program’s Header section. You can complete some tasks using the right-click Context Menu (see below).
Context Menu
Flag Manifest as Complete
Select this option when a currently Active record has been completed. It will be removed from the Record Summary Grid and will be viewable only when the Status Filter is set to 'ALL' or to 'COMPLETE'.
Set Manifest Back to Active
If the User must make some changes to a Manifest with the status of 'COMPLETE', selecting this option will set the Manifest’s status to 'REWORK', allowing it to be modified. Note that to view Manifests with 'COMPLETE' status, you must configure the Status Filter in the Toolbar.
Status Summary Grid
The Status Summary Grid displays all of the Status changes that have been applied to the Manifest selected in the Manifest Summary Grid, as well as some information regarding when and whom completed the changes. These records are for informational purposes only, and cannot be edited.
Vehicle Tab
The Vehicle Tab provides a summary of the Power Unit attached to the currently selected Manifest record.
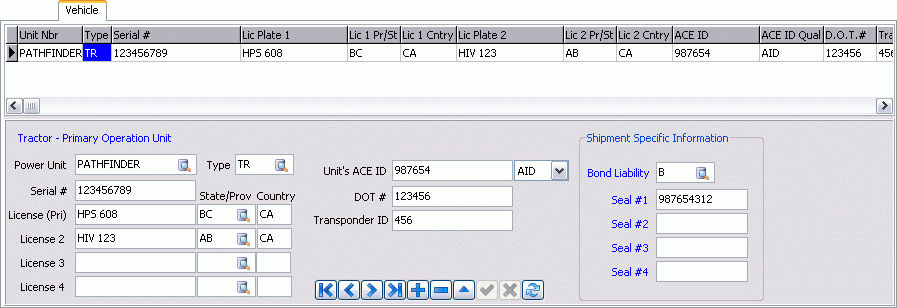
Vehicle Summary Grid
The Vehicle Summary Grid lists details regarding the Power Unit attached to the Manifest displayed in the eManifest program Header section. These values normally populate automatically when a Manifest record is created from a Dispatch Trip, but the User has the option of modifying these detail records using the Tractor Details section below.
Tractor Details
The Tractor Details section allows you to edit the details of the Power Unit(s) attached to the selected Manifest. If creating a Manifest record from a Dispatch Trip, some of these fields may be automatically populated based on the Power Unit’s configuration in the Power Unit Profiles program > Customs Tab. Editing details regarding a specific Power Unit in this section will not affect the Power Unit’s standard configuration as detailed on the Power Unit Profiles program > Customs Tab.
Power Unit
To choose a Power Unit to attach to the Manifest select the Database search button to view the Power Units available in your system. Power Unit codes are created and maintained in the Power Unit Profiles program.
| You may, alternatively, enter a Power Unit code that is not contained in the TruckMate system. The eManifest program allows the entry of non-TruckMate resources without the need of adding them into TruckMate. |
Type
Use the Database search button to select an ACE Type value for the selected Power Unit.
Serial #
Enter the Power Unit’s Serial Number in the field provided.
License (Primary) / State/Prov / Country
Because a Power Unit may have different Licenses for various regions, you can enter up to 4 different License plate numbers and their associated geographic specifications.
Unit’s ACE ID / ID Type
Enter the Power Unit’s ACE ID in the field provided, then select the ID Type. 'AID' refers to ACE ID, and 'CNV' refers to a Conveyance ID.
DOT #
Enter the Power Unit’s U.S. Department of Transportation number.
Transponder ID
Enter the Power Unit’s unique Transponder ID.
Shipment Specific Information
Bond Liability
Use the Database search button to select a Bond Type for the selected Manifest. The Type Codes correspond as follows:
-
A: loaded move. Merchandise release covered by Carrier’s Bond.
-
B: loaded move. Merchandise release covered by Importer’s Bond.
-
C: empty move. Equipment release covered by Carrier’s Bond.
-
D: empty move. Equipment release covered by Importer’s Bond.
Seal #1 / Seal #2 / Seal #3 / Seal #4
Enter the Seal number attached to the Trailer. You can enter up to 4 unique seals.
Equipment Tab
The Equipment Tab provides a summary of the Trailer attached to the currently selected Manifest record.
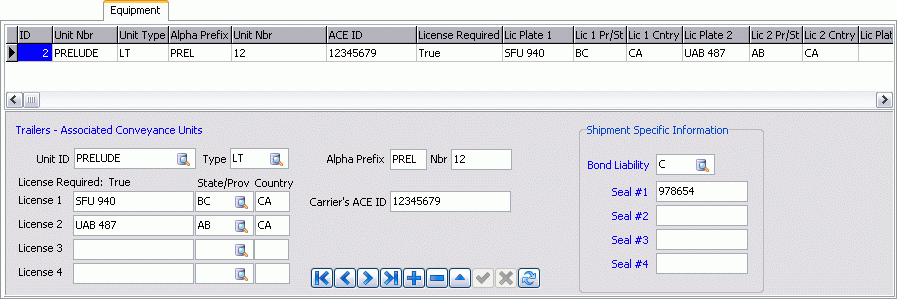
Equipment Summary Grid
The Vehicle Summary Grid lists details regarding the Trailer(s) attached to the Manifest displayed in the eManifest program Header section. These values normally populate automatically when a Manifest record is created from a Dispatch Trip, but the User has the option of modifying these detail records using the Trailer Details section below.
Trailer Details
The Tractor Details section allows you to edit the details of the Trailer(s) attached to the selected Manifest. If creating a Manifest record from a Dispatch Trip, some of these fields may be automatically populated based on the Trailer’s configuration in the Trailer Profiles program > Customs Tab. Editing details regarding a specific Trailer in this section will not affect the Trailer’s standard configuration as detailed on the Trailer Profiles program > Customs Tab.
Unit ID
To choose a Trailer to attach to the Manifest select the Database search button to view the Trailers available in your system. Trailer codes are created and maintained in the Trailer Profiles program.
| You may, alternatively, enter a Trailer code that is not contained in the TruckMate system. The eManifest program allows the entry of non-TruckMate resources without the need of adding them into TruckMate. |
Type
Use the Database search button to select an ACE Type value for the selected Trailer.
License (Primary) / State/Prov / Country
Because a Trailer may have different Licenses for various regions, you can enter up to 4 different License plate numbers and their associated geographic specifications.
Alpha Prefix / Nbr
Enter the Trailer’s Alpha Prefix code and then it’s number in the field provided.
Carrier’s ACE ID
Enter the associated Carrier’s ACE ID in the field provided.
Shipment Specific Information
Bond Liability
Use the Database search button to select a Bond Type for the selected Manifest. The Type Codes correspond as follows:
-
A: loaded move. Merchandise release covered by Carrier’s Bond.
-
B: loaded move. Merchandise release covered by Importer’s Bond.
-
C: empty move. Equipment release covered by Carrier’s Bond.
-
D: empty move. Equipment release covered by Importer’s Bond.
Seal #1 / Seal #2 / Seal #3 / Seal #4
Enter the Seal number attached to the Trailer. You can enter up to 4 unique seals.
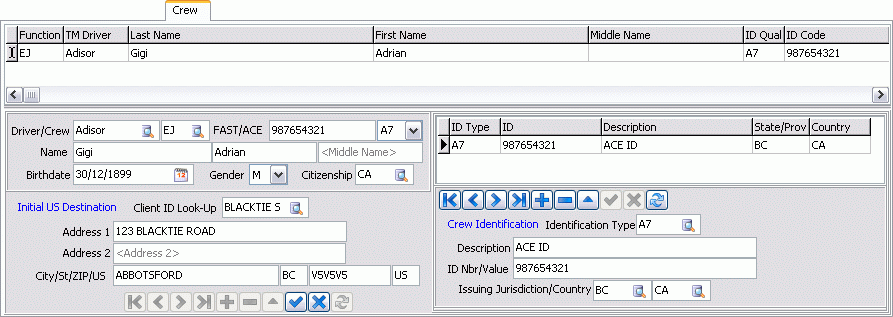
Crew Tab
The Crew Tab allows the User to attach Drivers, Passenger and general Crew members to the Manifest.
| Many of these fields can be set to automatically populate based on the default settings in the 'Crew' section on the Defaults A Tab. |
Driver / Crew
Use the Database search button to select a Driver for the current Shipment and then assign them 'FAST/ACE' number and an 'Identification Type'. During the Validation check of the Manifest, the program will verify that the Driver has at least one of: '5K' (Commercial Drv Lic), or 'PY' (FAST ID) Identification types.
FAST / ACE
Enter the Driver / Crew member’s FAST / ACE code in the space provided.
Identification Type
Use the drop-down menu to select the ACE Code Identification Type.
Name / Birthdate / Gender / Citizenship
These details should automatically populate depending on the Driver Code selected. If you are entering a new Driver, you must fill out these fields as necessary.
Initial US Destination
Use these fields to configure the initial U.S. Destination for the currently displayed Shipment.
Client ID Look-Up
Use the Database search button to select the Client ID that will be the initial U.S. destination of the Shipment. Client IDs and their associated details are maintained in the Customer & Vendor Profiles program.
Address Information
The Client’s address information will automatically populate based on the Client ID selected.